


Komentáře / Otázky (7)
![]() Merethe napsala:
Merethe napsala:
Hej. Rapport i højden. Jeg forstår simpelthen ikke disse pinde . Skal man gentage mønstret over hinanden , både på vrang og retsiden.
21.09.2024 - 08:22Odpověď DROPS Design :
Hei Merethe. Vi skal hjelpe deg så godt vi kan. Men fint om du opplyser hvilket / hvilken diagram du ikke forstår / hvor i oppskriften, og oppgi gjerne hvilken str. du strikker. mvh DROPS Design
23.09.2024 - 13:50
![]() Liza napsala:
Liza napsala:
Hi, I have few questions regarding the pattern. When you say complete A1, does that mean combining A1A and A1B? For example, after the first row of A1 in the Yoke, I should repeat the pattern 3k 1P 3k 2p on the wrong side followed by 3p 1fisherman 3p 2fisherman on the right side? thanks
28.12.2023 - 22:20Odpověď DROPS Design :
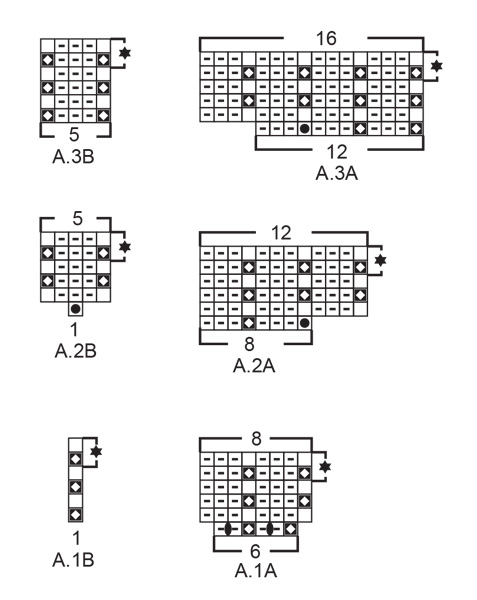
Dear Liza, "After the first row in A.1 there are 91-99-99-107-115-115 stitches. Complete A.1, then repeat the 2 rows with stars in A.1 until the piece measures 3-3-3-4-4-4 cm from the marker on the neck." You have established the pattern with A.1a and A.1b in the first row and have increased to 91-99-99-107-115-115 stitches. Now continue working both charts upwards, row by row, as established on the first row. After working all 6 rows of both charts, you will have completed A.1 ( or a repeat of A.1). Now repeat the last 2 rows of the chart, in the previously established pattern (so A.1a 10 to 13 times, depending on the size and A.1b). Happy knitting!
29.12.2023 - 00:31
![]() Dagny Djurhuus napsala:
Dagny Djurhuus napsala:
Hvad betyder en rapport i højden . Har aldrig set ordet rapport i en strikkeopskrif før, ved ikke hvad det betyder.
20.09.2023 - 10:36Odpověď DROPS Design :
Hei Dagny. Om du scroller deg nederst på oppskriften ser du flere diagrammer. I oppskriften gjentar du f.eks A.1A flere ganger i bredden = gjentar rapporten A.1A i bredden. Når det står 1 rapport i høyden, gjentar du diagrammet i høyden (oppå hverandre). F.eks de 2 øverste pinnene i diagram A.2A er vist med en stjerne. Det er disse 2 radene som gjentas i høyden. mvh DROPS Design
26.09.2023 - 14:44
![]() Lena napsala:
Lena napsala:
Ska beställa garn till barnkofta 7/8 40-8 med Flora (200 g) och Kid-Silk (100 g) Jag hittar inte i mönstret när jag ska använda Kid -Silk. Vänligen Lena
23.07.2023 - 15:00Odpověď DROPS Design :
Hei Lena. Du strikker Flora og Kid-Silk samtidig = det strikkes med 2 tråder. Slik starter oppskriften: Lägg upp 71-75-77-79-79-81 maskor (inklusive 5 framkantsmaskor i varje sida mot mitt fram) på rundsticka 5 med 1 tråd i varje kvalitet (= 2 trådar). mvh DROPS Design
25.07.2023 - 09:27
![]() Sophie napsala:
Sophie napsala:
Hallo, ich bin gerade beim Aufteilen der Passe. Ist es richtig, dass in den ersten 39 Maschen die Blenden-Maschen schon dabei sind? Und kann man die 6 neuen Maschen anschlagen, wenn man später die stillgelegten Maschen aufnimmt?
31.01.2023 - 21:32Odpověď DROPS Design :
Liebe Sophie, ja richtig, die BlendenMaschen sind in den 39 ersten Maschen der Reihe mitgezählt; diese Lektion zeigt ab Bild 8 wie die Aufteilung gearbeitet wird, z.B. wie die neuen Maschen angeschlagen werden (Bild 11) und wie die Ärmel später gestrickt werden (Bild 18). Viel Spaß beim stricken!
01.02.2023 - 08:48
![]() Sophie napsala:
Sophie napsala:
Hallo, kann ich mit Garngruppe C auch eine einfache Halsblende stricken? Oder passt das nicht zum Muster?
17.01.2023 - 21:44Odpověď DROPS Design :
Liebe Sophie, also gerne können Sie hier mit 1 Faden der Garngruppe C anstatt mit 2 Fäden der Gargruppe A stricken - die Halsblende können Sie auch verkürzten wenn Sie es so lieber möchten. Viel Spaß beim stricken!
18.01.2023 - 09:48
![]() Sophie napsala:
Sophie napsala:
Ich möchte die Jacke Forest Vines Kids stricken. Bitte helfrn Sie mir bei Garnberechnung. Ich würde gern mit Big Merino aus der Garngrppe C stricken und zwar Gr. 134/140 . Wie viel Garn werde ich dazu brauchen? Mit der Umrechnung bei 2 verschiedenen Garnen von A zu einem Garn aus Gruppe C bin ich leider nicht zurecht gekommen. Im Voraus vielen Dank!
02.01.2023 - 18:30Odpověď DROPS Design :
Liebe Sophie, hier wird es erklärt, wie man das umrechnet - siehe 2 Fäden unterschiedlicher Garne durch 1 Faden ersetzen. Gerne wird Ihnen auch Ihr DROPS Händler damit (auch per Telefon oder per E-Mail) weiterhelfen. Viel Spaß beim stricken!
03.01.2023 - 09:11
|
|||||||||||||||||||
Forest Vines Kids Cardigan#forestvineskidscardigan |
|||||||||||||||||||
 |
 |
||||||||||||||||||
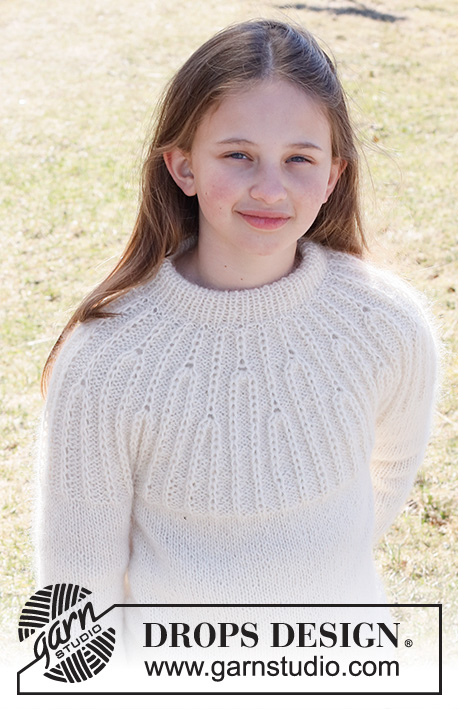
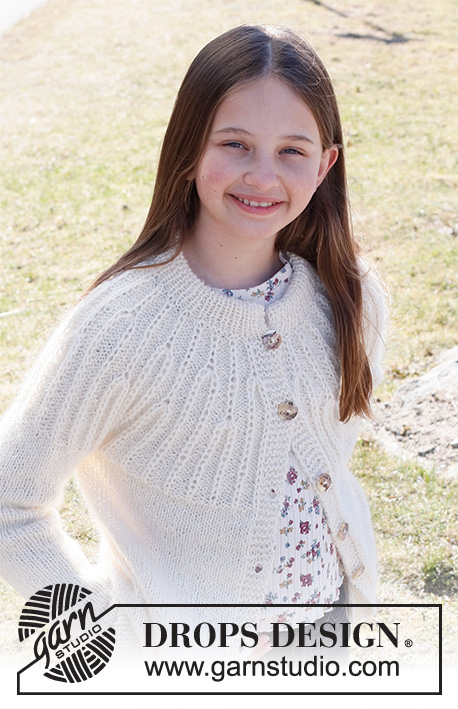
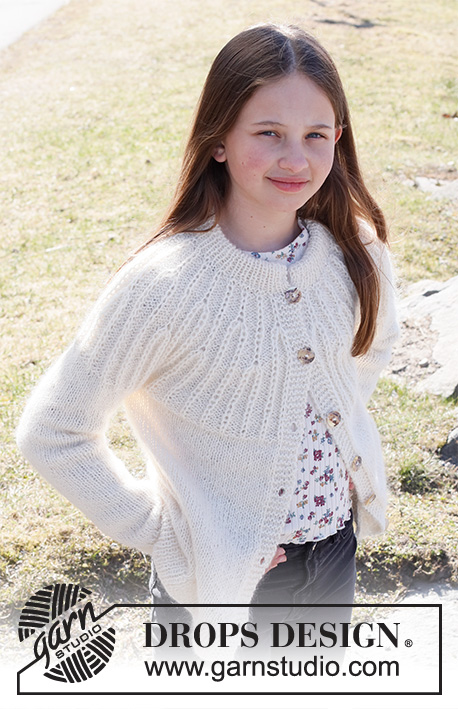
Dětský propínací svetr s plastickým kruhovým sedlem s chytovým patentem pletený shora dolů z příze DROPS Flora a DROPS Kid-Silk. Velikost 2 až 12 let.
DROPS Children 40-8 |
|||||||||||||||||||
|
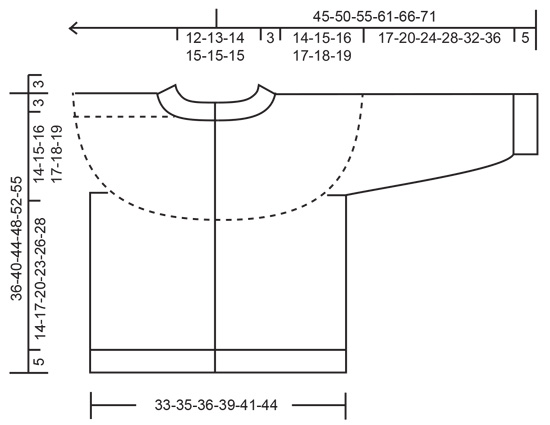
------------------------------------------------------- VYSVĚTLIVKY: ------------------------------------------------------- VROUBKOVÝ VZOR: Pleteme stále hladce, lícové i rubové řady. 1 vroubek = 2 řady hladce. VZOR: Viz schémata A.1 až A.3. Zobrazeny jsou všechny řady vzoru nahlížené z lícové strany. TIP – PŘIDÁVÁNÍ/UJÍMÁNÍ: Abychom vypočítali, v jakých rozestupech máme přidávat/ujímat, odečteme od celkového počtu ok na jehlici (např. 89) oka obou lég (tj. 10) a zbytek vydělíme počtem ok, která potřebujeme přidat/ujmout (tj. 8); takže 89 – 10 = 79 : 8 = 9,9. V tomto případě tedy 1x nahodíme za každým zhruba 9. okem. V následující řadě pleteme nahození za zadní nit, aby se v pletenině netvořily dírky. Pokud ujímáme, pak spleteme hladce dohromady každé zhruba 9. a 10. oko. Přidáváme i ujímáme vždy mimo obě légy. TIP - UJÍMÁNÍ (rukávy): Ujímáme 1 oko na každé straně značky, takto – začínáme 3 oka před značkou: 2 oka spleteme hladce, 2 oka upleteme hladce (značka leží mezi nimi), 1 oko sejmeme hladce, 1 upleteme hladce a sejmuté přes ně přetáhneme. KNOFLÍKOVÉ DÍRKY: Knoflíkové dírky vyplétáme v léze pravého předního dílu (na svetr se díváme, jako by byl oblečený). Dírky vyplétáme takto: pleteme lícovou řadu až po poslední 3 oka, 1x nahodíme, 2 oka spleteme hladce a poslední oko upleteme hladce. V následující (rubové) řadě pleteme nahození hladce – vznikne dírka. První knoflíkovou dírku vypleteme v lemu průkrčníku, ve výši asi 7 cm. Každou z dalších 5-5-5-6-6-6 dírek pak vypleteme po asi 5,5-6,5-7,5-6,5-7,5-8 cm výšky. TIP - UZAVÍRÁNÍ: Abychom neměli uzavřený okraj moc stažený, můžeme na uzavírání ok použít silnější jehlice nebo za každým zhruba 6. okem 1x nahodíme – nahození hned uzavřeme jako běžné oko. ------------------------------------------------------- POPIS PRÁCE: ------------------------------------------------------- SVETR – JAK BUDEME POSTUPOVAT: Lem průkrčníku a sedlo pleteme v řadách na kruhové jehlici, shora dolů, od jednoho předního okraje ke druhému. Pak od sedla oddělíme rukávy a trup dopleteme odděleně v řadách. Rukávy dokončíme v kruhových řadách na ponožkových jehlicích. DVOJITÝ LEM PRŮKRČNÍKU: Na kruhovou jehlici č. 5 nahodíme 1 vláknem od každého druhu příze (= dvojitou přízí) 71-75-77-79-79-81 ok (včetně 5 ok légy na každé straně) a upleteme 1 rubovou řadu obrace. Pak pleteninu převedeme na kruhovou jehlici č. 4. Následující lícovou řadu pleteme takto: 1 krajové oko VROUBKOVÝM VZOREM – viz výše, *1 oko hladce, 1 obrace*, *-* opakujeme až po poslední 2 oka, 1 upleteme hladce a krajové oko vroubkovým vzorem. V tomto rozvržení pleteme lem až do výše 7 cm. Lem později přehneme napolovic. Za oka légy na začátku řady vložíme značku – SEDLO NYNÍ MĚŘÍME OD TOHOTO MÍSTA. Pleteme 1 lícovou řadu hladce a SOUČASNĚ přidáme rovnoměrně 0-2-0-4-10-8 ok – viz TIP – PŘIDÁVÁNÍ/UJÍMÁNÍ; pamatujeme také na vyplétání KNOFLÍKOVÝCH DÍREK v pravé léze – viz výše = 71-77-77-83-89-89 ok. Upleteme 1 rubovou řadu hladce. SEDLO: Pleteninu převedeme na kruhovou jehlici č.5. První řadu – lícovou – pleteme takto: 5 ok légy vroubkovým vzorem, vzor A.1A – sekvenci opakujeme až po posledních 6 ok v řadě (= 10-11-11-12-13-13 sekvencí po 6 okách), vzor A.1B (= 1 oko) a 5 ok légy vroubkovým vzorem. Po dokončení 1. řady vzoru A.1 máme na jehlici 91-99-99-107-115-115 ok. Dokončíme celou 1 sekvenci vzoru A.1 (na výšku), pak opakujeme stále nad sebou 2 řady označené ve schématu A.1 hvězdičkou, a to až do výše 3-3-3-4-4-4 cm od značky na průkrčníku. Následující lícovou řadu pleteme takto: 5 ok légy vroubkovým vzorem, vzor A.2A – sekvenci opakujeme až po posledních 6 ok v řadě (= 10-11-11-12-13-13 sekvencí po 8 okách), vzor A.2B a 5 ok légy vroubkovým vzorem. Po dokončení 1. řady vzoru A.2 máme na jehlici 135-147-147-159-171-171 ok. Dokončíme celou 1 sekvenci vzoru A.2 (na výšku), pak opakujeme stále nad sebou 2 řady označené ve schématu A.2 hvězdičkou, a to až do výše 6-7-7-8-8-9 cm od značky na průkrčníku. Nyní pleteme obdobně vzor A.3 – začínáme lícovou řadou: 5 ok légy vroubkovým vzorem, vzor A.3A – sekvenci opakujeme až po posledních 10 ok v řadě (= 10-11-11-12-13-13 sekvencí po 12 okách), vzor A.3B (= 5 ok) a 5 ok légy vroubkovým vzorem. Po dokončení 1. řady vzoru A.3 máme na jehlici 175-191-191-207-223-223 ok. Dokončíme celou 1 sekvenci vzoru A.3 (na výšku), pak opakujeme stále nad sebou 2 řady označené ve schématu A.3 hvězdičkou, a to až do výše 13-14-15-16-17-18 cm od značky na průkrčníku. Upleteme 1 lícovou řadu hladce a SOUČASNĚ upravíme celkový počet ok na výsledných 178-190-198-210-222-234 ok – viz TIP – PŘIDÁVÁNÍ/UJÍMÁNÍ. Pokračujeme lícovým žerzejem s 5 oky légy vroubkovým vzorem na každé straně, a to až do výše 14-15-16-17-18-19 cm od značky na průkrčníku. V následující řadě rozdělíme sedlo na trup a rukávy, takto: prvních 30-32-33-35-37-39 ok upleteme jako dříve (= přední díl), následujících 34-36-38-40-42-44 ok odložíme na pomocnou jehlici (= rukáv), nahodíme 6 nových ok (= podpaží), upleteme 50-54-56-60-64-68 ok (= zadní díl), dalších 34-36-38-40-42-44 ok odložíme na pomocnou jehlici (= rukáv), nahodíme 6 nových ok (= podpaží) a posledních 30-32-33-35-37-39 ok upleteme jako dříve (= přední díl). Trup a rukávy dokončíme odděleně. NYNÍ MĚŘÍME DÍL OD TOHOTO MÍSTA! TRUP: = 122-130-134-142-150-158 ok. Pokračujeme v řadách lícovým žerzejem s 5 oky légy vroubkovým vzorem na každé straně, a to až do výše 14-17-20-23-26-28 cm od podpaží. Do ukončení práce zbývá doplést asi 5 cm výšky; svetr teď můžete vyzkoušet a míry upravit. Teď budeme plést lem – aby nebyl moc stažený, upleteme nejprve 1 lícovou řadu hladce a SOUČASNĚ přidáme rovnoměrně 13-15-15-15-17-17 ok = 135-145-149-157-167-175 ok. Pleteninu převedeme na kruhovou jehlici č. 4. První řada je rubová a pleteme ji takto: 5 ok légy vroubkovým vzorem, *1 oko obrace, 1 hladce*, *-* opakujeme až po posledních 6 ok, 1 oko upleteme obrace a 5 ok légy vroubkovým vzorem. V tomto rozvržení pleteme lem až do výše 5 cm. Pak všechna oka volně dle vzoru uzavřeme - viz TIP - UZAVÍRÁNÍ! Svetr měří asi 36-40-44-48-52-55 cm (od ramene). RUKÁV: Odložených 34-36-38-40-42-44 ok jednoho rukávu převedeme z pomocné jehlice na ponožkové jehlice č. 5 a navíc k nim nabereme po 1 oku z každého ze 6 ok nahozených v podpaží = 40-42-44-46-48-50 ok. Doprostřed 6 nových ok v podpaží vložíme značku. Pleteme v kruhových řadách lícovým žerzejem, kruhová řada začíná u značky. Ve výši 1 cm od podpaží ujmeme na každé straně značky 1 oko - viz TIP - UJÍMÁNÍ. Takto ujímáme v každé 6. kruhové řadě, celkem 4x = 32-34-36-38-40-42 ok. Pokračujeme bez dalšího ujímání až do výše 17-20-24-29-32-36 cm od podpaží. Do ukončení práce zbývá doplést asi 5 cm výšky; svetr teď můžete vyzkoušet a míry upravit. Teď pleteme 1 kruhovou řadu hladce a SOUČASNĚ ujmeme rovnoměrně 4 oka = 28-30-32-34-36-38 ok. Pleteninu převedeme na ponožkové jehlice č. 4 a upleteme 5 cm výšky pružným vzorem 1/1 (tj. střídáme 1 oko hladce, 1 obrace). Pak všechna oka dle vzoru uzavřeme – viz TIP – UZAVÍRÁNÍ! Rukáv měří asi 22-25-29-34-37-41 cm (od podpaží). Stejným způsobem upleteme i druhý rukáv. DOKONČENÍ: Lem průkrčníku zahneme napolovic do rubu a přišijeme; dbáme na to, aby šev zůstal volný, měkký a pružný, jinak se bude lem kroutit a otáčet na lícovou stranu. Drobnými stehy sešijeme přední okraje lemu. Na levou légu přišijeme knoflíky. |
|||||||||||||||||||
Vysvětlivky ke schématu |
|||||||||||||||||||
|
|||||||||||||||||||
|
|||||||||||||||||||
|
|||||||||||||||||||
Dokončili jste tento model?Pak označte své fotky tagem #dropspattern #forestvineskidscardigan nebo je pošlete do galerie #dropsfan. Potřebujete s tímto návodem poradit?Otevřete-li si návod na stránce garnstudio.com, najdete tam 31 výukových video-ukázek, Komentáře/Dotazy a další užitečné informace. © 1982-2025 DROPS Design A/S. Vyhrazujeme si veškerá práva. Tento dokument, včetně všech jeho dílčích částí, podléhá autorským právům. Podrobnější komentář k možnostem užití našich návodů najdete dole pod každým návodem na našich stránkách. |
|||||||||||||||||||


V oblasti pletené a háčkované módy působí DROPS Design více než 40 let. Díky tomu vám můžeme nabídnout jednu z nejrozsáhlejších kolekcí modelů s bezplatnými návody dostupnými na internetu - navíc v 17 jazycích. K dnešnímu dni máme na 314 katalogů a 11821 návodů celkem - z nich je už 7047 dostupných v [češtině].
Přidejte komentář k návodu DROPS Children 40-8
Rádi bychom věděli, co si o tomto modelu myslíte!
Pokud se chcete na něco zeptat, dbejte prosím na to, abyste ve formuláři níže vybrali správnou kategorii - díky tomu se dříve dozvíte, co potřebujete vědět. Povinná pole jsou označena *.