
Categorías populares
¿Buscas un hilo?


Comentarios / Preguntas (116)
![]() Joanne Seitz escribió:
Joanne Seitz escribió:
At the end of Row 4, it says in bold letters, REMEMBER THE CROCHET GAUGE. How big should the circle measure at this point? I do not see that mentioned.
05.07.2023 - 01:29DROPS Design respondió:
Dear Mrs Seitz, with 7 rounds = 10 cm, the first 4 rounds should measure approx. 6 cm. Happy crocheting!
05.07.2023 - 07:51
![]() Joanne Seitz escribió:
Joanne Seitz escribió:
Hi, I understand now that each row should begin with 3 chains. Does that begin with Round 1 when you are working 12 dc into the chain? And then you will sl st into the third chain before moving on to Round 2?
04.07.2023 - 01:22DROPS Design respondió:
Dear Mrs Seitz, you need to crochet 3 chains at the beginning of every round with dc (US-English), this means from the 1st round, in other words on round 1, crochet 3 chains + 11 dc in the magic round = 12 dc, slip stitch in the 3rd chain from beg of round to join then work 2nd round starting with 3 chains to replace first dc and so on. Happy crocheting!
04.07.2023 - 08:41
![]() Virkaten escribió:
Virkaten escribió:
Teen käsitöitä harrastuksena ja myyn niitä kaksi tai kolme kertaa vuodessa myyjäisissä ja joskus somen välityksellä. Yhden mallin kappalemäärä on usein vain 1. Ohjeiden alareunassa puhutaan vain neuleiden myynnistä. Saako näin myydä myös virkkauksia ja asusteita?
25.05.2023 - 12:53DROPS Design respondió:
Hei, kyllä, voit myydä myös virkkauksia ja asusteita tähän tapaan.
29.05.2023 - 16:49
![]() Jane Armstrong escribió:
Jane Armstrong escribió:
People have asked but it doesn't seem to have been answered. Why is the written pattern different from the chart? As in, the chart says Rd 3 = two DC of pink and 1 DCof gray. However, the written pattern says 1 DC, then 2 DC. If we follow the Crochet Info and replace the DC with a 3CH, it doesn't work with the written pattern. It's a lovely design, but I would think with so many comments and questions clarification on this one particular issue would be greatly appreciated. Thank you
04.02.2023 - 19:19DROPS Design respondió:
Dear Jane, even if you work 1 dc and then increase and work 2 dc in the next stitch, it doesn't mean the 2 dc in the increase are worked in the same colour. The chart is only used to see the color on each stitch: it may happen that you work 2 dc in 1 dc and each of the dc are of a different color. Also, the 3ch at the beginning always substitute the first dc of the round. For example, in round 3, you would work: 3chain stitches in pink, (1dc in pink, 1dc in light grey) in the same dc, 1dc in pink, (1 dc in pink, 1 dc in light grey) in the same dc.... Happy crocheting!
06.02.2023 - 00:24
![]() Susan Middleton escribió:
Susan Middleton escribió:
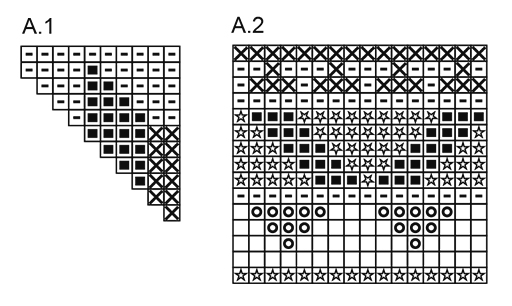
In Round 1 - 11 and in looking at A.1, when in each round do you change colors? Is the first square = Round 1? The next round is the 2 squares and continues up? So in Round 3 you use light gray & shocking ink - 2 squares of shocking pink and one square of light gray. Would your work 1 dc and then the increase in the first 2 squares and then use gray in the third square as a dc and then repeat that sequence?
09.01.2023 - 00:50DROPS Design respondió:
Dear Mrs Middleton, correct - read even more about diagrams here - you have to increase as explain in the written pattern (see ROUND 3, ROUND 4...) following the colours as in A.1 at the same time. Happy crocheting!
09.01.2023 - 10:42
![]() Susan Middleton escribió:
Susan Middleton escribió:
I am trying to start the Market Day tote. I am trying to figure out how A.1 works with the rounds. Is round 1 starting from the top right of the chart? Which round goes to which part of the diagram?
09.01.2023 - 00:35DROPS Design respondió:
Hi Susan, The diagrams are worked from bottom right to left and upwards. So round 1 is the bottom row, then round 2 etc. Happy crocheting!
09.01.2023 - 06:54
![]() Leen escribió:
Leen escribió:
Zijn de knopen om de schouderbanden aan de zak te zetten enkele knopen of maak je een dubbele knoop zodat het niet loskomt?
14.12.2022 - 14:32DROPS Design respondió:
Dag Leen,
Volgens het patroon is het één knoop, maar je kunt natuurlijk gerust een dubbele knoop maken. Je kan de uiteinden eerst wat langer houden om te bekijken of je een enkele of een dubbele knoop wilt. Een dubbele knoop neemt namelijk wat meer garen.
15.12.2022 - 21:55
![]() Danny escribió:
Danny escribió:
Hi, so changing to Apricot color in A2, I couldn’t proceed . The row says 9DC in Apricot, 3DC in Gray, 1DC in Apricot, 3DC in Gray and goes on… this round doesn’t comes right from me. Finishing the round, I have only 5DC left from previous round.
30.07.2022 - 02:05DROPS Design respondió:
Dear Danny, you start with 4dc in apricot, then 3dc in gray, *1 dc in apricot, 3dc in gray, 9dc in apricot, 3 dc in gray*, continue working from * to * the whole round and finish with 5dc in apricot, not 9dc. Happy crocheting!
31.07.2022 - 17:54
![]() Mónica Patricia Castro escribió:
Mónica Patricia Castro escribió:
Gracias por tan buena explicación, hasta ahora no encontraba algo tan completo como su página, es de gran ayuda
22.05.2022 - 18:54
![]() Silvia escribió:
Silvia escribió:
So I have started this one, instead of the shocking pink (100g) at the bottom, I am using Drops Paris Dark Wash, of which I have 100g too, but I am barely at the seventh round and I have finished the second ball??
27.05.2021 - 21:21DROPS Design respondió:
Dear Silvia, did you check and keep your tension? you should have 13 treble crochets x 6 rows with 2 strands held together =10x10 cm. Hope this can help.
28.05.2021 - 08:13
|
|||||||||||||||||||
Market Day#marketdaybag |
|||||||||||||||||||
 |
 |
||||||||||||||||||
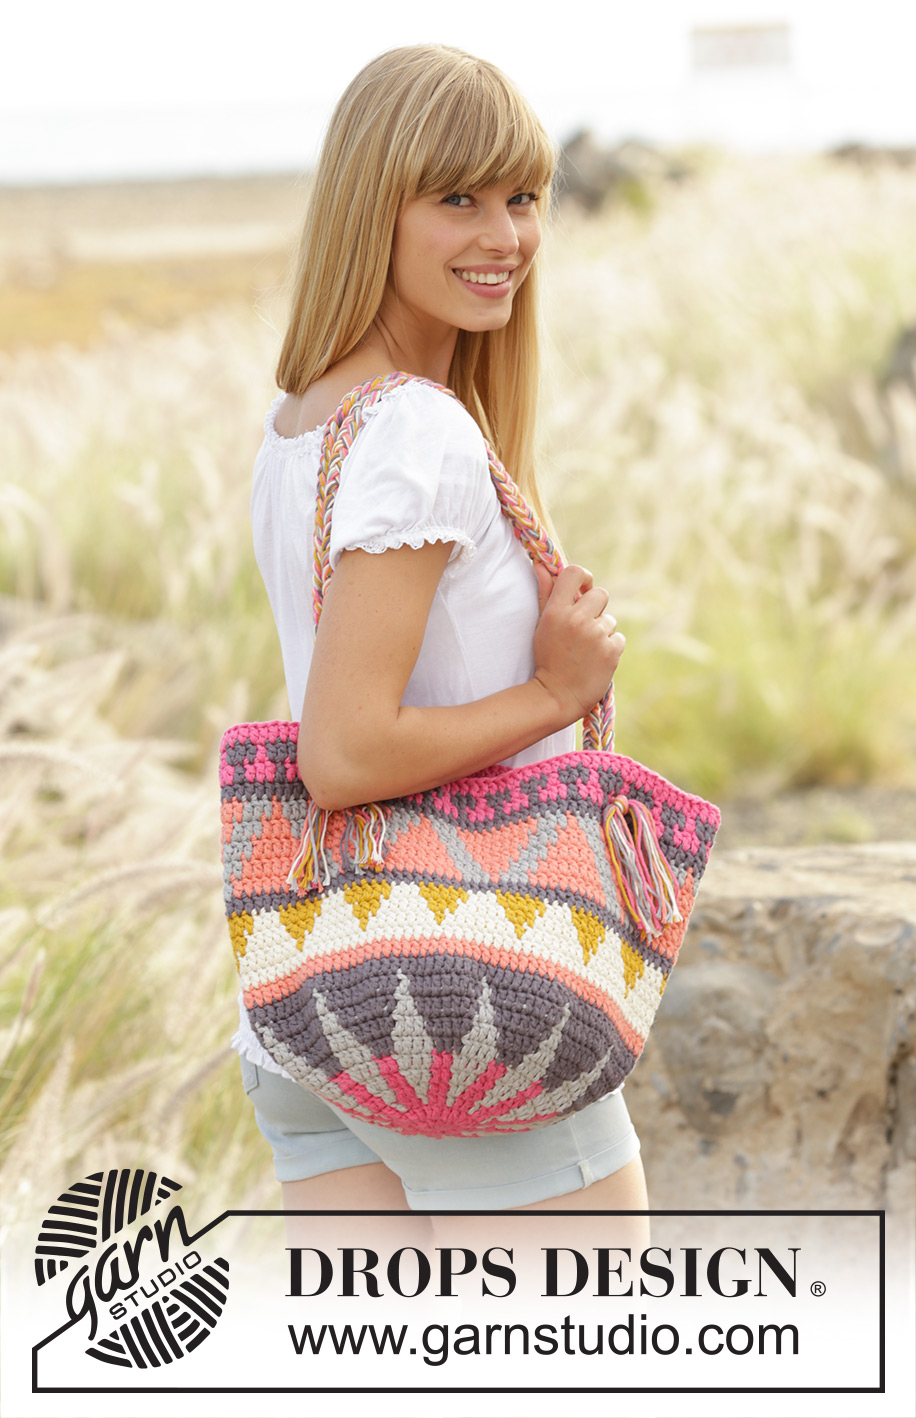
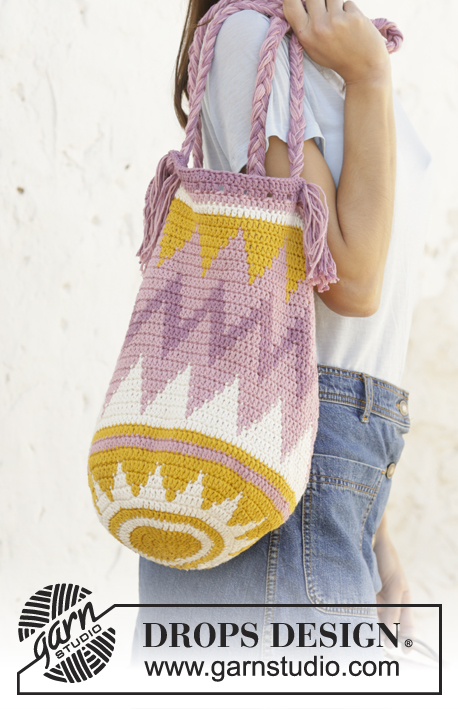
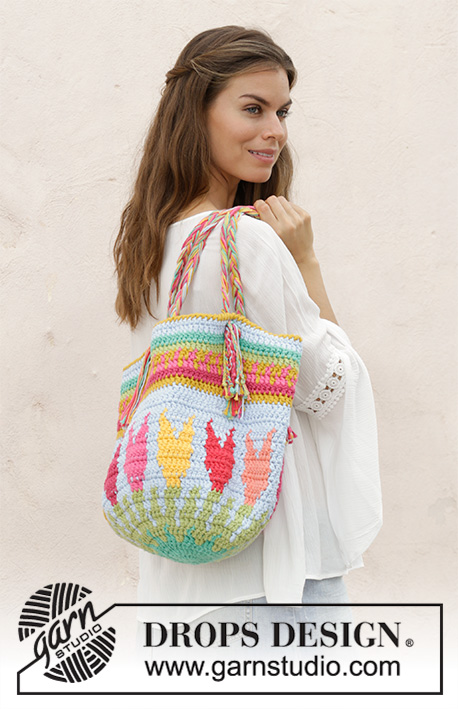
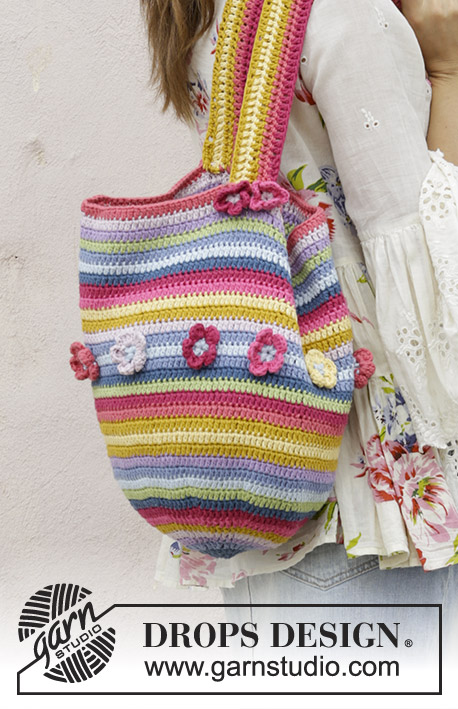
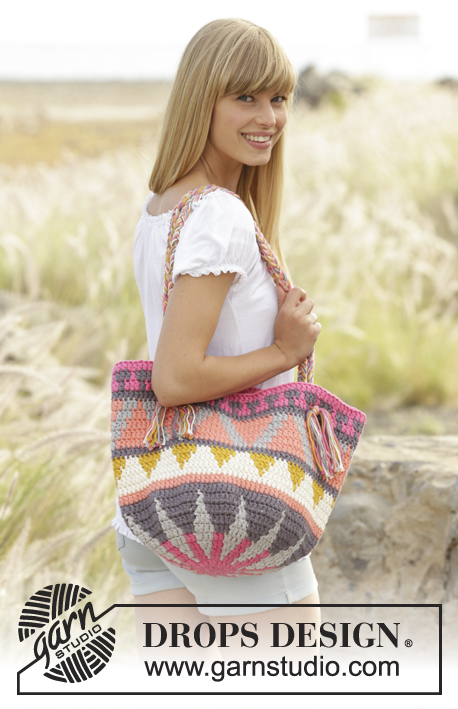
Bolso DROPS en ganchillo con patrón de colores en 2 hilos “Paris”.
DROPS 170-1 |
|||||||||||||||||||
|
PATRÓN: Ver diagramas A.1 y A.2. Los diagramas muestran los colores en el patrón. 1 cuadrado = 1 p.a. TIP PARA USAR DOBLE HILO: Usar el cabo de hilo tanto del interior como del exterior del ovillo. Al hacer el cambio para un nuevo ovillo, tratar de evitar cambiar ambos hilos al mismo tiempo – para evitar tener un hilo demasiado grueso cuando se entretejen los hilos al final. PATRÓN DE COLORES (trabajado en redondo): Cuando se cambia de color, trabajar de la manera siguiente: Trabajar el último p.a. con el primer color pero no hacer la última lazada, cambiar al color siguiente y extraer la última lazada, después trabajar el p.a. siguiente. Cuando se trabaja con dos colores, colocar los hilos del color no trabajado sobre los pts de la vta anterior, trabajar alrededor de los hilos para queden escondidos y sigan la labor en redondo. INFORMACIÓN PARA LA ELABORACIÓN DEL TRABAJO: Sustituir el 1er p.a. al principio de cada vta con 3 cad, terminar la vta con 1 p.bjs en la 3ª cad. TIP PARA DISMINUIR: Disminuir 1 p.a. trabajando 2 p.a. juntos de la manera siguiente: Trabajar 1 p.a. pero no hacer la última lazada, (= 2 pts en la ag), trabajar el p.a. siguiente, pero en la última lazada, extraer el hilo a través de todos los 3 bucles en la ag. ------------------------------------------------------ BOLSO: Trabajar en redondo con 2 hilos de cada color – LEER TIP PARA USAR DOBLE HILO. Montar 5 cad con 2 hilos rosado intenso en ag de ganchillo tamaño 4.5 mm y formar un anillo con 1 p.bjs en la 1ª cad. Después trabajar en redondo y de acuerdo al diagrama A.1 (trabajar 12 repeticiones de A.1 a lo ancho) – LEER PATRÓN DE COLORES. VUELTA 1: Trabajar 12 p.a. en el anillo – leer INFORMACIÓN PARA LA ELABORACIÓN DEL TRABAJO. VUELTA 2: Trabajar 2 p.a. en cada p.a. = 24 p.a. VUELTA 3: Trabajar * 1 p.a. en el primer p.a., 2 p.a. en el p.a. siguiente *, repetir de *a* en toda la vta = 36 p.a. VUELTA 4: Trabajar * 1 p.a. en cada uno de los primeros 2 p.a., 2 p.a. en el p.a. siguiente *, repetir de *a* en toda la vta = 48 p.a. RECORDARSE DE MANTENER LA MISMA TENSIÓN DE LA MUESTRA! VUELTAS 5-10: Continuar con los aumentos y el patrón como antes, es decir, en cada vta trabajar 1 p.a. más entre los aumentos = 120 p.a. VUELTA 11: Trabajar la última vta en A.1 y, AL MISMO TIEMPO, disminuir 4 p.a. distribuidos equitativamente, disminuir trabajando 2 y 2 p.a. juntos = 116 p.a. VUELTA 12: Continuar trabajando en redondo, pero sin aumentos y trabajar de acuerdo a A.2 (= 7 repeticiones a lo ancho), AL MISMO TIEMPO, en la 1ª vta en A.2, disminuir 4 p.a. distribuidos equitativamente = 112 p.a. Continuar hasta que A.2 esté trabajado, cortar y asegurar los hilos. ASAS: Cortar 6 hilos de cada color de 120 cm = 36 hilos. Colocar los hilos juntos y hacer un nudo flojo, dejar aprox 12 cm después del nudo. Distribuir los hilos en 3 grupos, con 12 hilos en cada grupo. Trenzar los grupos entre sí hasta que la trenza mida aprox 68 cm. Dividir el final de la trenza en 2. Pasar las 2 mitades a través del bolso, con 1 p.a. de separación, en la 3ª vta de la orilla. Atarlas juntamente en un nudo al frente del bolso. Desatar el nudo al principio de la trenza y asegurarla al bolso de la misma manera, pero en el lado opuesto. Hacer otra trenza de la misma manera – ver foto. |
|||||||||||||||||||
Explicaciones del diagrama |
|||||||||||||||||||
|
|||||||||||||||||||
 |
|||||||||||||||||||
¿Terminaste este patrón?Entonces, etiqueta tus fotos con #dropspattern #marketdaybag o envíalas a la galería #dropsfan. ¿Necesitas ayuda con este patrón?Encontrarás 9 videos tutoriales, un espacio para comentarios/preguntas y más visitando la página del patrón en garnstudio.com © 1982-2026 DROPS Design A/S. Todos los derechos reservados. Este documento, incluyendo todas sus sub-secciones, está protegido por los derechos de autor (copyright). Lee más acerca de lo que puedes hacer con nuestros patrones en la parte de abajo de cada patrón de nuestro sitio. |
|||||||||||||||||||


Con más de 40 años en el diseño de modelos de punto y de ganchillo, DROPS Design ofrece una de las más vastas colecciones de patrones gratuitos en el internet - traducidos en 17 idiomas. Al día de hoy, contamos con 324 catálogos y 12291 patrones - de los cuales 11689 están traducidos en español.
Nosotros trabajamos con mucho esmero para brindarte lo mejor que las labores de punto y ganchillo tienen para ofrecer,inspiración y consejos, así como hilos de magnífica calidad a precios increíbles! Te gustaría usar nuestros patrones para otro fin además del uso personal? Puedes leer acerca de lo que estás permitida a hacer en el texto de Copyright en la parte de abajo de todos nuestros patrones. Felices labores!
Escribe un comentario sobre DROPS 170-1
¡Nos encantaría saber qué piensas acerca de este patrón!
Si quieres escribir una pregunta referente al patrón, por favor asegúrate de elegir la categoría correcta en el formulario debajo, para acelerar el proceso de respuesta. Los campos obligatorios están marcados con un *.