
Populaarsed kategooriad
Otsid lõnga?


100% puuvill
alates 1.25 € /50g


Lõnga maksumus on arvutatud väikseima suuruse valmistamiseks ja kõige odavama lõnga järgi. Otsid paremat hinda? Leia see DROPS Soodushinnad lehelt!

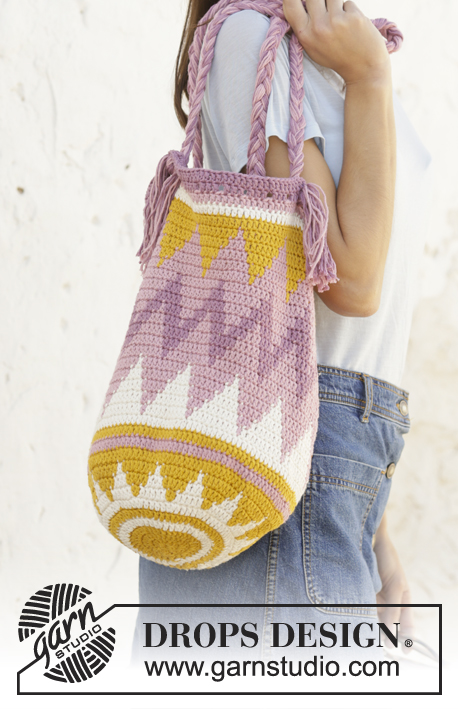
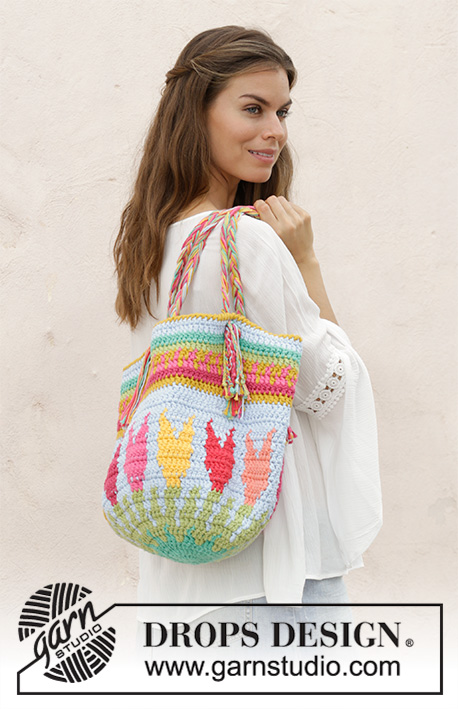
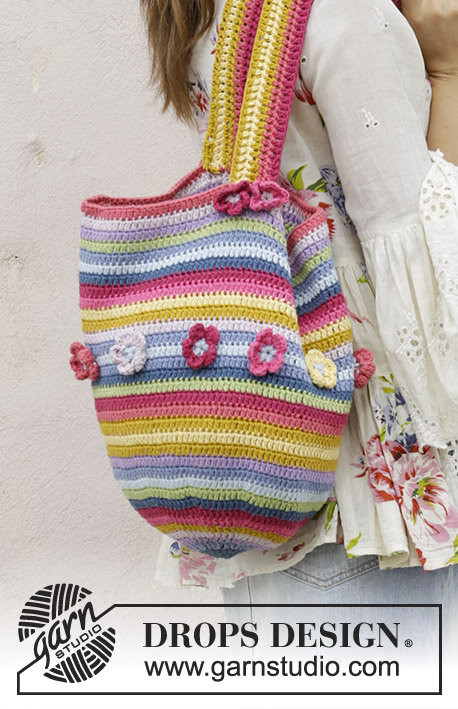
Market Day
Kahekordsest DROPS Paris lõngast heegeldatud värvilise mustriga kott
DROPSi disain: mudel nr w-599
Lõngagrupp E või C + C
----------------------------------------------------------
Mõõdud:
Laius: u. 43 cm
Kõrgus: u. 37 cm
Lõng: Garnstudio DROPS PARIS, 50 g/75 m
200 g värv nr 24, tumehall
150 g värv nr 01, aprikoos
100 g värv nr 23, helehall
100 g värv nr 06, erkroosa
100 g värv nr 17, naturaalvalge
50 g värv nr 41, sinep
NB! Ühevärvilisele kotile läheb 600 g Paris lõnga.
DROPSi heegelnõel: 5,5 mm – või sobiv, et 13 sammast x 7 rida sambaid kahekordse lõngaga = 10 x 10 cm.
-----------------------------------------------------
-------------------------------------------------------
Alternatiivlõng – Vaata siit, kuidas lõngu asendada
Lõngagrupid A kuni F – Kasuta sama mustrit ja vaheta lõnga, siin
Alternatiivlõnga kasutamine – Kasuta meie lõngamuundurit
-------------------------------------------------------
100% puuvill
alates 1.25 € /50g
Lõnga maksumus on arvutatud väikseima suuruse valmistamiseks ja kõige odavama lõnga järgi. Otsid paremat hinda? Leia see DROPS Soodushinnad lehelt!
- Eesti keel
- Česky
- Dansk
- Deutsch
- English (UK/cm)
- English (US/in)
- Español
- Français
- Íslenska
- Italiano
- Magyar
- Nederlands
- Norsk
- Polski
- Português
- Suomi
- Svenska
- English (UK/cm), Bulgaria
- English (UK/cm), Croatia
- English (UK/cm), Greece
- English (UK/cm), Latvia
- English (UK/cm), Lithuania
- English (UK/cm), Romania
- English (UK/cm), Slovenia
- Česky, Slovakia
Juhend
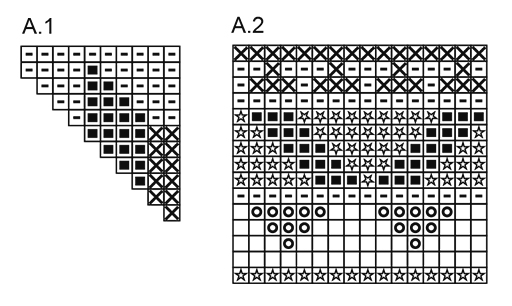
Vaata skeeme A.1 ja A.2. Skeem näitab mustri värve. 1 ruut = 1 ühekordne sammas (sm).
TOPELTLÕNGA NIPP
Võta lõngaots toki seest ja väljast. Uut tokki võttes tee lõnga ühendused eri kohtadesse, et üleminek ei jääks jäme.
VÄRVILINE MUSTER (ringselt)
Vaheta värvi nii: tee viimane sammas esimese värviga, aga ära tee viimast lõnga läbitõmmet, võta järgmine värv ja tee viimane lõnga läbitõmme, siis heegelda järgmine sammas. Kahe värviga heegeldades hoia töös mitteolev värv eelmise rea kõrval ja heegelda üle selle lõnga, nii et see ei jää näha.
HEEGELDAMISE INFO
Asenda iga sammaste ringi esimene ühekordne sammas (sm) 3 ahelsilmusega ja ringi lõpus tee 1 aassilmus kolmandasse ahels-sse ringi algul.
KAHANDAMISE NIPP
Kahanda 1 sammas, heegeldades 2 sm kokku järgmiselt: tee 1 sm, aga ära tee viimast lõnga läbitõmmet (= 2 s heegelnõelal), siis tee järgmine sammas, aga viimane lõnga läbitõmme tõmba läbi kõigi 3 s heegelnõelal.
---------------------------------
KOTT
Heegelda kahekordse lõngaga igast värvist - loe TOPELTLÕNGA NIPPI.
Heegelda 5 ahels kahekordse erkroosa lõngaga ja 4,5 mm heegelnõelaga, ühenda ringiks 1 aassilmusega esimesse ahels-sse. Siis heegelda ringselt ja skeemi A.1 (12 mustrikordust skeemi A.1 laiuses) - loe VÄRVILINE MUSTER üleval.
1. RING: heegelda 12 sm ringi – loe HEEGELDAMISE INFOT.
2. RING: tee 2 sm igasse sm-sse = 24 sm.
3. RING: tee * 1 sm esimesse sm-sse, 2 sm järgmisesse sm-sse *, korda *kuni* tervel ringil = 36 sm.
4. RING: * 1 sm igasse esimesse 2 sm-sse, 2 sm järgmisesse sm-sse *, korda *kuni* tervel ringil = 48 sm.
JÄLGI HEEGELDAMISE TUGEVUST!
5.- 10. RING: jätka kasvatustega ja mustrit nagu enne, st. igal ringil on 1 sammas rohkem kasvatuste vahel = 120 sm.
11. RING: heegelda viimane ring skeemil A.1, SAMAL AJAL kahanda 4 sm ühtlaste vahedega, kahanda heegeldades 2 sm kokku = 116 sm.
12. RING: heegelda ringselt, aga ilma kasvatusteta ja heegelda skeemi A.2 (= 7 kordust laiuses), SAMAL AJAL kahanda skeemi A.2 esimesel ringil 4 sm ühtlaste vahedega = 112 sm. Jätka kuni skeem A.2 on tehtud, katkesta ja kinnita lõng.
SANGAD
Lõika igast värvist 6 lõngajuppi pikkusega 120 cm = 36 lõnga. Pane lõngad kokku ja seo sõlm u. 12 cm kaugusel otsast. Jaga lõngad kolmeks - igas 12 lõnga. Punu pats pikkusega u. 68 cm. Jaga ots kaheks.
Pista 2 otsa läbi kotiserva, jättes vahele 1 samba, läbi kolmanda ringi servast. Seo otsad sõlme koti peal.
Tee teise otsa sõlm uuesti lahti ja pista läbi kotiserva samamoodi teisel küljel.
Tee teine sang samamoodi - vaata fotot.
Sede mustrit on parandatud. Vaata parandusi siit.
Kasuta 5,5 mm heegelnõela.
Skeem

|
= helehall |

|
= erkroosa |

|
= sinepikollane |

|
= aprikoos |

|
= tumehall |

|
= naturaalvalge |
Mida võib teha meie mustritega? Saate DROPSi mustreid internetis jagada, kasutades mustri originaalpilti, materjale, nime ja numbrit. Kuid täielikku mustrit EI TOHI mingil viisil digitaalselt reprodutseerida.
Lõngapoed on teretulnud kasutama DROPSi mustrite andmebaasi meie sordimendi läbimüügi edendamiseks. Meie mustreid võib printida, teha nii palju koopiaid, kui soovite. Ainus, mida me palume, et te ei teeks prinditud originaaldokumendis mingeid muudatusi / täiendusi. Vastavalt DROPSi filosoofiale jagatakse mustrid tarbijatele tasuta.
Toimetajad, kes soovivad avaldada meie mustreid trükitud raamatutes või ajakirjades, võivad meiega lisateabe saamiseks ühendust võtta.
DROPSi mustritel põhinevate rõivaste müük on lubatud seni, kuni neid müüakse üksikute esemetena või ühe tellimuse alusel. Mustrite edasine kaubanduslik kasutamine ei ole lubatud. Tuleb selgelt ära märkida, et rõivas on valmistatud DROPS DESIGN disaini järgi. DROPS DESIGNi osaks olevate rõivasiltide kasutamine on tingitud järgmise teksti lisamisest: „DROPS DESIGN, mille valmistas …..”. DROPSi fotode kasutamine turunduse/müügi eesmärgil on lubatud ainult seoses DROPSi toodete kasutamise/müügiga. Fotosid ei tohi lõigata ega töödelda ning logo peab olema selgelt nähtav.
Jätame endale õiguse oma mustrite kasutamise loa igal ajal tagasi võtta, olenemata põhjusest.
Iga mustriga kaasnevad videoõpetused.


Need samm-sammulised õpetused võivad olla abiks:


Miks on koetihedus tähtis?
Koetihedus määrab kudumi suuruse ja mõõdetakse tavaliselt 10 x 10 cm osalt. Tavaliselt kirjutatakse nii: silmuste arv laiuses x (korda) ridade arv kõrguses - näiteks: 19 silmust x 26 rida = 10 x 10 cm.
Koetihedus on kudujatel erinev, mõni koob/heegeldab lõdvemalt, mõni tugevalt. Koetihedust saab muuta varraste suurusega, seepärast me alati mainime, et varraste suurus on ainult soovituslik! Igaüks saab seda ise muuta (suuremaks või väiksemaks) vastavalt oma käekirjale, et koetihedus tuleks sama, kui mainitud juhendis. Kui koetihedus on erinev, on lõngakulu erinev ja lõpptulemuseks on teistsugused mõõdud.
Koetihedus määrab ka seda, milliseid alternatiivlõngu saab kasutada. Teine lõng sobib alternatiiviks, kui see annab sama koetiheduse.
Vaata DROPS õpetust: Kuidas mõõta koetihedust
Vaata DROPS videot: Kuidas teha tööproovi ja mõõta koetihedust
Mitu toki lõnga on vaja?
Vajaminev lõngakogus on antud grammides, näiteks: 450 g. Arvutamaks, mitu toki lõnga on vaja, on esiteks vaja teada, kui palju gramme on 1 tokis (25g, 50g või 100g). See informatsioon on saadaval, vaadates lõngainfot. Jaga vajalik grammide arv toki kaaluga. Näiteks, kui tokis on 50 g lõnga (standard kogus), siis arvutatakse järgmiselt: 450 / 50 = 9 tokki.
Kas ma saan kasutada erinevat lõnga kui antud mustrid?
Kasutades teist lõnga on tähtis, et koetihedus oleks sama. Nii tulevad eseme mõõdud samad, kui antud joonisel. Seda on lihtsam saavutada, kui kasutada sama lõngagrupi lõngu. Samuti on võimalik panna kokku mitu peenemat lõnga, et saavutatda soovitatud koetihedus. Proovi meie lõngamuundurit. Ma soovitame alati teha tööproovi.
NB! Kui kasutate erinevat lõnga, siis võib olla lõpptulemus ka erinev, kuna teisel lõngal on erinev tekstuur.
Vaata DROPS õpetust: Kas ma saan kasutada teist lõnga kui antud juhendis?
Mis on lõngagrupid?
Kõik meie lõngad on jagatud lõngagruppideks (A kuni F) lõnga jämeduse ja koetiheduse järgi - lõngagrupp A sisaldab peenikesi lõngu ja lõngagrupp F kõige jämedamaid. Nii on lihtne leida alternatiivlõngu samale mustrile, kui soovid kasutada teist lõnga. Ühe lõngagrupi lõngadel on sama koetihedus ja neid saab teineteisega asendada. Aga kuna erinevatel lõngadel on erinev tekstuur, siis lõpptulemus võib olla erinev.
Kuidas kasutada Lõngamuundurit?
Igal meie mustrilehel on link Lõngamuundurile, juhul kui soovid kasutada teist lõnga kui soovitatud juhendis. Sisesta lõng, mida soovid asendada, kogus (valitud suurusele) ja lõngade arv ning lõngamuundur pakub parima valiku alternatiive sama koetihedusega. Lisaks saad teada palju vajad uut lõnga ja mitut lõnga kasutada. Enamus tokke on 50 g (mõned 25 g või 100 g).
Kui mustris on kasutatud mitut värvi, siis tuleb iga värvi eraldi vaadata. Samuti, kui juhendis on kasutatud kahte erinevat lõnga koos (näiteks 1 Alpaca + 1 Kid-Silk), siis tuleb leida alternatiivid neile eraldi.
Miks on juhendis ikka näidatud tootmisest maas lõnga nime?
Kuna igal lõngal on oma tekstuur, on originaallõng jõetud juhendisse alles. Aga meie Lõngamuunduriga on lihtne leida alternatiivi, või vali lihtsalt sama lõngagrupi lõng.
Mõnes poes võib veel olla tootmisest maas lõnga müügil, või on kellegil veel kodus seda lõnga alles ja soovib leida juhendit.
Lõngamuundur aitab leida alternatiivlõnga ja vajaliku koguse.
Millist suurust kududa?
Kui ei tea millist suurust teha, siis on hea idee mõõta oma kampsunilt mõõdud. Siis saab nende mõõtude järgi valida sobiva suuruse.
Vaata mõõtudega joonist mustrilehel juhendi lõpus.
Vaata DROPS õpetust: Kuidas mõista mõõtudega joonist
Miks minu koetihedus tuleb vale soovitatud varrastega?
Varraste suurus mustrilehel on ainult soovituslik, tähtis on järgida koetihedust. Kuna koetihedus on kõigil erinev, siis on vaja valida omale sobivad vardad õige koetiheduse saavutamiseks – võib-olla on vaja võtta suuremad või väiksemad vardad. Seepärast on vajalik teha tööproov.
Kui Sinu koetihedus on erinev, siis tulevad ka eseme mõõdud erinevad.
Vaata DROPS õpetust: Kuidas mõõta koetihedust
Vaata DROPS videot: Kuidas teha tööproovi
Miks on ese kootud ülevalt alla?
Kui rõivas on kootud ülevalt alla, on lihtsam teha muudatusi pikkuses. Näiteks, on lihtsam proovida eset selga kudumise käigus, et kontrollida passe pikkust.
Juhendis on hoolikalt selgitatud iga samm õiges järjekorras. Skeemid on kohandatud vastavalt kudumise suunale ja kootakse nagu tavaliselt.
Kuidas kududa skeemi järgi?
Skeemil on näidatud kõik read/ringid ja iga silmus vaadates töö paremalt poolt. Skeemi loetakse alt üles, paremalt vasakule. 1 ruut = 1 silmus.
Edasi-tagasi kududes, kootakse iga teine rida töö paremal pool, skeemi loetakse paremalt vasakule; iga teine rida kootakse töö pahemal pool: loetakse skeemi vasakult paremale. Kududes töö pahemal pool, loetakse skeemi vasakult paremale, parempidi silmused kootakse pahempidi ja pahempidi silmused parempidi.
Ringselt kududes kootakse kõik read töö paremal pool ja skeemil loetakse kõik read paremalt vasakule.
Vaata DROPS õpetust: Kuidas lugeda kudumise skeeme
Kuidas heegeldada skeemi järgi?
Skeemil on näidatud kõik read/ringid ja iga silmus vaadates töö paremalt poolt. Skeemi loetakse alt üles, paremalt vasakule.
Edasi-tagasi heegeldades, read mis tehakse töö paremal pool loetakse skeemi paremalt vasakule; read mis tehakse töö pahemal pool: loetakse skeemi vasakult paremale.
Ringselt heegeldades tehakse kõik read töö paremal pool ja skeemi loetakse igal ringil paremalt vasakule.
Heegeldades ringset skeemi, alustatakse keskelt ja heegeldatakse väljapoole, vastupäeva ja ringi haaval.
Rida algab tavaliselt antud numbri ahelsilmustega (vastavalt järgmise silmuse kõrgusele), see on näidatud skeemil või kirjeldatud juhendis.
Vaata DROPS õpetust: Kuidas lugeda heegeldamise skeeme
Kuidas kududa ühel real/ringil mitu erinevat skeemi?
Kui on vaja teha samal real/ringil mitme erineva skeemi järgi, siis on see tavaliselt kirjutatud nii: “ koo skeemi A.1, A.2, skeemi A.3 kokku 0-0-2-3-4 times". Aee tähendab koo skeemi A.1 ühe korra, siis skeemi A.2 ühe korra, siis korda skeemi A.3 (laiuses) niimitu korda, kui on vaja sinu suurusele – siin näites on see: suurusel S = 0 korda, M = 0 korda, L= 2 korda, XL= 3 korda ja suurusel XXL = 4 korda.
Skeeme kootakse nagu tavaliselt, alusta esimese reaga skeemil A.1, siis tee skeemi A.2 esimene rida jne.
Vaata DROPS õpetust: Kuidas lugeda kudumise skeeme
Vaata DROPS õpetust: Kuidas lugeda heegeldamise skeeme
Miks on varrukad lühemad suurematel surrustel?
Suurematel suurustel on üldlaius (varruka otsast varruka otsani) ikkagi suurem, isegi kui varruka pikkus on lühem. Suurematel suurustel on varrukakaar pikem ja õlad laiemad, et rõivas istuks seljas paremini.
Kuidas mõõdetakse eseme pikkust?
Mustrilehel olev mõõtudega joonis annab infot rõiva pikkuse kohta. Kampsuni pikkust mõõdetakse õla kõrgemast kohast (tavaliselt kaelaaugu kõrvalt, MITTE õla tipust) alla alumise servani. Samamoodi passe pikkust mõõdetakse õla kõrgemast kohast alla varrukate ja kehaosa jagamise kohani.
Mõõte ei võeta mööda nööbiliiste, kui ei ole just nii mainitud; sel puhul mõõda nööbiliistude kõrvalt.
Vaata DROPS õpetust: Kuidas vaadata suurust joonisel
Mis on mustrikordus?
Mustri skeeme korratakse tihti ringil/real või vertikaalselt (kõrguses). 1 mustrikordus skeemil näitab mustri põhisilmuseid. Kui on öeldud juhendis, et tee 5 mustrikordust skeemi A.1 ringil, siis tuleb kududa skeemi 5 korda üksteise järgi samal ringil. Kui on öeldud juhendis, et tee 2 mustrikordust skeemi A.1 vertikaalselt, koo terve skeem ühe korra kõrguses, siis koo jälle otsast peale terve skeem teise korra.
Miks tehaks töö alguses rohkem ahelsilmuseid?
Ahelsilmused on natuke lühemad kui teised silmused, et äär ei jääks kiskuma, me teeme alguses rohkem silmuseid. Järgmisel real kohandatakse silmuste arvu, et see läheks kokku mustriga ja suuruse mõõtudega joonisel.
Miks kasvatatakse silmuseid enne soonikut ülevalt alla kududes?
Soonikkude on venivam ja tõmbab rohkem kokku, kui näiteks parempidine kude. Kasvatades silmuseid enne soonikkoes äärist, hoiab see ära suure erinevuse laiusesse.
Milleks kasvatada mahakudumise real?
Tihti jääb mahakudumise rida kiskuma. Seepärast tehakse silmuseid mahakududes mõned õhksilmused, et äär ei jääks kiskuma.
Vaata DROPSi videot: Kuidas kududa silmuseid maha, tehes õhksilmuseid?
Kuidas kasvatada/kahandada kordamööda igal 3. või 4. real/ringil?
Et kasvatused / kahandused jaguneksid ühtlaselt, tuleb kasvatada /kahandada näiteks kordamööda igal 3. või 4. real/ringil järgmiselt: koo 2 rida ja kasvata/kahanda kolmandal real/ringil, koo 3 rida ja kasvata neljandal real/ringil. Kasvata/kahanda niimoodi vaheldumisi, kuni vajalikud kasvatused/kahandused on tehtud.
Vaata DROPS õpetust: Kasvata / kahanda 1 silmus kordamööda igal 3. või 4. real
Kuidas kududa jakki ringselt, mitte edasi-tagasi?
Kui soovitakse kududa ringselt, mitte edasi-tagasi, saab juhendit natuke muuta. Esiosa keskele tuleb lisada steegid (õmblusvarud - tavaliselt u 5 silmust) ja järgida juhendit. Selle asemel et pöörata ja kududa töö pahemal pool, koo lihtsalt üle steekide ja jätka ringselt töö paremal pool. Pärast lõigatakse kudum eest lahti, korjatakse silmused nööbiliistude jaoks ja kaetakse lõikeservad.
Vaata DROPS videot: Kuidas kududa steeke ja neid lahti lõigata
Kuidas muuta ringselt kootud juhendit edasi-tagasi kudumiseks?
Kui soovitakse kududa ringse töövõtte asemel edasi-tagasi, võib kududa osad eraldi ja õmmelda pärast kokku. Kehaosa silmuste arv tuleb jagada kaheks, lisada 1 ääresilmus mõlemale küljele (õmblusvarudeks) ja kududa edasi-tagasi.
Vaata DROPS õpetust: Kuidas kududa ringvarrastele kirjutatud juhendit pikkade varrastega?
Miks on juhend natuke erinev kui disain pildil?
Mustrikordused võivad olla natuke erinevad erinevatel suurustel, et saavutada vajaliku suurust. Kui te teete suuremat suurust, võib teie töö olla natuke erinev. Seda kõike on võetud arvesse disaini loomisel, et üldmulje oleks kõikidel suurustel sama.
Järgi oma suurusele vastavat juhendit ja skeeme!
Kuidas muuta naiste suurusega kudum meeste suurusele?
Kui soovid kududa naiste suurusega disaini mehele, siis on seda lihtne muuta meeste suuruseks. Suurim erinevaus on varrukate ja kehaosa pikkus. Vali naiste suurus sobiva rinnaümbermõõduga. Pikkus saab lisada varrukale enne käeaugu mahakudumist/varrukakaare tegemist. Kui juhend on ülevalt alla, saab pikkus lisada kohe pärast käeauku või enne esimest kahandust varrukal.
Lõngakoguse muutus oleneb kui palju pikkust lisatakse, aga parem osta tokk rohkem kui vähem.
Kuidas hoiduda kampsuni topiliseks minemisest?
Enamus lõngu on karvased, mis eemalduvad pesus või moodustavad toppe. Kammitud lõngadel (st. karvastel lõngadel) on neid rohkem, mistõttu need ajavad ka rohkem karva.
Karva ajamine sõltub ka sellest, mida kantakse kudumi all ja kas see tõmbab kiude välja. Seetõttu on võimatu garanteerida, et kudum ei aja karva.
Allpool on mõned nipid, kuidas saada paremat tulemust karvaste lõngadega:
1. Kudumi valmides (enne pesu) raputa seda, et lahtised karvad eemalduks. NB! ÄRA KASUTA liimirulli, harja või muid meetodeid, mis kisuvad karvu välja.
2. Pane kudum kilekotti ja külmikusse – madal temperatuur põhjustab kiudude lõdvestumist ja need eemalduvad teineteisest kergemini.
3. Jäta ese külmikusse paariks tunniks, siis võta välja ja raputa kudumit jälle.
4. Pese kudumit vastavalt juhendile lõngatoki etiketil.
Miks mu kudum muutub tupsuliseks?
Tupsude tekkimine villase kudumi pinnale on loomulik protsess, mis juhtub isegi kõige eksklusiivsemate kiududega. See on loomuliku kulumise tunnus, mida on raske vältida ja mis on kõige rohkem nähtav eseme suure hõõrdumisega kohtades, nagu kampsuni varrukad ja mansetid.
Koepinna saab jälle ilusaks, kasutades riideharja või tupsude eemaldajat.
Seniks võib lugeda küsimusi-vastuseid kommentaaridest või ühineda DROPS Workshop grupiga Facebookis abi saamiseks kaaskudujatelt/heegeldajatelt!
Võib-olla meeldivad ka need...

Market Day
Market Day
Market Day
Market Day Bag
Ready for summer
Inspired by the #marketdaybag
#marketdaybag
Market Day
Market Day
Market Day
Market Day
Market Day Bag
Ready for summer
Inspired by the #marketdaybag
#marketdaybag
Market Day
|
|||||||||||||||||||
Market Day |
|||||||||||||||||||
|
|
|
||||||||||||||||||
Kahekordsest DROPS Paris lõngast heegeldatud värvilise mustriga kott
DROPS 170-1 |
|||||||||||||||||||
|
MUSTER Vaata skeeme A.1 ja A.2. Skeem näitab mustri värve. 1 ruut = 1 ühekordne sammas (sm). TOPELTLÕNGA NIPP Võta lõngaots toki seest ja väljast. Uut tokki võttes tee lõnga ühendused eri kohtadesse, et üleminek ei jääks jäme. VÄRVILINE MUSTER (ringselt) Vaheta värvi nii: tee viimane sammas esimese värviga, aga ära tee viimast lõnga läbitõmmet, võta järgmine värv ja tee viimane lõnga läbitõmme, siis heegelda järgmine sammas. Kahe värviga heegeldades hoia töös mitteolev värv eelmise rea kõrval ja heegelda üle selle lõnga, nii et see ei jää näha. HEEGELDAMISE INFO Asenda iga sammaste ringi esimene ühekordne sammas (sm) 3 ahelsilmusega ja ringi lõpus tee 1 aassilmus kolmandasse ahels-sse ringi algul. KAHANDAMISE NIPP Kahanda 1 sammas, heegeldades 2 sm kokku järgmiselt: tee 1 sm, aga ära tee viimast lõnga läbitõmmet (= 2 s heegelnõelal), siis tee järgmine sammas, aga viimane lõnga läbitõmme tõmba läbi kõigi 3 s heegelnõelal. --------------------------------- KOTT Heegelda kahekordse lõngaga igast värvist - loe TOPELTLÕNGA NIPPI. Heegelda 5 ahels kahekordse erkroosa lõngaga ja 4,5 mm heegelnõelaga, ühenda ringiks 1 aassilmusega esimesse ahels-sse. Siis heegelda ringselt ja skeemi A.1 (12 mustrikordust skeemi A.1 laiuses) - loe VÄRVILINE MUSTER üleval. 1. RING: heegelda 12 sm ringi – loe HEEGELDAMISE INFOT. 2. RING: tee 2 sm igasse sm-sse = 24 sm. 3. RING: tee * 1 sm esimesse sm-sse, 2 sm järgmisesse sm-sse *, korda *kuni* tervel ringil = 36 sm. 4. RING: * 1 sm igasse esimesse 2 sm-sse, 2 sm järgmisesse sm-sse *, korda *kuni* tervel ringil = 48 sm. JÄLGI HEEGELDAMISE TUGEVUST! 5.- 10. RING: jätka kasvatustega ja mustrit nagu enne, st. igal ringil on 1 sammas rohkem kasvatuste vahel = 120 sm. 11. RING: heegelda viimane ring skeemil A.1, SAMAL AJAL kahanda 4 sm ühtlaste vahedega, kahanda heegeldades 2 sm kokku = 116 sm. 12. RING: heegelda ringselt, aga ilma kasvatusteta ja heegelda skeemi A.2 (= 7 kordust laiuses), SAMAL AJAL kahanda skeemi A.2 esimesel ringil 4 sm ühtlaste vahedega = 112 sm. Jätka kuni skeem A.2 on tehtud, katkesta ja kinnita lõng. SANGAD Lõika igast värvist 6 lõngajuppi pikkusega 120 cm = 36 lõnga. Pane lõngad kokku ja seo sõlm u. 12 cm kaugusel otsast. Jaga lõngad kolmeks - igas 12 lõnga. Punu pats pikkusega u. 68 cm. Jaga ots kaheks. Pista 2 otsa läbi kotiserva, jättes vahele 1 samba, läbi kolmanda ringi servast. Seo otsad sõlme koti peal. Tee teise otsa sõlm uuesti lahti ja pista läbi kotiserva samamoodi teisel küljel. Tee teine sang samamoodi - vaata fotot. |
|||||||||||||||||||
Skeemi seletused |
|||||||||||||||||||
|
|||||||||||||||||||
|
|
|||||||||||||||||||
|
Oled teinud selle või mõne meie teise disaini? Lisa oma piltidele sotsiaalmeedias silt #dropsdesign , et me näeksime neid pilte. Vajad abi selle mustriga?Garnstudio.com kodulehel on õppevideot, küsimuste/vastuste osa ja muudki. © 1982-2024 DROPS Design A/S. Kõik õigused kaitstud. See dokument, ning selle alajaotused on kaitsud autoriõigustega. Loe rohkem, mida meie mustritega võib teha, iga mustrilehe alt meie kodulehel. |
|||||||||||||||||||


Tegeledes üle 40 aasta kudumise ja heegeldamise disainidega, pakub DROPS Design ühte suurimat tasuta mustrite kollektsiooni internetis - tõlgituna 17 keelde. Tänaseks on meil 304 kataloogi ja 11422 mustrit - millest 8492 on tõlgitud Eesti keelde.
Me anname endast parima, et tuua teieni kõike mida kudumine ja heegeldamine võib pakkuda - inspiratsiooni, nõuandeid ning ka kvaliteetseid lõngu parima hinnaga! Soovid kasutada mustreid muukski, kui ainult oma tarbeks? Loe infot meie Copyright osas iga lehekülje all. Rõõmsat loomist!
Kommentaarid / Küsimused (111)
Made this beautiful bag. Gifted it to my niece on her birthday and she is so thrilled to receive this. Thank you so much for the clear instructions and graph. Would love to post the picture of the bag but I don't see where to attach the pic.
18.03.2024 - 09:50On A.2 where it says (= 7 repetitions in width) does this mean “the next 7 rounds?” And when it says “AT THE SAME TIME on 1st round in A.2 dec 4 dc evenly = 112 dc.” Does this mean the last round should decrease to 112 dc?
04.01.2024 - 17:23DROPS Design answered:
Dear Andrea, no this means you have to repeat A.2 a total of 7 times in the round as follows: work the 16 stitches in diagram A.2 (- there are 114 sts, work the first round A.2 decreasing 4 sts evenly on this round = 112 sts remain); Work each round a total of 7 times in the round until A.2 is done. Happy crocheting!
05.01.2024 - 08:06Man soll die Tasche mit 2 Fäden "Paris" häkeln. Bezieht sich das auf die Tapestry Technik, die ja immer mindestens 2fädig ist? Ansonsten müsste ich ja bei 2 Farben mit 4 Fäden arbeiten. Ich verstehe es nicht.
21.10.2023 - 15:07DROPS Design answered:
Liebe Petra, es wird immer mit 2 Fäden also doppelfäddig gehäkelt - siehe Maschenprobe: 12 Stäbchen x 7 Reihen mit 2 Fäden = 10 x 10 cm, in diesem Video zeigen wir (für ein anderes Modell), wie das Muster gehäkelt wird - hier wird man genauso häkeln, aber mit 2 Fäden jeder Farbe anstatt nur 1 Faden jeder Farbe wie im Video. Viel Spaß beim häkeln!
23.10.2023 - 09:38At the end of Row 4, it says in bold letters, REMEMBER THE CROCHET GAUGE. How big should the circle measure at this point? I do not see that mentioned.
05.07.2023 - 01:31At the end of Row 4, it says in bold letters, REMEMBER THE CROCHET GAUGE. How big should the circle measure at this point? I do not see that mentioned.
05.07.2023 - 01:29DROPS Design answered:
Dear Mrs Seitz, with 7 rounds = 10 cm, the first 4 rounds should measure approx. 6 cm. Happy crocheting!
05.07.2023 - 07:51Hi, I understand now that each row should begin with 3 chains. Does that begin with Round 1 when you are working 12 dc into the chain? And then you will sl st into the third chain before moving on to Round 2?
04.07.2023 - 01:22DROPS Design answered:
Dear Mrs Seitz, you need to crochet 3 chains at the beginning of every round with dc (US-English), this means from the 1st round, in other words on round 1, crochet 3 chains + 11 dc in the magic round = 12 dc, slip stitch in the 3rd chain from beg of round to join then work 2nd round starting with 3 chains to replace first dc and so on. Happy crocheting!
04.07.2023 - 08:41Teen käsitöitä harrastuksena ja myyn niitä kaksi tai kolme kertaa vuodessa myyjäisissä ja joskus somen välityksellä. Yhden mallin kappalemäärä on usein vain 1. Ohjeiden alareunassa puhutaan vain neuleiden myynnistä. Saako näin myydä myös virkkauksia ja asusteita?
25.05.2023 - 12:53DROPS Design answered:
Hei, kyllä, voit myydä myös virkkauksia ja asusteita tähän tapaan.
29.05.2023 - 16:49People have asked but it doesn't seem to have been answered. Why is the written pattern different from the chart? As in, the chart says Rd 3 = two DC of pink and 1 DCof gray. However, the written pattern says 1 DC, then 2 DC. If we follow the Crochet Info and replace the DC with a 3CH, it doesn't work with the written pattern. It's a lovely design, but I would think with so many comments and questions clarification on this one particular issue would be greatly appreciated. Thank you
04.02.2023 - 19:19DROPS Design answered:
Dear Jane, even if you work 1 dc and then increase and work 2 dc in the next stitch, it doesn't mean the 2 dc in the increase are worked in the same colour. The chart is only used to see the color on each stitch: it may happen that you work 2 dc in 1 dc and each of the dc are of a different color. Also, the 3ch at the beginning always substitute the first dc of the round. For example, in round 3, you would work: 3chain stitches in pink, (1dc in pink, 1dc in light grey) in the same dc, 1dc in pink, (1 dc in pink, 1 dc in light grey) in the same dc.... Happy crocheting!
06.02.2023 - 00:24In Round 1 - 11 and in looking at A.1, when in each round do you change colors? Is the first square = Round 1? The next round is the 2 squares and continues up? So in Round 3 you use light gray & shocking ink - 2 squares of shocking pink and one square of light gray. Would your work 1 dc and then the increase in the first 2 squares and then use gray in the third square as a dc and then repeat that sequence?
09.01.2023 - 00:50DROPS Design answered:
Dear Mrs Middleton, correct - read even more about diagrams here - you have to increase as explain in the written pattern (see ROUND 3, ROUND 4...) following the colours as in A.1 at the same time. Happy crocheting!
09.01.2023 - 10:42I am trying to start the Market Day tote. I am trying to figure out how A.1 works with the rounds. Is round 1 starting from the top right of the chart? Which round goes to which part of the diagram?
09.01.2023 - 00:35DROPS Design answered:
Hi Susan, The diagrams are worked from bottom right to left and upwards. So round 1 is the bottom row, then round 2 etc. Happy crocheting!
09.01.2023 - 06:54