
Popular categories
Looking for a yarn?


Comments / Questions (145)
![]() Janice Kernaghan wrote:
Janice Kernaghan wrote:
Please explain how to progress after first pattern is completed . Do I drop down to First row and keep repeating until I get to end of A1 then do the same again for all the other sections. Love the design but instructions need to be clearer. Thanks in advance
03.09.2025 - 18:36DROPS Design answered:
Hi Janice, you have to repeat the pattern from the beginning, just remember you will have more lozenges in the next repetition of the diagram, for exemple in the diagram A.1 for smaller sizes you start with 1 lozenge, and finish with 3. When repeating the diagram for the second time you have to repeat the motif 3 times. Happy knitting!
03.09.2025 - 20:36
![]() Janice Kernaghan wrote:
Janice Kernaghan wrote:
I am struggling with the raglan. Do I move the marker stitch each time I increase? Thanks
01.09.2025 - 19:50DROPS Design answered:
Hi Janice, at the beginning I recommend you to move markers in every row. After w few rows, when raglan line is clearly visible, you may do it less frequently. Happy knitting!
15.09.2025 - 10:00
![]() Miriam Fischer wrote:
Miriam Fischer wrote:
Hallo, ich habe den Pulli nach Anleitung gestrickt. Wie auf den Bildern, habe ich beim Trage. auch so eine Welle vorne unterhalb des Kragens, das sieht nicht sehr gut aus.. kann ich das irgendwie ändern? Es wäre sehr schade um Material und Zeit, wenn der Pulli deswegen nicht getragen wird.. Ich bin für alle Tipps dankbar!!
13.04.2025 - 00:19DROPS Design answered:
Liebe Miriam, Sie können versuchen, den Pullover anzufeuchten und vorsichtig etwas in die Länge zu ziehen, und dann liegend trocknen lassen. Eventuell hängt sich die Welle auch durch das Tragen des Pullovers aus. Gutes Gelingen, damit Sie den Pulli doch noch gern tragen!
17.04.2025 - 23:19
![]() Olivia Crocker wrote:
Olivia Crocker wrote:
Hello, I've just begun the first row of colorwork after increasing to 112 stitches (size large). After placing the 4 stitch markers after the counted stiches (11, 43, 11, 43), I have 4 stitches left after the last marker. I am wondering where I could have went wrong in the pattern, since 11+43+11+43 is only 108 stitches instead of the desired 112 for the Large size. Thanks!
11.04.2025 - 21:50DROPS Design answered:
Dear Olivia, the markers are inserted in stitches ("insert 1 marker in next stitch"). So you should have: 11 + 1+ 43 + 1 + 11 + 1 +43 +1. That should total 112 stitches. Happy knitting!
13.04.2025 - 23:11
![]() Liselotte Hansen wrote:
Liselotte Hansen wrote:
Er udtagningsmasken med i mønsteret eller begynder mønstret først efter udtagning af maske?
07.04.2025 - 13:31DROPS Design answered:
Hej Liselotte, Tag 1 maske ud ved at slå om med perlegrå. På næste omgang strikkes omslagene drejet ret med perlegrå, så der ikke bliver hul. På næste omgang strikkes masken ind i mønsteret :)
09.04.2025 - 14:38
![]() Ania I Adam wrote:
Ania I Adam wrote:
Nie rozumiem od kiedy liczyć oczka pod pachą? Reglan ma 5 oczek. To jak mam +1 oczko reglanu ? Pierwszy raz robię sposobem od góry. Jest możliwość zobaczenia filmiku? Pozdrawiam serdecznie i dziękuję bardzo za Waszą pracę.
30.03.2025 - 12:45DROPS Design answered:
Dzień dobry, jak wykonywać sweter z reglanem od góry do dołu zobaczysz na filmie TUTAJ. Pozdrawiamy!
31.03.2025 - 10:56
![]() Liselotte Hansen wrote:
Liselotte Hansen wrote:
Jeg kan ikke få opskriften til at passe Skal strikke str M. Starter med 96 m skal slå 16 op så jeg har 112 m. Der skal sættet makør 11 m - 43 m - 11 m - 43 m det giver i alt 108 masker Hvor lægger fejlen og hvad gør jeg for at få det til at passe? Kh Liselotte
28.03.2025 - 20:02DROPS Design answered:
Hei Liselotte. Jo, du har 112 masker. Telle 11 masker, sett 1 merke i neste maske, tell 43 masker, sett 1 merke i neste maske, tell 11, sett 1 merke i neste maske, tell 43 masker, sett 1 merke i siste maske = 11+1+43+1+11+1+43+1 = 112 masker. (husk å telle de 4 maskene med merke i). mvh DROPS Design
31.03.2025 - 08:21
![]() Elin wrote:
Elin wrote:
När ärmen stickas ska man maska av 2 maskor var gång det minskas. För mig blir mönstret därefter fel och ojämnt, är det meningen? Hur ska jag sticka för att mönstret inte ska bli fel?
20.03.2025 - 18:53DROPS Design answered:
Hei Eli. Du må passe på at mønsteret passer pent over maskene på bærestykket og at det startes på riktig omgang i A.2B i forhold til siste omgang på bærestykket. Når det skal felles under ermet, vil det ikke alltid stemme med mønstret. mvh DROPS Design
24.03.2025 - 11:54
![]() Annette Hansen wrote:
Annette Hansen wrote:
Jeg bruger Lima fra Drops
10.03.2025 - 13:05DROPS Design answered:
Hei Annette. Pinne 7 høres altfor stort ut. Det er det man som oftes bruker når man f.eks skal strikke med 2 tråder / dobbelt tråd. Ville ha strikket prøvelapper og holdt meg til 4,5-5. På pinne 7 vil ikke oppskriften stemme. mvh DROPS Design
10.03.2025 - 14:53
![]() Annette Hansen wrote:
Annette Hansen wrote:
Fjord Mosaic Strikkefasthed: Jeg har 20 m i bredden med pinde 7 i mønsterstrik efter diagram, men højden er 20 m på 10 cm, den skal være 26 m i højden med glatstrik i nordisk mønster. Hvad skal jeg være opmærksom på?? ….nu er jeg nået (17,5 cm incl. halskant som er dobbelt) uden halskant 13 cm og har 13 raglanmasker(udtagninger )på hver side af raglanmasken Efter min udregning vil jeg nå 32 cm med raglanudtagn. og så blir trøjen alt for stor 🫣hvor ligger fejlen??
03.03.2025 - 12:05DROPS Design answered:
Hei Annette. Hvilket garn bruker du? Pinne 7 høres veldig stort ut, ettersom den veiledene pinne med glattstrikk/mønster er 4,5. Ville ha gått ned i pinne str. og strikket prøvelapper til du får den korrekte strikkefastheten. mvh DROPS Design
10.03.2025 - 09:37
|
||||||||||
Fjord Mosaic#fjordmosaicsweater |
||||||||||
 |
 |
|||||||||
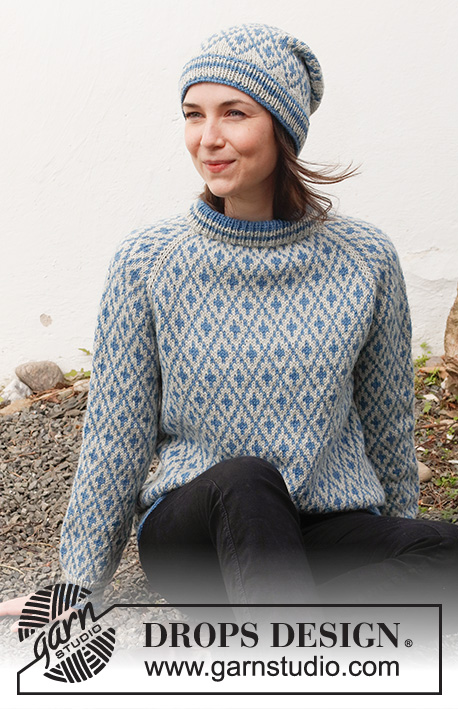
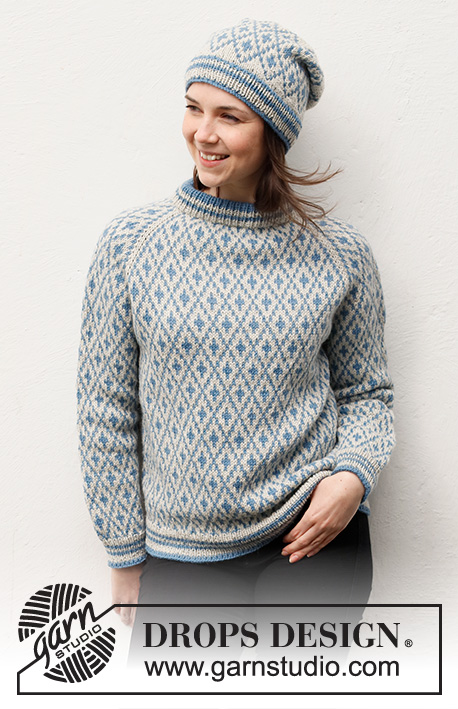
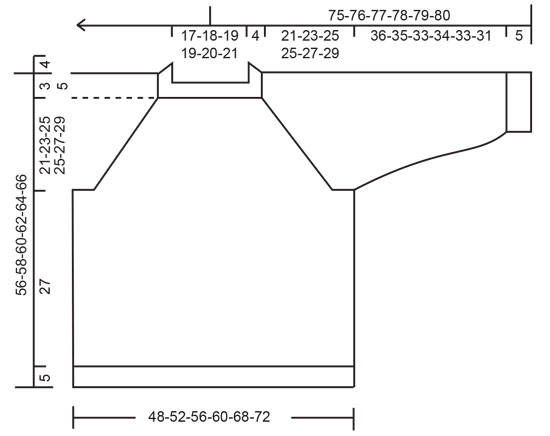
Knitted jumper and hat in DROPS Lima. Jumper is knitted top down with double neck edge, raglan and Nordic pattern. Hat is knitted with Nordic pattern. Size: S - XXXL
DROPS 216-28 |
||||||||||
|
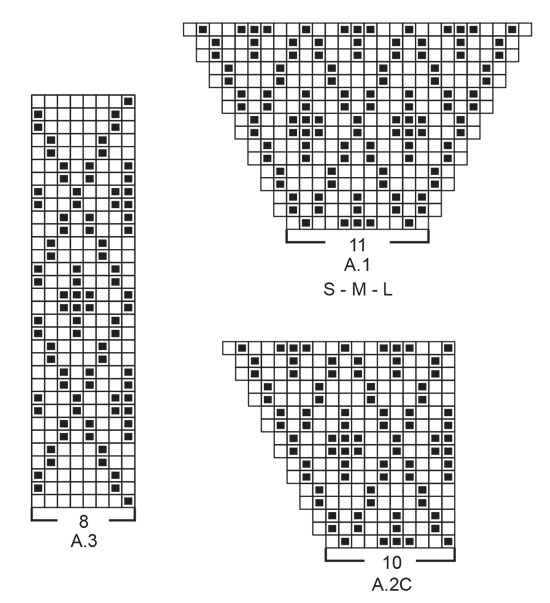
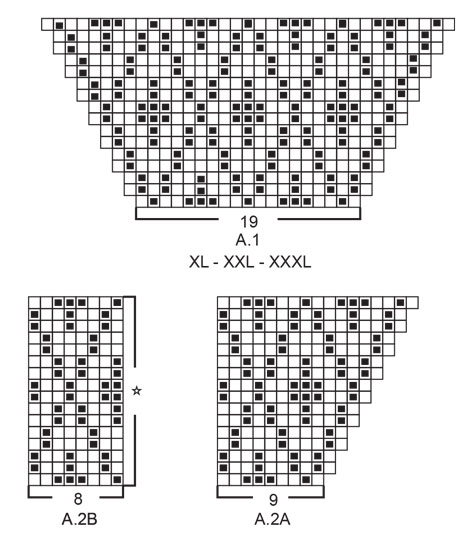
------------------------------------------------------- EXPLANATION FOR THE PATTERN: ------------------------------------------------------- PATTERN: Jumper: See diagrams A.1 and A.2. Choose diagram for your size (applies to A.1). Hat: See diagram A.3. Work the entire pattern in stocking stitch. INCREASE/DECREASE TIP (evenly): To calculate how to increase/decrease evenly, use the total number of stitches on row (e.g. 92 stitches) and divide stitches by number of increases/decreases to be done (e.g. 20) = 4.6. In this example increase by making 1 yarn over after alternately approx. every 4th and 5th stitch. On next round knit yarns over twisted to avoid holes. If decreasing knit in this example approx. every 3rd and 4th stitch and every 4th and 5th stitch together. KNITTING TIP: To avoid the knitting tension to tighten when working pattern with several colours, it is important not to tighten the strands on back of piece. Switch to a higher needle number when working pattern if the pattern is somewhat tight. RAGLAN: Increase for raglan by increasing 1 stitch on each side of the 4 stitches with markers - in every transition between front/back piece and sleeves (= 8 stitches increased on round). Increase 1 stitch by making 1 yarn over with pearl grey. On next round knit yarn over twisted with pearl grey to avoid holes. Then work the new stitches in A.1 and A.2. STRIPES-1 (applies to rib at the bottom of body and sleeves): 3 rounds pearl grey, 2 rounds grey blue, 2 rounds pearl grey, 2 rounds grey blue, 4 rounds pearl grey, 2 rounds grey blue. STRIPES-2 (applies to rib at the bottom of hat): 4 rounds pearl grey, 2 rounds grey blue, 2 rounds pearl grey, 2 rounds grey blue. DECREASE TIP-1 (applies to mid under sleeves): Decrease 2 stitches mid under sleeve as follows: Work until 2 stitches remain before marker thread, knit 2 together, marker thread, knit 2 twisted together (= 2 stitches decreased). DECREASE TIP-2 (applies to top of hat): Decrease 1 stitch after every marker thread as follows: Slip 1 stitch knitwise, knit 1, pass slipped stitch over stitch worked (= 1 stitch decreased = 8 stitches decreased in total on round). CAST-OFF TIP: To avoid a tight cast-off edge you may use a larger needle size. If this also is too tight, work a 1 yarn over after approx. every 6th stitch while casting off (cast off yarn overs as regular stitches). ------------------------------------------------------- START THE PIECE HERE: ------------------------------------------------------- JUMPER - SHORT OVERVIEW OF THE PIECE: Double neck edge and yoke are worked in the round on circular needle, top down. Now divide yoke for body and sleeves. Body is worked in the round on circular needle, top down. Work sleeves in the round on double pointed needles/a short circular needle, top down. DOUBLE NECK EDGE: Cast on 92-96-100-108-112-116 stitches on a short circular needle size 4.5 mm with grey blue. Switch to a short circular needle size 3.5 mm, and work rib in the round (= knit 1/purl 1). When 16 rounds rib have been worked with grey blue, work 2 rounds rib with pearl grey, 2 rounds rib with grey blue, and 4 rounds rib with pearl grey. Neck edge now measures approx. 8 cm. Knit 1 round with pearl grey while increasing 20-16-12-36-48-44 stitches evenly - read INCREASE/DECREASE TIP = 112-112-112-144-160-160 stitches. Switch to circular needle size 4.5 mm. Insert a marker at the beginning of round = right shoulder at the back when garment is worn. YOKE: Insert 4 markers in piece as explained below - insert markers without working them, and use markers when increasing for raglan: Count 11-11-11-19-19-19 stitches (= sleeve), insert 1 marker in next stitch (= raglan stitch), count 43-43-43-51-59-59 stitches (= front piece), insert 1 marker in next stitch, count 11-11-11-19-19-19 stitches (= sleeve), insert 1 marker in next stitch, count 43-43-43-51-59-59 stitches (= back piece), insert 1 marker in last stitch. On next round begin pattern - AT THE SAME TIME increase for RAGLAN - read explanation above, i.e. work first round as follows: Increase 1 stitch for raglan, work A.1 (= 11-11-11-19-19-19 stitches), increase for raglan on each side of stitch with marker (always work raglan stitch with pearl grey), work A.2A (= 9 stitches), work A.2B over the next 24-24-24-32-40-40 stitches (= 3-3-3-4-5-5 repetitions of 8 stitches), work A.2C (= 10 stitches), increase for raglan on each side of raglan stitch, work A.1 (= 11-11-11-19-19-19 stitches), increase for raglan on each side of raglan stitch, work A.2A (= 9 stitches), work A.2B over the next 24-24-24-32-40-40 stitches), work A.2C (= 10 stitches), and increase for raglan before the last raglan stitches (= 8 stitches increased on round), work the last raglan stitch. Read KNITTING TIP and continue pattern like this. REMEMBER THE KNITTING TENSION! AT THE SAME TIME increase for raglan every other round 24-28-32-28-32-36 times in total. After last increase for raglan there are 304-336-368-368-416-448 stitches on needle. Continue pattern without increasing until yoke measures 21-23-25-25-27-29 cm from under neck edge mid front (measured from transition between double neck edge and yoke), and finish round after 4th raglan stitch. On next round divide yoke for body and sleeves, i.e. work next round as follows: Slip the first 60-68-76-76-84-92 stitches on 1 stitch holder for sleeve, (= stitches from sleeve + 1 raglan sleeve), cast on 4-4-4-12-12-12 new stitches on needle (= in the side under sleeve) work as before over the next 92-100-108-108-124-132 stitches (= front piece - these stitches are stitches from front piece + 1 raglan stitch), slip the next 60-68-76-76-84-92 stitches on 1 stitch holder for sleeve (= stitches from sleeve + 1 raglan stitch), cast on 4-4-4-12-12-12 new stitches on needle (= in the side under sleeve), and work as before over the next 92-100-108-108-124-132 stitches (= back piece - these stitches are stitches from back piece + 1 raglan stitch). Cut the yarn. Finish body and sleeves separately. NOW MEASURE PIECE FROM HERE! BODY: = 192-208-224-240-272-288 stitches. Begin round in the middle of the 4-4-4-12-12-12 stitches cast on under sleeve in one side of piece, and continue pattern in the round – i.e. repeat A.2B but make sure to begin on correct round in A.2B according to last round on yoke (= 24-26-28-30-34-36 repetitions of 8 stitches). Work until piece measures approx. 27 cm from division, but finish pattern after one whole or half repetition vertically. Approx. 5 cm remain until finished measurements, try the jumper on and work until desired length. Knit 1 round with pearl grey while increasing 40-44-48-50-58-60 stitches evenly - remember INCREASE TIP = 232-252-272-290-330-348 stitches. Switch to circular needle size 3.5 mm. Work rib in the round (knit 1/purl 1) in STRIPES-1 - read explanation above. When stripes has been worked, rib measures approx. 5 cm. Cast off with grey blue and knit over knit and purl over purl - read CAST-OFF TIP! Jumper measures approx. 56-58-60-62-64-66 cm from shoulder and down. SLEEVE: Slip the 60-68-76-76-84-92 stitches from stitch holder in one side of piece on double pointed needles or a short circular needle size 4.5 mm and pick in addition up 1 stitch in each of the 4-4-4-12-12-12 new stitches cast on under sleeve = 64-72-80-88-96-104 stitches. Insert 1 marker thread in the middle of the 4-4-4-12-12-12 stitches under sleeve. Move the marker thread upwards when working; it should be used for decrease mid under sleeve. Begin round at the marker thread and continue pattern in the round - i.e. repeat A.2B but make sure that pattern fits nicely over stitches on yoke and to begin on correct round in A.2B according to last round on yoke. When sleeve measures 2-2-2-3-3-3 cm from division, decrease 2 stitches mid under sleeve - read DECREASE TIP-1. Decrease like this every 9-4-2½-2-1½-1 cm 4-8-12-12-16-20 times in total = 56-56-56-64-64-64 stitches. Work until sleeve measures approx. 36-35-33-34-33-31 cm from division. Approx. 5 cm remains until finished measurements. Try the jumper on and work to desired length, but finish pattern after one whole or half repetition vertically. NOTE! Shorter measurements in the larger sizes because of wider neck and longer yoke. Knit 1 round with pearl grey while decreasing 6-4-4-10-10-8 stitches evenly = 50-52-52-54-54-56 stitches. Switch to double pointed needles size 3.5 mm. Work rib in the round (knit 1/purl 1) in STRIPES-1 the same way as on body. When stripes has been worked, rib measures approx. 5 cm. Cast off with grey blue and knit over knit and purl over purl - remember CAST-OFF TIP. Work the other sleeve the same way. ASSEMBLY: Fold rib in the neck double in towards wrong side of piece. Fasten rib but to avoid a tight neck edge and avoiding the edge to tip outwards, it is important to make the seam elastic. ------------------------------------------------------ HAT - SHORT SUMMARY OF GARMENT: Worked in the round on a short circular needle, bottom up. Switch to double pointed needles when needed. HAT: Cast on 120-124-128 stitches on a short circular needle size 3 mm with blue grey. Knit 1 round. Then work rib in the round (= knit 1/purl 1) in STRIPES-2 - read explanation above. When stripes have been worked, switch to pearl grey. Knit 1 round while at the same time decrease 16-20-16 stitches evenly- read INCREASE/DECREASE TIP = 104-104-112 stitches. Switch to a short circular needle size 3.5 mm and knit 1 round with pearl grey. Then work A.3 in the round (= 13-13-14 repetitions of 8 stitches). Continue pattern like this. REMEMBER THE KNITTING TENSION. When A.3 has been worked vertically, piece measures approx. 15 cm from cast-on edge. Work in stocking stitch with pearl grey until piece measures 19-20-20 cm from cast-on edge. Insert 8 markers in piece 13-13-14 stitches apart. On next round, decrease 1 stitch at every marker – read DECREASE TIP-2. Decrease like this every other round 11-11-12 times in total = 16 stitches remain in all sizes. Knit 1 round where all stitches are knitted together 2 by 2 = 8 stitches remain in all sizes. Cut the yarn and pull it through the remaining stitches, tighten together and fasten. Hat measures approx. 26-27-28 cm from top and down. |
||||||||||
Diagram explanations |
||||||||||
|
||||||||||
 |
||||||||||
 |
||||||||||
 |
||||||||||
Have you finished this pattern?Tag your pictures with #dropspattern #fjordmosaicsweater or submit them to the #dropsfan gallery. Do you need help with this pattern?You'll find 34 tutorial videos, a Comments/Questions area and more by visiting the pattern on garnstudio.com. © 1982-2026 DROPS Design A/S. We reserve all rights. This document, including all its sub-sections, has copyrights. Read more about what you can do with our patterns at the bottom of each pattern on our site. |
||||||||||


With over 40 years in knitting and crochet design, DROPS Design offers one of the most extensive collections of free patterns on the internet - translated to 17 languages. As of today we count 324 catalogues and 12290 patterns translated into English (UK/cm).
We work hard to bring you the best knitting and crochet have to offer, inspiration and advice as well as great quality yarns at incredible prices! Would you like to use our patterns for other than personal use? You can read what you are allowed to do in the Copyright text at the bottom of all our patterns. Happy crafting!
Post a comment to pattern DROPS 216-28
We would love to hear what you have to say about this pattern!
If you want to leave a question, please make sure you select the correct category in the form below, to speed up the answering process. Required fields are marked *.