
Popular categories
Looking for a yarn?


Comments / Questions (145)
![]() Jenni wrote:
Jenni wrote:
Jag har fått problem med att börja arbetet igen efter att jag gjort de 4 ökningarna under armen på vardera sida. Det blir knas med mönstret, både på höjden (som att det förskjuts ett steg) samt att linjen på diagonalen inte blir jämn. När jag klippt av tråden efter att ha gjort varvet med ökningarna har jag totalt 7 grå maskor (inklusive de 4 nya) och jag förstår inte var jag ska börja (eller hur jag ska tänka med rapporten A2B) för att det ska bli jämt.
19.12.2025 - 22:45
![]() Esther wrote:
Esther wrote:
44 steken meerderen alvorens het boord aan de panden gebreid wordt, dt klinkt erg veel..klopt dat wel?
22.11.2025 - 16:38DROPS Design answered:
Dag Esther,
Het meerderen wordt gedaan om te voorkomen dat de boord het werkstuk samentrekt.
24.11.2025 - 20:58
![]() Carina wrote:
Carina wrote:
Hej! Jag har nu stickat klart alla ökningar på oket(storlek L) och arbetet mäter 26 cm. Det står att jag ska fortsätta sticka till oket mäter 25 cm, sedan görs indelningen i fram/bakstycken och ärmar. Ska jag göra den indelningen direkt då?
03.11.2025 - 19:15DROPS Design answered:
Hei Carina. Etter siste økning til raglan i str. L er det 368 masker på pinnen. Fortsett mønsteret uten økninger til bærestykket måler 25 cm fra under halskanten midt. Sjekk strikkefastheten din i høyden. Har du 26 cm etter siste økning har du 1 cm for mye. mvh DROPS Design
17.11.2025 - 09:10
![]() Susanne wrote:
Susanne wrote:
Kan det være rigtigt at jeg skal tage ud før jeg strikker ribben? på kroppen? Ellers flot trøje
20.10.2025 - 08:27DROPS Design answered:
Hei Susanne. Ja, det er helt riktig. For å få en pen overgang mellom bol og vrangbord øker man masker før vrangborden strikkes (da slipper man 80-talls looken med stram vrangbord). Bare husk å bytte til mindre pinne str. når vrangborden strikkes. mvh DROPS Design
20.10.2025 - 12:00
![]() Caro wrote:
Caro wrote:
Moin, ich stricke diesen Pullover in Größe S. Nach 21cm (gemessen wie in der Anleitung beschrieben) habe ich nicht genug Maschen auf der Nadel. Ich habe jede zweite Runde Ragglan Zunahmen gemacht, wie in Anleitung gesagt. Wissen Sie wo da mein Fehler liegt? Dankeschön!
19.10.2025 - 17:53DROPS Design answered:
Liebe Caro, haben Sie pro Zunahmerunde 8 Maschen zugenommen? Und stimmt Ihre Maschenprobe in der Höhe, also haben Sie auf 10 cm Höhe 30 gestrickte Reihen? Das wären zwei mögliche Fehlerquellen.
22.10.2025 - 20:32
![]() Sba wrote:
Sba wrote:
I like to knit this with group C yarn and for a child any suggestions on how to adapt the pattern to smaller size and different yarn?
08.10.2025 - 23:58DROPS Design answered:
Hei Sba. It is not a quick fix to adapt, so sorry, but we cant rewrite a whole pattern to another size and yarn. best regards DROPS Design
20.10.2025 - 08:06
![]() Janice Kernaghan wrote:
Janice Kernaghan wrote:
I have completed first pattern and don’t know how to proceed. A1 is now 24 sts but sections don’t fit in whichever way I try. I start again at A1 row 1 and keep repeating this section until I come to raglan or do I knit first 11 as in A1 and move onto A2 9 sts but then I have 4 sts before raglan. I find the pattern lacking in detail here and at point to unripping and finding another pattern. Please give me a detailed breakdown how to proceed. Thanks
06.10.2025 - 15:51
![]() Lene wrote:
Lene wrote:
Ang. rettelse hvad er det i stedet for ? Fantastisk flot trøje, jeg glæder mig til jeg er færdig med den 😊
05.10.2025 - 20:55DROPS Design answered:
Hej Lene. Oppskriften är rettet (texten uppdaterad) så följ bara beskrivningen så blir det riktigt :)
07.10.2025 - 07:12
![]() Kristin Aal wrote:
Kristin Aal wrote:
De 4 maskene som blir lagt opp , hvordan skal de strikkes? Mønstret går ikke opp
14.09.2025 - 19:10DROPS Design answered:
Hei Kristine, Du strikker de nye maskene i mønster, så langt det går under hvert erme. Hilsen Drops Team.
15.09.2025 - 06:47
![]() Janice K wrote:
Janice K wrote:
Thanks but I am still confused. When I begin the pattern again do I keep repeating A1 until I reach the raglan stitch? Then repeat A2 and a3. Also I am not familiar with the term lozenge could you please explain,
03.09.2025 - 22:49DROPS Design answered:
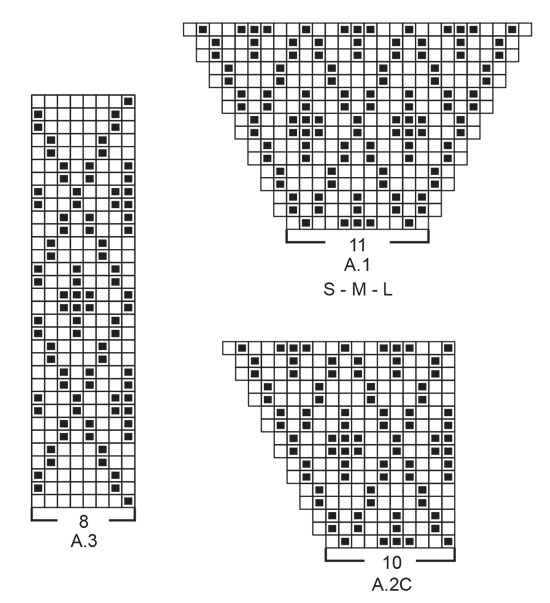
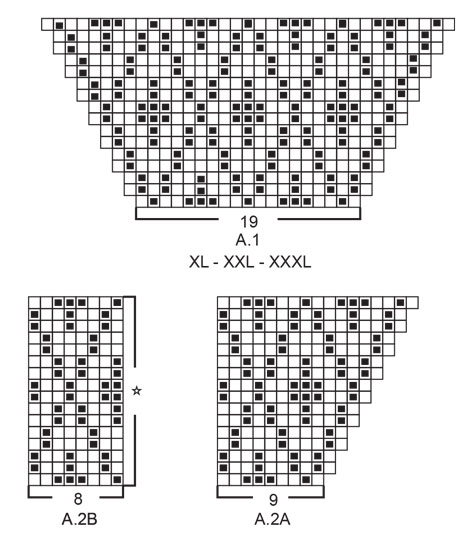
Hi Janice, the diagram is composed of several diamond (lozenge) shape patterns. You have to work one round like this: Increase 1 stitch for raglan, A.1, increase for raglan on each side of stitch with marker (always work raglan stitch with pearl grey), A.2A, A.2B over the next 24-24-24-32-40-40 stitches, A.2C, increase for raglan on each side of raglan stitch, A.1, increase for raglan on each side of raglan stitch, A.2A, A.2B over the next 24-24-24-32-40-40 stitches, A.2C and increase for raglan before the last raglan stitches (= 8 stitches increased on round), work the last raglan stitch. Happy knitting!
04.09.2025 - 07:54
|
||||||||||
Fjord Mosaic#fjordmosaicsweater |
||||||||||
 |
 |
|||||||||
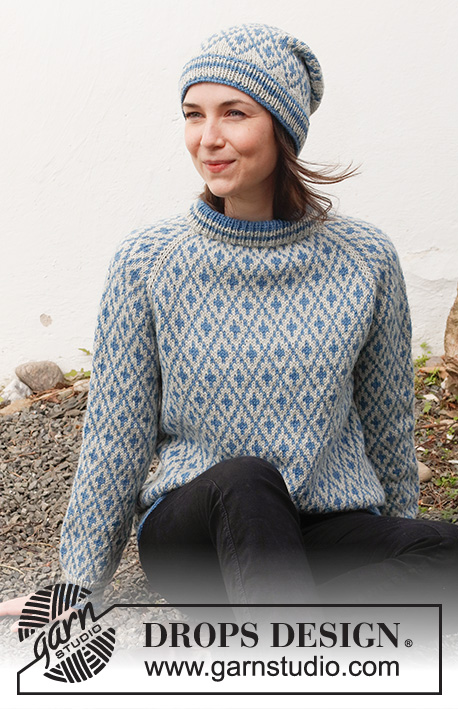
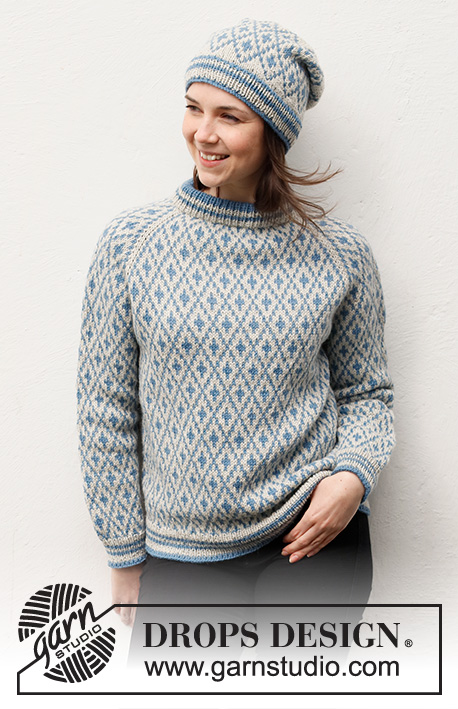
Knitted jumper and hat in DROPS Lima. Jumper is knitted top down with double neck edge, raglan and Nordic pattern. Hat is knitted with Nordic pattern. Size: S - XXXL
DROPS 216-28 |
||||||||||
|
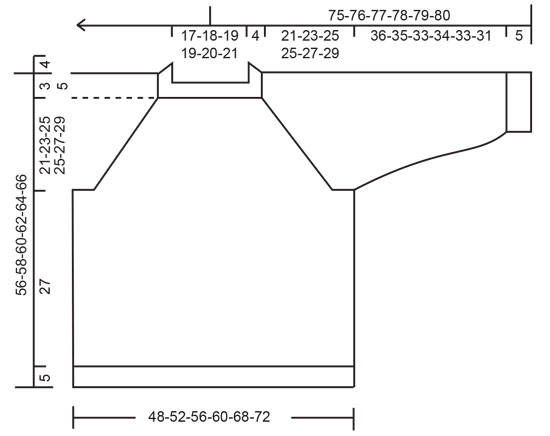
------------------------------------------------------- EXPLANATION FOR THE PATTERN: ------------------------------------------------------- PATTERN: Jumper: See diagrams A.1 and A.2. Choose diagram for your size (applies to A.1). Hat: See diagram A.3. Work the entire pattern in stocking stitch. INCREASE/DECREASE TIP (evenly): To calculate how to increase/decrease evenly, use the total number of stitches on row (e.g. 92 stitches) and divide stitches by number of increases/decreases to be done (e.g. 20) = 4.6. In this example increase by making 1 yarn over after alternately approx. every 4th and 5th stitch. On next round knit yarns over twisted to avoid holes. If decreasing knit in this example approx. every 3rd and 4th stitch and every 4th and 5th stitch together. KNITTING TIP: To avoid the knitting tension to tighten when working pattern with several colours, it is important not to tighten the strands on back of piece. Switch to a higher needle number when working pattern if the pattern is somewhat tight. RAGLAN: Increase for raglan by increasing 1 stitch on each side of the 4 stitches with markers - in every transition between front/back piece and sleeves (= 8 stitches increased on round). Increase 1 stitch by making 1 yarn over with pearl grey. On next round knit yarn over twisted with pearl grey to avoid holes. Then work the new stitches in A.1 and A.2. STRIPES-1 (applies to rib at the bottom of body and sleeves): 3 rounds pearl grey, 2 rounds grey blue, 2 rounds pearl grey, 2 rounds grey blue, 4 rounds pearl grey, 2 rounds grey blue. STRIPES-2 (applies to rib at the bottom of hat): 4 rounds pearl grey, 2 rounds grey blue, 2 rounds pearl grey, 2 rounds grey blue. DECREASE TIP-1 (applies to mid under sleeves): Decrease 2 stitches mid under sleeve as follows: Work until 2 stitches remain before marker thread, knit 2 together, marker thread, knit 2 twisted together (= 2 stitches decreased). DECREASE TIP-2 (applies to top of hat): Decrease 1 stitch after every marker thread as follows: Slip 1 stitch knitwise, knit 1, pass slipped stitch over stitch worked (= 1 stitch decreased = 8 stitches decreased in total on round). CAST-OFF TIP: To avoid a tight cast-off edge you may use a larger needle size. If this also is too tight, work a 1 yarn over after approx. every 6th stitch while casting off (cast off yarn overs as regular stitches). ------------------------------------------------------- START THE PIECE HERE: ------------------------------------------------------- JUMPER - SHORT OVERVIEW OF THE PIECE: Double neck edge and yoke are worked in the round on circular needle, top down. Now divide yoke for body and sleeves. Body is worked in the round on circular needle, top down. Work sleeves in the round on double pointed needles/a short circular needle, top down. DOUBLE NECK EDGE: Cast on 92-96-100-108-112-116 stitches on a short circular needle size 4.5 mm with grey blue. Switch to a short circular needle size 3.5 mm, and work rib in the round (= knit 1/purl 1). When 16 rounds rib have been worked with grey blue, work 2 rounds rib with pearl grey, 2 rounds rib with grey blue, and 4 rounds rib with pearl grey. Neck edge now measures approx. 8 cm. Knit 1 round with pearl grey while increasing 20-16-12-36-48-44 stitches evenly - read INCREASE/DECREASE TIP = 112-112-112-144-160-160 stitches. Switch to circular needle size 4.5 mm. Insert a marker at the beginning of round = right shoulder at the back when garment is worn. YOKE: Insert 4 markers in piece as explained below - insert markers without working them, and use markers when increasing for raglan: Count 11-11-11-19-19-19 stitches (= sleeve), insert 1 marker in next stitch (= raglan stitch), count 43-43-43-51-59-59 stitches (= front piece), insert 1 marker in next stitch, count 11-11-11-19-19-19 stitches (= sleeve), insert 1 marker in next stitch, count 43-43-43-51-59-59 stitches (= back piece), insert 1 marker in last stitch. On next round begin pattern - AT THE SAME TIME increase for RAGLAN - read explanation above, i.e. work first round as follows: Increase 1 stitch for raglan, work A.1 (= 11-11-11-19-19-19 stitches), increase for raglan on each side of stitch with marker (always work raglan stitch with pearl grey), work A.2A (= 9 stitches), work A.2B over the next 24-24-24-32-40-40 stitches (= 3-3-3-4-5-5 repetitions of 8 stitches), work A.2C (= 10 stitches), increase for raglan on each side of raglan stitch, work A.1 (= 11-11-11-19-19-19 stitches), increase for raglan on each side of raglan stitch, work A.2A (= 9 stitches), work A.2B over the next 24-24-24-32-40-40 stitches), work A.2C (= 10 stitches), and increase for raglan before the last raglan stitches (= 8 stitches increased on round), work the last raglan stitch. Read KNITTING TIP and continue pattern like this. REMEMBER THE KNITTING TENSION! AT THE SAME TIME increase for raglan every other round 24-28-32-28-32-36 times in total. After last increase for raglan there are 304-336-368-368-416-448 stitches on needle. Continue pattern without increasing until yoke measures 21-23-25-25-27-29 cm from under neck edge mid front (measured from transition between double neck edge and yoke), and finish round after 4th raglan stitch. On next round divide yoke for body and sleeves, i.e. work next round as follows: Slip the first 60-68-76-76-84-92 stitches on 1 stitch holder for sleeve, (= stitches from sleeve + 1 raglan sleeve), cast on 4-4-4-12-12-12 new stitches on needle (= in the side under sleeve) work as before over the next 92-100-108-108-124-132 stitches (= front piece - these stitches are stitches from front piece + 1 raglan stitch), slip the next 60-68-76-76-84-92 stitches on 1 stitch holder for sleeve (= stitches from sleeve + 1 raglan stitch), cast on 4-4-4-12-12-12 new stitches on needle (= in the side under sleeve), and work as before over the next 92-100-108-108-124-132 stitches (= back piece - these stitches are stitches from back piece + 1 raglan stitch). Cut the yarn. Finish body and sleeves separately. NOW MEASURE PIECE FROM HERE! BODY: = 192-208-224-240-272-288 stitches. Begin round in the middle of the 4-4-4-12-12-12 stitches cast on under sleeve in one side of piece, and continue pattern in the round – i.e. repeat A.2B but make sure to begin on correct round in A.2B according to last round on yoke (= 24-26-28-30-34-36 repetitions of 8 stitches). Work until piece measures approx. 27 cm from division, but finish pattern after one whole or half repetition vertically. Approx. 5 cm remain until finished measurements, try the jumper on and work until desired length. Knit 1 round with pearl grey while increasing 40-44-48-50-58-60 stitches evenly - remember INCREASE TIP = 232-252-272-290-330-348 stitches. Switch to circular needle size 3.5 mm. Work rib in the round (knit 1/purl 1) in STRIPES-1 - read explanation above. When stripes has been worked, rib measures approx. 5 cm. Cast off with grey blue and knit over knit and purl over purl - read CAST-OFF TIP! Jumper measures approx. 56-58-60-62-64-66 cm from shoulder and down. SLEEVE: Slip the 60-68-76-76-84-92 stitches from stitch holder in one side of piece on double pointed needles or a short circular needle size 4.5 mm and pick in addition up 1 stitch in each of the 4-4-4-12-12-12 new stitches cast on under sleeve = 64-72-80-88-96-104 stitches. Insert 1 marker thread in the middle of the 4-4-4-12-12-12 stitches under sleeve. Move the marker thread upwards when working; it should be used for decrease mid under sleeve. Begin round at the marker thread and continue pattern in the round - i.e. repeat A.2B but make sure that pattern fits nicely over stitches on yoke and to begin on correct round in A.2B according to last round on yoke. When sleeve measures 2-2-2-3-3-3 cm from division, decrease 2 stitches mid under sleeve - read DECREASE TIP-1. Decrease like this every 9-4-2½-2-1½-1 cm 4-8-12-12-16-20 times in total = 56-56-56-64-64-64 stitches. Work until sleeve measures approx. 36-35-33-34-33-31 cm from division. Approx. 5 cm remains until finished measurements. Try the jumper on and work to desired length, but finish pattern after one whole or half repetition vertically. NOTE! Shorter measurements in the larger sizes because of wider neck and longer yoke. Knit 1 round with pearl grey while decreasing 6-4-4-10-10-8 stitches evenly = 50-52-52-54-54-56 stitches. Switch to double pointed needles size 3.5 mm. Work rib in the round (knit 1/purl 1) in STRIPES-1 the same way as on body. When stripes has been worked, rib measures approx. 5 cm. Cast off with grey blue and knit over knit and purl over purl - remember CAST-OFF TIP. Work the other sleeve the same way. ASSEMBLY: Fold rib in the neck double in towards wrong side of piece. Fasten rib but to avoid a tight neck edge and avoiding the edge to tip outwards, it is important to make the seam elastic. ------------------------------------------------------ HAT - SHORT SUMMARY OF GARMENT: Worked in the round on a short circular needle, bottom up. Switch to double pointed needles when needed. HAT: Cast on 120-124-128 stitches on a short circular needle size 3 mm with blue grey. Knit 1 round. Then work rib in the round (= knit 1/purl 1) in STRIPES-2 - read explanation above. When stripes have been worked, switch to pearl grey. Knit 1 round while at the same time decrease 16-20-16 stitches evenly- read INCREASE/DECREASE TIP = 104-104-112 stitches. Switch to a short circular needle size 3.5 mm and knit 1 round with pearl grey. Then work A.3 in the round (= 13-13-14 repetitions of 8 stitches). Continue pattern like this. REMEMBER THE KNITTING TENSION. When A.3 has been worked vertically, piece measures approx. 15 cm from cast-on edge. Work in stocking stitch with pearl grey until piece measures 19-20-20 cm from cast-on edge. Insert 8 markers in piece 13-13-14 stitches apart. On next round, decrease 1 stitch at every marker – read DECREASE TIP-2. Decrease like this every other round 11-11-12 times in total = 16 stitches remain in all sizes. Knit 1 round where all stitches are knitted together 2 by 2 = 8 stitches remain in all sizes. Cut the yarn and pull it through the remaining stitches, tighten together and fasten. Hat measures approx. 26-27-28 cm from top and down. |
||||||||||
Diagram explanations |
||||||||||
|
||||||||||
 |
||||||||||
 |
||||||||||
 |
||||||||||
Have you finished this pattern?Tag your pictures with #dropspattern #fjordmosaicsweater or submit them to the #dropsfan gallery. Do you need help with this pattern?You'll find 34 tutorial videos, a Comments/Questions area and more by visiting the pattern on garnstudio.com. © 1982-2026 DROPS Design A/S. We reserve all rights. This document, including all its sub-sections, has copyrights. Read more about what you can do with our patterns at the bottom of each pattern on our site. |
||||||||||


With over 40 years in knitting and crochet design, DROPS Design offers one of the most extensive collections of free patterns on the internet - translated to 17 languages. As of today we count 324 catalogues and 12290 patterns translated into English (UK/cm).
We work hard to bring you the best knitting and crochet have to offer, inspiration and advice as well as great quality yarns at incredible prices! Would you like to use our patterns for other than personal use? You can read what you are allowed to do in the Copyright text at the bottom of all our patterns. Happy crafting!
Post a comment to pattern DROPS 216-28
We would love to hear what you have to say about this pattern!
If you want to leave a question, please make sure you select the correct category in the form below, to speed up the answering process. Required fields are marked *.