
Popular categories
Looking for a yarn?


Comments / Questions (260)
![]() Lena wrote:
Lena wrote:
Guten Tag, vielen Dank für die schöne Anleitung. Für Menschen mit Strickerfahrung finde ich sie eindeutig und wunderbar zu stricken. Das Ergebnis ist wirklich hübsch! Ich hatte viel Freude beim Stricken.
01.04.2025 - 07:54
![]() Emma wrote:
Emma wrote:
Hej! Jag har stickat och rivit upp flera gånger men får ändå inte till det. På rad 11 får jag kvar två maskor trots att diagrammen är "klara" över ärmen. Jag misstänker att det har att göra med att det är två omslag efter varandra, kanske gör jag fel men jag har kollat på er instruktionsvideo som ni har gällande två omslag efter varandra och jag gör som där.. Saknas det någon maska i diagrammen?
20.03.2025 - 10:46DROPS Design answered:
Hej Emma. Jag är inte helt säker på vad du menar, men på varv 11 i A.3 och A.1 är det inte 2 omslag efter varandra, utan det är: omslag, avig maska, omslag. Mvh DROPS Design
21.03.2025 - 13:35
![]() Verena wrote:
Verena wrote:
Hallo nochmal, zu meiner Frage: Ich habe meinen Denkfehler gefunden. Vielen Dank
12.03.2025 - 22:23
![]() Verena wrote:
Verena wrote:
Hallo, Ich bin gerade dabei "Catch the wind" zu stricken. Dabei ist mir aufgefallen, dass nach dem stricken der Halsblende, die Aufteilung der Mascjen für die Passe nicht passt. Wenn ich für Größe L, 120 Maschen stricke komme ich auf die Aufteilung von Größe XL. Hätte ich nur 116 Maschen aufnehmen sollen? Oder soll ich die Aufteilung 20-19-41-19-21 nehmen? Vielen Dank im Voraus
12.03.2025 - 21:54DROPS Design answered:
Liebe Verena, beachten Sie, daß die Markierungsfaden jeweils in einer Masche (und nicht zwischen 2 Maschen) eingesetzt sind, so haben Sie: 19+1+19+1+39+1+19+1+20=120. Viel Spaß beim Stricken!
13.03.2025 - 15:43
![]() Marion Saurer wrote:
Marion Saurer wrote:
Leider verstehe ich nicht wieso am Beginn des Rumpfes der Faden abgeschnitten werden muss. Und 6 Maschen vor der markierten Masche wieder angefangen werden muss. Was passiert mit den Maschen des halben Rückenteils?
01.03.2025 - 16:23DROPS Design answered:
Liebe Marion Saurer, alle Maschen vom vorigen Anfang der Runden bis zu den 6. Maschen vor der markierte Maschen legen Sie auf der rechten Nadel, ohne sie zu Stricken, damit die Runden jetzt an diese neue Stelle anfangen. Viel Spaß beim Stricken!
03.03.2025 - 09:08
![]() Sijt wrote:
Sijt wrote:
Ik brei het patroon cath the wind. Brei je het telpatroon van links naar rechts?
27.02.2025 - 12:42DROPS Design answered:
Dag Sijt,
Je leest de telpatronen van rechts naar links aan de goede kant en van onder naar boven.
09.03.2025 - 13:20
![]() Marion Saurer wrote:
Marion Saurer wrote:
Hallo. Ich verstehe die Raglanzunahmen nicht. Ich versteh nicht genau wann ich wieviel Maschen zunehme. Habe jetzt überall Vor und Nach der Raglanmasche 1 Masche dazugenommen. Aber das ist zu viel. Dankeschön
19.02.2025 - 06:54DROPS Design answered:
Liebe Frau Saurer, die Raglanzunahmen für die Ärmel sind in Diagramme A.1 und A.3 gezeichnet, für Rücken und Vorderteil nehmen Sie mit 1 Umschlang vor der Masche mit dem Marker am Ende Rückenteil, nach der Masche mit dem Marker am Anfang Vorderteil, vor der Masche mit dem Marker am Ende Vorderteil und nach der Masche mit einem Marker am Anfang Rückenteil. Viel Spaß beim Stricken!
19.02.2025 - 07:52
![]() Annlaug Magerøy Aarseth wrote:
Annlaug Magerøy Aarseth wrote:
Hvordan strikker vi videre på mønster på arm etter A1 , A2 og A3 en gang, Da strikkes 2 rapporter mer av A2 , korleis strikkes det?
18.02.2025 - 23:15DROPS Design answered:
Hej Annlaug. När du börjar på ärmen så har du 19 maskor och stickar då A.1 (= 2 masker), A.2 (= 14 masker) og A.3 (= 3 masker). När diagram A.1. A.2 och A.3 har stickats 1 gång på höjden så har du 16 (A.1) + 14 (A.2) + 17 (A.3) maskor, dvs totalt 47 maskor på ärmen. Du börjar då längst ner på diagrammen och stickar: A.1 (= 2 masker), A.2 (= 14 masker), A.2 (= 14 masker), A.2 (= 14 masker) og A.3 (= 3 masker). Mvh DROPS Design
21.02.2025 - 15:18
![]() Irene Overgaard Larsen wrote:
Irene Overgaard Larsen wrote:
På billedet ser det ud til at der er ‘huller’ ved siden af A.4, men det er der ikke i mønstret. Er det en fejl? Ved udtagningerne står der at der ikke skal blive hul?
17.02.2025 - 17:29DROPS Design answered:
Hej Irene, jo det skal blive hul - se her - RAGLAN: Der tages ud til raglan i hver side af bagstykket og i hver side af forstykket (mod ærmerne). Tag ud ved at slå om før/efter masken med mærketråd, på næste omgang strikkes omslaget ret, det skal blive hul.
18.02.2025 - 14:18
![]() Marion Saurer wrote:
Marion Saurer wrote:
Bleibt die Halsblende offen oder muss ich die erste und letzte Masche zusammenstricken? Herzlichen dank
16.02.2025 - 10:03DROPS Design answered:
Liebe Frau Saurer, das Top wird von oben nach unten in der Runde gestrickt, wenn alle Maschen angeschlagen sind, wird man in Runden weiter stricken. Viel Spaß beim Stricken!
17.02.2025 - 09:32
|
|||||||||||||||||||
Catch the Wind#catchthewindtop |
|||||||||||||||||||
 |
 |
||||||||||||||||||
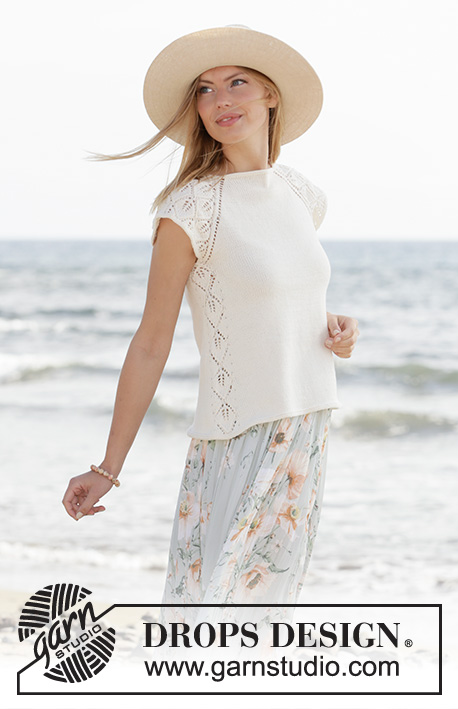
Knitted top with raglan and short sleeves in DROPS Safran. The piece is worked top down with lace pattern. Sizes XS - XXL.
DROPS 211-5 |
|||||||||||||||||||
|
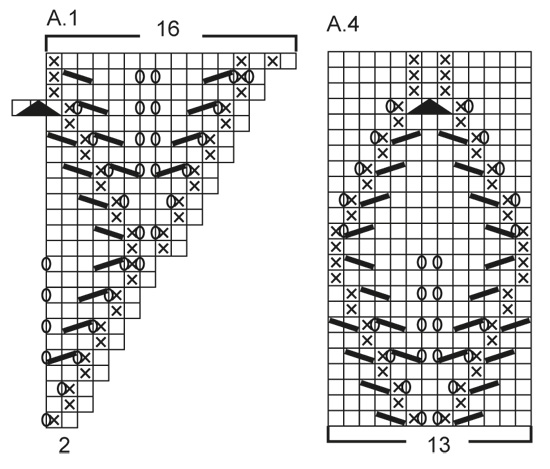
------------------------------------------------------- EXPLANATIONS FOR THE PATTERN: ------------------------------------------------------- RIDGE/GARTER STITCH (worked in the round): 1 ridge in height = 2 rounds; Knit 1 round and purl 1 round. PATTERN: See diagrams A.1 to A.4. RAGLAN: Increase to raglan on each side of the back piece and each side of the front piece (towards the sleeves). Increase by making 1 yarn over before/after the stitch with the marker thread; on the next round knit the yarn overs to leave holes. The increases on the sleeves are drawn into patterns A.1 and A.3. ------------------------------------------------------- START THE PIECE HERE: ------------------------------------------------------- TOP – SHORT OVERVIEW OF THE PIECE: The neck and yoke are worked in the round with circular needle, top down. The yoke is divided for body and sleeves and the body continued in the round. A small edge is worked around the armholes. NECK: Cast on 106-110-116-120-124-132 stitches with circular needle size 3 mm and Safran. Work 2 RIDGES – read description above. Then work the yoke as described below. YOKE: Insert 4 marker threads in the piece as described below (without working the stitches). The threads will be used when increasing to raglan. Count 16-17-18-19-20-22 stitches (= half back piece), insert 1 marker thread in the next stitch, count 19 stitches (= sleeve), insert 1 marker thread in the next stitch, count 32-34-37-39-41-45 stitches (= front piece), insert 1 marker thread in the next stitch, count 19 stitches (= sleeve), insert 1 marker thread in the next stitch. There are 16-17-19-20-21-23 stitches after the last marker thread (half back piece). The first round is worked as follows: Work stocking stitch as far as the first marker-stitch, make 1 yarn over (first increase to RAGLAN – see description above), work the marker-stitch in stocking stitch, A.1 (= 2 stitches), A.2 (= 14 stitches) and A.3 ( = 3 stitches) (= 19 stitches on the sleeve), work the marker-stitch in stocking stitch, 1 yarn over, work stocking stitch as far as the next marker-stitch (= front piece), 1 yarn over, work the marker-stitch in stocking stitch, A.1 (= 2 stitches), A.2 (= 14 stitches) and A.3 (= 3 stitches) (= 19 stitches on the sleeve), work the marker-stitch in stocking stitch, 1 yarn over, work stocking stitch over the remaining stitches (= half back piece). Continue this pattern with stocking stitch on the front and back pieces and A.1, A.2 and A.3 on the sleeves. Each time A.1, A.2 and A.3 are worked 1 time in height, you work 2 more repeats of A.2 between A.1 and A.3. REMEMBER THE KNITTING TENSION! AT THE SAME TIME continue to increase to raglan every 2nd round a total of 22-26-28-31-35-39 times at each marker thread (including the first increase described above). The new stitches are worked in stocking stitch on the front and back pieces and in lace pattern as shown in the diagrams on the sleeves. When the increases to raglan are finished there are 294-334-356-388-424-468 stitches on the needle. The next round is worked as follows: Work 39-44-47-51-56-62 stitches (= half the back piece), place the next 69-79-83-91-99-109 stitches on 1 thread for the sleeve, cast on 9-9-9-11-13-15 new stitches on the needle (= in side under sleeve), work 78-88-95-103-113-125 stitches (= front piece), place the next 69-79-83-91-99-109 stitches on 1 thread for the sleeve, cast on 9-9-9-11-13-15 new stitches on the needle (= in side under sleeve), work the last 39-44-48-52-57-63 stitches (= half back piece). Body and sleeves are finished separately. THE PIECE IS NOW MEASURED FROM HERE! BODY: = 174-194-208-228-252-280 stitches. Insert 1 marker thread in the middle of the 9-9-9-11-13-15 stitches cast on under each sleeve. Cut the strand and begin the round 6 stitches before 1 of the stitches with marker thread. Work A.4 (= 13 stitches), work 74-84-91-101-113-127 stitches in stocking stitch, work A.4 and then stocking stitch over the last 74-84-91-101-113-127 stitches. Continue this pattern, AT THE SAME TIME, when the piece measures 2 cm, increase by making 1 yarn over on each side of A.4, on the next round knit the yarn overs twisted to avoid holes (= 4 increased stitches). Repeat the increase every 1 ½ cm a total of 18 times; the increased stitches are worked in stocking stitch = 246-266-280-300-324-352 stitches. When the piece measures 28-29-29-30-29-29 cm from the division work 2 ridges over all stitches, then cast off. SLEEVE-EDGE: Place the 69-79-83-91-99-109 stitches on one of the threads on short circular needle size 3 mm and knit up 1 stitch in each of the 9-9-9-11-13-15 new stitches under the sleeve = 78-88-92-102-112-124 stitches. Work 2 ridges over all stitches, then cast off. Work the other sleeve-edge in the same way. |
|||||||||||||||||||
Diagram explanations |
|||||||||||||||||||
|
|||||||||||||||||||
 |
|||||||||||||||||||
 |
|||||||||||||||||||
 |
|||||||||||||||||||
Have you finished this pattern?Tag your pictures with #dropspattern #catchthewindtop or submit them to the #dropsfan gallery. Do you need help with this pattern?You'll find 20 tutorial videos, a Comments/Questions area and more by visiting the pattern on garnstudio.com. © 1982-2026 DROPS Design A/S. We reserve all rights. This document, including all its sub-sections, has copyrights. Read more about what you can do with our patterns at the bottom of each pattern on our site. |
|||||||||||||||||||


With over 40 years in knitting and crochet design, DROPS Design offers one of the most extensive collections of free patterns on the internet - translated to 17 languages. As of today we count 325 catalogues and 12291 patterns translated into English (UK/cm).
We work hard to bring you the best knitting and crochet have to offer, inspiration and advice as well as great quality yarns at incredible prices! Would you like to use our patterns for other than personal use? You can read what you are allowed to do in the Copyright text at the bottom of all our patterns. Happy crafting!
Post a comment to pattern DROPS 211-5
We would love to hear what you have to say about this pattern!
If you want to leave a question, please make sure you select the correct category in the form below, to speed up the answering process. Required fields are marked *.