
Popular categories
Looking for a yarn?


|
|||||||||||||||||||
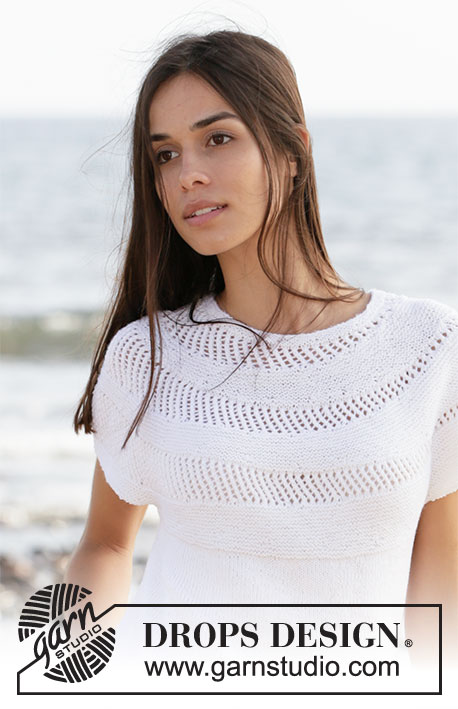
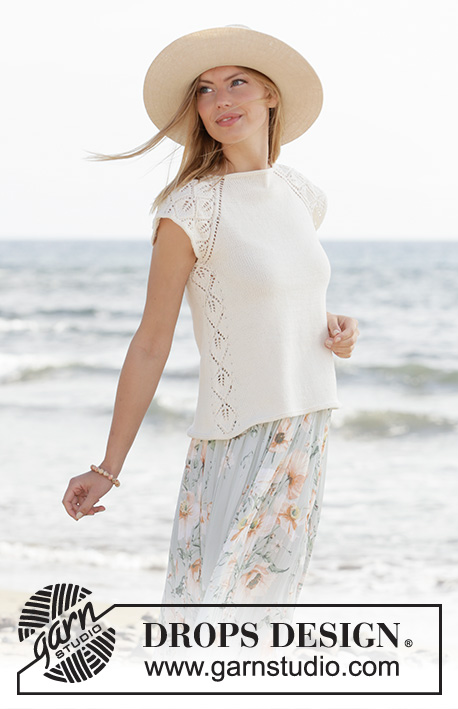
Catch the Wind |
|||||||||||||||||||
 |
 |
||||||||||||||||||
Knitted top with raglan and short sleeves in DROPS Safran. The piece is worked top down with lace pattern. Sizes XS - XXL.
DROPS 211-5 |
|||||||||||||||||||
|
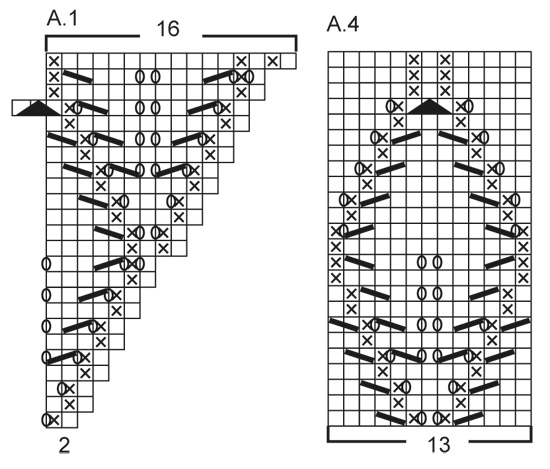
------------------------------------------------------- EXPLANATIONS FOR THE PATTERN: ------------------------------------------------------- RIDGE/GARTER STITCH (worked in the round): 1 ridge in height = 2 rounds; Knit 1 round and purl 1 round. PATTERN: See diagrams A.1 to A.4. RAGLAN: Increase to raglan on each side of the back piece and each side of the front piece (towards the sleeves). Increase by making 1 yarn over before/after the stitch with the marker thread; on the next round knit the yarn overs to leave holes. The increases on the sleeves are drawn into patterns A.1 and A.3. ------------------------------------------------------- START THE PIECE HERE: ------------------------------------------------------- TOP – SHORT OVERVIEW OF THE PIECE: The neck and yoke are worked in the round with circular needle, top down. The yoke is divided for body and sleeves and the body continued in the round. A small edge is worked around the armholes. NECK: Cast on 106-110-116-120-124-132 stitches with circular needle size 3 mm and Safran. Work 2 RIDGES – read description above. Then work the yoke as described below. YOKE: Insert 4 marker threads in the piece as described below (without working the stitches). The threads will be used when increasing to raglan. Count 16-17-18-19-20-22 stitches (= half back piece), insert 1 marker thread in the next stitch, count 19 stitches (= sleeve), insert 1 marker thread in the next stitch, count 32-34-37-39-41-45 stitches (= front piece), insert 1 marker thread in the next stitch, count 19 stitches (= sleeve), insert 1 marker thread in the next stitch. There are 16-17-19-20-21-23 stitches after the last marker thread (half back piece). The first round is worked as follows: Work stocking stitch as far as the first marker-stitch, make 1 yarn over (first increase to RAGLAN – see description above), work the marker-stitch in stocking stitch, A.1 (= 2 stitches), A.2 (= 14 stitches) and A.3 ( = 3 stitches) (= 19 stitches on the sleeve), work the marker-stitch in stocking stitch, 1 yarn over, work stocking stitch as far as the next marker-stitch (= front piece), 1 yarn over, work the marker-stitch in stocking stitch, A.1 (= 2 stitches), A.2 (= 14 stitches) and A.3 (= 3 stitches) (= 19 stitches on the sleeve), work the marker-stitch in stocking stitch, 1 yarn over, work stocking stitch over the remaining stitches (= half back piece). Continue this pattern with stocking stitch on the front and back pieces and A.1, A.2 and A.3 on the sleeves. Each time A.1, A.2 and A.3 are worked 1 time in height, you work 2 more repeats of A.2 between A.1 and A.3. REMEMBER THE KNITTING TENSION! AT THE SAME TIME continue to increase to raglan every 2nd round a total of 22-26-28-31-35-39 times at each marker thread (including the first increase described above). The new stitches are worked in stocking stitch on the front and back pieces and in lace pattern as shown in the diagrams on the sleeves. When the increases to raglan are finished there are 294-334-356-388-424-468 stitches on the needle. The next round is worked as follows: Work 39-44-47-51-56-62 stitches (= half the back piece), place the next 69-79-83-91-99-109 stitches on 1 thread for the sleeve, cast on 9-9-9-11-13-15 new stitches on the needle (= in side under sleeve), work 78-88-95-103-113-125 stitches (= front piece), place the next 69-79-83-91-99-109 stitches on 1 thread for the sleeve, cast on 9-9-9-11-13-15 new stitches on the needle (= in side under sleeve), work the last 39-44-48-52-57-63 stitches (= half back piece). Body and sleeves are finished separately. THE PIECE IS NOW MEASURED FROM HERE! BODY: = 174-194-208-228-252-280 stitches. Insert 1 marker thread in the middle of the 9-9-9-11-13-15 stitches cast on under each sleeve. Cut the strand and begin the round 6 stitches before 1 of the stitches with marker thread. Work A.4 (= 13 stitches), work 74-84-91-101-113-127 stitches in stocking stitch, work A.4 and then stocking stitch over the last 74-84-91-101-113-127 stitches. Continue this pattern, AT THE SAME TIME, when the piece measures 2 cm, increase by making 1 yarn over on each side of A.4, on the next round knit the yarn overs twisted to avoid holes (= 4 increased stitches). Repeat the increase every 1 ½ cm a total of 18 times; the increased stitches are worked in stocking stitch = 246-266-280-300-324-352 stitches. When the piece measures 28-29-29-30-29-29 cm from the division work 2 ridges over all stitches, then cast off. SLEEVE-EDGE: Place the 69-79-83-91-99-109 stitches on one of the threads on short circular needle size 3 mm and knit up 1 stitch in each of the 9-9-9-11-13-15 new stitches under the sleeve = 78-88-92-102-112-124 stitches. Work 2 ridges over all stitches, then cast off. Work the other sleeve-edge in the same way. |
|||||||||||||||||||
Diagram explanations |
|||||||||||||||||||
|
|||||||||||||||||||

|
|||||||||||||||||||
|
|||||||||||||||||||

|
|||||||||||||||||||
|
Have you made this or any other of our designs? Tag your pictures in social media with #dropsdesign so we can see them! Do you need help with this pattern?You'll find tutorial videos, a Comments/Questions area and more by visiting the pattern on garnstudio.com. © 1982-2024 DROPS Design A/S. We reserve all rights. This document, including all its sub-sections, has copyrights. Read more about what you can do with our patterns at the bottom of each pattern on our site. |
|||||||||||||||||||


With over 40 years in knitting and crochet design, DROPS Design offers one of the most extensive collections of free patterns on the internet - translated to 17 languages. As of today we count 304 catalogues and 11422 patterns - 11422 of which are translated into English (UK/cm).
We work hard to bring you the best knitting and crochet have to offer, inspiration and advice as well as great quality yarns at incredible prices! Would you like to use our patterns for other than personal use? You can read what you are allowed to do in the Copyright text at the bottom of all our patterns. Happy crafting!
Comments / Questions (156)
Hi, habe die 4 zugenommen Umschläge rechts verschränkt gestrickt. Werden die anderen zugenommenen Umschschläge ( aller 1,5 cm ) auch verschränkt gestrickt oder nur einfach rechts gestrickt,so daß Löcher entstehen sollen? Dankeschön für die Hilfe.
03.06.2021 - 21:09DROPS Design answered:
Liebe Mia, die Umschläge/Zunahmen beidseitig von den beiden A.4 beim Rumfpteil werden bei der nächsten Runde rechts verschränkt gestrickt, diese müssen kein Loch bilden. Viel Spaß beim stricken!
04.06.2021 - 07:06Hi, ich befinde mich nun beim Rumpfteil.Habe Markirungen in der mittleren Masche unter dem Arm angebracht. Warum muss ich den Faden abschneiden? Somit würden die 47 Maschen ( mit Abzug einiger Maschen für die mittleren markierten M unter dem Arm sind es 45 Maschen ) vom anderen Rückenteil (Anfang der Runde) eine Runde ungestrickt bleiben,Oder werden die M vom ersten halben Rückenteil ( Anfang ) abgestrickt und der Rundenanfang verschiebt sich zu den 6 abgezählten M unter dem Arm? Danke.
03.06.2021 - 07:41DROPS Design answered:
Liebe Mia, nach der Verteilung wird der Faden abgeschnitten, damit die Runden 6 Maschen vor der Markierung beginnen: A.4 wird über die nächsten 13 Maschen gestrickt (= 6 M vor der Markierung + Markierung + 6 M nach der Markierung an einer Seite). Viel Spaß beim stricken!
03.06.2021 - 08:32Hi, bei der Beschreibung für die Passe,die erste Runde, ist am Ende nicht das Rückenteil gemeint? Da ja 2x das "Vorderteil" in der Beschreibung vorkommt.
26.05.2021 - 08:29DROPS Design answered:
Liebe Mia, Sie sind ja recht, danke für den Hinweis, eine Korrektur erfolgt. Viel Spaß beim stricken!
26.05.2021 - 10:35Your answers to my other two questions have been very helpful! thanks so much. My other question is: in this pattern it states to "Insert 4 marker threads in next stitch". I have added stitch markers between stitches and have performed a function 'after marker' or 'before marker'. What is the difference with this instruction? why not just knit after the marker in the next stitch? do I have to move this marker each row after knitting that stitch? Thanks so much for your quick response.
23.05.2021 - 22:45DROPS Design answered:
Dear Sheila, "insert marker in stitch" means that the marker should be put IN a stitch and not between two stitches, Increases for raglan should be done before and after this stitch, the marked stitch will stay (it will help if you move the marker, as your piece grows. Happy Knitting!
24.05.2021 - 03:28What does WORKED 1 TIME IN HEIGHT mean?
16.05.2021 - 23:56DROPS Design answered:
Dear Mrs Kaupa, this means when all rows in diagrams are done, ie A.1, A.2 and A.3 = 24 rows. After these 24 rows are worked, repeat them as explained in pattern/previous answer. Hope this will help. Happy knitting!
17.05.2021 - 09:51I am trying to knit the Catch The Wind top. When I look at the diagram it looks as if the yoke portion of the pattern with the sleeve and front/back increases are done using 24 rounds (number of lines on the diagram). But this will not get me to the correct number of increases as the back/front must increase by 28 and each sleeve by 63. I'm confused on how to get these increases correctly.
16.05.2021 - 23:39DROPS Design answered:
Dear Mrs Kaupa, when you will have worked diagrams A.1, A.2 and A.3 one time in height, repeat them as follows: A.1 over the first 2 sts from previous A.1, repeat A.2 until 3 sts from previous A.3 remains (= you will have now enough stitches to repeat A.2 2 more times in width) and work A.3 over these 3 sts. That way you continue the lace pattern and increases for the raglan. Happy knitting!
17.05.2021 - 09:50Nella riga 11 sono corretti i gettati? In A1 l'ultimo e il primo di A3, danno due maglie in più nella 12' riga, che non fa combaciare i rovesci uno sull'altro come dovrebbe essere. Ho risolto facendo due maglie insieme nella 12 riga. E in effetti così il motivo funziona e il raglan non è sfalsato. (ho ricominciato la seconda volta, la prima, arrivata alla fine del motivo, il raglan era sfalsato).
04.05.2021 - 09:37Una duda, no se que tengo que hacer con la siguiente indicación: “continuar a aumentar para el reglan a cada 2a vuelta un total de X veces en cada marcador”. Significa que cada 2a vuelta se teje toda del derecho y en la siguiente se sigue con el diagrama?? Muchas gracias!
04.05.2021 - 00:33DROPS Design answered:
Hola Marta, Se trabaja siempre según el diagrama. El delantero y la espalda se trabajan en punto jersey y las mangas en punto de calados.
09.05.2021 - 20:12Hi, my first attempt at lacework so apologies if this is a dumb question, but when the pattern says “Each time A.1, A.2 and A.3 are worked 1 time in height, you work 2 more repeats of A.2 between A.1 and A.3“ does that mean twice on each sleeve or once on each side? Thanks all you expert knitters!
12.04.2021 - 12:21DROPS Design answered:
Dear Fenella, this applies on both sleeves, when diagrams are done in height , you have increased enough sts to work 2 more repeats in A.2, ie over the 16 sts previous A.1 work: 2 sts new A.1 in height + A.2 (=14sts); repeat A.2 as before and over the 17 sts previous A.3 work a new reapeat of A.2 (=14 sts)+ a new A.3 (=3 sts). Happy knitting!
12.04.2021 - 13:01Hvilken maske skal strikkes i diagrammet når der er X ? Mangler forklaring. Rubrik uden kryds skal være ret - hvordan ser vrang og 2 ret sammen ud
16.03.2021 - 21:59DROPS Design answered:
Hej Joan, du finder diagrammet og forklaring til symbolerne nederst i opskriften. God fornøjelse!
17.03.2021 - 14:57