
Popular categories
Looking for a yarn?


Comments / Questions (177)
![]() Miranda wrote:
Miranda wrote:
Hello! I have a questions about casting off the armholes. "cast off for the armholes at the beginning of each row on each side: Cast off 4-5-6-7-8-9 sts 1 time, 2 sts 0-1-2-3-4-6 times and 1 stitch 2-2-2-3-5-5 times = 68-70-72-74-76-78 sts." In this instruction, I read that for a size SM, you cast off 4 sts 1 time, then 1 st 2 times. Since I'm starting with 80 sts, That leaves me with 74 sts, but the patterns says I should have 68 at the end?
04.02.2023 - 16:34DROPS Design answered:
Dear Miranda, you need to cast off once or twice on each side. So cast off 4 stitches once on one side and 4 stitches on the other side. Then, cast off 1 stitch on each side twice (so, cast off 4 more stitches). 4+4+4 = 12 cast-off stitches. 80-12 = 68 stitches. Happy knitting!
06.02.2023 - 00:14
![]() Miranda wrote:
Miranda wrote:
Hello! I have a question about casting off the armholes. "cast off for the armholes at the beginning of each row on each side: Cast off 4-5-6-7-8-9 sts 1 time, 2 sts 0-1-2-3-4-6 times and 1 stitch 2-2-2-3-5-5 times = 68-70-72-74-76-78 sts." In this instruction, I read that for a size SM, you cast off 4 sts 1 time, then 1 st 2 times. Since I'm starting with 80 sts, That leaves me with 74 sts, but the patterns says I should have 68 at the end?
04.02.2023 - 16:34DROPS Design answered:
Dear Miranda, you need to cast off once or twice on each side. So cast off 4 stitches once on one side and 4 stitches on the other side. Then, cast off 1 stitch on each side twice (so, cast off 4 more stitches). 4+4+4 = 12 cast-off stitches. 80-12 = 68 stitches. Happy knitting!
06.02.2023 - 00:14
![]() Hanne Estdahl wrote:
Hanne Estdahl wrote:
Må op pind 5 1/2 for at strikkefastheden passer , og 150 g garn ( drops sky ) er bestemt heller ikke nok , strikker en str medium . Er ret træls at få sådan en opskrift der åbenbart ikke er afprøvet , skulle bruge vesten til julegave og er ikke sikker på jeg nu kan få samme indfarvning , surt .
17.12.2022 - 17:33DROPS Design answered:
Hej Hanne, Det er individuelt hvilken pind som skal bruges for at få strikkefastheden som står i opskriften. I denne opskrift er det vigtigt at du får 20 masker i bredden og 26 pinde i højden på 10x10 cm, overholder du strikkefastheden vil det også være nok garn :)
20.12.2022 - 08:33
![]() Tanja wrote:
Tanja wrote:
Den strikkefasthed, der angives i opskriften - er det på pind 4,5 eller 3,5 ? Jeg har købt soft tweed
04.12.2022 - 22:54DROPS Design answered:
Hei Tanja. Strikkefastheten som oppgis er med den pinnen selve plagget strikkes med, ikke vrangbord. I denne vesten er det DROPS RUNDPINNER NR 4,5, men husk pinne nr er kun veiledende. Får du for mange masker på 10 cm, bytt til tykkere pinner. Får du for få masker på 10 cm, bytt til tynnere pinner. mvh DROPS Design
05.12.2022 - 14:14
![]() Marita Weslien wrote:
Marita Weslien wrote:
Hej, jag har stickat mycket och aldrig haft problem med stickfastigheten. Detta mönster med 20m på 10 cm kan du inte nå på stickor 4,5 slätstickning. Då måste man sticka oerhört löst. Jag vill att ni kontrollerar och ändrar i mönstret. Ser att flera i kommentarsfältet också tar upp detta problem.
02.11.2022 - 20:01
![]() Melanie Proudlock wrote:
Melanie Proudlock wrote:
I did keep the tension correct but only by using larger needles, had to use 5.5 mm instead of 4.5 mm
15.10.2022 - 09:32
![]() Melanie Proudlock wrote:
Melanie Proudlock wrote:
I bought 150 grams of the Sky yarn to make the Medium size vest but found I had to increase the size of the needles and make a bigger size to get the correct dimensions. I now find I have insufficient yarn to finish the piece and the dye lot is out of stock. Very disappointed as I loved the look of the vest
14.10.2022 - 10:42DROPS Design answered:
Dear Mrs Proudlock, sorry to hear that ; did you get and keep the correct tension in width as well as in height? Read more about tension here. Happy knitting!
14.10.2022 - 13:24
![]() Catharina wrote:
Catharina wrote:
De Soft Tweed staat er als alternatief bij, maar hiervan lijken minder bollen nodig te zijn terwijl er minder meters op een bol zitten. Een klant van ons had hierdoor te weinig. Kun je hiernaar kijken?
20.09.2022 - 10:26DROPS Design answered:
Dag Catharina,
Dank voor het doorgeven! Er was inderdaad te weinig garen aangegeven voor de Soft Tweed en het is nu aangepast.
21.09.2022 - 19:37
![]() Bittan wrote:
Bittan wrote:
Varför maskar man av vid halsen på bakstycket, men sätter maskorna på en tråd på framstycket?
20.02.2022 - 12:59
![]() Lynn wrote:
Lynn wrote:
After binding off 32 stitches on the next row it says bind off 1 stitch from the neck. I’m interrupting that as next row bind off 1st stitch and continue for 20 stitches then knit next 20 stitches and bind off last stitch. Then continue on both shoulders until it measures 9” from the armhole. You mentioned not the break the yarn. Please advise. Thank you again for all of your help.
15.02.2022 - 22:16DROPS Design answered:
Dear Lynn, after you have bind off the middle stitch for neck, you continue each shoulder separately. If you worked this row from RS, now turn and work the next row from WS (left shoulder on back piece), turn and at the beginning of next row from RS cast off 1 stitch for neck. Now continue back and forth over the shoulder to the finsihed measurements. Cut the yarn and work now the other shoulder casting off 1 stitch at the beginning of the first row from WS (= from neck towards shoulder). Happy knitting!
16.02.2022 - 11:03
|
|
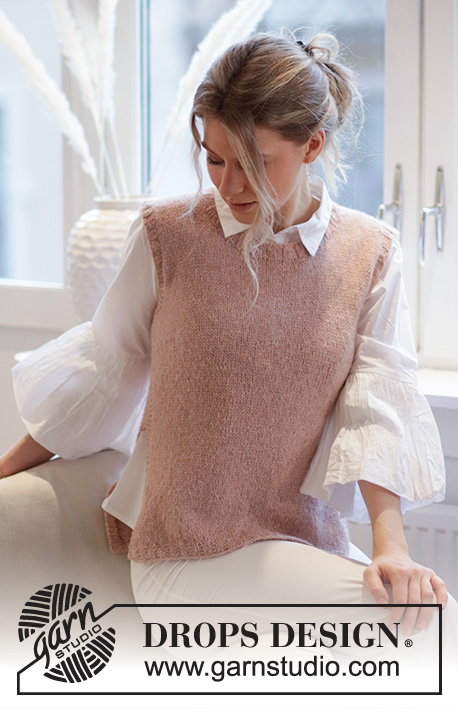
Rose Blush#roseblushvest |
|
 |
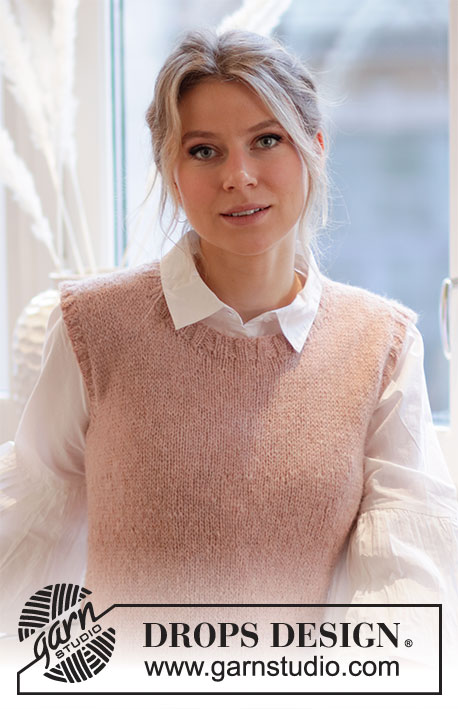 |
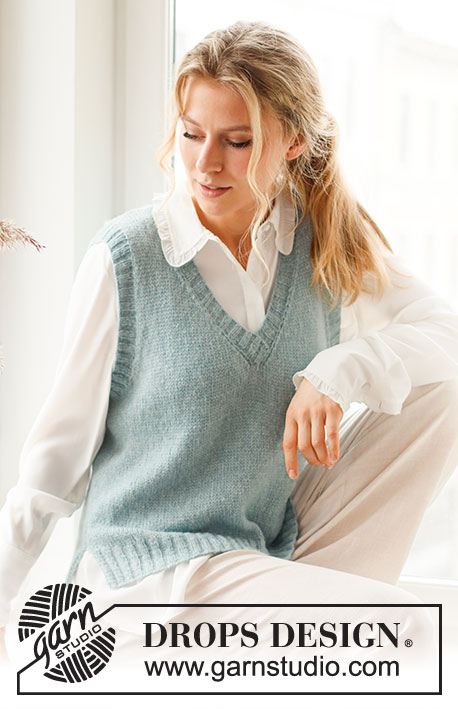
Knitted vest / slipover in DROPS Sky or DROPS Soft Tweed. The piece is worked with ribbed edging and a split in the sides. Sizes S - XXXL.
DROPS 212-44 |
|
|
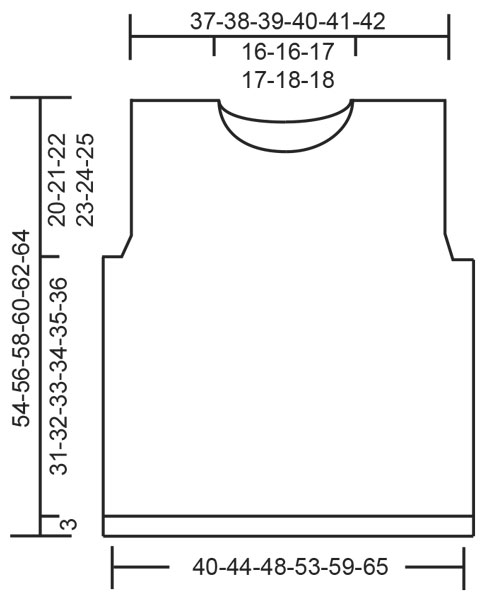
------------------------------------------------------- EXPLANATIONS FOR THE PATTERN: ------------------------------------------------------- RIDGE/GARTER STITCH (worked back and forth): Knit all rows. 1 ridge in height = Knit 2 rows. DECREASE TIP (evenly spaced): To work out how to decrease evenly, count the total number of stitches on needle (e.g. 88 stitches) minus the edge stitches (e.g. 10 stitches) and divide the remaining stitches by number of decreases to be made (e.g. 8) = 9.8. In this example decrease by knitting approx. each 9th and 10th stitch together (do not decrease over the edge stitches). ------------------------------------------------------- START THE PIECE HERE: ------------------------------------------------------- VEST – SHORT OVERVIEW OF THE PIECE: The piece is worked back and forth in sections and sewn together to finish. Stitches are knitted up for the ribbed edges around the armholes and neck. BACK PIECE: Cast on 88-96-104-116-128-144 stitches with circular needle size 3.5 mm and Sky. Purl 1 row (= wrong side). The next row is worked as follows from the right side: 5 edge stitches in GARTER STITCH – read description above, * 2 stitches in stocking stitch , 2 stitches in garter stitch *, work from *-* until there are 7 stitches left, 2 stitches in stocking stitch and finish with 5 edge stitches in garter stitch. Continue like this for 3 cm. Now knit 1 row from the right side, where you decrease 8-8-8-10-10-14 stitches evenly spaced – read DECREASE TIP = 80-88-96-106-118-130 stitches. Purl 1 row from the wrong side. Change to circular needle size 4.5 mm. Work stocking stitch back and forth with 5 edge stitches in garter stitch on each side. REMEMBER THE KNITTING TENSION! When the piece measures 34-35-36-37-38-39 cm, cast off for the armholes at the beginning of each row on each side as follows: Cast off 4-5-6-7-8-9 stitches 1 time, 2 stitches 0-1-2-3-4-6 times and 1 stitch 2-2-2-3-5-5 times = 68-70-72-74-76-78 stitches. Continue back and forth with stocking stitch and 1 edge stitch in garter stitch on each side. When the piece measures 50-52-54-56-58-60 cm, cast off the middle 30-30-32-32-34-34 stitches for the neck and each shoulder is finished separately. Continue by casting off 1 stitch on the next row from the neck = 18-19-19-20-20-21 stitches left on the shoulder. Continue with stocking stitch and 1 edge stitch in garter stitch on each side until the piece measures 20-21-22-23-24-25 cm from where stitches were first cast off for the armhole. Cast off with knit (make sure the cast-off edge is not tight). The piece measures a total of 54-56-58-60-62-64 cm from the shoulder down. Work the other shoulder in the same way. FRONT PIECE: Cast on 88-96-104-116-128-144 stitches with circular needle size 3.5 mm and Sky. Purl 1 row (= wrong side). The next row is worked as follows from the right side: 5 edge stitches in garter stitch – read description above, * 2 stitches in stocking stitch, 2 stitches in garter stitch *, work from *-* until there are 7 stitches left, 2 stitches in stocking stitch and finish with 5 edge stitches in garter stitch. Continue like this for 3 cm. Now knit 1 row from the right side, where you decrease 8-8-8-10-10-14 stitches evenly spaced = 80-88-96-106-118-130 stitches. Purl 1 row from the wrong side. Change to circular needle size 4.5 mm. Work stocking stitch back and forth with 5 edge stitches in garter stitch on each side. REMEMBER THE KNITTING TENSION When the piece measures 34-35-36-37-38-39 cm, cast off for the armholes at the beginning of each row on each side as follows: Cast off 4-5-6-7-8-9 stitches 1 time, 2 stitches 0-1-2-3-4-6 times and 1 stitch 2-2-2-3-5-5 times = 68-70-72-74-76-78 stitches. Continue with stocking stitch and 1 edge stitch in garter stitch on each side until the piece measures 44-46-47-49-50-52 cm, then place the middle 16-16-18-18-18-18 stitches on 1 thread for the neck and each shoulder is finished separately. Continue by casting off on each row from the neck as follows: Cast off 3 stitches 1 time, 2 stitches 2 times and 1 stitch 1-1-1-1-2-2 times = 18-19-19-20-20-21 stitches left on the shoulder. Continue with stocking stitch and 1 edge stitch in garter stitch on each side until the piece measures 20-21-22-23-24-25 cm from where stitches were first cast off for the armhole. Cast off with knit (make sure the cast-off edge is not tight). The piece measures a total of 54-56-58-60-62-64 cm from the shoulder down. Work the other shoulder in the same way. ASSEMBLY: Sew the shoulder seams with grafting stitches inside the cast-off edge. Start under the sleeve and sew the side seam in the outermost loop of the outermost stitch so the seam is flat – leave approx. 18 cm for the split. Repeat on the other side. NECK: Start from the right side at the one shoulder seam and knit up with short circular needle size 3.5 mm approx. 100 to 120 stitches (including the 16-16-18-18-18-18 stitches on the thread) inside the 1 stitch around the whole neck (number of stitches must be divisible by 4). Work rib (= knit 2/ purl 2) in the round for 2½-3 cm. Cast off with knit over knit and purl over purl. EDGE AROUND ARMHOLES: Start from the right side at the side seam under the sleeve and knit up with short circular needle size 3.5 mm approx. 96 to 120 stitches around the armhole (number of stitches must be divisible by 4). Work rib (= knit 2/ purl 2) in the round for 2 cm. Cast off with knit over knit and purl over purl. Work the other edge around armhole in the same way. |
|
 |
|
Have you finished this pattern?Tag your pictures with #dropspattern #roseblushvest or submit them to the #dropsfan gallery. Do you need help with this pattern?You'll find 25 tutorial videos, a Comments/Questions area and more by visiting the pattern on garnstudio.com. © 1982-2026 DROPS Design A/S. We reserve all rights. This document, including all its sub-sections, has copyrights. Read more about what you can do with our patterns at the bottom of each pattern on our site. |
|


With over 40 years in knitting and crochet design, DROPS Design offers one of the most extensive collections of free patterns on the internet - translated to 17 languages. As of today we count 324 catalogues and 12290 patterns translated into English (UK/cm).
We work hard to bring you the best knitting and crochet have to offer, inspiration and advice as well as great quality yarns at incredible prices! Would you like to use our patterns for other than personal use? You can read what you are allowed to do in the Copyright text at the bottom of all our patterns. Happy crafting!
Post a comment to pattern DROPS 212-44
We would love to hear what you have to say about this pattern!
If you want to leave a question, please make sure you select the correct category in the form below, to speed up the answering process. Required fields are marked *.