
Popular categories
Looking for a yarn?


|
|
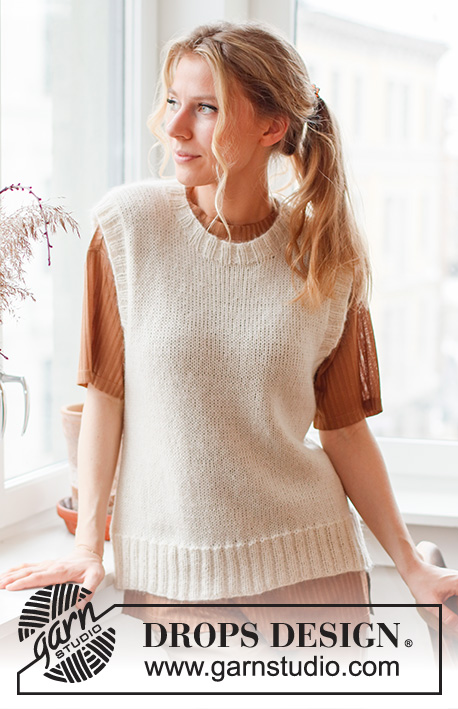
Abby Vest |
|
 |
 |
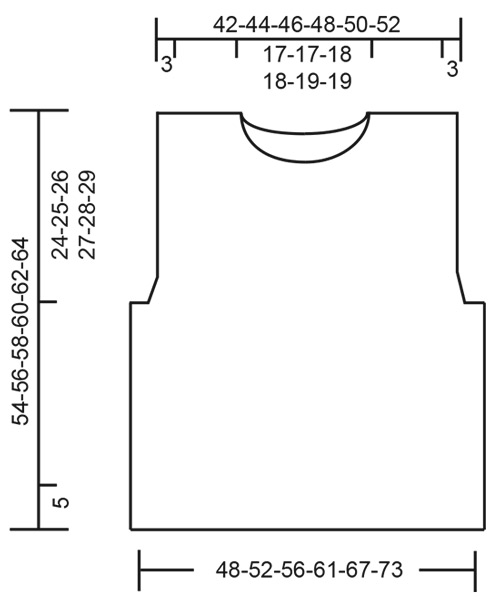
Knitted vest / slipover in DROPS Flora. The piece is worked in stocking stitch with ribbed edges. Sizes S - XXXL.
DROPS 220-42 |
|
|
------------------------------------------------------- EXPLANATIONS FOR THE PATTERN: ------------------------------------------------------- DECREASE TIP (evenly spaced): To work out how to decrease evenly, count the total number of stitches on the needle (e.g. 280 stitches) and divide by the number of decreases to be made (e.g. 48) = 5.8. In this example, decrease by knitting together approx. each 5th and 6th stitch. DECREASE TIP-2 (for armholes and neck): Decrease on the inside of 2 stitches. All decreases are worked from the right side. Decrease as follows at the beginning of the row: Knit 2, slip 1 stitch as if to knit, knit 1 and pass the slipped stitch over the knitted stitch. Decrease as follows at the end of the row: Work until there are 4 stitches left, knit 2 together and knit the last 2 stitches. ------------------------------------------------------- START THE PIECE HERE: ------------------------------------------------------- VEST – SHORT OVERVIEW OF THE PIECE: The piece is worked in the round with circular needle, bottom up as far as the armholes. Then the front and back pieces are finished separately, back and forth. The neck and armhole edges are worked in the round to finish. BODY: Cast on 280-300-324-352-384-424 stitches with circular needle size 2.5 mm and Flora. Knit 1 round. Work rib (knit 2, purl 2) for 5 cm. Change to circular needle size 3 mm and work stocking stitch, decreasing 48-52-56-60-64-72 stitches evenly spaced on the first round = 232-248-268-292-320-352 stitches – read DECREASE TIP in explanations above. Insert 1 marker at the beginning of the round and 1 marker after the next 116-124-134-146-160-176 stitches. Allow the markers to follow your work onwards; they are used when casting off for the armholes. Work stocking stitch until the piece measures 30-31-32-33-34-35 cm from the cast-on edge. REMEMBER THE KNITTING TENSION! On the next round cast off for the armholes, starting 3 stitches before the first marker. Cast off 6 stitches (the marker sits in the middle of these 6 stitches), work until there are 3 stitches left before the second marker, cast off the next 6 stitches (the marker sits in the middle of these 6 stitches) and work to the end of the round. The front and back pieces are now finished separately. FRONT PIECE: = 110-118-128-140-154-170 stitches. Work stocking stitch back and forth and cast off for both armholes at the beginning of every row as follows: Cast off 2 stitches 2-2-2-3-3-3 times on each side. Now continue to decrease inside 2 stitches, decreasing 1 stitch on each side 8-9-12-14-18-24 times – read DECREASE TIP-2 = 86-92-96-100-106-110 stitches. Continue with stocking stitch. When the piece measures 45-47-48-50-51-53 cm, place the middle 22-22-26-26-28-28 stitches on a thread for the neck and each shoulder is finished separately. Continue casting off on each row from the neck as follows: 2 stitches 3 times. Then decrease inside 2 stitches, decreasing 1 stitch 3 times – remember DECREASE TIP-2 = 23-26-26-28-30-32 stitches on the shoulder. Continue with stocking stitch until the piece measures 54-56-58-60-62-64 cm (24-25-26-27-28-29 cm from the bottom of the armhole). Cast off with knit from the right side (making sure the cast-off edge is not tight). Work the other shoulder in the same way. BACK PIECE: = 110-118-128-140-154-170 stitches. Work stocking stitch back and forth and cast off for both armholes at the beginning of every row as follows: Cast off 2 stitches 2-2-2-3-3-3 times on each side. Now continue to decrease inside 2 stitches, decreasing 1 stitch on each side 8-9-12-14-18-24 times = 86-92-96-100-106-110 stitches. Continue with stocking stitch. When the piece measures 52-54-56-58-60-62 cm, cast off the middle 38-38-42-42-44-44 stitches for the neck and each shoulder is finished separately. Then cast off 1 stitch on the next row from the neck = 23-26-26-28-30-32 stitches on the shoulder. Continue with stocking stitch until the piece measures 54-56-58-60-62-64 cm (24-25-26-27-28-29 cm from the bottom of the armhole). Cast off with knit from the right side (making sure the cast-off edge is not tight). Work the other shoulder in the same way. ASSEMBLY: Sew the shoulder seams. NECK: Start from the right side, at one of the shoulder seams. Using short circular needle size 2.5 mm, knit up 124 to 140 stitches (including the 22-22-26-26-28-28 stitches from the thread) inside 1 stitch around the neck opening (number of stitches must be divisible by 4). Work rib in the round (knit 2, purl 2) for 3 cm. Cast off with knit over knit and purl over purl. ARMHOLE-EDGE: Start from the right side, by the side seam under the armhole. Using short circular needle size 2.5 mm, knit up 140 to 168 stitches around the armhole (number of stitches must be divisible by 4). Work rib in the round (knit 2, purl 2) for 3 cm. Cast off with knit over knit and purl over purl. Work the other armhole in the same way. |
|
|
|
|
Have you made this or any other of our designs? Tag your pictures in social media with #dropsdesign so we can see them! Do you need help with this pattern?You'll find tutorial videos, a Comments/Questions area and more by visiting the pattern on garnstudio.com. © 1982-2024 DROPS Design A/S. We reserve all rights. This document, including all its sub-sections, has copyrights. Read more about what you can do with our patterns at the bottom of each pattern on our site. |
|


With over 40 years in knitting and crochet design, DROPS Design offers one of the most extensive collections of free patterns on the internet - translated to 17 languages. As of today we count 304 catalogues and 11422 patterns - 11422 of which are translated into English (UK/cm).
We work hard to bring you the best knitting and crochet have to offer, inspiration and advice as well as great quality yarns at incredible prices! Would you like to use our patterns for other than personal use? You can read what you are allowed to do in the Copyright text at the bottom of all our patterns. Happy crafting!
Comments / Questions (12)
How much yarn is required for this pattern?
06.03.2024 - 14:58DROPS Design answered:
Dear Tammy, you will find the total amount of yarn required for each size in the header; so that ou will need in size S for example: 200 g DROPS Flora/50 g a ball =4 balls. Happy knitting!
06.03.2024 - 16:28Jeg strikker på pind 3,5 for at strikkeprøven passer men jeg får kun 40 cm i bredden i stedet for 48 cm i str. S - der kan vel ikke være fejl i opskrift eller målskema. Jeg har købt Flora Beige Mix hos YarnLiving, men de kan ikke hjælpe med opskriften. Og jeg har købt 4 nøgler men nu kommer jeg jo så nok til at mangle 2 - og jeg kan ikke være sikker på at få samme parti...
20.09.2023 - 20:49DROPS Design answered:
Hej Laila, du har 232 masker deler med 24m(på 10 cm) = 96 cm (omkreds) deler med 2 = 48 cm.
26.09.2023 - 15:17What does it mean that you "work back and forth" ?
09.09.2022 - 16:07DROPS Design answered:
Dear Nikol, this means that you work back and forth in straight rows, i.e. you do not join the row in the round (circle), but work right side (RS) and wrong side (WS). Happy knitting!
10.09.2022 - 16:12Per favore potrei avere le spiegazioni per fare il Modello n° fl-064 con i ferri diritti e non circolari? Grazie Maria Carla Minelli
25.04.2022 - 08:10DROPS Design answered:
Buongiorno Maria Carla, può lavorare il modello in piano aggiungendo 1 maglia di vivagno per lato per la cucitura. Buon lavoro!
25.04.2022 - 13:20Hvad er jeres målskema for str. s-m-ll osv.. På forhånd tak.
04.03.2022 - 09:26DROPS Design answered:
Hei Maja. Du finner målskisse til hver plagg nederst på siden. mvh DROPS Design
07.03.2022 - 14:25Hvem er jeg
01.11.2021 - 07:07Hva heter jeg
01.11.2021 - 07:06Am now doing the armholes of this sweater. What tur of decreased should be used here? Would like a nice professional look instead of a homemade look. S
10.10.2021 - 17:44DROPS Design answered:
Dear Sharon, you can find the suggested decreases at the beginning of the pattern, under "explanations for the pattern". Happy Stitching!
10.10.2021 - 22:09Hei, hvor bestiller jeg denne strikkepakken?
28.09.2021 - 16:04Hej igen Forstår ikke. Strikkefasthed i opskrift 24×32 Men det garn jeg har siger 22× 28 Så kan ikke få strikkefasthed til at passe. Skal jeg så en strikkepind op? Mvh Lilli
21.05.2021 - 08:53DROPS Design answered:
Hej Lilli, for at få målene i opskriften skal du have samme strikkefasthed som der står i opskriften (24 masker på 10 cm). Hvis du har for få masker på 10 cm, så skal du prøve med en tyndere strikkepind. Det letteste er at bruge det garn som står i opskriften :)
21.05.2021 - 10:16