
Popular categories
Looking for a yarn?


Comments / Questions (121)
![]() Tina Hjørne wrote:
Tina Hjørne wrote:
Jeg vil gerne strikke i Drops Wish. Hvordan beregner jeg forbrug? Er det 1:1 i forhold til trådlængde?
01.06.2021 - 09:20DROPS Design answered:
Hej Tina, Prøv vores garnomregner. Vælg DROPS Air, vælg antal gram i din størrelse, vælg 2 tråde, så får du alternativ op i 1 tråd DROPS Wish :)
01.06.2021 - 12:06
![]() Regina Aus Hamburg wrote:
Regina Aus Hamburg wrote:
Moin, ihr Lieben, ich würde gerne ein pattern finden, das hinten am Nacken länger ist und vorne eben kürzer, damit es einen hübschen Ausschnitt gibt und kein Gewürge am Hals und dabei einen freien Nacken. Ich meine, mal irgendwo so etwas gelesen zu haben vor langer Zeit, leider hab ich es mir nicht gemerkt. Habt ihr eine Idee? Ich habe viele Farben und suchen einen Ringelpullover von oben nach unten zu stricken. Liebe Grüße Regina
15.05.2021 - 16:25DROPS Design answered:
Liebe Regina, dann können Sie einige verkürzten Reihen für den Halsausschnitt stricken, wie beim diesem Modell zum Beispiel. Viel Spaß beim stricken!
17.05.2021 - 09:00
![]() Elin Hirmoen wrote:
Elin Hirmoen wrote:
Hvordan får jeg bestilt alternativ B (happy stripes)
25.02.2021 - 19:39DROPS Design answered:
Hej Elin, du ser hvilke farver der er brugt i garnalternativ B lige under pindene. Klik på Beställ og bestil de farver i den kombination du synes om :)
26.02.2021 - 07:54
![]() Happy Stripes wrote:
Happy Stripes wrote:
I have been working this pattern ,have got to the division where it says work 25cm then change to smaller size needles ,given a side seam of 25cm looking at picture on pattern it does not match the number of stripes and not long enough ,
21.02.2021 - 10:51DROPS Design answered:
Hi, this might depends on your tension in height, feel free to adjust the length if required - you will find all finished measurements in the chart at the bottom of the pattern, check out with a similar garment you have and like the shape and/or try out the jumper and knit to the required length. Happy knitting!
22.02.2021 - 08:42
![]() Mia Eriksen wrote:
Mia Eriksen wrote:
Kan man strikke denne med 1 tråd, så den ikke bliver så tyk?
17.02.2021 - 09:12DROPS Design answered:
Hej Mia, da er det lettere at finde en model i DROPS Air og så strikke striberne efter denne opskrift :)
17.02.2021 - 11:34
![]() Erica Lopez wrote:
Erica Lopez wrote:
I would be very grateful if you offer the possibility to read the patterns in spanish language. Also I would like to have the explanations to work with two needles, but I am an old woman and I have some difficulties to learn new techniques , as circular needles. Thank you very much.
11.02.2021 - 07:27DROPS Design answered:
Hola Erica, On the left side, under the picture you can change the language. The Spanish version of this particular pattern is available HERE. As for knitting with two needles, you will find how to adapt a pattern for circular needles into straight needles HERE. Happy knitting!
11.02.2021 - 07:48
![]() Corry Dubois wrote:
Corry Dubois wrote:
Als ik de raglan startm et 2 steken en e rij eindig met 8 dan zit ik toch met begin van de naald in mijn mouw
30.01.2021 - 13:43DROPS Design answered:
Dag Corry,
Ja dat klopt. Je begint 2 steken voor de raglan die tussen de mouw en het achterpand zit. Je eindigt daar ook weer met 8 steken na de laatst geplaatste markeerdraad. Op beide mouwen zitten 10 steken tussen de markeerdraden. Op die manier heb je de overgang van de strepen bij de raglan en later bij de zijnaad. Alleen zie ik dat het bij het verdelen van het werk voor het lijf en de mouwen uitgelegd wordt dat je vanaf midden achter, dus dit moet ik even navragen bij de ontwerpafdeling om evt. aan te passen...
31.01.2021 - 20:38
![]() Ida wrote:
Ida wrote:
Hej :-) Jeg ønsker at strikke denne trøje i ensfarvet garn (stadigvæk Drops Air). Hvor meget garn skal jeg da bruge?
26.01.2021 - 21:39DROPS Design answered:
Hej Ida, denne bluse strikkes i 2xair som denne i ensfarvet DROPS 216-23 Prøv at sammenligne målene og tag hellere et par nøgler ekstra en for lidt, det er så trist med for lidt garn :)
28.01.2021 - 09:53
![]() Věra wrote:
Věra wrote:
Dobrý den,prosím nerozumím rozmístění značek....1značka za druhé oko-rukáv......když začínáme uprostřed zad tak jak mi to pak bude vycházet?pak budu začínat každou kruhovou řadu na rukávu......mužete mi prosím pomociradou?....děkuji
23.01.2021 - 19:33DROPS Design answered:
Dobrý den, Věro, ano - začátek kruhové řady se v tuto chvíli posouvá mezi rukáv a zadní díl. To proto, aby se "schoval", splynul s krajem raglánového "švu", tj. místem, kde přidáváme oka. Hodně zdaru! Hana
23.01.2021 - 22:01
![]() Lena wrote:
Lena wrote:
Vielen Dank für die Beantwortung meiner ersten Frage! Ich hätte noch eine zweite: Könnte ich den Pullover einfarbig in Drops Wish stricken und wenn ja, wie viel Wolle bräuchte ich dann? Vielen Dank, Lena
23.01.2021 - 10:12DROPS Design answered:
Liebe Lena, hier lesen Sie mehr über Garnalternativen - und wie die neue Menge kalkuliert wird. Viel Spaß beim stricken!
25.01.2021 - 08:32
|
||||||||||||||||||||||||||||
Happy Stripes#happystripessweater |
||||||||||||||||||||||||||||
 |
 |
|||||||||||||||||||||||||||
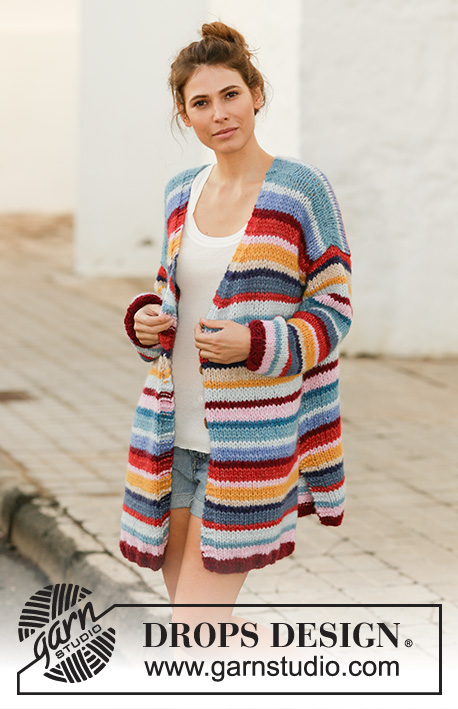
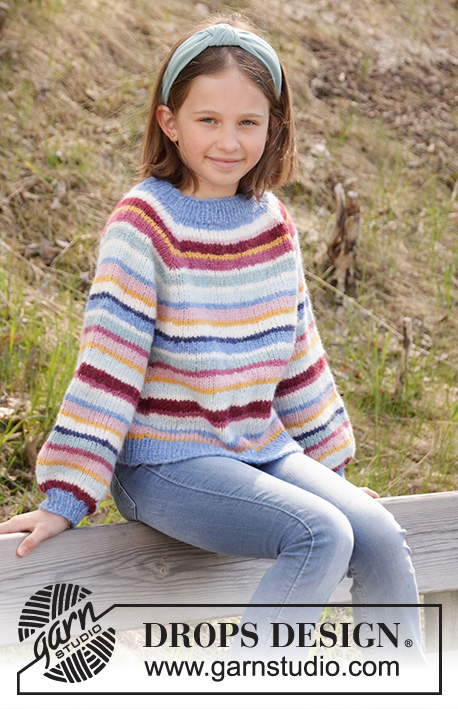
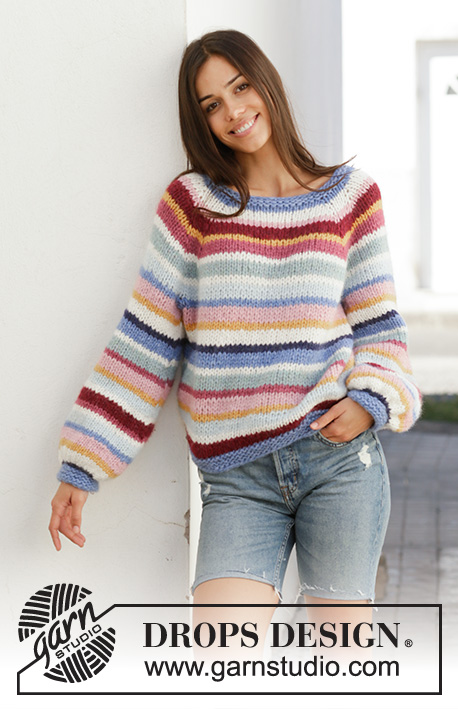
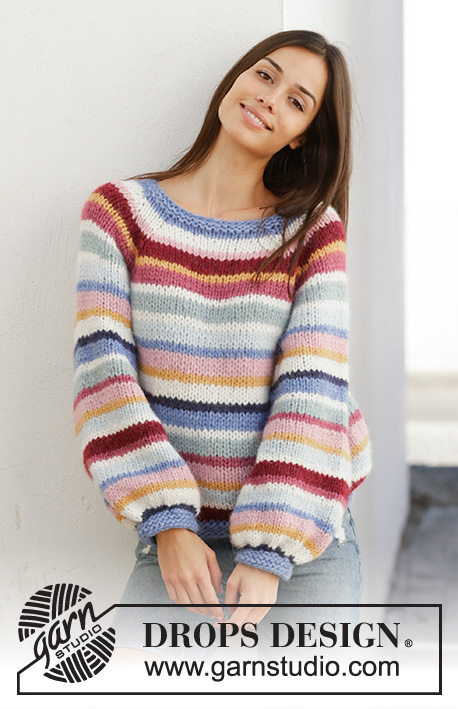
Knitted jumper with balloon sleeves in 2 strands DROPS Air. The piece is worked top down with raglan and stripes. Sizes S - XXXL.
DROPS 202-1 |
||||||||||||||||||||||||||||
|
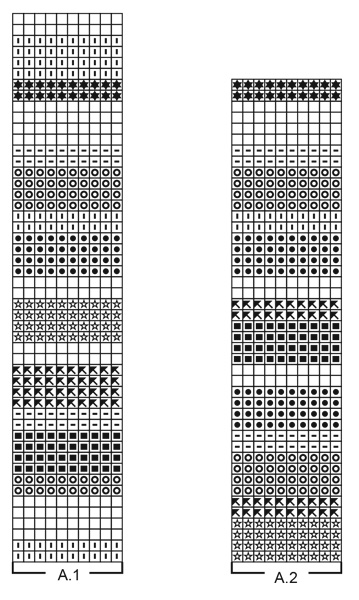
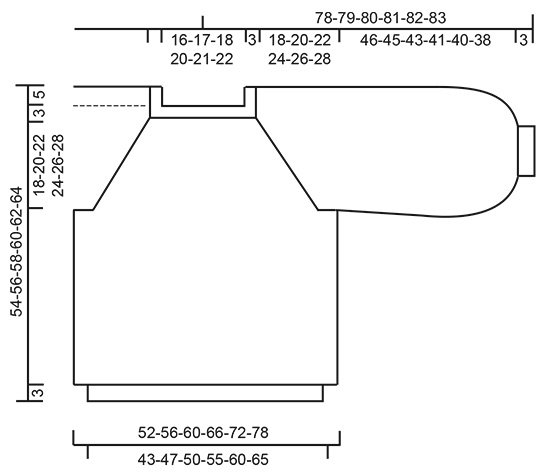
------------------------------------------------------- EXPLANATIONS FOR THE PATTERN: ------------------------------------------------------- RIDGE/GARTER STITCH (worked in the round): 1 ridge in height = 2 rounds; knit 1 round and purl 1 round. INCREASE TIP-1 (evenly spaced): To work out how to increase evenly, count the total number of stitches on the needle (e.g. 54 stitches) and divide by the number of increases to be made (e.g. 6) = 9. In this example increase by making 1 yarn over after each 9th stitch. On the next round knit the yarn overs twisted to avoid holes. STRIPES: See diagram A.1 and A.2. The stripes are worked in stocking stitch with 2 strands Air. Work A.1 once, then work A.2 to finished length (applies to both body and sleeves). RAGLAN: Increase to raglan on each side of the 4 marker threads as follows: Start 2 stitches before the marker thread, make 1 yarn over, knit 4 (marker thread sits in middle of these 4 stitches), 1 yarn over = 2 stitches increased and a total of 8 stitches increased on round. On the next round knit the yarn overs twisted to avoid holes. Then work the new stitches in stocking stitch. INCREASE TIP-2 (for mid under sleeve): Increase 2 stitches mid under sleeve as follows: Start 2 stitches before the marker thread, make 1 yarn over, knit 4 (marker thread sits in the middle of these 4 stitches), 1 yarn over = 2 stitches increased. On the next round knit the yarn overs twisted to avoid holes. Then work the new stitches in stocking stitch. ------------------------------------------------------- START THE PIECE HERE: ------------------------------------------------------- JUMPER - SHORT OVERVIEW OF THE PIECE: The neck, yoke and body are worked in the round with circular needle, top down. The yoke is divided for sleeves and body. The body is worked in the round with circular needle, top down to finished length. The sleeves are worked in the round with double pointed needles, top down. The whole garment is worked in 2 strands Air. NECK: Cast on 54-56-58-62-64-66 stitches with short circular needle size 7 mm and 2 strands blue. Work 3 RIDGES in the round – read description above. Knit 1 round where you increase 6-4-2-6-4-2 stitches evenly on round – read INCREASE TIP-1 = 60-60-60-68-68-68 stitches. Change to circular needle size 9 mm and work yoke as described below. YOKE: Insert 4 marker threads in the piece as follows (without working the stitches): Count 2 stitches, insert 1 marker thread before the next stitch (=sleeve), count 20-20-20-24-24-24 stitches, insert 1 marker thread before the next stitch (=back piece), count 10 stitches in all sizes, insert 1 marker thread before the next stitch (= sleeve), count 20-20-20-24-24-24 stitches, insert 1 marker thread before the next stitch (= front piece), count 8 stitches in all sizes (= sleeve). Then work as follows: Work STRIPES – read description above. AT THE SAME TIME on the first round increase to RAGLAN – read description above. Increase to raglan every 2nd round a total of 12-14-15-16-17-19 times. REMEMBER THE KNITTING TENSION! After the last increase to raglan there are 156-172-180-196-204-220 stitches on the needle. Continue with stripes until the piece measures 21-23-25-27-29-31 cm from the cast-on edge mid front. The next round is worked as follows: Work 48-52-54-60-64-70 stitches in stocking stitch (= back piece), place the next 30-34-36-38-38-40 stitches on 1 thread for sleeve, cast on 4-4-6-6-8-8 new stitches on the needle (= in side under sleeve), work 48-52-54-60-64-70 stitches in stocking stitch (= front piece), place the next 30-34-36-38-38-40 stitches on 1 thread for sleeve, cast on 4-4-6-6-8-8 new stitches on needle (= in side under sleeve). Body and sleeves are finished separately. THE PIECE IS NOW MEASURED FROM HERE! BODY: = 104-112-120-132-144-156 stitches. Work stocking stitch in the round and continue the stripes in A.1. When A.1 has been completed, work A.2 to finished length. When the piece measures 25 cm from the division, change to circular needle size 7 mm and 2 strands blue. Work garter stitch in the round for 3 cm and finish with a purled round. Loosely cast off with knit, but to avoid the cast-off edge being tight you can cast off with a larger needle. The jumper measures approx. 54-56-58-60-62-64 cm from the shoulder down. SLEEVE: Place the 30-34-36-38-38-40 stitches from the thread on the one side of the body on double pointed needles 9 mm and knit up 1 stitch in each of the 4-4-6-6-8-8 stitches cast on under the sleeve = 34-38-42-44-46-48 stitches. Insert 1 marker thread in the middle of the 4-4-6-6-8-8 stitches under the sleeve and allow it to follow your work onwards. The marker thread will be used when increasing mid under sleeve. Work stocking stitch in the round and continue the stripes in the same way as on the body (important to continue on the same round as on the body after the yoke). When the sleeve measures 4 cm from the division in all sizes, increase 2 stitches mid under sleeve – read INCREASE TIP-2. Increase like this every 4-5-5-5-4½-4½ cm a total of 8-7-6-6-6-6 times = 50-52-54-56-58-60 stitches. Continue working until the sleeve measures approx. 45-44-42-40-39-37 cm from the division (shorter measurements in larger sizes due to wider neck and longer yoke). Knit 1 round where you decrease 4 stitches evenly in all sizes = 46-48-50-52-54-56 stitches. On the next round knit all stitches together 2 and 2 = 23-24-25-26-27-28 stitches. Change to double pointed needles size 7 mm. Work garter stitch in the round for 3 cm and finish after a purled round. Cast off with knit, but make sure that the cast-off edge is not tight. The sleeve measures approx. 49-48-46-44-43-41 cm from the division. Work the other sleeve in the same way. |
||||||||||||||||||||||||||||
Diagram explanations |
||||||||||||||||||||||||||||
|
||||||||||||||||||||||||||||
 |
||||||||||||||||||||||||||||
 |
||||||||||||||||||||||||||||
Have you finished this pattern?Tag your pictures with #dropspattern #happystripessweater or submit them to the #dropsfan gallery. Do you need help with this pattern?You'll find 25 tutorial videos, a Comments/Questions area and more by visiting the pattern on garnstudio.com. © 1982-2026 DROPS Design A/S. We reserve all rights. This document, including all its sub-sections, has copyrights. Read more about what you can do with our patterns at the bottom of each pattern on our site. |
||||||||||||||||||||||||||||


With over 40 years in knitting and crochet design, DROPS Design offers one of the most extensive collections of free patterns on the internet - translated to 17 languages. As of today we count 324 catalogues and 12290 patterns translated into English (UK/cm).
We work hard to bring you the best knitting and crochet have to offer, inspiration and advice as well as great quality yarns at incredible prices! Would you like to use our patterns for other than personal use? You can read what you are allowed to do in the Copyright text at the bottom of all our patterns. Happy crafting!
Post a comment to pattern DROPS 202-1
We would love to hear what you have to say about this pattern!
If you want to leave a question, please make sure you select the correct category in the form below, to speed up the answering process. Required fields are marked *.