Comments / Questions (196)
![]() Helena Witte wrote:
Helena Witte wrote:
A4 stykket- 3.+4.pind siger, strik til 6 masker før mærke. Men derefter i næste linie Mht ve.forstykke - hvordan strikker jeg de masker der er sat fra før, så det bliver pænt? Jeg har hyllet hele arbejdet op igen bla fordi der kom en grim hullet kant der hvor jeg strikkede de ventende masker med, så hvordan undgår jeg det?
03.02.2025 - 20:41DROPS Design answered:
Hej Helena, du kan undgå hullerne ved at strikke: German Short Rows
12.02.2025 - 10:04
![]() Helena Witte wrote:
Helena Witte wrote:
A4 stykket- 3.+4.pind siger, strik til 6 masker før mærke. Men derefter i næste linie står der, at man skal strikke til 3 masker før mærke, så skal jeg følge pind 1 til 4, eller den efterfølgende beskrivelse med 3 masker hver gang?
03.02.2025 - 20:40DROPS Design answered:
Hej Helena, du vender 3 masker før mærketråden, næste gang når der er 6 masker før mærketråden og så 9 masker før mærketråden osv :)
12.02.2025 - 10:01
![]() VICTORIA STURGEON wrote:
VICTORIA STURGEON wrote:
Do I knit over to the middle back marker then cut strand? then pick up after marker? I am almost there I would hate to mess it up now!! Kindly Victoria
03.02.2025 - 05:52DROPS Design answered:
Dear Victoria, you have just finished Circle part, correct? Then you have placed the first 94-124 sts of the round on a thread, work the remaining 210-276 sts (= sides and bottom of jacket) back and forth with short rows with increases as before to keep the shape and to make the piece longer (but avoiding it to be larger in width so you will work less stitches at the end of each row on each side). Happy knitting!
03.02.2025 - 14:21
![]() VICTORIA STURGEON wrote:
VICTORIA STURGEON wrote:
Hi I have made this before and dont remember getting stumped. I am at the part I have completed fitst half with the middle back marker. the pattern says cut strand and start from right side and after marker. what do I do with the stitches currently on my needles? Also what do I do with the cut strand?
03.02.2025 - 05:34
![]() Helena Witte wrote:
Helena Witte wrote:
Jeg er nået til forstykkerne. Hvilke masker er det, jeg skal strikke og hvor mange? Er det de masker, jeg har sat fra på rygstykket, og skal rygstykkemasker strikkes med? Og så opdagede jeg, at der stod på rygstykket, at på pind 3 og 4 skulle jeg vende ved 6 masker tilbage, men nedenunder står der jo, at man skal nu skal vende ved 3 masker tilbage? Hvor mange masker skal jeg have tilbage, når jeg er færdig med 7 rapporter A.4 i str XXL? Glæder mig til det færdige resultat.
19.01.2025 - 11:45
![]() Matilda wrote:
Matilda wrote:
Olen hieman hämilläni työn takakappaleen kohdalla. Kun jätän silmukoita neulomatta aina 3 enemmän kuin edellisellä kerralla, etukappaleista ei tule symmetrisiä vaikka olen lisäyksetkin tehnyt oikeissa kohdissa. Pystyttekö auttamaan?
01.01.2025 - 13:43DROPS Design answered:
Hei, on vaikea vastata kysymykseesi näkemättä neulettasi, mutta työn kumpaankin reunaan tulee yhtä monta kääntymiskohtaa, koska kerroksia on 42. Oikean etukappaleen alaosa neulotaan vasemman etukappaleen alaosan peilikuvaksi.
09.01.2025 - 17:48
![]() Wibke wrote:
Wibke wrote:
Hallo ich habe einen Brustumfang von 120 cm welche größe würde mir da am besten passen?
26.12.2024 - 19:51
![]() Cynthia Bruster wrote:
Cynthia Bruster wrote:
I'm not understanding the measurements for chest in this pattern. I am 37 1/2 bust. I wear a size medium, but according to these measurements, it puts me in an XXXL, which is still too small? Please help.
22.12.2024 - 18:40
![]() Cynthia Bruster wrote:
Cynthia Bruster wrote:
I'm not understanding the measurements for chest in this pattern. I am 37 1/2 bust. I wear a size medium, but according to these measurements, it puts me in an XXXL, which is still too small? Please help.
22.12.2024 - 18:40DROPS Design answered:
Dear Cynthia, this garment doesn't have an actual chest, because there is barely front pieces. So the measurements are for the width of the back, not the full chest. So you should be able to work your usual size. You can also check the width of the armholes in cm in the size chart to check which would fit you best, in case you aren't sure of which size to work. For your chest size, the first 2 sizes may be a bit tight in the front; if you want a more loose front part of the garment you could work size L. Happy knitting!
22.12.2024 - 23:57
![]() Matilda Lahtinen wrote:
Matilda Lahtinen wrote:
Työssä kun neulotaan mallineuletta A.3 en saa mainittua 16 mallikertaa kerroksella tehtyä sillä silmukoiden määrä ei riitä. Tuleeko mallikertojen määrään mukaan tässä kohtaa kädenteiden kohdille luotavat silmukat
13.12.2024 - 19:07DROPS Design answered:
Hei, kädenteille luotavilla silmukoilla neulotaan myös mallineuletta piirroksen A.3 mukaisesti. Eli esim. koossa S silmukoita on yhteensä 128 ja piirroksen A.3 mallikertoja (8 silmukkaa) on 16.
18.12.2024 - 17:04
Empress#empressjacket |
|||||||||||||||||||||||||||||||
 |
 |
||||||||||||||||||||||||||||||
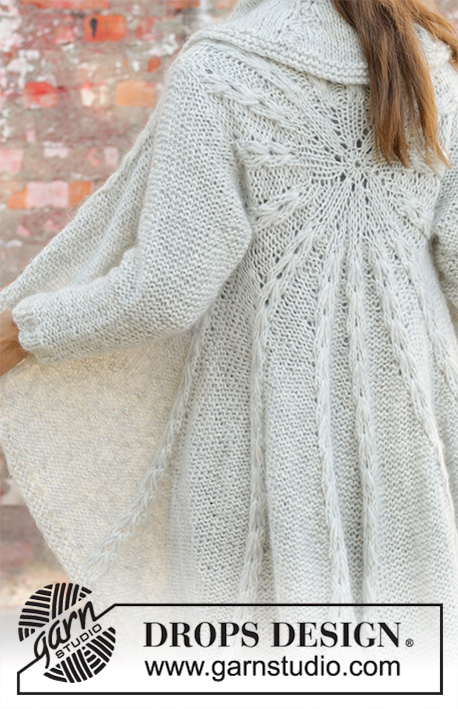
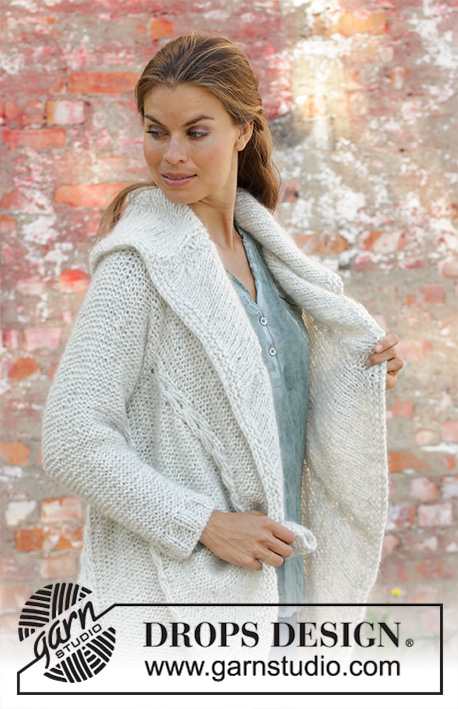
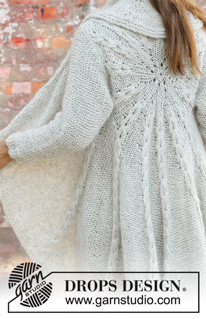
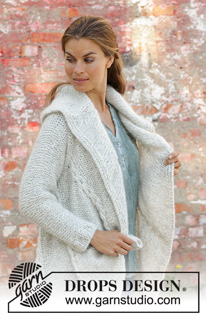
Knitted long circle jacket in 1 strand DROPS Air and 1 strand DROPS Brushed Alpaca Silk. The piece is worked in the round in a circle with texture. Sizes S - XXXL.
DROPS 194-17 |
|||||||||||||||||||||||||||||||
|
------------------------------------------------------- EXPLANATIONS FOR THE PATTERN: ------------------------------------------------------- RIDGE/GARTER STITCH (worked in the round): 1 ridge = 2 rounds. Knit 1 round and purl 1 round. RIDGE/GARTER STITCH (worked back and forth): 1 ridge = knit 2 rows. PATTERN: See diagrams A.1 to A.4. Choose diagram for your size. The diagrams show all the rows in the pattern seen from the right side! DECREASE TIP (for sleeves): All decreases are made from the side in purl! Decrease 1 stitch by purling 2 stitches together ------------------------------------------------------- START THE PIECE HERE: ------------------------------------------------------- CIRCLE JACKET - SHORT OVERVIEW OF THE PIECE: The piece is worked in the round in a circle from the middle of the back outwards. Change to circular needle(s) when necessary. Then work back and forth with short rows for the front pieces and down the back. The sleeves are worked top down in stocking stitch with the wrong side out. Because of the weight of the yarn, the garment will stretch somewhat after use. CIRCLE JACKET: CIRCLE: Cast on 8 stitches with double pointed needles size 8 mm and 1 strand Air and 1 strand Brushed Alpaca Silk (= 2 strands). Divide the stitches between 4 needles so that there are 2 stitches on each. Insert a marker thread at the beginning of the round. Allow the marker thread to follow your work onwards. Work pattern in the round according to A.1 – choose diagram for your size, a total of 8 times on the round. REMEMBER THE KNITTING TENSION! When A.1 is finished, there are 48 stitches on the round. Now work pattern as follows: Work A.2 – choose diagram for your size, a total of 16 times on the round. After the next-to-last round in A.2 there are 128-128-144-144-160-160 stitches on the round. The last round in A.2 is worked as follows: Work the first 39-39-45-45-49-49 stitches (there is now 1-1-0-0-1-1 stitch left in the last repeat of A.2 worked), insert a new marker thread here (follows your work onwards and is later used when you work short rows from the front pieces and down the body on the back piece), cast off the next 20-21-22-23-24-25 stitches (= armhole), work the next 49-47-55-53-63-61 stitches, cast off the last 20-21-22-23-24-25 stitches (= armhole). The piece measures approx. 39-39-41-41-47-47 cm in diameter. The next round is worked as follows: Work A.3 – choose diagram for your size (= 8-8-9-9-10-10 stitches on the first round in the diagram) a total of 16 times on the round and at the same time cast on 20-21-22-23-24-25 new stitches on the needle where the stitches were cast off for the armholes = 128-128-144-144-160-160 stitches. Continue in the round with A.3 until the whole diagram has been completed in height. There are now 304-304-352-352-400-400 stitches on the round. The piece measures approx. 87-87-97-97-111-111 cm in diameter. Cut the strand. Place the first 94-94-110-110-124-124 stitches on the round (= stitches between the 2 marker threads) on a thread. FRONT PIECES AND DOWN THE BODY: There are now 210-210-242-242-276-276 stitches for the front pieces and down the body on the back piece. Start from the right side after the second marker thread and work short rows back and forth for the front pieces and down the body on the back piece as follows: ROW 1 (right side): Purl over purl and work A.4 (= 3 stitches) over each cable until there are 3 stitches left before the next marker thread (i.e. start of round), turn. ROW 2 (wrong side): Work back until there are 3 stitches left before the marker thread, turn. ROW 3: Purl over purl and work A.4 over each of the cables until there are 6 stitches left before the marker thread, AT THE SAME TIME increase 1 purled stitch after each cable/A.4, turn. ROW 4: Work back until there are 6 stitches left before the marker thread, turn. Continue back and forth like this by working 3 fewer stitches than the previous row and increase 1 stitch after each cable/A.4 every 4th row until you have worked 7 repeats of A.4 in height (= 42 rows). The piece measures approx. 72-72-77-77-84-84 cm from the middle of the circle and down mid back. The last row is worked from the wrong side. Do not cut the strand. Insert a marker thread in the middle cable/A.4 mid back of jacket. Continue back and forth with pattern as before over the bottom of the left front piece as follows: ROW 1 (right side): Work until there are 4 stitches left before the cable/A.4 with the marker thread mid back, turn. ROW 2 (wrong side): Work until there are 3 more stitches left before the marker thread than the previous row (start of round), AT THE SAME TIME increase 1 purled stitch after each cable/A.4, turn. ROW 3 (right side): Work until there are 4 more stitches than last time left before the cable/A.4 with the marker thread mid back, turn. ROW 4 (wrong side): Work until there are 3 more stitches before the marker thread than the previous row, turn. Continue back and forth with pattern and increase after each cable/A.4 every 4th row until you have worked 3 repeats of A.4 in height (= 18 rows). Cut the strand. Start from the right side and after A.4/mid back and work short rows back and forth over the bottom of the right front piece in the same way, but reversed, i.e. each row from the wrong side is turned when there are 4 more stitches before the cable/A.4 with the marker thread mid back than the previous time and on each row from the right side is turned when there are 3 more stitches left than the previous time. EDGE: Place all stitches on the circle back on circular needle and work 2 RIDGES – read description above, around the whole circle. Cast off, but to avoid the cast-off edge being tight you can make 1 yarn over after approx. each 5th stitch - the yarn overs are cast off as normal stitches. SLEEVE: The sleeve is worked in stocking stitch with the wrong side out (reversed stocking stitch). Cast on 11-11-12-12-14-14 stitches with circular needle size 8 mm and 1 strand Air and 1 strand Brushed Alpaca Silk (= 2 strands). Work stocking stitch back and forth, AT THE SAME TIME cast on new stitches at the end of each row in each side as follows: Cast on 2 stitches 2 times, 1 stitch 3-4-5-6-6-7 times, 2 stitches 1 time and 4 stitches 1 time = 37-39-42-44-46-48 stitches. THE PIECE IS NOW MEASURED FROM HERE. Continue back and forth with stocking stitch and 1 edge stitch in GARTER STITCH – read description above, in each side. When the piece measures 4 cm decrease 1 stitch inside the 1 edge stitch in garter stitch in each side – read DECREASE TIP. Decrease like this every 7-6-6-5-5-4 cm a total of 6-7-7-8-8-9 times = 25-25-28-28-30-30 stitches. When the piece measures 42-42-40-40-39-39 cm increase 7-7-4-9-7-7 stitches evenly on row = 32-32-32-37-37-37 stitches. Change to circular needle size 7 mm. Work rib, starting from the side with purl (reversed stocking stitch/the wrong side out) as follows: 1 edge stitch in garter stitch (knit 2, purl 3) until there is 1 stitch left, 1 edge stitch in garter stitch. When the rib measures 5 cm cast off with knit over knit and purl over purl. The sleeve measures approx. 55-56-55-56-56-57 cm from the sleeve cap down. Work the other sleeve in the same way. ASSEMBLY: Sew sleeves to body inside the cast-off/cast-on edge. Sew sleeve seams. Make sure that the seam is not tight. |
|||||||||||||||||||||||||||||||
Diagram explanations |
|||||||||||||||||||||||||||||||
|
|||||||||||||||||||||||||||||||
 |
|||||||||||||||||||||||||||||||
 |
|||||||||||||||||||||||||||||||
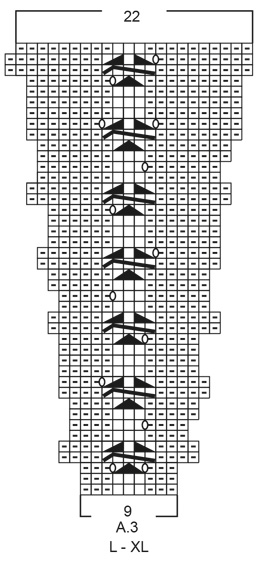 |
|||||||||||||||||||||||||||||||
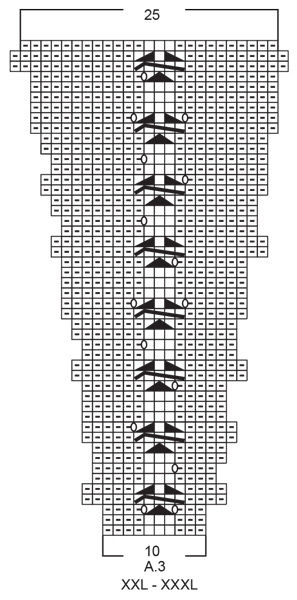 |
|||||||||||||||||||||||||||||||
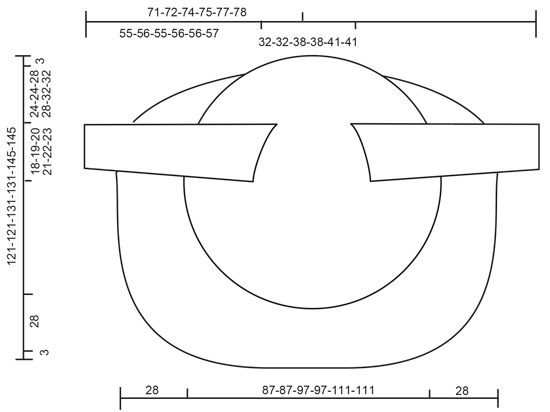 |
|||||||||||||||||||||||||||||||
Have you finished this pattern?Tag your pictures with #dropspattern #empressjacket or submit them to the #dropsfan gallery. Do you need help with this pattern?You'll find 31 tutorial videos, a Comments/Questions area and more by visiting the pattern on garnstudio.com. © 1982-2026 DROPS Design A/S. We reserve all rights. This document, including all its sub-sections, has copyrights. Read more about what you can do with our patterns at the bottom of each pattern on our site. |
|||||||||||||||||||||||||||||||






Post a comment to pattern DROPS 194-17
We would love to hear what you have to say about this pattern!
If you want to leave a question, please make sure you select the correct category in the form below, to speed up the answering process. Required fields are marked *.