
Popular categories
Looking for a yarn?


Comments / Questions (14)
![]() Claudette Grenier wrote:
Claudette Grenier wrote:
Bonjour, Sur le patron du bonnet, vers la fin, vous dite: Diminuer ainsi 6 fois........= il reste 48-48-54-54. Moi j'arrive à 45 mailles? Pourquoi ? âge 5/6 ans. Merci.
31.01.2020 - 05:02DROPS Design answered:
Bonjour Mme Grenier, en taille 5/8 ans vous avez 108 m et diminuez 6 fois 9 mailles (soit 54 m au total), il doit vous rester: 108-54= 54 m. Bon tricot!
31.01.2020 - 07:30
![]() Claudette Grenier wrote:
Claudette Grenier wrote:
Sur l'échantillon de 10x10 cm: 21 mailles en largeur et 28 rangs en hauteur jersey et jacquard nordique. Dois-je faire mon échantillon en jacquard? ou bien en jersey (endroit et envers)? Si c'est en jacquard nordique je dois prendre le A1.A 5-6 ans que je veux faire? Merci. Une bonne et heureuse année 2020 à toute votre belle équipe. Santé. On fait tout avec ça. Merci.
30.12.2019 - 16:24DROPS Design answered:
Bonjour Mme Grenier, votre échantillon doit être en jersey endroit (= mais vous auriez le même résultat en jersey envers), et doit être le même en jacquard, autrement dit, vous pouvez tricoter 1 échantillon en jersey et 1 en jacquard (= n'importe quel diagramme, par ex. A.3 peut être pratique car il ne comporte pas d'augmentations) et le nombre de mailles et de rangs doit être le même dans les deux cas. Bon tricot!
02.01.2020 - 13:47
![]() Christine Aiguillon wrote:
Christine Aiguillon wrote:
Malgré un échantillon réalisé. Le modèle de bonnet est vraiment trop petit. 40 cm de tour de tête pour un 50cm. J'ai utilisé les aiguilles 2.5 puis 3.5 comme conseillé et je prend une aiguille 4 pour le jacquard. Me conseillez vous 3.5 pour les cotes et 4 et 5 . Par avance je vous remercie
10.02.2019 - 09:14DROPS Design answered:
Bonjour Christine! Si votre echantillon etais correct, mails le bonnet est trop petit, je vous conseille de realiser une taille plus grande. N'oubliez pas de faire le jaquard souplement, autrement la partie du bonnet avec jaquard peut resserer votre ouvrage. Bon tricot!
11.02.2019 - 07:25
![]() Shahira Rezk wrote:
Shahira Rezk wrote:
Bonjour! Je vous suits depuis plus de 4 ans est j'adord....voila Je be trouve pas d'explication pour faire un pompon est la Je bloque . Pouring vous s'il vous plait m'aider. Merci Shahira
15.01.2019 - 19:37DROPS Design answered:
Bonjour Shahira Rezk! Consulterez le video sur ce sujet ICI. Bon tricot!
16.01.2019 - 07:27
|
|||||||||||||||||||
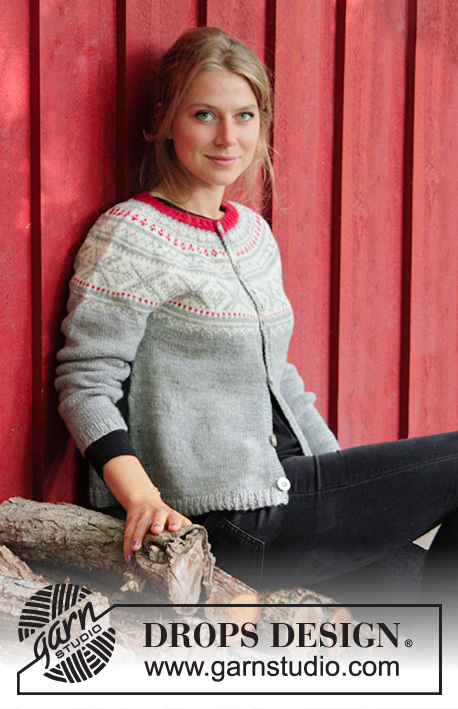
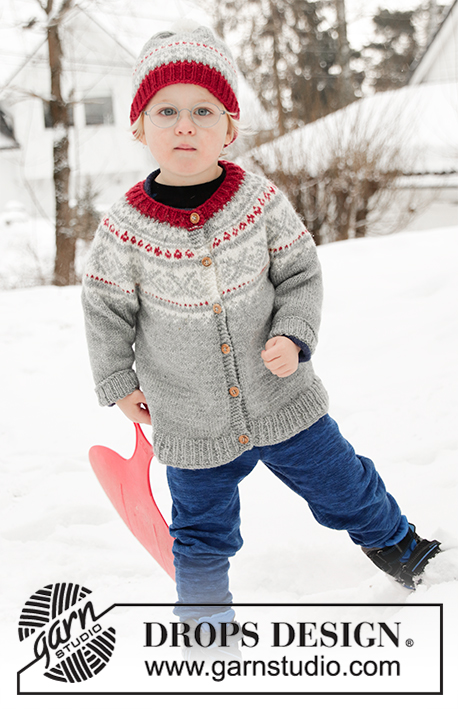
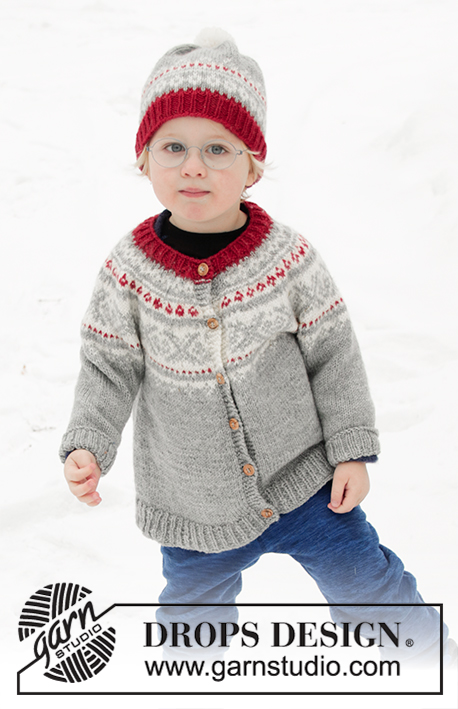
Narvik Jacket#narvikjacket |
|||||||||||||||||||
 |
 |
||||||||||||||||||
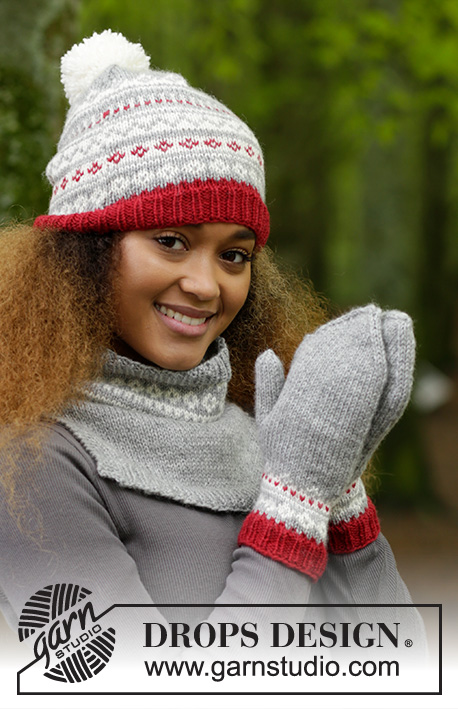
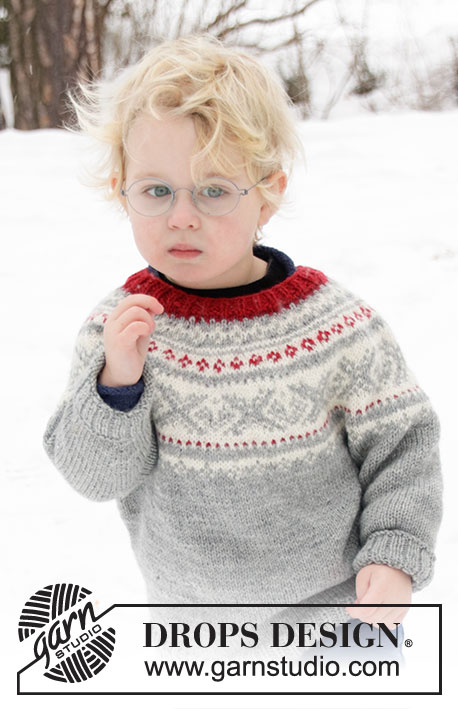
Knitted children’s jacket in DROPS Karisma. The piece is worked top down with round yoke and Nordic pattern on the yoke. Sizes 2 – 12 years. Knitted hat in DROPS Karisma. The piece is worked with Nordic pattern and a pom pom.
DROPS Children 32-11 |
|||||||||||||||||||
|
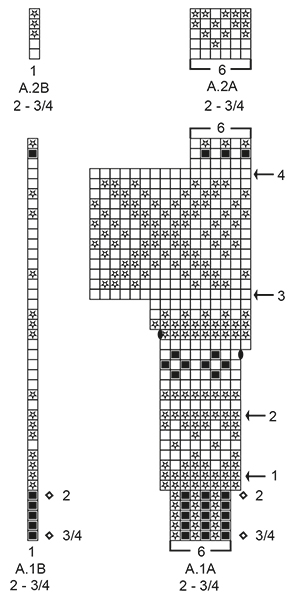
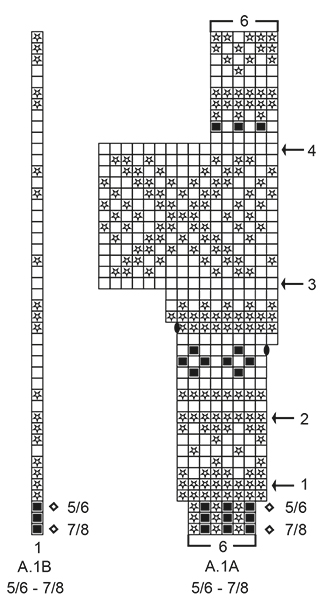
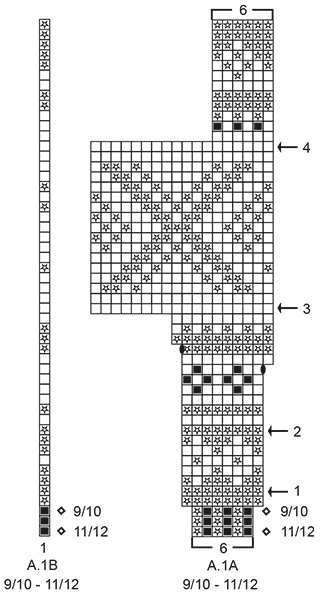
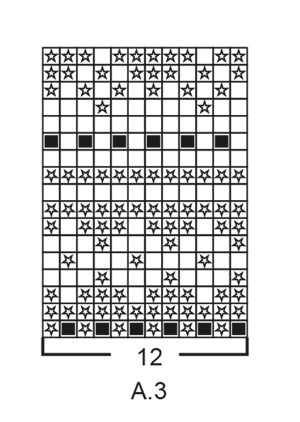
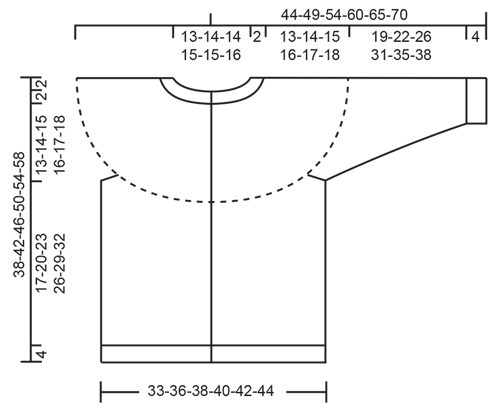
EXPLANATIONS FOR THE PATTERN: ------------------------------------------------------- RIDGE/GARTER STITCH (worked back and forth): 1 ridge = Knit 2 rows. ELEVATION (back of neck): Skip this section if you do not want an elevation; the neck will then be the same front and back. Insert 1 marker in the middle stitch on the row (= mid back). Start from the right side with light grey and knit 12-13-14-14-15-16 stitches past the stitch with marker, turn, tighten the strand and purl 25-27-29-29-31-33 stitches. Turn, tighten the strand and knit 37-40-43-43-46-49 stitches, turn, tighten the strand and purl 49-53-57-57-61-65 stitches. Turn, tighten the strand and knit 61-66-71-71-76-81 stitches, turn, tighten the strand and purl 73-79-85-85-91-97 stitches. Turn, tighten the strand and knit to the end of row. Purl 1 row from wrong side with 5 band stitches in garter stitch in each side.Then work YOKE as described in the text. PATTERN: Jacket: See diagrams A.1 and A.2 (A.2 for sizes 2 and 3/4 years only). Choose diagram for your size. Hat: See diagram A.3. The whole pattern is worked in stocking stitch. KNITTING TIP-1 (for bands): On the rows with stripes or pattern border, use the stripe colour or the background colour in the border for the 5 band stitches in each side. KNITTING TIP-2 (for Nordic pattern): To avoid the knitting tension becoming tighter when working pattern it is important that the strands at the back of the piece are not tight. You can use a larger needle size when working pattern if this is a problem. INCREASE TIP (evenly spaced): To work out how to increase evenly, count the total number of stitches on the needle (e.g. 92 stitches) minus the bands (e.g.10 stitches) and divide the remaining stitches by the number of increases to be made (e.g. 21) = 3.9. In this example, increase by making 1 yarn over after approx. each 4th stitch. On the next round work the yarn overs twisted to avoid holes. Do not increase over the bands. DECREASE TIP-1 (for mid under sleeve): Start 2 stitches before the marker thread, knit 2 together, marker thread, slip 1 stitch as if to knit, knit 1 and pass the slipped stitch over the knitted stitch (= 2 stitches decreased). DECREASE TIP-2: (for hat): To work out how to decrease evenly, count the total number of stitches on the needle (e.g. 102 stitches) and divide by the number of decreases to be made (e.g. 6) = 17. In this example, decrease by knitting each 16th and 17th stitch together. DECREASE TIP-3 (for hat): Decrease after the marker as follows: Slip 1 stitch as if to knit, knit 1 and pass the slipped stitch over the knitted stitch (= 1 stitch decreased). BUTTONHOLE: Work buttonholes on right band (when the garment is worn). 1 buttonhole = Work from the right side until there are 3 stitches left on the row, make 1 yarn over, knit 2 together and knit 1. On the next row (wrong side) knit the yarn over to leave a hole. The first buttonhole is worked when the neck measures approx.1½ cm. Then work the next 4-5-5-6-6-7 buttonholes with approx. 8-7½-8-7½-8-7½ cm between each one. ------------------------------------------------------- START THE PIECE HERE: ------------------------------------------------------- JACKET - SHORT OVERVIEW OF THE PIECE: Neck, yoke and body are worked back and forth with circular needle from mid front and top down. The sleeves are worked in the round with double pointed needles, top down. NECK: Cast on 92-95-98-101-104-107 stitches (including 5 band stitches in each side towards mid front) with circular needle size 3 mm and wine red. Purl 1 row (= wrong side). The next row is worked as follows from the right side: 5 band stitches in GARTER STITCH – read description above, * knit 1, purl 2 *, work from *-* until there are 6 stitches left on the row, knit 1 and finish with 5 band stitches in garter stitch. Continue the rib like this – remember BUTTONHOLES on right band – read description above. When the rib measures approx. 2-2½ cm purl 1 row from the wrong side where you increase 21-24-27-30-33-36 stitches evenly on row – read INCREASE TIP = 113-119-125-131-137-143 stitches. Change to circular needle size 4 mm. You can now work an elevation in the back of the neck so that the neck is slightly higher at the back. This elevation can be left out; the neck is then the same front and back – work ELEVATION – read description above, or go straight to YOKE. YOKE: Read KNITTING TIP-1 and KNITTING TIP-2! The first row is worked as follows from the right side: 5 band stitches in garter stitch, work A.1A until there are 6 stitches left on the row (= 17-18-19-20-21-22 repeats of 6 stitches), work A.1B (= 1 stitch) and finish with 5 band stitches in garter stitch. Continue with this pattern. AT THE SAME TIME on each row marked with an arrow in A.1A increase evenly as described below (all increases are worked from the right side). REMEMBER THE KNITTING TENSION and INCREASE TIP. Arrow-1: Increase 10-12-14-16-18-20 stitches evenly on row = 123-131-139-147-155-163 stitches (there is now room for 14-15-16-17-18-19 repeats of 8 stitches). Arrow-2: Increase 24-32-32-40-32-40 stitches evenly on row = 147-163-171-187-187-203 stitches (there is now room for 17-19-20-22-22-24 repeats of 8 stitches – NOTE: Make sure that you work the increases between arrow-2 and arrow-3 which are drawn in the diagrams). Arrow-3: There are now 181-201-211-231-231-251 stitches on the row. Increase 22-18-24-20-32-30 stitches evenly on row = 203-219-235-251-263-281 stitches (there is now room for 12-13-14-15-14-15 repeats of 16-16-16-16-18-18 stitches). Arrow-4: Increase 18-26-16-6-6-6 stitches evenly on row = 221-245-251-257-269-287 stitches (there is now room for 35-39-40-41-43-46 repeats of 6 stitches). When A.1 has been completed, the piece measures approx. 15-16-17-18-19-20 cm from the cast-on edge mid front. If the piece is shorter than this, you can work stocking stitch with light grey and 5 band stitches in each side to the right length. The next row is worked as follows from the right side and with light grey: Knit 37-40-42-43-45-48 stitches (= front piece), place the next 42-48-47-48-50-53 stitches on 1 thread for sleeve, cast on 6-6-6-8-8-6 new stitches on the needle (= in side under sleeve), knit 63-69-73-75-79-85 stitches (= back piece), place the next 42-48-47-48-50-53 stitches on 1 thread for sleeve, cast on 6-6-6-8-8-6 new stitches on the needle (= in side under sleeve), knit 37-40-42-43-45-48 stitches (= front piece). Body and sleeves are finished separately. THE PIECE IS NOW MEASURED FROM HERE! BODY: = 149-161-169-177-185-193 stitches. Continue as follows: SIZES 2 and 3/4 years: Purl 1 row from the wrong side with light grey and 5 band stitches in garter stitch in each side. The next row is worked as follows from the right side: 5 band stitches in garter stitch, work A.2A until there are 6 stitches left on the row (23-25 repeats of 6 stitches), work A.2B (= 1 stitch) and finish with 5 band stitches in garter stitch. Continue with this pattern. When A.2 has been completed, work stocking stitch with light grey and 5 band stitches in garter stitch in each side until the piece measures 17-20 cm from the division. Then work RIB as described below. SIZES 5/6, 7/8, 9/10 and 11/12 years: Work stocking stitch back and forth with light grey and 5 band stitches in garter stitch in each side until the piece measures 23-26-29-32 cm from the division. Then work RIB as described below. RIB: Knit 1 row from the right side where you increase 30-33-34-35-39-40 stitches evenly on row – remember INCREASE TIP = 179-194-203-212-224-233 stitches. Change to circular needle size 3 mm and work the next row as follows from the wrong side: 5 band stitches in garter stitch, * purl 1, knit 2 *, work from *-* until there are 6 stitches left on the row, purl 1 and finish with 5 band stitches in garter stitch. Continue the rib like this for 4 cm. Cast off with garter stitch over garter stitch, knit over knit and purl over purl; but make sure that the cast-off edge is not tight. The jacket measures approx. 38-42-46-50-54-58 cm from the shoulder down. SLEEVE: Place the 42-48-47-48-50-55 stitches from the thread on the one side of the piece on double pointed needles size 4 mm and knit up 1 stitch in each of the 6-6-6-8-8-6 stitches cast on under the sleeves = 48-54-53-56-58-59 stitches. Insert 1 marker thread in the middle of the 6-6-6-8-8-6 stitches under the sleeve and allow it to follow your work onwards. The marker thread will be used a little later when decreasing under the sleeve. SIZES 2 and 3/4 years: Start the round at the marker thread and knit 1 round with light grey. Then work A.2A in the round (= 8-9 repeats of 6 stitches). When A.2A has been completed continue with light grey as described under ALL SIZES. SIZES 5/6, 7/8, 9/10 and 11/12 years: Start the round at the marker thread and work stocking stitch in the round with light grey. Continue as described under ALL SIZES. ALL SIZES: AT THE SAME TIME when the piece measures 2-2-2-3-3-3 cm decrease 2 stitches mid under sleeve – read DECREASE TIP-1. Decrease like this every 3-2½-3½-4-4-4½ cm a total of 6-8-7-7-8-8 times = 36-38-39-42-42-43 stitches. Continue working until the sleeve measures 19-22-26-31-35-38 cm from the division. Knit 1 round where you increase 0-1-3-3-6-5 stitches evenly on round = 36-39-42-45-48-48 stitches. Change to double pointed needles size 3 mm. Work rib in the round (= knit 1 / purl 2) for 4 cm. Then cast off with knit over knit and purl over purl, but make sure that the cast-off edge is not tight. The sleeve measures approx. 23-26-30-35-39-42 cm from the division. Work the other sleeve in the same way. ASSEMBLY: Sew buttons onto left band. ---------------------------------------------------------- HAT: The piece is worked in the round with short circular needle; change to double pointed needles when necessary. Cast on 102-105-114-117 stitches with short circular needle size 2.5 mm and wine red. Knit 1 round. Then work rib (= knit 1 / purl 2) for 3 cm. Change to circular needle size 3.5 mm. Knit 1 round where you decrease 6-9-6-9 stitches evenly in all sizes – read DECREASE TIP-2 = 96-96-108-108 stitches. Then work A.3 in the round (= 8-8-9-9 repeats of 12 stitches). REMEMBER THE KNITTING TENSION! When A.3 has been completed, work stocking stitch with light grey to finished length. When the piece measures 15-16-17-18 cm, insert 8-8-9-9 markers in the piece with 12 stitches between each one. On the next round decrease 1 stitch after each marker – read DECREASE TIP-3 (= 8-8-9-9 stitches decreased). Decrease like this every 2nd round a total of 6 times in all sizes = 48-48-54-54 stitches left on needles. * Knit 1 round, on the next round knit all stitches together 2 and 2 *, work from *-* one more time = 12-12-14-14 stitches left on needles. Cut the strand, pull it through the remaining stitches, tighten and fasten well. The hat measures approx. 20-21-22-23 cm from the top down. POM POM: Make a pom pom with off-white, approx. 4-5 cm in diameter and fasten to top of hat. |
|||||||||||||||||||
Diagram explanations |
|||||||||||||||||||
|
|||||||||||||||||||
 |
|||||||||||||||||||
 |
|||||||||||||||||||
 |
|||||||||||||||||||
 |
|||||||||||||||||||
 |
|||||||||||||||||||
Have you finished this pattern?Tag your pictures with #dropspattern #narvikjacket or submit them to the #dropsfan gallery. Do you need help with this pattern?You'll find 36 tutorial videos, a Comments/Questions area and more by visiting the pattern on garnstudio.com. © 1982-2026 DROPS Design A/S. We reserve all rights. This document, including all its sub-sections, has copyrights. Read more about what you can do with our patterns at the bottom of each pattern on our site. |
|||||||||||||||||||


With over 40 years in knitting and crochet design, DROPS Design offers one of the most extensive collections of free patterns on the internet - translated to 17 languages. As of today we count 325 catalogues and 12298 patterns translated into English (UK/cm).
We work hard to bring you the best knitting and crochet have to offer, inspiration and advice as well as great quality yarns at incredible prices! Would you like to use our patterns for other than personal use? You can read what you are allowed to do in the Copyright text at the bottom of all our patterns. Happy crafting!
Post a comment to pattern DROPS Children 32-11
We would love to hear what you have to say about this pattern!
If you want to leave a question, please make sure you select the correct category in the form below, to speed up the answering process. Required fields are marked *.