
Popular categories
Looking for a yarn?


Comments / Questions (121)
![]() Gisela Rodrigues wrote:
Gisela Rodrigues wrote:
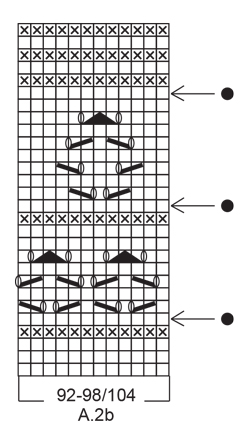
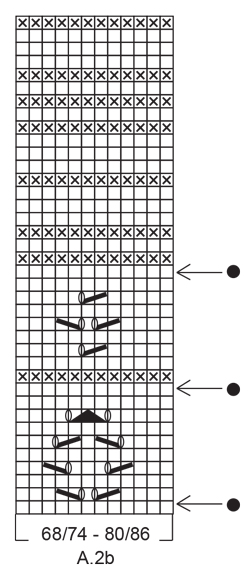
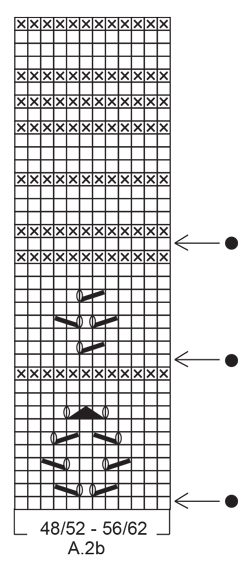
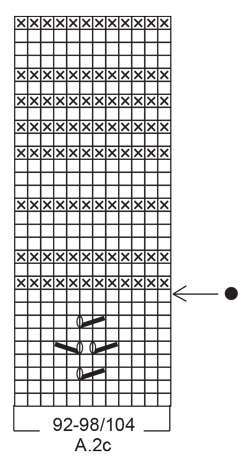
Boa tarde! Já fiz o esquema A1 e o A2a e o A2b.....tenho que fazer o A2c? Fiz o A2a com as medidas 92-98/104 mas foi por um acaso que fiz estas medidas e depois é que vi e então também fiz o esquema A2b com as mesmas medidas. Não sei se são as corretas para o tamanho que quero....meti 204 malhas no início. Vendo o vestido não me parece que tenha o A2c.....é a minha dúvida
20.10.2021 - 18:31DROPS Design answered:
Bom dia, O vestido tem vários pontos rendados. Cada ponto rendado corresponde, respectivamente, a A2a, A2b e A2c. Depois de tricotar todas os A2, continua em ponto jarreteira. No entanto, pode não tricotar A2c e continuar em ponto meia e, depois, tricotar o ponto jarreteira. Bons tricôs!
21.10.2021 - 10:43
![]() Rita Bertling wrote:
Rita Bertling wrote:
After doing all of pattern I have less stitches than stated. Is this correct?
14.06.2021 - 22:21DROPS Design answered:
Dear Rita, you should have the amount of stitches stated in the pattern. Please check if you missed something in the description. Happy Stitching!
15.06.2021 - 00:22
![]() Fanny Ortiz wrote:
Fanny Ortiz wrote:
Muy agradecida con ustefes...por compartir sus conocimientos...y trabajo....hermosos. todos los modelos que comparten....y felicitandoles por tan buena pagina....Dios bendiga sus hermosas vidas....
03.05.2021 - 15:06
![]() Trudd wrote:
Trudd wrote:
Bonjour je suis rendue aux emmanchures et je n’ai aucune idée comment lire le patron à partir de là
02.05.2021 - 13:14DROPS Design answered:
Bonjour Mme Trudd, pour les emmanchures, vous devez tricoter les mailles sous les manches au point mousse, en diminuant des mailles sur le devant/le dos au 1er de ces tours. Indiquez-nous la taille que vous tricotez, nous vous expliquerons comment faire cette partie. Bon tricot!
03.05.2021 - 08:46
![]() Ilaria wrote:
Ilaria wrote:
Buonasera, ho appena finito il modello 0-3 mesi ma non capisco una cosa, cosa vuol dire bordo del collo? Il collo non è già stato lavorato facendo prima il dietro e poi il davanti?
26.04.2021 - 21:53DROPS Design answered:
Buonasera Ilaria, è un bordino di rifinitura del collo. Buon lavoro!
27.04.2021 - 20:37
![]() Francine wrote:
Francine wrote:
(suite) Est-ce que je fais 2A plus qu’une fois,jusqu’à 130 mailles? merci
13.04.2021 - 20:47DROPS Design answered:
cf réponse précédente ;)
14.04.2021 - 07:25
![]() Francine wrote:
Francine wrote:
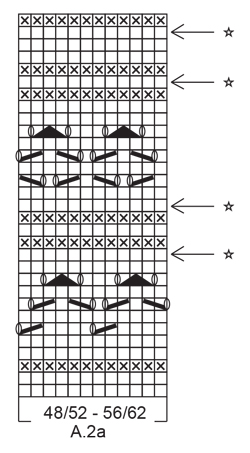
Bonjour,je ne comprends pas les diminutions en A-2a.J’ai 168m au départ et 108 après les diminutions. Il y a 4 * tours à diminuer.Je diminue 6 mailles par tour?(168-108=60 m) Merci
13.04.2021 - 20:07DROPS Design answered:
Bonjour Francine, en 0/1 mois, vous diminuez 4 fois 6 mailles dans A.2a (cf étoile) + 3 fois 12 mailles dans A.2b (cf rond noir) (pas de A.2c dans cette taille), soit 24+36=60 diminutions au total. Bon tricot!
14.04.2021 - 07:24
![]() Svenja wrote:
Svenja wrote:
Sehr geehrtes DROPS Design , wäre es möglich, die Länge des Garnes im Knäul anzugeben? Dann kann man auf den ersten Blick sehen, wie dick bzw. dünn das gestrickte Teil wird. Haben Sie vielen Dank.
21.03.2021 - 19:00DROPS Design answered:
Liebe Svenja, hier lesen Sie mehr über DROPS Alpaca: Zusammensetzung, Lauflänge, Maschenprobe usw sowie die Liste von den DROPS Händlern, wo Sie diese Wolle bestellen können. Viel Spaß beim stricken!
22.03.2021 - 08:57
![]() Pia wrote:
Pia wrote:
Hvornår og hvor meget skal jeg tage ind, når jeg ikke bruger diagrammet, og kun strikker ret.
25.02.2021 - 18:42DROPS Design answered:
Hej Pia, du skal stadigvæk tage ind på omgangen med pil, uanset om du strikker maskerne i diagrammet i glatstrik. God fornøjelse!
26.02.2021 - 07:48
![]() Claire wrote:
Claire wrote:
Tejí está prenda, en el talle 1-3 meses, quedó hermosa, y el talle perfecto. La bebé hermosamente vestida. Felicitaciones a los diseñadores.
09.02.2021 - 16:59
|
|||||||||||||||||||||||||
Serafina#serafinadress |
|||||||||||||||||||||||||
 |
 |
||||||||||||||||||||||||
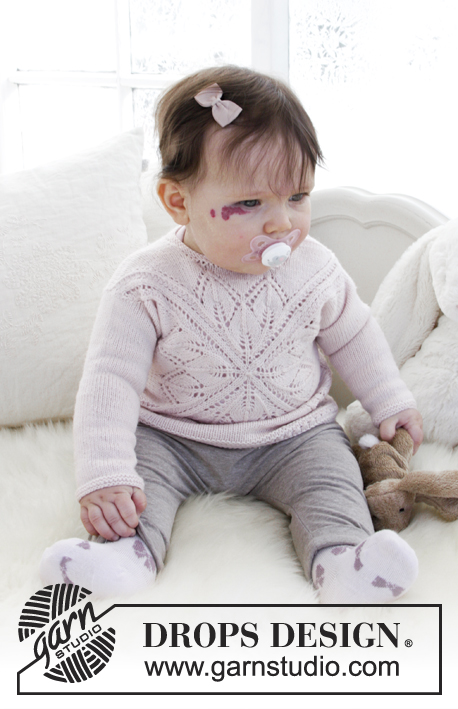
Knitted dress with lace pattern and garter stitch for baby. Size 0 - 4 years Piece is knitted in DROPS Alpaca.
DROPS Baby 31-17 |
|||||||||||||||||||||||||
|
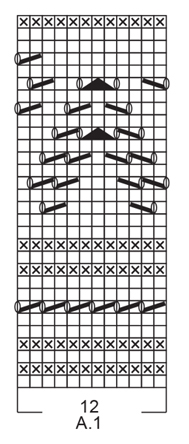
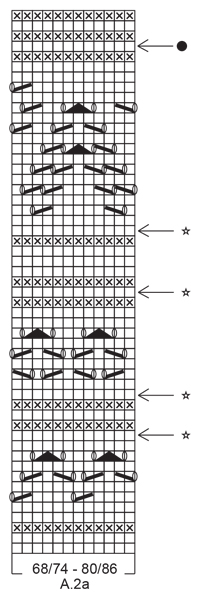
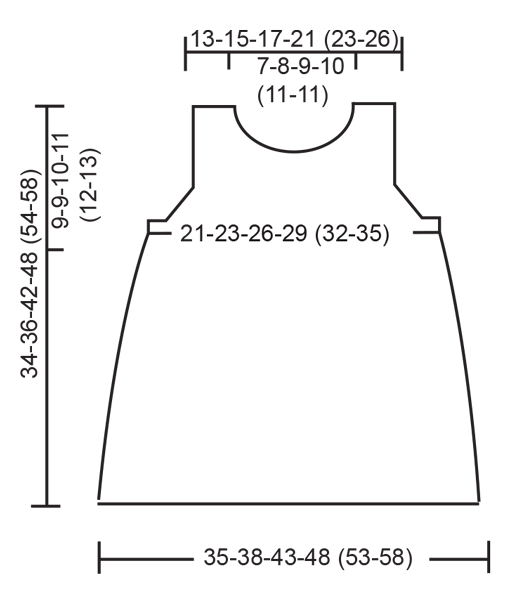
INFORMATION FOR PATTERN: GARTER STITCH (worked in the round): 1 ridge = 2 rounds. Knit 1 round and purl 1 round. GARTER STITCH (back and forth): 1 ridge = knit 2 rows. PATTERN: See diagrams A.1 and A.2 (first A.2a, then A.2b and A.2c). Choose diagram for your size. Diagrams show all rows in pattern seen from the right side. DECREASE TIP-1 (applies evenly spaced decrease): To calculate how to decrease evenly, use the total number of stitches on row (e.g. 168 stitches) and divide stitches by number of decreases to be done (e.g. 6) = 28. In this example work approx. every 27th and 28th stitch together. DECREASE TIP-2 (applies to armholes): Decrease inside 3 edge stitches in garter stitch. All decreases are done from the right side. Decrease before 3 edge stitches as follows: Knit 2 together. Decrease after 3 edge stitches as follows: Slip 1 stitch knitwise, knit 1, pass slipped stitch over stitch worked. ---------------------------------------------------------- DRESS: Worked in the round on circular needle up to armhole, then work front and back piece back and forth separately. Neck edge is worked back and forth on needle. BODY: Cast on 168-180-204-228 (252-276) stitches on circular needle size 3 mm with Alpaca. Insert 1 marker at beginning of round and 1 marker after 84-90-102-114 (126-138) stitches, markers indicates side of garment. Then work A.1 (= 12 stitches) over all stitches (= 14-15-17-19 (21-23) times in width). REMEMBER THE KNITTING TENSION! When A.1 has been worked 1 time vertically, piece measures approx. 8 cm. Then work A.2 (= 12 stitches) over all stitches (= 14-15-17-19 (21-23) times in width). On rounds marked with arrow decrease stitches evenly - read DECREASE TIP-1. For every time 12 stitches are decreased in total, work 1 repetition less of A.2 in width. When all decreases are done, there are 108-120-132-156 (156-180) stitches on needle (= 54-60-66-78 (78-90) stitches on each side of marker). READ ALL OF THE FOLLOWING SECTION BEFORE CONTINUING! WORK PATTERN WHILE AT THE SAME TIME DECREASING FOR ARMHOLE THE SIDE AS FOLLOWS: PATTERN: Continue with pattern. When A.2 has been worked vertically, continue in GARTER STITCH - see explanation above. Piece measures approx. 27-27-33-33 (39-39) cm. ARMHOLE: When piece measures 24-26-31-36 (41-44) cm, continue as follows: Work 9 stitches in garter stitch, work pattern/garter stitch as before, but decrease 4-4-4-8 (2-6) stitches evenly until 9 stitches remain before next marker, work 18 stitches in garter stitch, work pattern/garter stitch as before, but decrease 4-4-4-8 (2-6) stitches evenly until 9 stitches remain on round, finish with 9 stitches in garter stitch = 100-112-124-140 (152-168) stitches in total (= 50-56-62-70 (76-84) stitches on each side of markers). Continue like this until piece measures 25-27-32-37 (42-45) cm. Now cast off stitches for armhole as follows: Cast off the first 6 stitches, work 3 stitches in garter stitch, work pattern until 9 stitches remain before next marker, work 3 stitches in garter stitch, cast off the next 12 stitches, work 3 stitches in garter stitch, work pattern as before until 9 stitches remain, work 3 stitches in garter stitch and cast off the last 6 stitches. Now finish front and back piece separately. BACK PIECE: Now work back and forth. = 38-44-50-58 (64-72) stitches. Continue with pattern and 3 stitches in garter stitch in each side of piece. Then decrease 1 stitch for armhole inside 3 stitches in garter stitch in each side of piece - read DECREASE TIP-2! Decrease like this on every other row 3-4-5-4 (4-5) times in total = 32-36-40-50 (56-62) stitches. When piece measures 32-34-40-46 (52-56) cm, cast off the middle 16-18-22-24 (26-26) stitches for neck = 8-9-9-13 (15-18) stitches on each shoulder. Now finish each shoulder separately. LEFT SHOULDER: Continue in stocking stitch with 3 stitches in garter stitch out towards armhole as before until piece measures 34-36-42-48 (54-58) cm in total. Cast off by purling from wrong side. This shoulder is sewn together with left shoulder on front piece later. RIGHT SHOULDER: Continue in stocking stitch with 3 stitches in garter stitch out towards armhole as before until piece measures 34-36-42-48 (54-58) cm in total. Cast off by knitting from wrong side. On this shoulder sew on buttons later. FRONT PIECE: Work as on back piece until piece measures 30-32-37-42 (48-51) cm. Now cast off the middle 10-12-16-16 (18-18) stitches for neck = 11-12-12-17 (19-22) stitches on each shoulder. Now finish each shoulder separately. RIGHT SHOULDER: Cast off 1 stitch on every row from neck 3-3-3-4 (4-4) times in total = 8-9-9-13 (15-18) stitches. When piece measures 32-34-40-46 (52-56) cm, work in stocking stitch with 3 stitches in garter stitch out towards armhole. When piece measures 34-36-42-48 (54-58) cm, decrease for 2 buttonholes from right side as follows: Knit 1-1-1-2 (3-3), knit 2 together, make 1 yarn over (= 1 buttonhole), knit 2-2-2-4 (5-8), knit 2 together, make 1 yarn over (= 1 buttonhole), finish with 1-2-2-3 (3-3) stitches in garter stitch. Cast off by knitting on next row from wrong side. LEFT SHOULDER: Cast off 1 stitch on every row from neck 3-3-3-4 (4-4) times in total = 8-9-9-13 (15-18) stitches. Continue in stocking stitch with 3 stitches in garter stitch out towards armhole as before until piece measures 34-36-42-48 (54-58) cm in total. Cast off by purling from wrong side. This shoulder is sewn together with left shoulder on back piece later. ASSEMBLY: Sew buttons on to right shoulder on back piece. Sew left shoulder together with grafting/kitchener stitches. NECK EDGE: Worked back and forth. Begin at right shoulder on back piece and pick up 46-70 stitches around the neck from right side. Knit 3 rows, cast off by knitting, make sure to avoid a tight cast-off edge, cast off with 1 larger needle size if needed. |
|||||||||||||||||||||||||
Diagram explanations |
|||||||||||||||||||||||||
|
|||||||||||||||||||||||||
 |
|||||||||||||||||||||||||
 |
|||||||||||||||||||||||||
 |
|||||||||||||||||||||||||
 |
|||||||||||||||||||||||||
 |
|||||||||||||||||||||||||
 |
|||||||||||||||||||||||||
 |
|||||||||||||||||||||||||
 |
|||||||||||||||||||||||||
 |
|||||||||||||||||||||||||
Have you finished this pattern?Tag your pictures with #dropspattern #serafinadress or submit them to the #dropsfan gallery. Do you need help with this pattern?You'll find 28 tutorial videos, a Comments/Questions area and more by visiting the pattern on garnstudio.com. © 1982-2026 DROPS Design A/S. We reserve all rights. This document, including all its sub-sections, has copyrights. Read more about what you can do with our patterns at the bottom of each pattern on our site. |
|||||||||||||||||||||||||


With over 40 years in knitting and crochet design, DROPS Design offers one of the most extensive collections of free patterns on the internet - translated to 17 languages. As of today we count 325 catalogues and 12298 patterns translated into English (UK/cm).
We work hard to bring you the best knitting and crochet have to offer, inspiration and advice as well as great quality yarns at incredible prices! Would you like to use our patterns for other than personal use? You can read what you are allowed to do in the Copyright text at the bottom of all our patterns. Happy crafting!
Post a comment to pattern DROPS Baby 31-17
We would love to hear what you have to say about this pattern!
If you want to leave a question, please make sure you select the correct category in the form below, to speed up the answering process. Required fields are marked *.