Comments / Questions (116)
![]() Dorothy Chu wrote:
Dorothy Chu wrote:
My question is, in Decrease Tip 1 - work 1 repetition less of A.2 in width. What does this mean? Thank you for the beautiful pattern.
16.10.2022 - 07:44DROPS Design answered:
Dear Dorothy, please see the answer above. Happy knitting!
16.10.2022 - 23:59
![]() Emily Kim wrote:
Emily Kim wrote:
Hello, I am a bit confused at the ARMHOLE part where I have decreased one round but then the next part says to ‘Continue like this until piece measures 25-27-32-37 (42-45) cm. ‘ So how many stitches should I be left with on each side of the markers?
29.09.2022 - 23:25DROPS Design answered:
Dear Kim, you have to continue pattern as before with 18 stitches in garter stitch on each side of piece (= 9 sts in garter stitch on each side of each marker) for armhole until piece measures 25-27-32-37 (42-45) cm, then you will cast off the middle 12 sts of these 18 sts and continue each piece spearately with 3 sts in garter stitch on each side. Happy knitting!
30.09.2022 - 08:14
![]() Laura Hammel wrote:
Laura Hammel wrote:
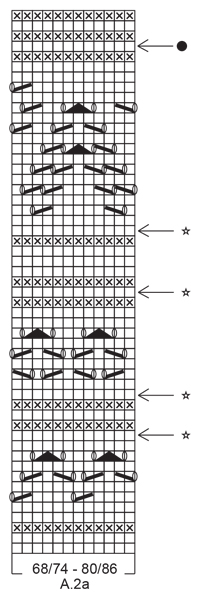
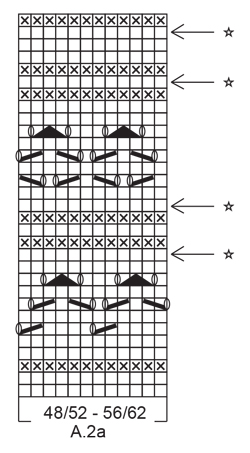
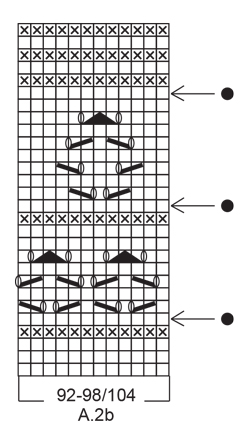
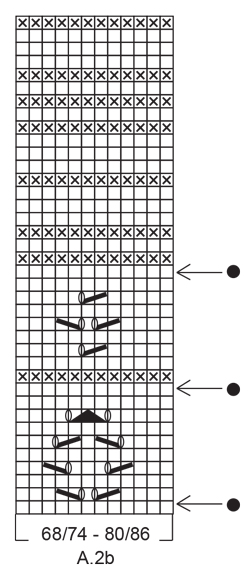
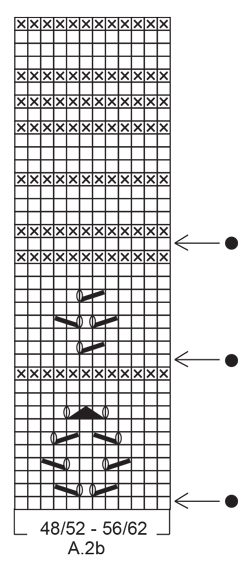
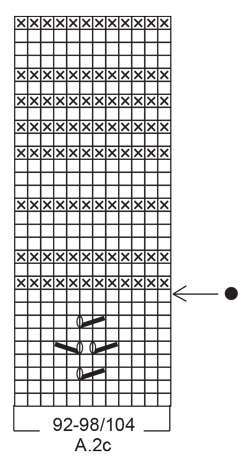
Liebes Drops Team, ich habe eine Frage zum Diagramm A.2: Werden die Diagramme A.2a, A.2b und ggf. A.2c nacheinander in die Höhe gestrickt oder werden in einer Reihe nacheinander A.2a, A.2b und ggf. A.2c nacheinander gestrickt?
14.09.2022 - 13:18DROPS Design answered:
Liebe Frau Hammel, zuerst stricken Sie A.1a, dann stricken Sie A.1b und endlich A.1c also jeweils nach einander in der Höhe und nicht nacheinander in der Breite/Runde (wir habe das Diagram in 3 Teilen geschnitten damit jedes einfacher zu lesen wird). Viel Spaß beim stricken!
14.09.2022 - 16:31
![]() Liisa Rossi wrote:
Liisa Rossi wrote:
Kädenteiden ohjeessa on epätarkkuus. Ensin neuvotaan neulomaan kerros, jossa kerroksen alussa ja keskellä neulotaan 18 s aina oikeaa ja väleissä kavennetaan molemmin puolin neljä. Sitten sanotaan "jatka tähän tapaan", mikä antaa ymmärtää, että kavennukset toistuvat. Seuraavan osion silmukkamäärästä kuitenkin näkee, että kavennukset kuuluu tehdä vain kerran. Kannattaisi tarkentaa ohjeeseen, ettei muutkin joudu purkamaan.
23.08.2022 - 10:44
![]() Liz wrote:
Liz wrote:
Hi, good morning, I've slept on it and looked with fresh eyes and it's all clear now. Sorry to have bothered you. Beautiful pattern by the way and an absolute joy to knit, I'm using flora
22.07.2022 - 08:07
![]() Liz wrote:
Liz wrote:
Good evening, I am making the 2nd size and I am lost with the decreasing. On A2 it says I decrease 4 times (in the instructions it says 12 St's each Dec, but the code says 6 st) I decreased 12 St's each decreased row and am left with 132st and it says I should have 120sts
22.07.2022 - 01:10
![]() Jessy Prkno wrote:
Jessy Prkno wrote:
Hallo, Ich habe eine Frage zu dem Muster A1. Fange ich mit dem Muster oben an zu stricken oder unten? (Weil wir das Kleid ja auch von unten beginnen). Liebe Grüße :)
14.07.2022 - 08:21DROPS Design answered:
Liebe Jessy, Sie lesen die Diagramme immer von unten nach oben, auch in dieser Anleitung. Gutes Gelingen!
18.07.2022 - 10:01
![]() Sheila Kaupa wrote:
Sheila Kaupa wrote:
I see on-line 2 different version of this pattern. The differences are on the how to knit the shoulders. On one pattern it says to bind off 3 stitches on the back left shoulder. On the other it says to do all binding off of shoulders on the front. I am very confused! Can you please send to me the correct pattern? I am knitting size 6 to 9 month size.
16.06.2022 - 21:34DROPS Design answered:
Dear Mrs Kaupa, the left and right shoulder on back piece is worked without further bind off for neckline (pattern will be edited, see UK-pattern in the meantime). Thanks for your feedback.
17.06.2022 - 07:46
![]() Sheila Kaupa wrote:
Sheila Kaupa wrote:
As an additional comment on my last question - I am knitting size 6 - 9 months size
14.06.2022 - 23:02DROPS Design answered:
thanks - see below.
15.06.2022 - 09:00
![]() Sheila Kaupa wrote:
Sheila Kaupa wrote:
The pattern says to cast off at the neck (back) middle stitches leaving 9 for each shoulder. Then for the shoulders it states "Cast off 1 stitch on every row from neck 3-3-3-4 (4-4) times in total = 8-9-9-13 (15-18) stitches. " Casting off 1 every row 3 times is only 3 and leaves 6 stitches. How many do I cast off on each shoulder - 3?
14.06.2022 - 22:49DROPS Design answered:
Dear Mrs Kaupa, after you cast off the middle stitches for neck on front piece (no more cast off for shoulders on back piece), you now cast off at the beginning of each of the next 3 rows from the neck towards shoulder (= beg of a right side row on right shoulder / beg of a wrong side row on left shoulder). Happy knitting!
15.06.2022 - 08:59
Serafina#serafinadress |
|||||||||||||||||||||||||
 |
 |
||||||||||||||||||||||||
Knitted dress with lace pattern and garter stitch for baby. Size 0 - 4 years Piece is knitted in DROPS Alpaca.
DROPS Baby 31-17 |
|||||||||||||||||||||||||
|
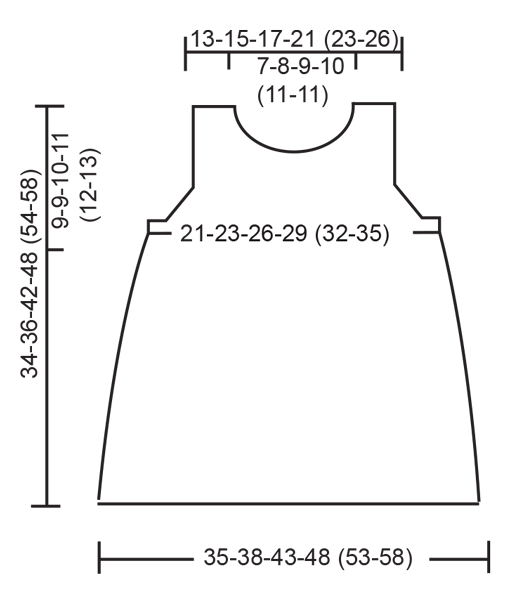
INFORMATION FOR PATTERN: GARTER STITCH (worked in the round): 1 ridge = 2 rounds. Knit 1 round and purl 1 round. GARTER STITCH (back and forth): 1 ridge = knit 2 rows. PATTERN: See diagrams A.1 and A.2 (first A.2a, then A.2b and A.2c). Choose diagram for your size. Diagrams show all rows in pattern seen from the right side. DECREASE TIP-1 (applies evenly spaced decrease): To calculate how to decrease evenly, use the total number of stitches on row (e.g. 168 stitches) and divide stitches by number of decreases to be done (e.g. 6) = 28. In this example work approx. every 27th and 28th stitch together. DECREASE TIP-2 (applies to armholes): Decrease inside 3 edge stitches in garter stitch. All decreases are done from the right side. Decrease before 3 edge stitches as follows: Knit 2 together. Decrease after 3 edge stitches as follows: Slip 1 stitch knitwise, knit 1, pass slipped stitch over stitch worked. ---------------------------------------------------------- DRESS: Worked in the round on circular needle up to armhole, then work front and back piece back and forth separately. Neck edge is worked back and forth on needle. BODY: Cast on 168-180-204-228 (252-276) stitches on circular needle size 3 mm with Alpaca. Insert 1 marker at beginning of round and 1 marker after 84-90-102-114 (126-138) stitches, markers indicates side of garment. Then work A.1 (= 12 stitches) over all stitches (= 14-15-17-19 (21-23) times in width). REMEMBER THE KNITTING TENSION! When A.1 has been worked 1 time vertically, piece measures approx. 8 cm. Then work A.2 (= 12 stitches) over all stitches (= 14-15-17-19 (21-23) times in width). On rounds marked with arrow decrease stitches evenly - read DECREASE TIP-1. For every time 12 stitches are decreased in total, work 1 repetition less of A.2 in width. When all decreases are done, there are 108-120-132-156 (156-180) stitches on needle (= 54-60-66-78 (78-90) stitches on each side of marker). READ ALL OF THE FOLLOWING SECTION BEFORE CONTINUING! WORK PATTERN WHILE AT THE SAME TIME DECREASING FOR ARMHOLE THE SIDE AS FOLLOWS: PATTERN: Continue with pattern. When A.2 has been worked vertically, continue in GARTER STITCH - see explanation above. Piece measures approx. 27-27-33-33 (39-39) cm. ARMHOLE: When piece measures 24-26-31-36 (41-44) cm, continue as follows: Work 9 stitches in garter stitch, work pattern/garter stitch as before, but decrease 4-4-4-8 (2-6) stitches evenly until 9 stitches remain before next marker, work 18 stitches in garter stitch, work pattern/garter stitch as before, but decrease 4-4-4-8 (2-6) stitches evenly until 9 stitches remain on round, finish with 9 stitches in garter stitch = 100-112-124-140 (152-168) stitches in total (= 50-56-62-70 (76-84) stitches on each side of markers). Continue like this until piece measures 25-27-32-37 (42-45) cm. Now cast off stitches for armhole as follows: Cast off the first 6 stitches, work 3 stitches in garter stitch, work pattern until 9 stitches remain before next marker, work 3 stitches in garter stitch, cast off the next 12 stitches, work 3 stitches in garter stitch, work pattern as before until 9 stitches remain, work 3 stitches in garter stitch and cast off the last 6 stitches. Now finish front and back piece separately. BACK PIECE: Now work back and forth. = 38-44-50-58 (64-72) stitches. Continue with pattern and 3 stitches in garter stitch in each side of piece. Then decrease 1 stitch for armhole inside 3 stitches in garter stitch in each side of piece - read DECREASE TIP-2! Decrease like this on every other row 3-4-5-4 (4-5) times in total = 32-36-40-50 (56-62) stitches. When piece measures 32-34-40-46 (52-56) cm, cast off the middle 16-18-22-24 (26-26) stitches for neck = 8-9-9-13 (15-18) stitches on each shoulder. Now finish each shoulder separately. LEFT SHOULDER: Continue in stocking stitch with 3 stitches in garter stitch out towards armhole as before until piece measures 34-36-42-48 (54-58) cm in total. Cast off by purling from wrong side. This shoulder is sewn together with left shoulder on front piece later. RIGHT SHOULDER: Continue in stocking stitch with 3 stitches in garter stitch out towards armhole as before until piece measures 34-36-42-48 (54-58) cm in total. Cast off by knitting from wrong side. On this shoulder sew on buttons later. FRONT PIECE: Work as on back piece until piece measures 30-32-37-42 (48-51) cm. Now cast off the middle 10-12-16-16 (18-18) stitches for neck = 11-12-12-17 (19-22) stitches on each shoulder. Now finish each shoulder separately. RIGHT SHOULDER: Cast off 1 stitch on every row from neck 3-3-3-4 (4-4) times in total = 8-9-9-13 (15-18) stitches. When piece measures 32-34-40-46 (52-56) cm, work in stocking stitch with 3 stitches in garter stitch out towards armhole. When piece measures 34-36-42-48 (54-58) cm, decrease for 2 buttonholes from right side as follows: Knit 1-1-1-2 (3-3), knit 2 together, make 1 yarn over (= 1 buttonhole), knit 2-2-2-4 (5-8), knit 2 together, make 1 yarn over (= 1 buttonhole), finish with 1-2-2-3 (3-3) stitches in garter stitch. Cast off by knitting on next row from wrong side. LEFT SHOULDER: Cast off 1 stitch on every row from neck 3-3-3-4 (4-4) times in total = 8-9-9-13 (15-18) stitches. Continue in stocking stitch with 3 stitches in garter stitch out towards armhole as before until piece measures 34-36-42-48 (54-58) cm in total. Cast off by purling from wrong side. This shoulder is sewn together with left shoulder on back piece later. ASSEMBLY: Sew buttons on to right shoulder on back piece. Sew left shoulder together with grafting/kitchener stitches. NECK EDGE: Worked back and forth. Begin at right shoulder on back piece and pick up 46-70 stitches around the neck from right side. Knit 3 rows, cast off by knitting, make sure to avoid a tight cast-off edge, cast off with 1 larger needle size if needed. |
|||||||||||||||||||||||||
Diagram explanations |
|||||||||||||||||||||||||
|
|||||||||||||||||||||||||
 |
|||||||||||||||||||||||||
 |
|||||||||||||||||||||||||
 |
|||||||||||||||||||||||||
 |
|||||||||||||||||||||||||
 |
|||||||||||||||||||||||||
 |
|||||||||||||||||||||||||
 |
|||||||||||||||||||||||||
 |
|||||||||||||||||||||||||
 |
|||||||||||||||||||||||||
Have you finished this pattern?Tag your pictures with #dropspattern #serafinadress or submit them to the #dropsfan gallery. Do you need help with this pattern?You'll find 28 tutorial videos, a Comments/Questions area and more by visiting the pattern on garnstudio.com. © 1982-2026 DROPS Design A/S. We reserve all rights. This document, including all its sub-sections, has copyrights. Read more about what you can do with our patterns at the bottom of each pattern on our site. |
|||||||||||||||||||||||||


Post a comment to pattern DROPS Baby 31-17
We would love to hear what you have to say about this pattern!
If you want to leave a question, please make sure you select the correct category in the form below, to speed up the answering process. Required fields are marked *.