DROPS Alpaca
DROPS Alpaca
100% Alpaca
from 3.40 £ /50g
Get the yarn to make this pattern from 6.80£.

The yarn cost is calculated from the pattern’s smallest size and the yarn’s cheapest product type. Looking for an even better price? You might find it on the DROPS Deals!

DROPS SS24

Serafina

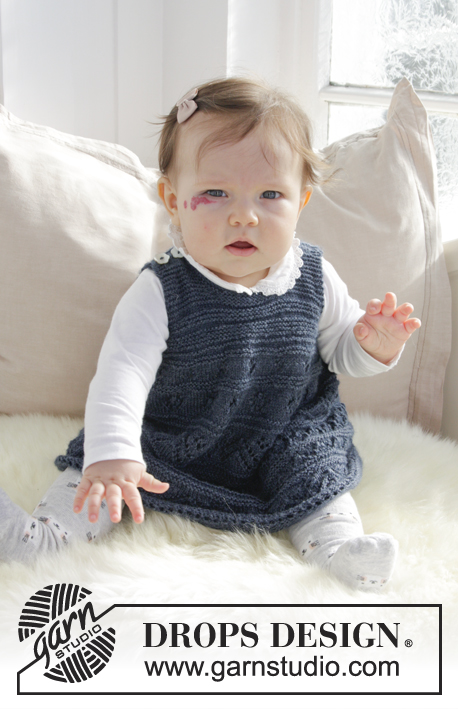
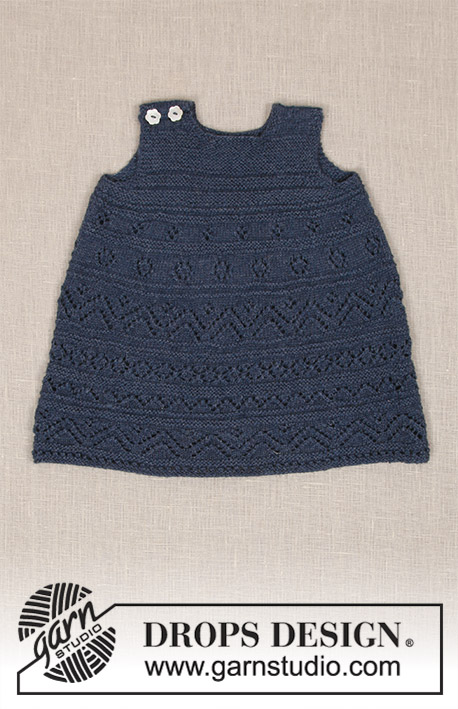
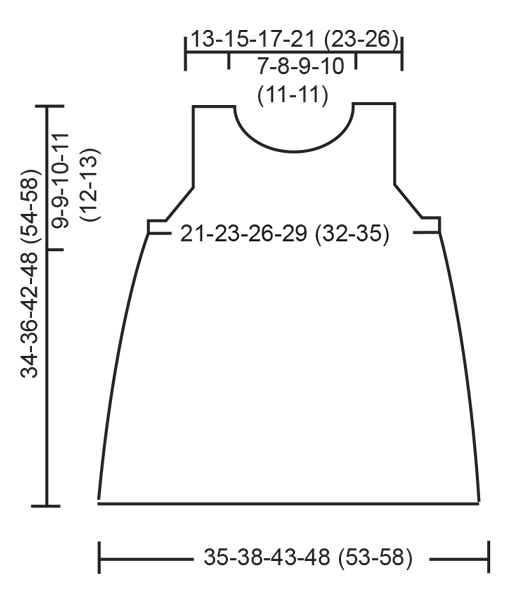
Knitted dress with lace pattern and garter stitch for baby. Size 0 - 4 years Piece is knitted in DROPS Alpaca.

DROPS Baby 31-17
DROPS design: Pattern z-100-by
Yarn group A
----------------------------------------------------------
Size: 0/1 - 1/3 - 6/9 - 12/18 months (2 - 3/4) years
Size equivalent to approx. child’s length in cm:
48/52 - 56/62 - 68/74 - 80/86 (92 - 98/104)
Materials:
DROPS ALPACA from Garnstudio (belongs to yarn group A)
100-100-150-150 (150-150) g colour 4305, dark indigo

Piece can also be knitted with yarn from:
“Alternative yarn (yarn group A)” - see link below.

DROPS CIRCULAR NEEDLE (40 and 60 cm) SIZE 3 mm – or size needed to get 24 stitches and 32 rows in stocking stitch = width 10 cm and 10 cm vertically.

DROPS MOTHER-OF-PEARL BUTTON, flower (white), NO 600: 2 pieces for all sizes
----------------------------------------------------------

-------------------------------------------------------

Alternative Yarn – See how to change yarns here
Yarn Groups A to F – Use the same pattern and change the yarn here
Yarn usage using an alternative yarn – Use our yarn converter here

-------------------------------------------------------

DROPS Alpaca
DROPS Alpaca
100% Alpaca
from 3.40 £ /50g
Get the yarn to make this pattern from 6.80£.

The yarn cost is calculated from the pattern’s smallest size and the yarn’s cheapest product type. Looking for an even better price? You might find it on the DROPS Deals!

Pattern instructions

NOTE: This pattern is written in British English. All measurements in charts are in cm. For conversion from cm to inches - click here. There are different terms for crocheting in British and American English. If this pattern includes crochet, click for "crochet terms" here. For this pattern in American English, please click here.
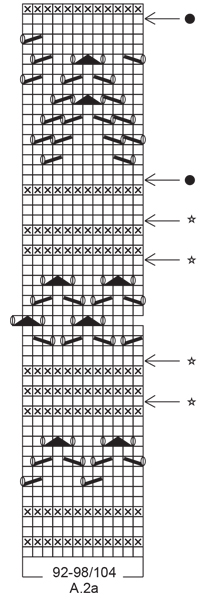
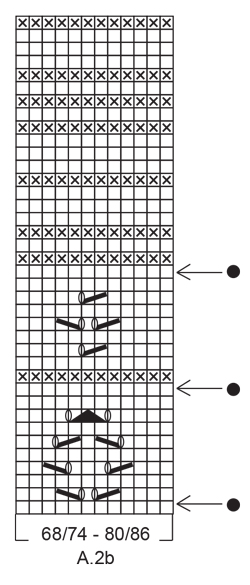
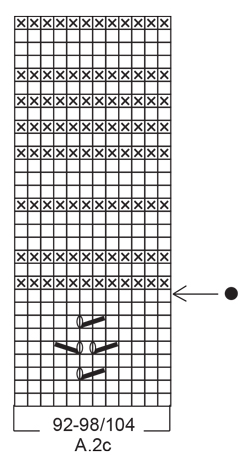
INFORMATION FOR PATTERN:

GARTER STITCH (worked in the round):
1 ridge = 2 rounds. Knit 1 round and purl 1 round.

GARTER STITCH (back and forth):
1 ridge = knit 2 rows.

PATTERN:
See diagrams A.1 and A.2 (first A.2a, then A.2b and A.2c). Choose diagram for your size.
Diagrams show all rows in pattern seen from the right side.

DECREASE TIP-1 (applies evenly spaced decrease):
To calculate how to decrease evenly, use the total number of stitches on row (e.g. 168 stitches) and divide stitches by number of decreases to be done (e.g. 6) = 28. In this example work approx. every 27th and 28th stitch together.

DECREASE TIP-2 (applies to armholes):
Decrease inside 3 edge stitches in garter stitch. All decreases are done from the right side.
Decrease before 3 edge stitches as follows: Knit 2 together.
Decrease after 3 edge stitches as follows: Slip 1 stitch knitwise, knit 1, pass slipped stitch over stitch worked.
----------------------------------------------------------

DRESS:
Worked in the round on circular needle up to armhole, then work front and back piece back and forth separately. Neck edge is worked back and forth on needle.

BODY:
Cast on 168-180-204-228 (252-276) stitches on circular needle size 3 mm with Alpaca. Insert 1 marker at beginning of round and 1 marker after 84-90-102-114 (126-138) stitches, markers indicates side of garment. Then work A.1 (= 12 stitches) over all stitches (= 14-15-17-19 (21-23) times in width). REMEMBER THE KNITTING TENSION! When A.1 has been worked 1 time vertically, piece measures approx. 8 cm. Then work A.2 (= 12 stitches) over all stitches (= 14-15-17-19 (21-23) times in width). On rounds marked with arrow decrease stitches evenly - read DECREASE TIP-1. For every time 12 stitches are decreased in total, work 1 repetition less of A.2 in width. When all decreases are done, there are 108-120-132-156 (156-180) stitches on needle (= 54-60-66-78 (78-90) stitches on each side of marker).

READ ALL OF THE FOLLOWING SECTION BEFORE CONTINUING! WORK PATTERN WHILE AT THE SAME TIME DECREASING FOR ARMHOLE THE SIDE AS FOLLOWS:
PATTERN:
Continue with pattern. When A.2 has been worked vertically, continue in GARTER STITCH - see explanation above. Piece measures approx. 27-27-33-33 (39-39) cm.
ARMHOLE:
When piece measures 24-26-31-36 (41-44) cm, continue as follows: Work 9 stitches in garter stitch, work pattern/garter stitch as before, but decrease 4-4-4-8 (2-6) stitches evenly until 9 stitches remain before next marker, work 18 stitches in garter stitch, work pattern/garter stitch as before, but decrease 4-4-4-8 (2-6) stitches evenly until 9 stitches remain on round, finish with 9 stitches in garter stitch = 100-112-124-140 (152-168) stitches in total (= 50-56-62-70 (76-84) stitches on each side of markers). Continue like this until piece measures 25-27-32-37 (42-45) cm. Now cast off stitches for armhole as follows: Cast off the first 6 stitches, work 3 stitches in garter stitch, work pattern until 9 stitches remain before next marker, work 3 stitches in garter stitch, cast off the next 12 stitches, work 3 stitches in garter stitch, work pattern as before until 9 stitches remain, work 3 stitches in garter stitch and cast off the last 6 stitches. Now finish front and back piece separately.

BACK PIECE:
Now work back and forth.
= 38-44-50-58 (64-72) stitches. Continue with pattern and 3 stitches in garter stitch in each side of piece. Then decrease 1 stitch for armhole inside 3 stitches in garter stitch in each side of piece - read DECREASE TIP-2! Decrease like this on every other row 3-4-5-4 (4-5) times in total = 32-36-40-50 (56-62) stitches. When piece measures 32-34-40-46 (52-56) cm, cast off the middle 16-18-22-24 (26-26) stitches for neck = 8-9-9-13 (15-18) stitches on each shoulder. Now finish each shoulder separately.

LEFT SHOULDER:
Continue in stocking stitch with 3 stitches in garter stitch out towards armhole as before until piece measures 34-36-42-48 (54-58) cm in total. Cast off by purling from wrong side. This shoulder is sewn together with left shoulder on front piece later.

RIGHT SHOULDER:
Continue in stocking stitch with 3 stitches in garter stitch out towards armhole as before until piece measures 34-36-42-48 (54-58) cm in total. Cast off by knitting from wrong side. On this shoulder sew on buttons later.

FRONT PIECE:
Work as on back piece until piece measures 30-32-37-42 (48-51) cm. Now cast off the middle 10-12-16-16 (18-18) stitches for neck = 11-12-12-17 (19-22) stitches on each shoulder. Now finish each shoulder separately.

RIGHT SHOULDER:
Cast off 1 stitch on every row from neck 3-3-3-4 (4-4) times in total = 8-9-9-13 (15-18) stitches. When piece measures 32-34-40-46 (52-56) cm, work in stocking stitch with 3 stitches in garter stitch out towards armhole. When piece measures 34-36-42-48 (54-58) cm, decrease for 2 buttonholes from right side as follows: Knit 1-1-1-2 (3-3), knit 2 together, make 1 yarn over (= 1 buttonhole), knit 2-2-2-4 (5-8), knit 2 together, make 1 yarn over (= 1 buttonhole), finish with 1-2-2-3 (3-3) stitches in garter stitch. Cast off by knitting on next row from wrong side.

LEFT SHOULDER:
Cast off 1 stitch on every row from neck 3-3-3-4 (4-4) times in total = 8-9-9-13 (15-18) stitches. Continue in stocking stitch with 3 stitches in garter stitch out towards armhole as before until piece measures 34-36-42-48 (54-58) cm in total. Cast off by purling from wrong side. This shoulder is sewn together with left shoulder on back piece later.

ASSEMBLY:
Sew buttons on to right shoulder on back piece. Sew left shoulder together with grafting/kitchener stitches.

NECK EDGE:
Worked back and forth.
Begin at right shoulder on back piece and pick up 46-70 stitches around the neck from right side. Knit 3 rows, cast off by knitting, make sure to avoid a tight cast-off edge, cast off with 1 larger needle size if needed.

This pattern has been corrected.

Updated online: 12.06.2019
Correction - LEFT SHOULDER:
Cast off 1 stitch on every row from neck 3-3-3-4 (4-4) times in total = 8-9-9-13
(15-18) stitches.

Diagram

symbols = knit from the right side, purl from the wrong side
symbols = purl from the right side, knit from the wrong side
symbols = knit 2 together
symbols = slip 1 stitch knitwise, knit 1, pass slipped stitch over
symbols = between 2 stitches make 1 yarn over
symbols = slip 2 stitches knitwise, knit 1, pass the 2 slipped stitches over
symbols = on this round decrease 6 stitches evenly
symbols = on this round/row decrease 12 stitches evenly
diagram
diagram
diagram
diagram
diagram
diagram
diagram
diagram
diagram

Each of our patterns has specific tutorial videos to help you.

Do you have a question? See a list of frequently asked questions (FAQ)

Knitting tension is what determines the final measurements of your work, and is usually measured per 10 x 10 cm. It is provided like so: number of stitches in width x number of rows in height - eg: 19 stitches x 26 rows = 10 x 10 cm.

The knitting tension is very individual; some people knit/crochet loosely while others work tightly. You adjust the knitting tension with the needle size, which is why the suggested needle size is only meant as a guide! You need to adjust this (up or down) to ensure that YOUR knitting tension matches the knitting tension provided in the pattern. If you work with a different knitting tension than provided you will have a different yarn consumption, and your work will have different measurements than what the pattern suggests.

The knitting tension also determines which yarns can replace each other. As long as you achieve the same knitting tension you can replace one yarn with another.

See DROPS lesson: How to measure your tension/gauge

See DROPS video: How to make a gauge tension swatch

The required amount of yarn is provided in grams, eg: 450 g. To calculate how many balls you’ll need you first need to know how many grams are in 1 ball (25g, 50g or 100g). This information is available if you click on the individual yarn quality on our pages. Divide the amount required with the amount of each ball. For example, if each ball is 50g (the most common amount), the calculation will be as follows: 450 / 50 = 9 balls.

The important thing when changing from one yarn to another is that the knitting/crochet tension remains the same. This is so that the measurements of the finished piece will be the same as on the sketch provided. It is easier to achieve the same knitting tension using yarns from the same yarn group. It is also possible to work with multiple strands of a thinner yarn to achieve the knitting tension of a thicker one. Please try our yarn converter. We recommend you to always work a test swatch.

Please NOTE: when changing yarn the garment might have a different look and feel to the garment in the photo, due to individual properties and qualities of each yarn.

See DROPS lesson: Can I use a different yarn than the one mentioned in the pattern?

All our yarns are categorised into yarn groups (from A to F) according to thickness and knitting tension – group A contains the thinnest yarns and group F the thickest. This makes it easier for you to find alternative yarns to our patterns, should you wish to switch yarn. All yarns within the same group have a similar knitting tension and can easily replace each other. However, different yarn qualities have different structures and properties which will give the finished work a unique look and feel.

Click here for an overview of the yarns in each yarn group

At the top of all our patterns you’ll find a link to our yarn calculator, which is a helpful tool should you wish to use a different yarn than suggested. By filling in the yarn quality you wish to replace, the amount (in your size) and number of strands, the calculator will present good alternative yarns with the same knitting tension. Additionally it will tell you how much you’ll require in the new qualities and whether you’ll need to work with multiple strands. Most skeins are 50g (some are 25g or 100g).

If the pattern is worked with multiple colours, every colour will have to be calculated separately. Similarly, if the pattern is worked with several strands of different yarns (for example 1 strand Alpaca and 1 strand Kid-Silk) you will have to find alternatives for each, individually.

Click here to see our yarn calculator

Since different yarns have different qualities and textures we have chosen to keep the original yarn in our patterns. However, you can easily find options among our available qualities by using our yarn calculator, or simply pick a yarn from the same yarn group.

It is possible that some retailers still have discontinued yarns in stock, or that someone has a few skeins at home that they would like to find patterns for.

The yarn calculator will provide both alternative yarn as well as required amount in the new quality.

If you think it's hard to decide what size to make, it can be a good idea to measure a garment you own already and like the size of. Then you can pick the size by comparing those measures with the ones available in the pattern's size chart.

You'll find the size chart at the bottom of the pattern.

See DROPS lesson: How to read size chart

The needle size provided in the pattern serves only as a guide, the important thing is to follow the knitting tension. And since knitting tension is very individual, you will have to adjust the needle size to ensure that YOUR tension is the same as in the pattern – maybe you’ll have to adjust 1, or even 2 needle sizes, up or down to achieve the correct tension. For this, we recommend that you work test swatches.

Should you work with a different knitting tension than the one provided, the measurements of the finished garment might deviate from the measurement sketch.

See DROPS lesson: How to measure your tension/gauge

See DROPS video: How to make a tension/gauge swatch

Working a garment top-down provides more flexibility and room for personal adjustment. For example it is easier to try the garment on while working, as well as making adjustments to length of yoke and shoulder caps.

The instructions are carefully explaining every step, in the correct order. Diagrams are adjusted to the knitting direction and are worked as usual.

The diagram depicts all rows/rounds, and every stitch seen from the right side. It is read from bottom to top, from right to left. 1 square = 1 stitch.

When working back and forth, every other row is worked from the right side and every other row is worked from the wrong side. When working from the wrong side, the diagram will have to be worked reversed: from left to right, knit stitches are purled, purl stitches are knit etc.

When working in the round every round is worked from the right side and the diagram are worked from right to left on all rounds.

See DROPS lesson: How to read knitting diagrams

The diagram depicts all rows/rounds, and every stitch seen from the right side. It is worked from bottom to top, from right to left.

When working back and forth every other row is worked from the right side: from right to left and every other row is worked from the wrong side: from left to right.

When working in the round, every row in the diagram are worked from the right side, from right to left.

When working a circular diagram you start in the middle and work your way outwards, counter clockwise, row by row.

The rows usually start with a given number of chain stitches (equivalent to the height of the following stitch), this will either be depicted in the diagram or explained in the pattern.

See DROPS lesson: How to read crochet diagrams

Instructions for working several diagrams after each other on the same row/round, will often be written like so: “work A.1, A.2, A.3 a total of 0-0-2-3-4 times". This means you work A.1 once, then A.2 is worked once, and A.3 is repeated (in width) the number of times provided for your size – in this case like so: S = 0 times, M = 0 times, L=2 times, XL= 3 times and XXL = 4 times.

The diagrams are worked as usual: begin with the first row in A.1, then work the first row in A.2 etc.

See DROPS lesson: How to read knitting diagrams

See DROPS lesson: How to read crochet diagrams

The total width of the garment (from wrist-to-wrist) will be larger in the larger sizes, despite the actual sleeves being shorter. The larger sizes have longer sleeve caps and wider shoulders, so there will be a good fit in all sizes.

The measurement sketch/schematic drawing provides information regarding the full length of the garment. If it’s a jumper or a jacket the length is measured from the highest point on the shoulder closest to the neckline, and straight down to the bottom of the garment. It is NOT measured from the tip of shoulder. Similarly, the length of yoke is measured from the highest point on the shoulder and down to where yoke is split into body and sleeves.

On a jacket measures are never taken along bands, unless specifically stated. Always measure inside band stitches when measuring the length.

See DROPS lesson: How to read a schematic drawing

Diagrams are often repeated on the round or in height. 1 repeat is the diagram the way it appears in the pattern. If it says to work 5 repeats of A.1 in the round, then you work A.1 a total of 5 times after/next to each other in the round. If it says to work 2 repeats of A.1 vertically/in height you work the entire diagram once, then begin again at the start and work the entire diagram one more time.

Chain stitches are slightly narrower than other stitches and to avoid working the cast-on edge too tight, we simply chain more stitches to begin with. The stitch count will be adjusted on the following row to fit the pattern and measurement sketch.

The rib edge is more elastic and will contract slightly compared to, for example, stocking stitch. By increasing before the rib edge, you avoid a visible difference in width between the rib edge and the rest of the body.

It’s very easy to cast off too tightly, and by making yarn overs while casting off (and simultaneously casting these off) you avoid a too tight cast off edge.

See DROPS video: How to bind off with yarn overs (yo)

To achieve an even increase (or decrease) you can increase on, for example: every 3rd and 4th row alternately, like so: work 2 rows and increase on the 3rd row, work 3 rows and increase on the 4th. Repeat this until the increase is complete.

See DROPS lesson: Increase or decrease 1 st on every 3rd and 4th row alternately

Should you prefer to work in the round instead of back and forth, you may of course adjust the pattern. You’ll need to add steeks mid-front (usually 5 stitches), and follow the instructions. When you would normally turn and work from the wrong side, simply work across the steek and continue in the round. At the end you’ll cut the piece open, pick up stitches to work bands, and cover the cut edges.

See DROPS video: How to knit steeks and cut open

Should you prefer to work back and forth instead of in the round, you may of course adjust the pattern so you work the pieces separately and then assemble them at the end. Divide the stitches for the body in 2, add 1 edge stitch in each side (for sewing) and work the front and back pieces separately.

See DROPS lesson: Can I adapt a pattern for circular needles into straight needles?

Pattern repeats can vary slightly in the different sizes, in order to get the correct proportions. If you’re not working the exact same size as the garment in the photo, yours might deviate slightly. This has been carefully developed and adjusted so that the complete impression of the garment is the same in all sizes.

Make sure to follow instructions and diagrams for your size!

If you have found a pattern you like which is available in women’s size it’s not very difficult to convert it to men’s size. The biggest difference will be the length of sleeves and body. Start working on the women size that you think would fit across the chest. The additional length will be worked right before you cast off for the armhole/sleeve cap. If the pattern is worked top-down you can add the length right after the armhole or before the first decrease on sleeve.

Regarding additional yarn amount, this will depend on how much length you add, but it is better with a skein too many than too few.

All yarns will have excess fibres (from production) that might come off as lint or shedding. Brushed yarns (ie hairier yarns) have more of these loose, excess fibres, causing more shedding.

Shedding also depends on what is worn under or over the garment, and whether this pulls at the yarn fibres. It’s therefore not possible to guarantee that there will be no shedding

Below are some tips on how to get the best result when working with hairier yarns:

1. When the garment is finished (before you wash it) shake it vigorously so the looser hairs come off. NOTE: do NOT use a lint roller, brush or any method that pulls at the yarn.

2. Place the garment in a plastic bag and put it in your freezer - the temperature will cause the fibres to become less attached to each other, and excess fibres will come off easier.

3. Leave in the freezer for a few hours before taking it out and shaking it again.

4. Wash the garment according to the instructions on the yarn label.

Pilling is a natural process that happens to even the most exclusive of fibers. It's a natural sign of wear and tear that is hard to avoid, and that is most visible in high friction areas of your garment like a sweater's arms and cuffs.

You can make your garment look as new by removing the pilling, using a fabric comb or a pill/lint remover.

Still can't find the answer you need? Then scroll down and leave your question so one of our experts can try to help you. This will be done normally within 5 to 10 working days.
In the meantime, you can read the questions and answers that others have left to this pattern or join the DROPS Workshop on Facebook to get help from fellow knitters/crocheters!

You might also like...

Serafina

Enni / Tänkimäätein, Finland

Serafina

Dalmazia Lodi Rizzini, Italy

Post a comment to pattern DROPS Baby 31-17

We would love to hear what you have to say about this pattern!

If you want to leave a question, please make sure you select the correct category in the form below, to speed up the answering process. Required fields are marked *.

Comments / Questions (101)

country flag Manora wrote:

I am done upto the armhole and cannot understands the instructions. Can you please help? Thanks.

06.06.2020 - 15:58

DROPS Design answered:

Dear Manora, when you are up to the armhole, work the last round on body as explained to cast off the 12 middle stitches on each side of piece for the armholes, cut the yarn, and work now front and back pieces separately back and forth decreasing for armhole. Happy knitting!

08.06.2020 - 08:29

country flag Manora wrote:

I am now at the armhole and cannot follow the instructions after. Can you please help me? Thanks

06.06.2020 - 15:55

country flag Ana wrote:

Når A.2 er strikket ferdig i høyden strikkes arbeidet videre i Riller. Arbeidet måler ca 27-27-33-33 (39-39) cm. ERMEHULL: Når arbeidet måler 24-26-31-36 (41-44) cm.. Dette skjønner jeg ikke, det vises til forskjellige mål men jeg vet ikke hvor det menes at disse skal være. Også lurer jeg på hvorfor mål i de første tre str er kortere før "ermehull" og neste tre str er lengre. Takker på forhånd

27.05.2020 - 15:33

DROPS Design answered:

Hei Ana. Når A.2 er ferdig strikket måler arbeidet ca 27-27-33-33 (39-39) cm, MEN når arbeidet måler 24-26-31-36 (41-44) skal det felles til ermhull. Dvs at det felles til ermhull i de 3 minste størrelsene før A.2 er ferdig strikket. Mindre mål/kortere kjole i de minste størrelsene, altså kortere før ermhullene felles. God Fornøyelse!

03.06.2020 - 10:38

country flag Petronelle wrote:

Hej, jeg skal til at strikke A.2 str. 92. Skal jeg starte med at strikke hele diagram A.2a først for derefter at gå videre til b og til sidst c, eller skal jeg skiftevis strikke en rapport af hver, til omgangen er færdig? Derudover står der, at man skal strikke en rapport mindre i bredden, når der totalt er taget 12 masker ind, er det diagram a, b eller c der er tale om her??

06.05.2020 - 14:28

DROPS Design answered:

Hej Petronelle, du strikker først a, så b og sidst c i højden. Når der er taget 12 masker ind, strikker du en rapport mindre i bredden i det diagram du er igang med. God fornøjelse!

08.05.2020 - 10:15

country flag Aa wrote:

Hej, jag stickar 56/62, på diagrammet A.2b. Hur menas det med att sticka en rapport mindre varje gång man minskar 12 maskor? Ska man på varje varv ta bort en rapport eller? T.ex på fösta gången när man minskar 12 maskor ska man då bara sticka 2 maskor räta efter ”mönstret” fast det är 3 maskor i diagrammet?

19.03.2020 - 18:43

DROPS Design answered:

Hej. När du minskar 12 m på ett varv så får du 12 maskor mindre till nästa varv och då stickar du bara rapporten t.ex 14 gånger istället för 15 gånger som varvet innan. Lycka till!

20.03.2020 - 07:36

country flag Sharyn King wrote:

Ok sorry I have no idea about this pattern. On A1 on the 7th line upwards there is a strong angular bar over 2 stitches then a yarn over. What does this mean please.

26.01.2020 - 07:56

Sandy answered:

To Sharon: I’m working on the same pattern and can help with your question. Round seven reads: knit two together, yarn over. The similar characters starting on line 15 read: yo, s1k1psso (slip one st knit wise, knit 1, pass slipped stitch over). There’s a key to the charts just above chart A1. Hope that helps :)

26.01.2020 - 22:37

country flag Sandy wrote:

Hello. Would you please explain chart A2a (size 6-9 mo) for me? There are an odd number of rows in this chart, which seems unusual to me, and the special sts (k2tog, skpsso) occur on the even, or wrong side rows. Is that correct? Also, the decreased seem to fall on wrong side rows, though the directions say they should occur on the right side rows. Am I misreading the chart? Thank you.

24.01.2020 - 20:29

DROPS Design answered:

Dear Sandy, Diagram A.2a is worked in the round, this means there is no right side nor wrong side rows; all rows will be worked from the right side = in the round. Happy knitting!

27.01.2020 - 07:57

country flag Betina Eriksen wrote:

Hej. Jeg kan ikke få indtagning-1 (første indtagning) til at passe med de antal masker jeg skal tilbage efter indtagningen. Jeg har 180 skal tage ind 4 gang og det skal passe med 12 maske i møsnteret skal ned på 130 maske. Jeg vil jo tro at der mangler en indtagnings pind (omgang) hvor jeg skal tage 12 maske ind? Det er str. 1/3 - 56/62. Ligeledes kan jeg heller ikke finde mænster A.2c til den størrelse. Nogen der kan hjælpe mig?

07.01.2020 - 21:30

DROPS Design answered:

Hei Betina. Du har 180 masker på pinnen og når du strikker A.2a skal det felles 4 ganger 6 masker = 24 felte masker (se stjerne i diagramforklaringen). Når det skal strikkes A.2b skal det felles 12 masker 3 ganger = 36 felt masker (se sort prikk i diagramforklaringen). 180 masker - 24 felte masker(A.2a) - 36 felte masker(A.2b) = 120 masker. I størrelse 56/62 strikkes det kun A.2a og A.2b. God Fornøyelse!

10.02.2020 - 09:50

country flag Hanneke wrote:

Oh ik zie het nu, eerst 2a en dan 2b,

22.12.2019 - 18:40

country flag Hanneke wrote:

Ik kom er niet uit, ik brei 48/52 en bij A2 moet ik 4 x 6 steken minderen, maar 168- 24 is niet 108????

22.12.2019 - 16:41

DROPS Design answered:

Dag Hanneke,

Bedankt voor de terugkoppeling in je andere opmerking. Inderdaad eerst A.2a dan A2b, waardoor je wel op het juiste aantal minderingen komt.

26.12.2019 - 15:51