
Popular categories
Looking for a yarn?


Comments / Questions (43)
![]() Gabriela wrote:
Gabriela wrote:
Was bedeutet 1-0-0-0-0 usw. ich bin am verzweifeln. Eigentlich dachte ich das stricken kapiert zu haben, bin auch kein absolutes Neuling. Anscheinend habe ich eine Denkblokade. Vielen Dank!
06.12.2018 - 13:15DROPS Design answered:
Liebe Gabriela, je nach der Größe werden Sie (vor und nach A.2) entweder keine Masche rechts oder 1 Masche recht (= nur in der 2. Größe = 0/1 Monat stricken. Viel Spaß beim stricken!
06.12.2018 - 13:45
![]() Gerlinda Hoogeboom wrote:
Gerlinda Hoogeboom wrote:
Ik ben denk ik zwaar irritant op t moment, maar heb nog een vraag. Bij het meerderen wordt aangegeven dit met een omslag te doen, dit leverd bij mij gaatjes op, net als bij het het ajour patroon, waar dat nou net bij hoort. Dit kan toch niet de bedoeling zijn, of wel?
06.11.2018 - 15:03DROPS Design answered:
Dag Gerlinda,
Je breit de omslag op de volgende naald gedraaid om gaatjes te voorkomen (zie bovenaan bij 'tip voor het meerderen').
07.11.2018 - 15:14
![]() G. Hoogeboom wrote:
G. Hoogeboom wrote:
Leuke patronen, maar vaak onduidelijke uitleg. Helaas ook altijd weer dat rondbreien, wat ikzelf zwaar irritant breien vind, ook met rondbreinaalden, omdat je altijd weer een andere lengte nodig hebt. T zou fijn zijn, als er ook eens rekening gehouden zou worden, met beginnende breiers, ik ben geen beginner, maar zelfs ik snap t vaak niet.
06.11.2018 - 12:59
![]() Gerlinda Hoogeboom wrote:
Gerlinda Hoogeboom wrote:
Ik ben met t broekje bezig, maar zit even te martelen op het punt van de verdeling met markeerdraden. Het middenvoor heb ik maar uitgeteld, omdat het daar 5 cm hoog moet zijn voor mijn maat. Maar het verdelen vind ik raar beschreven. Vanaf waar begin je nu met verdelen? Wat wordt t begin van de naald nou, m.a of m.v? Ik had graag het hele setje af willen hebben voor mn kleindochters eerste verjaardag, maar ben bang dat dit m niet gaat worden.
06.11.2018 - 12:54DROPS Design answered:
Dag Gerlinda,
Je breit steeds van midden achter naar midden achter in de rondte, dus bij het plaatsen van markeerdraden begin je ook te tellen vanaf midden achter. Als je vanaf het begin een markeerdraad invoegt aan het begin van de naald (zoals aangegeven in het patroon) kun je makkelijker zien waar het begin van de naald is.
07.11.2018 - 15:18
![]() Gerlinda Hoogeboom wrote:
Gerlinda Hoogeboom wrote:
Ik ben met Odette broekje bezig. Ik heb helaas al de pech, dat ik diverse naalden geprobeerd heb, maar geen juiste steken verhouding krijg, iets wat mij met origineel garen nooit eerder is gebeurd. Maar ik gok t er op. Maar wil even voor alle zekerheid navragen, of je vanaf midden voor, begint tetellen, om het werk verdelen met markeerdraad, lijkt mij wel. Dit omdat er nergens eerde een midden voor wordt aangegeven.
04.11.2018 - 15:28DROPS Design answered:
Dag Gerlinda,
Nee, je begint de naald steeds midden achter, ook wanneer je maarkeerdraden plaatst. (Je meet het werk wel midden voor, omdat er aan de achterkant een verhoging gebreid is.
04.11.2018 - 19:59
![]() Gerlinda Hoogeboom wrote:
Gerlinda Hoogeboom wrote:
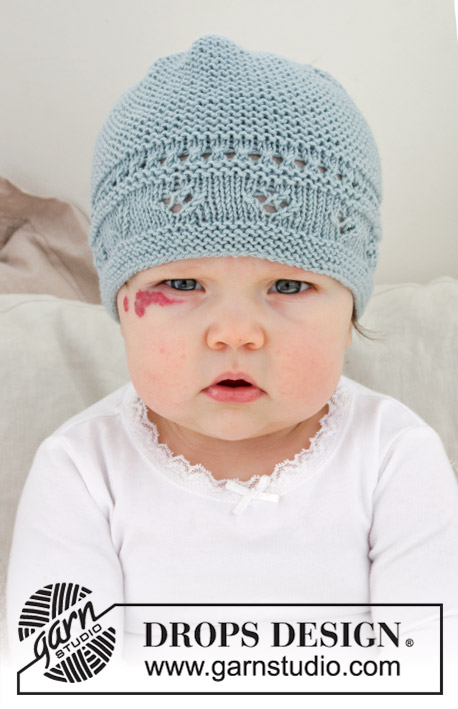
Op de foto heeft het kindje ook een bijpassend hesje, vestje of bolero aan. Is hier ook een gratis breipatroon van? Ik wil het namelijk voor de 1e verjaardag van mijn jongste kleindochter breien.
10.10.2018 - 10:39DROPS Design answered:
Dag Gerlinda Hoogeboom, Het vestje vind je in dit patroon. Veel breiplezier!
11.10.2018 - 16:32
![]() EJ wrote:
EJ wrote:
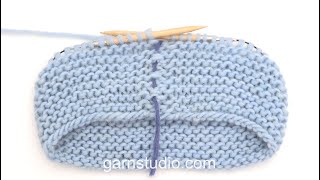
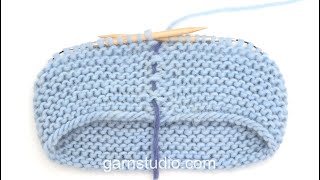
Hello, I\'m currently working on this in size 0/1 months and have a question about elevation. Your video shows the technique with stockinette stitch, and when I try to apply it to the rib stitch as needed in this pattern, I end up with holes and twisted stitches. Could you help me figure out how to do the elevation in rib stitch? Thank you in advance!
18.06.2018 - 06:44DROPS Design answered:
Dear Ej, when working the elevation in rib, just work sts K over K and P over P on next row from WS. Turn, and tighten the thread before working 1st st at the beg of next row, make sure to not twist the sts when working them. Happy knitting!
18.06.2018 - 09:39
![]() Inger Marie Ihsan wrote:
Inger Marie Ihsan wrote:
Hei! Hva menes med beskrivelsen "øk slik på hver cm totalt (14) ganger, deretter økes det 2 masker jevnt fordelt på neste omgang". At man skal øke med ytterligere 4 masker pr omgang for hver cm man strikker i høyden?
09.05.2018 - 23:43DROPS Design answered:
Hei Inger Marie, Du har forstått det riktig. Du skal øke 4 masker hver høyde-cm 14 ganger og deretter 2 masker på neste omgangen. God fornøyelse!
11.05.2018 - 08:06
![]() Lena wrote:
Lena wrote:
Hej! Innan mönsterstickning står att arbetet ska mäta 12 cm (1-3 mån). Ska det måttet vara mätt framifrån eller bakifrån arbetet?
22.04.2018 - 19:59DROPS Design answered:
Hej Lena, du mäter mitt fram. Lycka till :)
24.04.2018 - 11:49
![]() Marian wrote:
Marian wrote:
Tengo que rematar para las piernas. Estoy haciendo el tamaño 6/9 meses por tanto tengo 136 puntos en total. si remato, como pone en el patrón 61 puntos, tejo 14, remato 61 y 14 restantes suman 150 puntos. Por otro lado imagino que los 14 puntos tienen que estar centrados por lo que no se puede empezar remantando sino tejiendo 7 puntos y luego rematar, tejer 14 y rematar y tejer los últimos 7puntos.
05.04.2018 - 11:57DROPS Design answered:
Hola Marian, los 14 puntos restantes son los 14 puntos centrales trabajados. 136-61-61= 14
08.04.2018 - 18:52
|
||||||||||||||||||||||
Odeta Pants#odetapants |
||||||||||||||||||||||
 |
 |
|||||||||||||||||||||
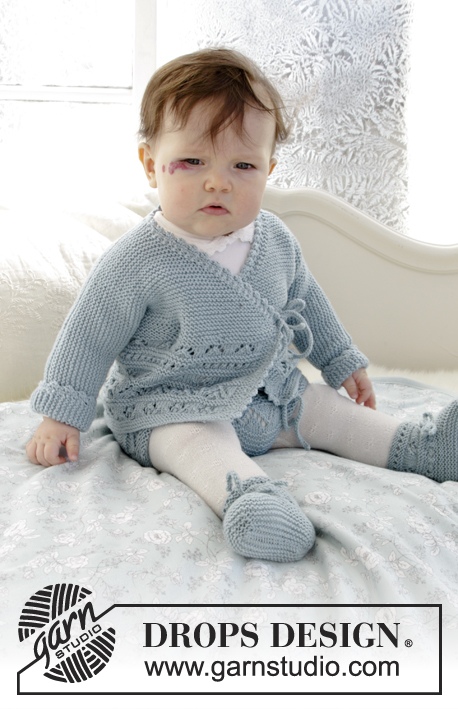
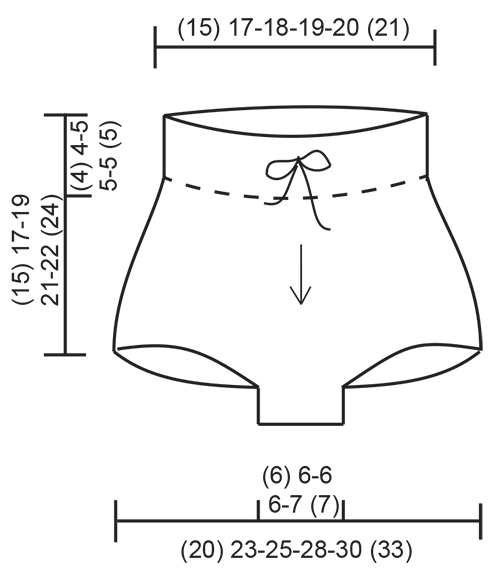
The set consists of: knitted baby shorts and slippers with lace pattern and garter stitch. Sizes premature - 4 years. The set is worked in DROPS BabyMerino.
DROPS Baby 31-4 |
||||||||||||||||||||||
|
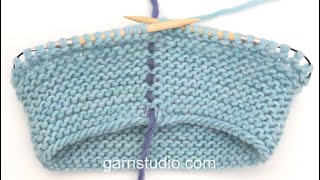
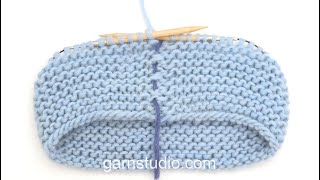
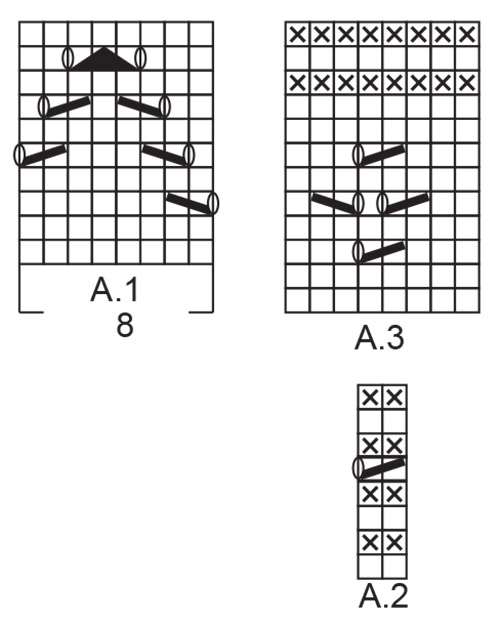
INFORMATION FOR THE PATTERN: RIDGE/GARTER STITCH (worked in the round): 1 ridge = 2 rounds. Knit 1 round and purl 1 round. RIDGE/GARTER STITCH (worked back and forth): 1 ridge = Knit 2 rows. PATTERN: Shorts: See diagram A.1. Slippers: See diagrams A.2 and A.3. The diagrams show all the rows in the pattern seen from the right side. INCREASE TIP (for the shorts): Work until there are 2 stitches left before the marker thread in the side, 1 yarn over (= 1 stitch increased), knit 4 stitches (the marker thread sits in the middle of these stitches), 1 yarn over (= 1 stitch increased), increase like this at both marker threads (= a total of 4 stitches increased). On the next round work the yarn overs twisted to avoid holes. ---------------------------------------------------------- SHORTS: The piece is worked in the round with double pointed needles, top down. Cast on (80) 96-96-112-112 (128) stitches with double pointed needles size 2.5 mm and BabyMerino. Insert 1 marker at the beginning of the round (= mid back). Work rib from mid back as follows: Knit 1, * purl 2, knit 2 *, work from *-* until there are 3 stitches left, finish with purl 2 and knit 1. When the rib measures (2) 2-2-3-3 (3) cm work a row of holes for the cord on the next round as follows: * Knit 1, 1 yarn over, purl 2 together, knit 1 *, work from *-* to end of round. Work 1 round of rib knit 2 /purl 2. Then work an elevation in the rib at the back as follows: Work (7) 9-9-9-9 (9) stitches, turn, tighten the strand, work (14) 18-18-18-18 (18) stitches back, turn, tighten the strand, work (20) 24-24-24-26 (26) stitches, turn, tighten the strand, work (26) 30-30-30-34 (34) stitches back, turn, tighten the strand, work (32) 36-36-36-42 (42) stitches, turn, tighten the strand, work (38) 42-42-42-50 (50) stitches back. Continue like this, i.e. work (6) 6-6-6-8 (8) more stitches each time the piece is turned until you have worked over a total of (62) 66-66-66-82 (82) stitches. Turn, tighten the strand, then continue with rib in the round over all stitches again. When the piece measures (4) 4-5-5-5 (5) cm mid front, change to double pointed needles size 3 mm. Knit 1 round and decrease (10) 14-10-22-14 (26) stitches evenly on round = (70) 82-86-90-98 (102) stitches. On the next round insert 1 marker thread in each side of the piece as follows: Work (17) 20-21-22-24 (25) stitches GARTER STITCH – see description above, insert 1 marker thread (= half the back piece), work (35) 41-43-45-49 (51) stitches garter stitch, insert 1 marker thread (= front piece), work (18) 21-22-23-25 (26) stitches garter stitch (= half the back piece). The piece is now continue in garter stitch. REMEMBER THE KNITTING TENSION! On the next round increase 1 stitch on each side of both the marker threads in the sides (= 4 stitches increased) – read INCREASE TIP. Increase like this every cm a total of (6) 7-8-11-11 (14) times, then increase 2 stitches evenly on next round = (96) 112-120-136-144 (160) stitches. When the piece measures (10) 12-14-16-17 (19) cm, adjust so that the last row was purled, work pattern A.1 over all stitches (= a total of (12) 14-15-17-18 (20) times in width). When A.1 has been worked 1 time in height, work garter stitch to finished length. When the piece measures (15) 17-19-21-22 (24) cm, cast off stitches for the legs as follows: Cast off the first (41) 49-53-61-63 (71) stitches, work (14) 14-14-14-18 (18) stitches, cast off the last (41) 49-53-61-63 (71) stitches = (14) 14-14-14-18 (18) stitches left for gusset. Cut the strand. Now continue working back and forth. Work GARTER STITCH – see description above, for approx. (2) 2-2-3-4 (5) cm. Cast off. Sew these ridges to the cast off edge on the back piece, in the middle, in the outermost loop of the outermost stitch. CORD: Crochet a cord as follows: Work chain stitches with hook size 2.5 mm and BabyMerino for 75-80-85-90-95 cm, turn and work back with 1 slip stitch in each chain. Cut and fasten the strand. Thread the cord in and out through the row of holes (start and finish mid front). ---------------------------------------------------------- SLIPPER: The slipper is worked back and forth with double pointed needles from mid back, top down, i.e. the leg is worked first, then the foot. Cast on (36) 38-40-44-48 (52-56) stitches with double pointed needles size 2.5 mm and BabyMerino. Work 1 stitch in GARTER STITCH – see above, A.2 (= 2 stitches) until 1 stitch remains, work 1 stitch in garter stitch When A.2 has been worked 1 time in height, work the next row as follows from the right side: Work (2) 3-0-2-0 (2-0) stitches stocking stitch, A.3 (= 8 stitches) in total (4) 4-5-5-6 (6-7) times in width and finish with (2) 3-0-2-0 (2-0) stitches stocking stitch. REMEMBER THE KNITTING TENSION! When A.3 has been worked 1 time in height, work A.2 as follows: work 1 stitch in garter stitch, A.2 until 1 stitch remains, and work 1 stitch in garter stitch (the cord is thread through this row of holes later). When A.2 has been completed in height, work 2 RIDGES – see description above and decrease (6) 8-6-6-10- (10-14) stitches evenly on the last row from the right side = (30) 30-34-38-38 (42-42) stitches. Cut the strand. Now place the first (11) 11-12-13-13 (15-15) stitches and the last (11) 11-12-13-13 (15-15) stitches on separate threads. The piece is now worked in garter stitch to finished length. Work (3) 3½-4-4½-5½ (6½-8) cm, over the middle (8) 8-10-12-12 (12-12) stitches (= mid top of slipper), cut the strand. The next row is worked as follows from the right side: Work the stitches from the thread in the one side of the piece back onto the double pointed needles, knit up (7) 9-10-11-13 (16-21) stitches in the outermost loop of the outermost stitch along the side of the middle piece, work the (8) 8-10-12-12 (12-12) stitches on the needle (= front), knit up (7) 9-10-11-13 (16-21) stitches in the outermost loop of the outermost stitch along the other side of the middle piece and work the stitches from the other thread back onto the double pointed needles = (44) 48-54-60-64 (74-84) stitches on needle. THE PIECE IS NOW MEASURED FROM HERE! Work a total of (2½) 3-3-4-5 (5-5) cm garter stitch over all the stitches, AT THE SAME TIME when you have worked approx. (1) 1½-1½-2-3 (3-3) cm, insert 1 marker (22) 24-27-30-32 (37-42) stitches along the row (= middle of slipper). Now decrease every 2nd row to finished length as follows: Knit 1 stitch, knit the next 2 stitches together (= 1 stitch decreased), knit until there are 2 stitches left before the marker, knit together the next 4 stitches 2 and 2 (= 2 stitches decreased), knit until there are 3 stitches left, knit the next 2 stitches together (= 1 stitch decreased), knit 1 stitch (= 4 stitches decreased every 2nd row) = approx. (32) 36-42-48-52 (62-72) stitches. Cast off and sew the seam under the foot and up along mid back in the outermost loop of the outermost stitch so the seam is flat. Work 1 more slipper in the same way. CORD: Crochet a cord as follows: Work chain stitches with hook size 2.5 mm and BabyMerino for approx. 30-40 cm, turn and work back with 1 slip stitch in each chain stitch. Cut and fasten the strand. Thread the cord in and out of the row of holes on the slipper (start and finish mid front). ---------------------------------------------------------- For jacket see DROPS number 31-3. ---------------------------------------------------------- |
||||||||||||||||||||||
Diagram explanations |
||||||||||||||||||||||
|
||||||||||||||||||||||
 |
||||||||||||||||||||||
 |
||||||||||||||||||||||
Have you finished this pattern?Tag your pictures with #dropspattern #odetapants or submit them to the #dropsfan gallery. Do you need help with this pattern?You'll find 40 tutorial videos, a Comments/Questions area and more by visiting the pattern on garnstudio.com. © 1982-2026 DROPS Design A/S. We reserve all rights. This document, including all its sub-sections, has copyrights. Read more about what you can do with our patterns at the bottom of each pattern on our site. |
||||||||||||||||||||||


With over 40 years in knitting and crochet design, DROPS Design offers one of the most extensive collections of free patterns on the internet - translated to 17 languages. As of today we count 325 catalogues and 12298 patterns translated into English (UK/cm).
We work hard to bring you the best knitting and crochet have to offer, inspiration and advice as well as great quality yarns at incredible prices! Would you like to use our patterns for other than personal use? You can read what you are allowed to do in the Copyright text at the bottom of all our patterns. Happy crafting!
Post a comment to pattern DROPS Baby 31-4
We would love to hear what you have to say about this pattern!
If you want to leave a question, please make sure you select the correct category in the form below, to speed up the answering process. Required fields are marked *.