
Popular categories
Looking for a yarn?


Comments / Questions (26)
![]() MJ, The SKEINdinvian wrote:
MJ, The SKEINdinvian wrote:
Lovely vest with beautiful details and silhouette. Still waiting for the pattern... tick, tick, tick. WAITING.
10.08.2017 - 09:00
![]() Tina Jespersen wrote:
Tina Jespersen wrote:
Super flot, og garanteret spændende at strikke
18.07.2017 - 12:50
![]() Tina Jespersen wrote:
Tina Jespersen wrote:
Super flot, og garanteret spændende at strikke
18.07.2017 - 12:49
![]() Amyah wrote:
Amyah wrote:
Superbe...
01.07.2017 - 07:15
![]() Fall Bliss wrote:
Fall Bliss wrote:
Beautiful design. Love the flow.
08.06.2017 - 00:15
![]() Anja Harms wrote:
Anja Harms wrote:
Die Weste gefällt mir sehr gut. Ein schönes Teil für den Übergang
03.06.2017 - 12:50
|
|||||||||||||||||||||||||||||||
Morgan's Daughter Vest#morgansdaughtervest |
|||||||||||||||||||||||||||||||
 |
 |
||||||||||||||||||||||||||||||
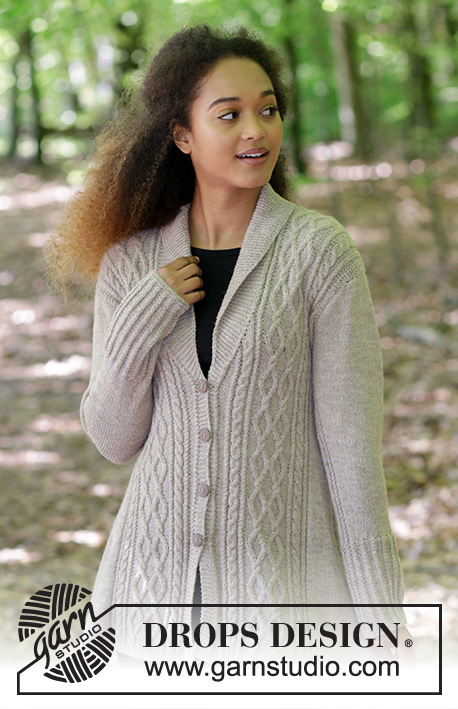
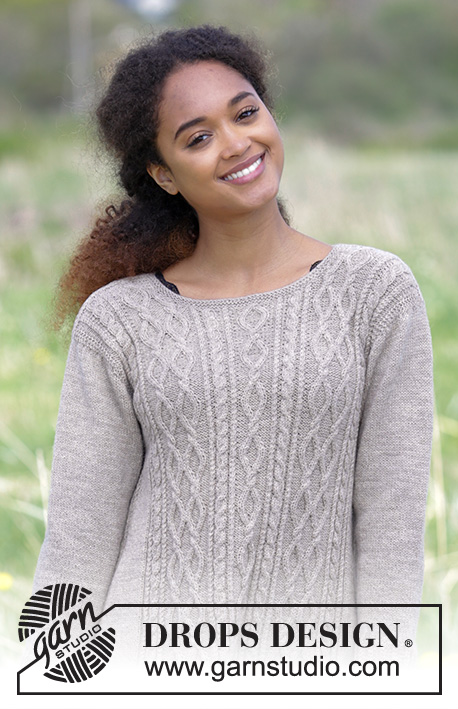
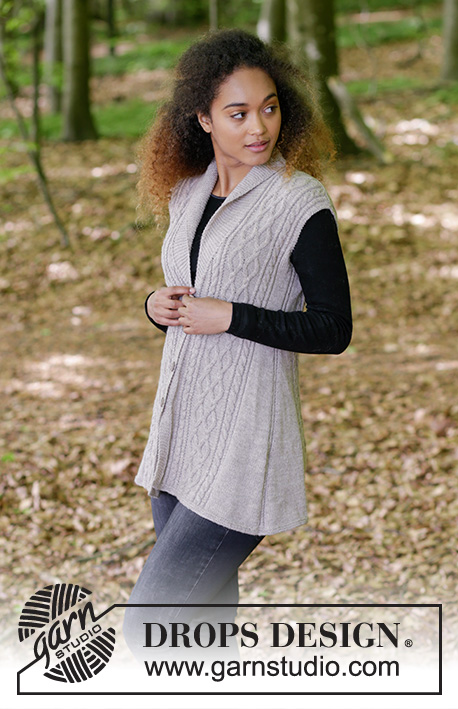
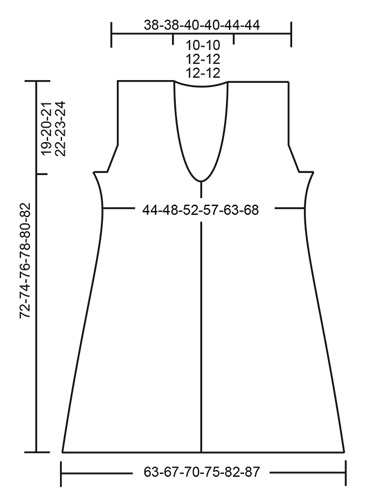
Knitted vest with shawl collar, cables and A-shape, worked top down. Sizes S - XXXL. The piece is worked in DROPS Flora.
DROPS 179-13 |
|||||||||||||||||||||||||||||||
|
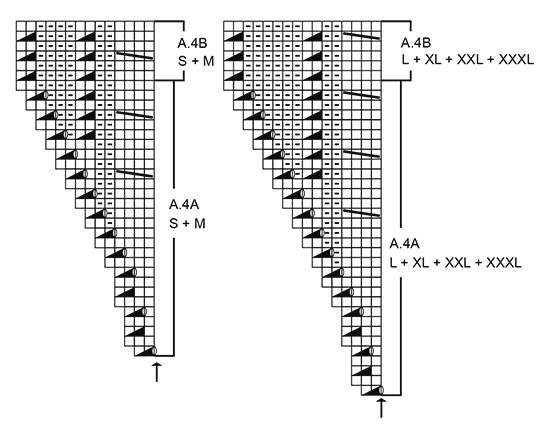
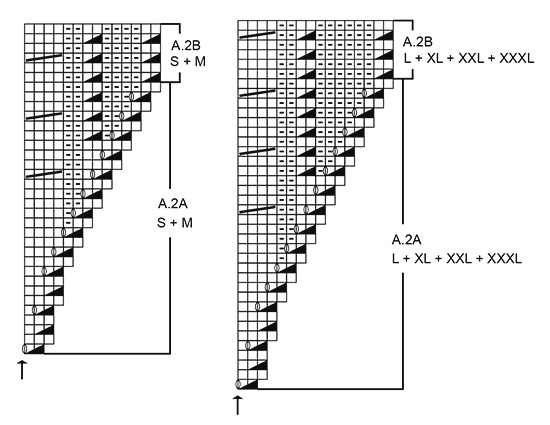
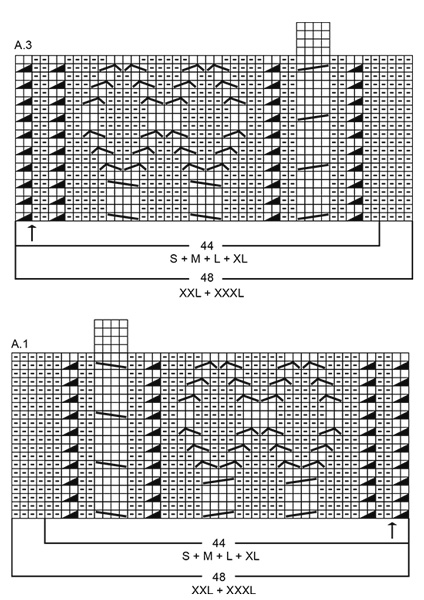
INFORMATION FOR THE PATTERN: RIDGE/GARTER STITCH (worked back and forth): 1 ridge = Knit 2 rows. PATTERN: See diagrams A.1 to A.6. Choose diagram for your size. The diagrams show all the rows in the pattern seen from the right side. KNITTING TIP (for the band): To prevent the band contracting in height, you can regularly work an extra ridge over just the band stitches (the other stitches remain on the needle while you work the ridge over the band). Repeat this every 5 cm to finished length. INCREASE TIP-1: To work out how to increase evenly, count the total number of stitches the increases are to be made over (e.g. 34 stitches) and divide by the number of increases to be made (e.g. 13) = 2.6. In this example, increase alternately after every 2nd and 3rd stitch. Increase 1 stitch by making 1 yarn over, on the next row work the yarn overs twisted to prevent holes. INCREASE TIP-2 (for the armhole): All increases are made from the right side! Increase 1 stitch by making 1 yarn over, on the next row (wrong side) purl the yarn over twisted to prevent a hole. INCREASE TIP-3 (for sides in body): All increases are made from the right side! Start 4 stitches before the marker thread, make 1 yarn over, work 1 stitch stocking stitch, work A.6 (= 6 stitches, the marker thread sits in the middle of A.6), work 1 stitch stocking stitch, make 1 yarn over (= 2 stitches increased). On the next row (wrong side) purl the yarn overs twisted to prevent holes. BUTTONHOLE: Cast off for the buttonholes in the right band (when the garment is worn). In other words, work from the right side until there are 4 stitches left at the end of the row, cast off 2 stitches and knit the last stitch. On the next row cast on 2 new stitches over the cast-off stitches from the previous row (= hole). The first buttonhole is worked when the piece measures 30-30-32-32-34-34 cm from the shoulder (i.e. when the decreases outermost on the shawl collar have been completed). Then work the 3-3-3-4-4-4 next buttonholes with approx. 8-8-8-7-7-7 cm between each. ---------------------------------------------------------- VEST: The front and back pieces are worked separately back and forth with circular needle, top down. When the increases for the armholes have been completed, put the parts together and the body is worked back and forth with circular needle from mid front to finished length. SHAWL COLLAR ON LEFT FRONT PIECE (when the garment is worn): Cast on 26-26-28-28-30-30 stitches with circular needle size 3 mm and Flora. Work GARTER STITCH – see description above, as follows: * 1 ridge back and forth over all the stitches, 1 ridge back and forth over the first 20-20-22-22-24-24 stitches towards mid front *, repeat from *-* until the shawl collar measures 7-7-8-8-8-8 cm along the shortest side. Knit 1 row from the right side and cast on 34-34-34-34-38-38 stitches for the shoulder at the end of this row (where the shawl collar is shortest) = 60-60-62-62-68-68 stitches. THE PIECE IS NOW MEASURED FROM HERE! Knit 1 row from the wrong side, knit 1 row from the right side and knit 1 row from the wrong side (over all the stitches). Now work the left front piece as described below. LEFT FRONT PIECE WITH SHAWL COLLAR: = 60-60-62-62-68-68 stitches on the needle. The first row is worked as follows from the right side: Work 26-26-28-28-30-30 stitches in garter stitch over the shawl collar, knit the remaining 34-34-34-34-38-38 stitches and, at the same time. increase 13 stitches in all sizes evenly over these stitches - read INCREASE TIP-1 = 73-73-75-75-81-81 stitches. Work back from the wrong side with 3 edge stitches in garter stitch, purl 44-44-44-44-48-48 stitches and knit 26-26-28-28-30-30 stitches. Continue as follows from the right side: 26-26-28-28-30-30 stitches in garter stitch over the shawl collar, work A.1 (= 44-44-44-44-48-48 stitches) and finish with 3 edge stitches in garter stitch. Insert 1 marker thread after the 2 first stitches in A.1 (seen from the right side – i.e. just after a small cable) – allow the marker thread to follow your work. Continue the pattern in this way, at the same time decrease the shawl collar to a band, increase to armhole and increase to neckline as described below. REMEMBER THE KNITTING TENSION: When the piece measures 11-11-12-12-11-11 cm from the shoulder, decrease 1 stitch outermost on the shawl collar by knitting together the second and third stitch at the beginning of the row from the right side. Decrease in this way every 6th row a total of 3-3-3-3-4-4 times, every 4th row a total of 7-7-7-7-8-8 times and then every 2nd row a total of 10-10-12-12-12-12 times. After the last decrease to the band, there are 6 band stitches in garter stitch towards mid front and the piece measures approx.30-30-32-32-34-34 cm from the shoulder down. ARMHOLE: AT THE SAME TIME when the piece measures 16-15-16-13-13-11 cm increase 1 stitch to armhole before the 3 edge stitches in garter stitch at the end of the row from the right side – read INCREASE TIP-2 (i.e. the increased stitches are worked in stocking stitch). Increase in this way every 2nd row a total of 4-8-8-14-16-20 times, then cast on 3-4-6-6-8-10 new stitches towards armhole at the end of the next row from the right side = 7-12-14-20-24-30 stitches increased to armhole. The piece now measures approx. 19-20-21-22-23-24 cm from the shoulder down. Work back from the wrong side with knit 6-7-9-9-11-13 stitches, purl 4-8-8-14-16-20 stitches, A.1, A.2 as described under NECKLINE and knit over the shawl collar as before. Lay the piece to one side and continue with SHAWL COLLAR ON RIGHT FRONT PIECE and RIGHT FRONT PIECE WITH SHAWL COLLAR, but be aware that the increase to NECKLINE which is described below, starts at the same time or before the piece is lain to one side. NECKLINE: AT THE SAME TIME when the piece measures 19-19-20-20-22-22 cm from the shoulder, increase to neckline after the marker thread as shown in A.2A, i.e. the next row from the right side is worked as follows: work garter stitch over the shawl collar as before, work A.2A and increase as shown in the diagram, continue A.1, continue the increases to armhole as described above and finish with 3 edge stitches in garter stitch. The first two stitches in A.1 now become A.2A. NOTE: Work the cable on the same row in A.2A as in A.1. After the last increase to neckline, the piece measures approx. 28-28-30-30-32-32 cm from the shoulder down and you have increased 12-12-14-14-14-14 stitches to neckline. The next row is worked as follows from the right side: Work garter stitch over shawl collar/band, continue A.2B over A.2A (= 14-14-16-16-16-16 stitches), continue A.1 (the 2 first stitches in A.1 are the same as the 2 first stitches in A.2 and have already been worked), work stocking stitch over the increased stitches by the armhole and finish with 3 edge stitches in garter stitch. SHAWL COLLAR ON RIGHT FRONT PIECE (when the piece is worn): Cast on 26-26-28-28-30-30 stitches with circular needle size 3 mm. Knit 1 row. Then work garter stitch as follows: * work 1 ridge back and forth over all stitches, 1 ridge back and forth over the first 20-20-22-22-24-24 stitches towards mid front *, repeat from *-* until the shawl collar measures 7-7-8-8-8-8 cm along the shortest side. Knit 1 row from the wrong side and cast on 34-34-34-34-38-38 stitches to shoulder at the end of this row (where the shawl collar is shortest) = 60-60-62-62-68-68 stitches. THE PIECE IS NOW MEASURED FROM HERE! Knit 1 row from the right side and knit 1 row from the wrong side (over all stitches). Then work right front piece with shawl collar as described below. RIGHT FRONT PIECE WITH SHAWL COLLAR: = 60-60-62-62-68-68 stitches on the row. The first row is worked as follows from the right side: Knit the first 34-34-34-34-38-38 stitches and at the same time increase 13 stitches in all sizes evenly over these stitches, work 26-26-28-28-30-30 stitches garter stitch over the shawl collar = 73-73-75-75-81-81 stitches. Work back from the wrong side with knit 26-26-28-28-30-30 stitches, purl 44-44-44-44-48-48 stitches and knit 3 edge stitches. Continue as follows from the right side: 3 edge stitches in garter stitch, work A.3 (= 44-44-44-44-48-48 stitches) and finish with 26-26-28-28-30-30 stitches in garter stitch over the shawl collar. Insert 1 marker thread before the 2 last stitches in A.3 (seen from the right side – i.e. just before a small cable) – allow the marker thread to follow your work. Continue the pattern in this way, at the same time decrease the shawl collar to a band, increase to armhole and increase to neckline as described below. BAND: When the piece measures 11-11-12-12-11-11 cm from the shoulder, decrease 1 stitch outermost on the shawl collar by knitting together the last third and second stitches at the end of the row from the right side. Decrease in this way every 6th row a total of 3-3-3-3-4-4 times, every 4th row a total of 7-7-7-7-8-8 times and then every 2nd row a total of 10-10-12-12-12-12 times. After the last decrease to the band, there are 6 band stitches in garter stitch towards mid front and the piece measures approx. 30-30-32-32-34-34 cm from the shoulder down. ARMHOLE: AT THE SAME TIME when the piece measures 16-15-16-13-13-11 cm increase 1 stitch to armhole after the 3 edge stitches in garter stitch at the beginning of the next row from the right side – read INCREASE TIP-2. Increase in this way every 2nd row a total of 4-8-8-14-16-20 times, then cast on 3-4-6-6-8-10 new stitches towards armhole at the end of the next row from the wrong side = 7-12-14-20-24-30 stitches increased to armhole. The piece now measures approx. 19-20-21-22-23-24 cm from the shoulder down. Lay the piece to one side and continue with RIGHT SHOULDER BACK, but be aware that the increases to NECKLINE as described below, starts at the same time or before the piece is lain to one side. NECKLINE: AT THE SAME TIME when the piece measures approx. 19-19-20-20-22-22 cm from the shoulder, increase to neckline before the marker thread as shown in A.4A, i.e. the next row from the right side is worked as follows: Work 3 edge stitches in garter stitch, continue the increase to armhole as described above, continue A.3 to the marker thread, work A.4A and increase as shown in the diagram and finish with garter stitch over the shawl collar as before. The 2 last stitches in A.3 are now part of A.4A. NOTE: Work the cable on the same row in A.4A as in A.3. After the last increase to neckline, the piece measures approx. 28-28-30-30-32-32 cm from the shoulder down. The next row is worked as follows from the right side: 3 edge stitches in garter stitch, work stocking stitch over the increased stitches by the armhole, continue A.3 (the last 2 stitches in A.3 are the same as the last 2 stitches in A.4B and are worked when A.4B is worked), continue A.4B over A.4A (= 14-14-16-16-16-16 stitches) and finish with garter stitch over the shawl collar/band. RIGHT SHOULDER BACK (when the garment is worn): Cast 34-34-34-34-38-38 stitches with circular needle size 3 mm. Knit 1 row from the wrong side, knit 1 row from the right side and knit 1 row from the wrong side. Knit 1 row from the right side where you increase 13 stitches in all sizes evenly on row = 47-47-47-47-51-51 stitches. Work back from the wrong side with knit 3 edge stitches and purl 44-44-44-44-48-48 stitches. The next row is worked as follows from the right side: work A.1 (= 44-44-44-44-48-48 stitches) and finish with 3 edge stitches in garter stitch. When you have worked 2 rows in A.1 cast on 2 stitches at the end of the last row to the neck (the new stitches are purled from the right side and knitted from the wrong side). Work 2 more rows in A.1 and AT THE SAME TIME cast on 24-24-28-28-28-28 new stitches at the end of the last row to the neck = 73-73-77-77-81-81 stitches on the row. Lay the piece to one side and work left shoulder back as described below. LEFT SHOULDER BACK (when the piece is worn): Cast on 34-34-34-34-38-38 stitches with circular needle size 3 mm. Knit 1 row from the wrong side, knit 1 row from the right side and knit 1 row from the wrong side. Knit 1 row from the right side where you increase 13 stitches in all sizes evenly on row = 47-47-47-47-51-51 stitches. Purl 44-44-44-44-48-48 stitches back from the wrong side and knit 3 edge stitches. The next row is worked as follows from the right side: Work 3 edge stitches in garter stitch, then work A.3 (= 44-44-44-44-48-48 stitches). When you have worked 3 rows in A.3 cast on 2 stitches at the end of the last row to neck = 49-49-49-49-53-53 stitches. Work back from the wrong side with knit 2, A.3 and knit 3 edge stitches. Now work the left and right shoulders together to the back piece as described below. BACK PIECE: Place the stitches from the two shoulders on the same circular needle size 3 mm (the 24-24-28-28-28-28 stitches which were cast on to the neck on the right shoulder back = mid back of neck) = 122-122-126-126-134-134 stitches on the row. The first row from the right side is worked as follows: 3 edge stitches in garter stitch, continue A.3 over the next 44-44-44-44-48-48 stitches, work A.5 over the next 28-28-32-32-32-32 stitches, continue A.1 over the next 44-44-44-44-48-48 stitches and finish with 3 edge stitches in garter stitch. Continue pattern in this way and increase to armhole as described below. ARMHOLE: When the piece measures 16-15-16-13-13-11 cm increase 1 stitch in each side to armhole as on the front pieces, i.e. increase from the right side after the 3 edge stitches in garter stitch at the beginning of the row and before the 3 edge stitches in garter stitch at the end of the row. Increase in this way every 2nd row (i.e. every row from the right side) a total of 4-8-8-14-16-20 times, then cast on 3-4-6-6-8-10 new stitches at the end of the 2 next rows = 136-146-154-166-182-194 stitches and the piece measures approx. 19-20-21-22-23-24 cm from the shoulder down. Now work the front and back pieces together as described below. BODY: Place the stitches from the left front piece (seen from the right side) on the needle without working the stitches, insert 1 marker thread (= in the side), place the stitches from the back piece on the needle, insert 1 marker thread (= in the side) and place the stitches from the right front piece on the needle. Continue pattern as before, Continue the increases to neckline as before and continue the decreases to the bands as before. In other words, the first row is worked as follows from the right side: Work garter stitch over the shawl collar/band with decreases, if necessary, as before, continue A.2 and A.1, work 4-8-8-14-16-20 stitches stocking stitch, 12-14-18-18-22-26 stitches garter stitch (the marker thread in the side sits in the middle of these 12-14-18-18-22-26 stitches), work 4-8-8-14-16-20 stitches stocking stitch, continue A.3, A.5 and A.1 over the back piece, work 4-8-8-14-16-20 stitches stocking stitch, 12-14-18-18-22-26 stitches garter stitch (the marker thread in the side sits in the middle of these 12-14-18-18-22-26 stitches), work 4-8-8-14-16-20 stitches stocking stitch, continue A.3 and A.4 as before and finish with garter stitch over the shawl collar/band with decreases, if necessary, as before. Continue the pattern in this way, but when you have worked 2 ridges over the middle 12-14-18-18-22-26 stitches in each side, work as follows from the right side: Work garter stitch over the shawl collar/band with decreases, if necessary, as before, continue A.2 and A.1 as before, work 7-12-14-20-24-30 stitches stocking stitch, work A.6 (= 6 stitches, the marker thread sits in the middle of A.6), work 7-12-14-20-24-30 stitches stocking stitch, continue A.3, A.5 and A.1 as before, work 7-12-14-20-24-30 stitches stocking stitch, work A.6 (the marker thread sits in the middle of A.6), work 7-12-14-20-24-30 stitches stocking stitch, continue A.3 and A.4 as before and finish with garter stitch over the shawl collar/band with decreases if necessary as before. After all the increases to neckline and decreases to the bands have been completed, there are 280-300-316-340-372-396 stitches on the row. Read KNITTING TIP and continue working until the piece measures 30-32-34-36-38-40 cm from the shoulder. On the next row from the right side increase 2 stitches in each side – read INCREASE TIP-3 (= 4 stitches increased). Increase in this way every 6th row (approx. every 2 cm) until finished length (if the knitting tension is correct in height, this is equivalent to 21 increases in each side). When the piece measures 71-73-75-77-79-81 cm there are approx. 364-384-400-424-456-480 stitches on the row. On the next row from the right side, knit the stitches in each cable together 2 and 2 (only on the cables, not the purled or stocking stitch sections) = approx. 312-332-348-372-404-428 stitches. Work 3 ridges back and forth over all stitches and loosely cast off with knit from the right side, but to prevent the cast-off edge being tight, you can make 1 yarn over after every 8th stitch at the same time as casting off (the yarn overs are cast off as normal stitches). The whole vest measures approx. 72-74-76-78-80-82 cm from the shoulder down. ASSEMBLY: Sew the shoulder seams inside the cast-on edge. Sew the shawl collar together mid back and make sure the seam turns in to the wrong side, when the collar is turned down. Sew the shawl collar to the neckline back of neck. Sew on the buttons. |
|||||||||||||||||||||||||||||||
Diagram explanations |
|||||||||||||||||||||||||||||||
|
|||||||||||||||||||||||||||||||
 |
|||||||||||||||||||||||||||||||
 |
|||||||||||||||||||||||||||||||
 |
|||||||||||||||||||||||||||||||
 |
|||||||||||||||||||||||||||||||
 |
|||||||||||||||||||||||||||||||
Have you finished this pattern?Tag your pictures with #dropspattern #morgansdaughtervest or submit them to the #dropsfan gallery. Do you need help with this pattern?You'll find 26 tutorial videos, a Comments/Questions area and more by visiting the pattern on garnstudio.com. © 1982-2026 DROPS Design A/S. We reserve all rights. This document, including all its sub-sections, has copyrights. Read more about what you can do with our patterns at the bottom of each pattern on our site. |
|||||||||||||||||||||||||||||||


With over 40 years in knitting and crochet design, DROPS Design offers one of the most extensive collections of free patterns on the internet - translated to 17 languages. As of today we count 324 catalogues and 12291 patterns translated into English (UK/cm).
We work hard to bring you the best knitting and crochet have to offer, inspiration and advice as well as great quality yarns at incredible prices! Would you like to use our patterns for other than personal use? You can read what you are allowed to do in the Copyright text at the bottom of all our patterns. Happy crafting!
Post a comment to pattern DROPS 179-13
We would love to hear what you have to say about this pattern!
If you want to leave a question, please make sure you select the correct category in the form below, to speed up the answering process. Required fields are marked *.