
Popular categories
Looking for a yarn?


|
|||||||||||||||||||||||||||||||
Morgan's Daughter Vest |
|||||||||||||||||||||||||||||||
 |
 |
||||||||||||||||||||||||||||||
Knitted vest with shawl collar, cables and A-shape, worked top down. Sizes S - XXXL. The piece is worked in DROPS Flora.
DROPS 179-13 |
|||||||||||||||||||||||||||||||
|
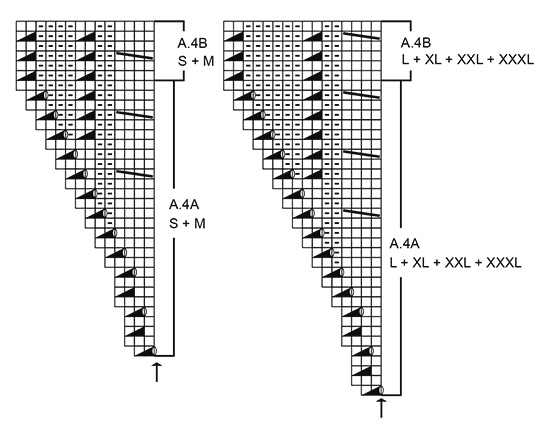
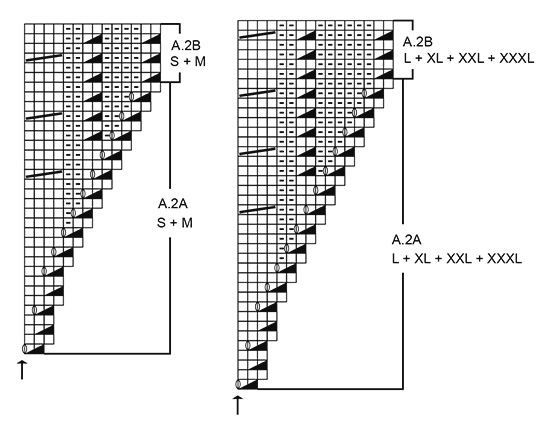
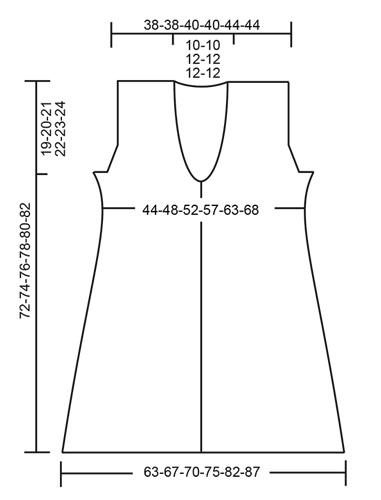
INFORMATION FOR THE PATTERN: RIDGE/GARTER STITCH (worked back and forth): 1 ridge = Knit 2 rows. PATTERN: See diagrams A.1 to A.6. Choose diagram for your size. The diagrams show all the rows in the pattern seen from the right side. KNITTING TIP (for the band): To prevent the band contracting in height, you can regularly work an extra ridge over just the band stitches (the other stitches remain on the needle while you work the ridge over the band). Repeat this every 5 cm to finished length. INCREASE TIP-1: To work out how to increase evenly, count the total number of stitches the increases are to be made over (e.g. 34 stitches) and divide by the number of increases to be made (e.g. 13) = 2.6. In this example, increase alternately after every 2nd and 3rd stitch. Increase 1 stitch by making 1 yarn over, on the next row work the yarn overs twisted to prevent holes. INCREASE TIP-2 (for the armhole): All increases are made from the right side! Increase 1 stitch by making 1 yarn over, on the next row (wrong side) purl the yarn over twisted to prevent a hole. INCREASE TIP-3 (for sides in body): All increases are made from the right side! Start 4 stitches before the marker thread, make 1 yarn over, work 1 stitch stocking stitch, work A.6 (= 6 stitches, the marker thread sits in the middle of A.6), work 1 stitch stocking stitch, make 1 yarn over (= 2 stitches increased). On the next row (wrong side) purl the yarn overs twisted to prevent holes. BUTTONHOLE: Cast off for the buttonholes in the right band (when the garment is worn). In other words, work from the right side until there are 4 stitches left at the end of the row, cast off 2 stitches and knit the last stitch. On the next row cast on 2 new stitches over the cast-off stitches from the previous row (= hole). The first buttonhole is worked when the piece measures 30-30-32-32-34-34 cm from the shoulder (i.e. when the decreases outermost on the shawl collar have been completed). Then work the 3-3-3-4-4-4 next buttonholes with approx. 8-8-8-7-7-7 cm between each. ---------------------------------------------------------- VEST: The front and back pieces are worked separately back and forth with circular needle, top down. When the increases for the armholes have been completed, put the parts together and the body is worked back and forth with circular needle from mid front to finished length. SHAWL COLLAR ON LEFT FRONT PIECE (when the garment is worn): Cast on 26-26-28-28-30-30 stitches with circular needle size 3 mm and Flora. Work GARTER STITCH – see description above, as follows: * 1 ridge back and forth over all the stitches, 1 ridge back and forth over the first 20-20-22-22-24-24 stitches towards mid front *, repeat from *-* until the shawl collar measures 7-7-8-8-8-8 cm along the shortest side. Knit 1 row from the right side and cast on 34-34-34-34-38-38 stitches for the shoulder at the end of this row (where the shawl collar is shortest) = 60-60-62-62-68-68 stitches. THE PIECE IS NOW MEASURED FROM HERE! Knit 1 row from the wrong side, knit 1 row from the right side and knit 1 row from the wrong side (over all the stitches). Now work the left front piece as described below. LEFT FRONT PIECE WITH SHAWL COLLAR: = 60-60-62-62-68-68 stitches on the needle. The first row is worked as follows from the right side: Work 26-26-28-28-30-30 stitches in garter stitch over the shawl collar, knit the remaining 34-34-34-34-38-38 stitches and, at the same time. increase 13 stitches in all sizes evenly over these stitches - read INCREASE TIP-1 = 73-73-75-75-81-81 stitches. Work back from the wrong side with 3 edge stitches in garter stitch, purl 44-44-44-44-48-48 stitches and knit 26-26-28-28-30-30 stitches. Continue as follows from the right side: 26-26-28-28-30-30 stitches in garter stitch over the shawl collar, work A.1 (= 44-44-44-44-48-48 stitches) and finish with 3 edge stitches in garter stitch. Insert 1 marker thread after the 2 first stitches in A.1 (seen from the right side – i.e. just after a small cable) – allow the marker thread to follow your work. Continue the pattern in this way, at the same time decrease the shawl collar to a band, increase to armhole and increase to neckline as described below. REMEMBER THE KNITTING TENSION: When the piece measures 11-11-12-12-11-11 cm from the shoulder, decrease 1 stitch outermost on the shawl collar by knitting together the second and third stitch at the beginning of the row from the right side. Decrease in this way every 6th row a total of 3-3-3-3-4-4 times, every 4th row a total of 7-7-7-7-8-8 times and then every 2nd row a total of 10-10-12-12-12-12 times. After the last decrease to the band, there are 6 band stitches in garter stitch towards mid front and the piece measures approx.30-30-32-32-34-34 cm from the shoulder down. ARMHOLE: AT THE SAME TIME when the piece measures 16-15-16-13-13-11 cm increase 1 stitch to armhole before the 3 edge stitches in garter stitch at the end of the row from the right side – read INCREASE TIP-2 (i.e. the increased stitches are worked in stocking stitch). Increase in this way every 2nd row a total of 4-8-8-14-16-20 times, then cast on 3-4-6-6-8-10 new stitches towards armhole at the end of the next row from the right side = 7-12-14-20-24-30 stitches increased to armhole. The piece now measures approx. 19-20-21-22-23-24 cm from the shoulder down. Work back from the wrong side with knit 6-7-9-9-11-13 stitches, purl 4-8-8-14-16-20 stitches, A.1, A.2 as described under NECKLINE and knit over the shawl collar as before. Lay the piece to one side and continue with SHAWL COLLAR ON RIGHT FRONT PIECE and RIGHT FRONT PIECE WITH SHAWL COLLAR, but be aware that the increase to NECKLINE which is described below, starts at the same time or before the piece is lain to one side. NECKLINE: AT THE SAME TIME when the piece measures 19-19-20-20-22-22 cm from the shoulder, increase to neckline after the marker thread as shown in A.2A, i.e. the next row from the right side is worked as follows: work garter stitch over the shawl collar as before, work A.2A and increase as shown in the diagram, continue A.1, continue the increases to armhole as described above and finish with 3 edge stitches in garter stitch. The first two stitches in A.1 now become A.2A. NOTE: Work the cable on the same row in A.2A as in A.1. After the last increase to neckline, the piece measures approx. 28-28-30-30-32-32 cm from the shoulder down and you have increased 12-12-14-14-14-14 stitches to neckline. The next row is worked as follows from the right side: Work garter stitch over shawl collar/band, continue A.2B over A.2A (= 14-14-16-16-16-16 stitches), continue A.1 (the 2 first stitches in A.1 are the same as the 2 first stitches in A.2 and have already been worked), work stocking stitch over the increased stitches by the armhole and finish with 3 edge stitches in garter stitch. SHAWL COLLAR ON RIGHT FRONT PIECE (when the piece is worn): Cast on 26-26-28-28-30-30 stitches with circular needle size 3 mm. Knit 1 row. Then work garter stitch as follows: * work 1 ridge back and forth over all stitches, 1 ridge back and forth over the first 20-20-22-22-24-24 stitches towards mid front *, repeat from *-* until the shawl collar measures 7-7-8-8-8-8 cm along the shortest side. Knit 1 row from the wrong side and cast on 34-34-34-34-38-38 stitches to shoulder at the end of this row (where the shawl collar is shortest) = 60-60-62-62-68-68 stitches. THE PIECE IS NOW MEASURED FROM HERE! Knit 1 row from the right side and knit 1 row from the wrong side (over all stitches). Then work right front piece with shawl collar as described below. RIGHT FRONT PIECE WITH SHAWL COLLAR: = 60-60-62-62-68-68 stitches on the row. The first row is worked as follows from the right side: Knit the first 34-34-34-34-38-38 stitches and at the same time increase 13 stitches in all sizes evenly over these stitches, work 26-26-28-28-30-30 stitches garter stitch over the shawl collar = 73-73-75-75-81-81 stitches. Work back from the wrong side with knit 26-26-28-28-30-30 stitches, purl 44-44-44-44-48-48 stitches and knit 3 edge stitches. Continue as follows from the right side: 3 edge stitches in garter stitch, work A.3 (= 44-44-44-44-48-48 stitches) and finish with 26-26-28-28-30-30 stitches in garter stitch over the shawl collar. Insert 1 marker thread before the 2 last stitches in A.3 (seen from the right side – i.e. just before a small cable) – allow the marker thread to follow your work. Continue the pattern in this way, at the same time decrease the shawl collar to a band, increase to armhole and increase to neckline as described below. BAND: When the piece measures 11-11-12-12-11-11 cm from the shoulder, decrease 1 stitch outermost on the shawl collar by knitting together the last third and second stitches at the end of the row from the right side. Decrease in this way every 6th row a total of 3-3-3-3-4-4 times, every 4th row a total of 7-7-7-7-8-8 times and then every 2nd row a total of 10-10-12-12-12-12 times. After the last decrease to the band, there are 6 band stitches in garter stitch towards mid front and the piece measures approx. 30-30-32-32-34-34 cm from the shoulder down. ARMHOLE: AT THE SAME TIME when the piece measures 16-15-16-13-13-11 cm increase 1 stitch to armhole after the 3 edge stitches in garter stitch at the beginning of the next row from the right side – read INCREASE TIP-2. Increase in this way every 2nd row a total of 4-8-8-14-16-20 times, then cast on 3-4-6-6-8-10 new stitches towards armhole at the end of the next row from the wrong side = 7-12-14-20-24-30 stitches increased to armhole. The piece now measures approx. 19-20-21-22-23-24 cm from the shoulder down. Lay the piece to one side and continue with RIGHT SHOULDER BACK, but be aware that the increases to NECKLINE as described below, starts at the same time or before the piece is lain to one side. NECKLINE: AT THE SAME TIME when the piece measures approx. 19-19-20-20-22-22 cm from the shoulder, increase to neckline before the marker thread as shown in A.4A, i.e. the next row from the right side is worked as follows: Work 3 edge stitches in garter stitch, continue the increase to armhole as described above, continue A.3 to the marker thread, work A.4A and increase as shown in the diagram and finish with garter stitch over the shawl collar as before. The 2 last stitches in A.3 are now part of A.4A. NOTE: Work the cable on the same row in A.4A as in A.3. After the last increase to neckline, the piece measures approx. 28-28-30-30-32-32 cm from the shoulder down. The next row is worked as follows from the right side: 3 edge stitches in garter stitch, work stocking stitch over the increased stitches by the armhole, continue A.3 (the last 2 stitches in A.3 are the same as the last 2 stitches in A.4B and are worked when A.4B is worked), continue A.4B over A.4A (= 14-14-16-16-16-16 stitches) and finish with garter stitch over the shawl collar/band. RIGHT SHOULDER BACK (when the garment is worn): Cast 34-34-34-34-38-38 stitches with circular needle size 3 mm. Knit 1 row from the wrong side, knit 1 row from the right side and knit 1 row from the wrong side. Knit 1 row from the right side where you increase 13 stitches in all sizes evenly on row = 47-47-47-47-51-51 stitches. Work back from the wrong side with knit 3 edge stitches and purl 44-44-44-44-48-48 stitches. The next row is worked as follows from the right side: work A.1 (= 44-44-44-44-48-48 stitches) and finish with 3 edge stitches in garter stitch. When you have worked 2 rows in A.1 cast on 2 stitches at the end of the last row to the neck (the new stitches are purled from the right side and knitted from the wrong side). Work 2 more rows in A.1 and AT THE SAME TIME cast on 24-24-28-28-28-28 new stitches at the end of the last row to the neck = 73-73-77-77-81-81 stitches on the row. Lay the piece to one side and work left shoulder back as described below. LEFT SHOULDER BACK (when the piece is worn): Cast on 34-34-34-34-38-38 stitches with circular needle size 3 mm. Knit 1 row from the wrong side, knit 1 row from the right side and knit 1 row from the wrong side. Knit 1 row from the right side where you increase 13 stitches in all sizes evenly on row = 47-47-47-47-51-51 stitches. Purl 44-44-44-44-48-48 stitches back from the wrong side and knit 3 edge stitches. The next row is worked as follows from the right side: Work 3 edge stitches in garter stitch, then work A.3 (= 44-44-44-44-48-48 stitches). When you have worked 3 rows in A.3 cast on 2 stitches at the end of the last row to neck = 49-49-49-49-53-53 stitches. Work back from the wrong side with knit 2, A.3 and knit 3 edge stitches. Now work the left and right shoulders together to the back piece as described below. BACK PIECE: Place the stitches from the two shoulders on the same circular needle size 3 mm (the 24-24-28-28-28-28 stitches which were cast on to the neck on the right shoulder back = mid back of neck) = 122-122-126-126-134-134 stitches on the row. The first row from the right side is worked as follows: 3 edge stitches in garter stitch, continue A.3 over the next 44-44-44-44-48-48 stitches, work A.5 over the next 28-28-32-32-32-32 stitches, continue A.1 over the next 44-44-44-44-48-48 stitches and finish with 3 edge stitches in garter stitch. Continue pattern in this way and increase to armhole as described below. ARMHOLE: When the piece measures 16-15-16-13-13-11 cm increase 1 stitch in each side to armhole as on the front pieces, i.e. increase from the right side after the 3 edge stitches in garter stitch at the beginning of the row and before the 3 edge stitches in garter stitch at the end of the row. Increase in this way every 2nd row (i.e. every row from the right side) a total of 4-8-8-14-16-20 times, then cast on 3-4-6-6-8-10 new stitches at the end of the 2 next rows = 136-146-154-166-182-194 stitches and the piece measures approx. 19-20-21-22-23-24 cm from the shoulder down. Now work the front and back pieces together as described below. BODY: Place the stitches from the left front piece (seen from the right side) on the needle without working the stitches, insert 1 marker thread (= in the side), place the stitches from the back piece on the needle, insert 1 marker thread (= in the side) and place the stitches from the right front piece on the needle. Continue pattern as before, Continue the increases to neckline as before and continue the decreases to the bands as before. In other words, the first row is worked as follows from the right side: Work garter stitch over the shawl collar/band with decreases, if necessary, as before, continue A.2 and A.1, work 4-8-8-14-16-20 stitches stocking stitch, 12-14-18-18-22-26 stitches garter stitch (the marker thread in the side sits in the middle of these 12-14-18-18-22-26 stitches), work 4-8-8-14-16-20 stitches stocking stitch, continue A.3, A.5 and A.1 over the back piece, work 4-8-8-14-16-20 stitches stocking stitch, 12-14-18-18-22-26 stitches garter stitch (the marker thread in the side sits in the middle of these 12-14-18-18-22-26 stitches), work 4-8-8-14-16-20 stitches stocking stitch, continue A.3 and A.4 as before and finish with garter stitch over the shawl collar/band with decreases, if necessary, as before. Continue the pattern in this way, but when you have worked 2 ridges over the middle 12-14-18-18-22-26 stitches in each side, work as follows from the right side: Work garter stitch over the shawl collar/band with decreases, if necessary, as before, continue A.2 and A.1 as before, work 7-12-14-20-24-30 stitches stocking stitch, work A.6 (= 6 stitches, the marker thread sits in the middle of A.6), work 7-12-14-20-24-30 stitches stocking stitch, continue A.3, A.5 and A.1 as before, work 7-12-14-20-24-30 stitches stocking stitch, work A.6 (the marker thread sits in the middle of A.6), work 7-12-14-20-24-30 stitches stocking stitch, continue A.3 and A.4 as before and finish with garter stitch over the shawl collar/band with decreases if necessary as before. After all the increases to neckline and decreases to the bands have been completed, there are 280-300-316-340-372-396 stitches on the row. Read KNITTING TIP and continue working until the piece measures 30-32-34-36-38-40 cm from the shoulder. On the next row from the right side increase 2 stitches in each side – read INCREASE TIP-3 (= 4 stitches increased). Increase in this way every 6th row (approx. every 2 cm) until finished length (if the knitting tension is correct in height, this is equivalent to 21 increases in each side). When the piece measures 71-73-75-77-79-81 cm there are approx. 364-384-400-424-456-480 stitches on the row. On the next row from the right side, knit the stitches in each cable together 2 and 2 (only on the cables, not the purled or stocking stitch sections) = approx. 312-332-348-372-404-428 stitches. Work 3 ridges back and forth over all stitches and loosely cast off with knit from the right side, but to prevent the cast-off edge being tight, you can make 1 yarn over after every 8th stitch at the same time as casting off (the yarn overs are cast off as normal stitches). The whole vest measures approx. 72-74-76-78-80-82 cm from the shoulder down. ASSEMBLY: Sew the shoulder seams inside the cast-on edge. Sew the shawl collar together mid back and make sure the seam turns in to the wrong side, when the collar is turned down. Sew the shawl collar to the neckline back of neck. Sew on the buttons. |
|||||||||||||||||||||||||||||||
Diagram explanations |
|||||||||||||||||||||||||||||||
|
|||||||||||||||||||||||||||||||

|
|||||||||||||||||||||||||||||||
|
|||||||||||||||||||||||||||||||
|
|||||||||||||||||||||||||||||||

|
|||||||||||||||||||||||||||||||
|
|||||||||||||||||||||||||||||||
|
Have you made this or any other of our designs? Tag your pictures in social media with #dropsdesign so we can see them! Do you need help with this pattern?You'll find tutorial videos, a Comments/Questions area and more by visiting the pattern on garnstudio.com. © 1982-2024 DROPS Design A/S. We reserve all rights. This document, including all its sub-sections, has copyrights. Read more about what you can do with our patterns at the bottom of each pattern on our site. |
|||||||||||||||||||||||||||||||


With over 40 years in knitting and crochet design, DROPS Design offers one of the most extensive collections of free patterns on the internet - translated to 17 languages. As of today we count 304 catalogues and 11422 patterns - 11422 of which are translated into English (UK/cm).
We work hard to bring you the best knitting and crochet have to offer, inspiration and advice as well as great quality yarns at incredible prices! Would you like to use our patterns for other than personal use? You can read what you are allowed to do in the Copyright text at the bottom of all our patterns. Happy crafting!
Comments / Questions (26)
Storlek L: Jag ska lägga upp 28 m och sticka rätstickning i 2 v över de 28 m. Sedan ska jag sticka rätstickning över 22 m i 8 cm. Vad händer med de 6 m som inte blir stickade? Vad menas med den kortaste sidan - är det mot mitt fram eller där jag har 6 m som inte har blivit stickade?
27.02.2024 - 20:10DROPS Design answered:
Hej Anna. Du stickar förkortade varv (se gärna våra videor längre ner på sidan) när du stickar växelvis över alla maskor och växelvis bara över 22 maskor. Du upprepar alltså detta " 2 varv rätstickning fram och tillbaka över alla maskorna, 2 varv rätstickning fram och tillbaka över de första 20-20-22-22-24-24 maskorna mot mitt fram" tills arbetet mäter 8 cm längst den kortaste sidan, dvs den sidan som du inte stickar hela varvet ut varannan gång. Mvh DROPS Design
28.02.2024 - 07:38Czy schematy w tym projekcie pokazują rzędy po obu stronach pracy? Czyli czy jak zaczynam czytać schemat od prawej strony do lewej, to gdy dojdę do końca rzędu kolejny rząd czytam ze schematu od lewej do prawej?
29.01.2024 - 16:57DROPS Design answered:
Witaj Moniko, schematy pokazują wszystkie rzędy robótki (widok na prawej stronie robótki). Jak czytać schematy znajdziesz TUTAJ. Patrz część kursu, w której robótka jest przerabiana w tę i z powrotem. W razie dodatkowych pytań proszę pisać. Pozdrawiamy!
29.01.2024 - 18:31Buenas tardes , soy nueva en esto y antes tenia otro modelo de patrón de drops , pero no logro entender por donde comenzar el tejido . En resumen que debo hacer primero para una talla xl ?
21.08.2023 - 01:35DROPS Design answered:
Hola Geraldine, la talla XL se corresponde a la 4ª talla en el patrón. Por lo tanto, cuando tengas secuencias de números, tendrás que trabajar el 4º número de la secuencia. Por ejemplo, empiezas montando 28 puntos, trabajas 1 pliegue sobre todos los puntos y 1 pliegue sobre los 22 puntos centrales y repites estos 2 pliegues hasta que el cuello chal mida 8 cm por el lado más corto. Continúa trabajando como se explica en el patrón. También puedes leer la siguiente lección para más ayuda sobre cómo trabajar los patrones: https://www.garnstudio.com/lesson.php?id=79&cid=23.
27.08.2023 - 22:39Forstår ikke dette: Det er starten af sjalskraven Slå 26-26-28-28-30-30 masker op på rundpind 3 med Flora eller Nord. Strik RETSTRIK – se forklaring over, således: * 2 p retstrik frem og tilbage over alle masker, 2 p retstrik frem og tilbage over de første 20-20-22-22-24-24 masker mod midt foran. I skriver at man slår 26 masker op. Men ved pind 3 skal man kun strikke retstrik i de 20 masker. Hvad med de resterende 6 masker? Håber i kan forklare det.
20.05.2023 - 22:17DROPS Design answered:
Hej Ina, det bliver vendepinde, så du strikker flere pinde over de yderste masker mod halsen til du kommer til skulderen hvor du skal slå masker op i den anden side (den side hvor du har strikket færrest pinde) :)
23.05.2023 - 11:16I'm still really confused by this pattern. I'm starting on body section where you put all sections back on needles my question is when it states continue with A2 and A3 do I just continue and repeat last 2 rows of A2? Or if I start chart over then I still have to knit last row of A2 because those stitches are on needle. I hope I explained things clearly.
10.03.2023 - 22:05DROPS Design answered:
Dear Suzanne, just continue as you have knit before (the last two roes). Happy Knitting!
12.03.2023 - 15:45Hi, I hope I can explain my question so you can understand. I'm at the point where I'm putting all pieces back on needles and starting body. Pattern states all charts in order of how they are worked. When it states to continue with A2A and A4A do I just repeat the last row over until end of project or do I start over at the beginning of A2A and A4A? Thanks
16.02.2023 - 02:25DROPS Design answered:
Hi Suzanne, You repeat all rows in the charts, from the bottom upwards. Happy crafting!
16.02.2023 - 06:54Bonjour, jusqu\\\'ou doit on faire les rangs raccourcis pour le col du n)179-13
20.01.2023 - 13:01DROPS Design answered:
Bonjour Annie, on tricote les rangs raccourci du col jusqu'à ce qu'il mesure 7-7-8-8-8-8 cm le long du côté le plus court (il fera le double de l'autre côté). Bon tricot!
20.01.2023 - 16:43When A.1 had been completed one time (20 rows), should I go back to the first row to continue the pattern? There are some stitches sticking up on top after the last row. They are the 4 stitches above the 2/2 cables. How should those be knitted? Thanks.
10.09.2022 - 05:52DROPS Design answered:
Dear Liz, when A.1 has been done in height, start again from 1st row but the cable over 4 sts will have to be worked as before on every 6th row, ie this cable is worked over a different number of rows. Happy knitting!
12.09.2022 - 09:28Hi there. What does the size range S to XXXL equate to in say UK sizes or inches/ cm. I'd love to knit this but can't figure out how much wool I'd need. Thank you Drops : )
31.03.2021 - 19:06DROPS Design answered:
Dear Charlotte, you can find the finished measurements on the scematic drawing at the bottom of the instructions. We suggest you take a sweater that is comfortable (and possiblly similar style) and compare the measurements. The amount of wool needed to knit this pattern is given in the pattern. Happy Knitting!
01.04.2021 - 09:49Bonjour, Que fait on des 6 mailles qui restent sur le col châle, quand on tricote les 20 mailles du milieu. Merci bonne journée
18.04.2020 - 13:53DROPS Design answered:
Bonjour Mme Maxant, on tricote des rangs raccourcis sur les 26 mailles du col, ainsi, quand on tricote 2 rangs sur les 20 premières mailles seulement, on va laisser les 6 dernières mailles non tricotées et on aura ainsi 4 rangs sur les 20 premières mailles et 2 seulement sur les 26 mailles. On forme ainsi une démarcation qui permettra au col de se plier à ce niveau-là. Bon tricot!
20.04.2020 - 09:41