
Popular categories
Looking for a yarn?


Comments / Questions (41)
![]() Kari Weggersen wrote:
Kari Weggersen wrote:
Det er litt vanskelig og formidle problemet med skriving,men prøver igjen. Jeg har 286 masker og skal ha 43 masker på forstykket og sette av 60 masker til armene. Inne i det maskeantallet kommer A2 som er strikket foran og bak armene. Hva gjør jeg for å avslutte de 8 maskene. Det må være noe som mangler i oppskriften. Har lest om igjen mange ganger, men kan ikke finne noen forklaring på akkurat det. Håper jeg snart klarer å knekke koden. Kari😊
08.01.2018 - 19:28DROPS Design answered:
Hei Kari. Hei igjen. Litt usikker på hva du mener med «å avslutte de 8 maskene». Når du har satt erm masken på en tråd og lagt opp 8+8 nye masker, skal du ha 43+8+80+8+43 = 182 masker på pinnen. De 8 nye maskene i hver siden (under ermene) strikkes videre i glattstrikk, men når arbeidet måler 4 cm felles det 1 maske på hver side av begge merketrådene. Les videre på oppskriften. Håper du forstår, hvis ikke skriv inn igjen. Lykke til!
11.01.2018 - 13:48
![]() Kari Weggersen wrote:
Kari Weggersen wrote:
Takk for svar. Jeg har fått med meg at det er forskjell på økningene. Jeg skal starte med 12 masker til armene og øke 2 masker 19 ganger og 2 masker en gang. Da får ikke jeg 60 masker som det står i oppskriften. Skjønner heller ikke hva jeg gjør med A 2 under armene. Nå er det tredje gangen jeg prøver. Liker jakken veldig godt, men trot jeg snart må gi opp. Kari Weggersen
04.01.2018 - 19:24DROPS Design answered:
Hei igjen. Du skal ikke ha 60 ermmasker, men du skal sette 60 masker til ett erme på 1 tråd. Når du er ferdig med alle raglanøkningene skal du ha 286 masker på pinnen. Fra vrangen skal du nå strikke de første 43 masker som før, sett de neste 60 maskene på en trå. Legg opp 8 nye masker og følg videre på oppskriften til BOL. ERME: Du har lagt opp 8 nye masker under ermet (sett en marketråd midt i de 8 maskene). På neste omgang strikkes det opp 1 ny maske i hver av de 8 nye maskene (=16 masker), men merketråden er fremdeles i midten av disse 16 maskene og A.2 strikkes i de 8 midterste maskene. God fornøyelse, håper du ikke gir opp
05.01.2018 - 09:39
![]() Kari Weggersen wrote:
Kari Weggersen wrote:
Det gjelder innsvinget jakke med raglan og fletter strikket ovenfra og ned. Har kommet til der armene skal settes av. Får ikke maskeantallet til å stemme,og lurer på hva jeg gjør for å avslutte A2. Hilsen Kari😊
02.01.2018 - 10:14DROPS Design answered:
Hei Kari. Det er litt vanskelig å vite hvorfor du får feil maskeantall med den informasjonen du har oppgitt. Husk det er forskjellig økninger på raglan for for-og bakstykket og økning på ermene, både antall økte masker og på hvilken omganger det skal økes. Husk å lese godt på øketips for RAGLAN FOR- OG BAKSTYKKE, RAGLAN ERME og STRIKKETIPS før du starter. Avhengig av hvilken str du strikker skal du ha etter alle økningene i raglan ha: 238-270-286-314-330-358 masker på pinnen. God Fornøyelse!
04.01.2018 - 07:51Laura wrote:
Hi, I'm still stuck... I wrote the # of sts after each incr and everything added up until the incr after the 4th row for the sleeves. I have 266 sts but after the incr as written (k2tog, yo)I'm left with the same # of sts! What do you mean by "work a hole before or after A.2 on row from right side without decrease"?
21.11.2017 - 19:36DROPS Design answered:
Dear Laura, when increasing every 4th row you will work as explained before/after A.2 on sleeve (= at the beg + at the end of each sleeve) on the 2nd row from RS after last increase (= row from RS without any increase) so that you keep the eyelet pattern on raglan as before, number of sts will be the same and you'll get the eyelet continuing as before. Increase on next row from RS (= last inc for sleeve is every 4th row, ie every 2nd row from RS). Happy knitting!
22.11.2017 - 08:50
![]() Christel wrote:
Christel wrote:
C’est en finissant le patron et en regardant le modèle que je comprends que lors de la séparation il fallait arrêter A.2 du dos et du devant droit. Mais ça il n’est precisé nul part qu’il faut arrêter la continuité de ces torsades une fois la séparation des manches faites. Est-ce un incompréhension de ma part ? Je vous remercie pour tous vos patrons et vos réponses à mes questions
11.11.2017 - 08:14DROPS Design answered:
Bonjour Christel, A.2 se tricote uniquement à chaque raglan, quand on divise l'ouvrage, on monte de nouvelles mailles sous les manches qui vont se tricoter en jersey, mais en même temps, on continue les torsades A.1 sur les devants et dans le dos. Bon tricot!
13.11.2017 - 09:18
![]() Christel wrote:
Christel wrote:
Bonjour. Je suis à la section dos/devants dans l’augmentation d’une maille envers entre chaque torsades. Vous dites qu’il doit y avoir 18 augmentations et je n’y arrive que à 16 augmentations. Il me manque deux augmentations ,où dois-je les placer? Merci pour la réponse à venir.
08.11.2017 - 20:10DROPS Design answered:
Bonjour Christel, vous avez un total de 9 torsades (= 2 sur chaque devant et 5 dans le dos), augmentez 1 m de chaque côté de chacune de ces 9 torsades = 18 augmentations. Bon tricot!
09.11.2017 - 08:49
![]() Laura Silva wrote:
Laura Silva wrote:
Hi, I keep getting stuck at the end of the increases. I'm knitting size M. For my size, I started with 100 stitche's. After all the increases I should have 270 stitches. Before the last increase for the sleeves, I have 256 stitches. Even after doing one more increase row, and the last increase at the sleeves, I'm short by 2 stitches. What am I doing wrong?
20.10.2017 - 13:12DROPS Design answered:
Dear Mrs Silva, increase on body: 2 sts x 2 times x 4 (both front piece + back piece), then 1 st x 4 (both front pieces + back piece) = 16+68= 84 sts increased on body. Increase on sleeves: 1 st x 17 times x 4 (= 2 sleeves) + 1 st x 4 (2 sleeves) = 68+4= 72 sts inc on sleeve (= 36 sts inc on each sleeve). There were 100 sts + 84 sts inc on body + 72 sts inc on sleeves = 256 sts. Happy knitting!
20.10.2017 - 14:27
![]() Mirja wrote:
Mirja wrote:
Hallo, ich sitze nun seid Stunden bei der 1. Reihe. Ich weiß nicht, wie die Aufteilung mit A2 zu verstehen ist. Wann werden 2M zugenommen, wann 1M für den Ärmel??? Ich vertehe die Raglanzunahmen bzw die Aufteilung nicht. Viele Grüsse
08.07.2017 - 11:58DROPS Design answered:
Liebe Mirja, je nach der Größe wird es 2 Maschen 1-6 x in jede 2. Reihe zugenommen und dann 1 M 16-22 x in jede 2. Reihe (= vor A.2 bzw am Ende vom 1. Vorderteil, nach A.2 und vor A.2 bzw am Anfang und Ende von dem Rückenteil und nach A.2 bzw am Anfang 2. Rückenteil). Für die Ärmel nehmen Sie nach A.2 und vor A.2 (= bzw am Anfang und Ende von jedem Ärmel) zu. Viel Spaß beim stricken!
10.07.2017 - 09:26
![]() Astrid Kummerfeldt wrote:
Astrid Kummerfeldt wrote:
Hallo Ich habe eine Frage zur Aufteilung von Vorterteil, Ärmel und Rückenteil. Laut Beschreinung der ersten Hin Reihe, gehört das erste A2 Muster zum linken Ärmel, das zweite zum Rückenteil, das 3 zum rechten Ärmel und das 4 zum rechten Vorterteil. Ist das so richtig? Das linke Vorterteil hat kein A2 Muster und das rechte hat eins? Oder sollen vieleicht alle A2 Muster zum den Ärmel gehören? Vielen Dank im Vorraus Liebe Grüße Astrid
28.06.2017 - 07:17DROPS Design answered:
Liebe Frau Kummerfeldt, danke für den Hinweis, es wird nachgeprüft. Die Raglanzunahmen werden auf beiden Seiten von jedem A.2 gemacht, dh wie unter RAGLANZUNAHMEN VORDER- UND RÛCKENTEIL + RAGLANZUNAHMEN ÄRMEL. Viel Spaß beim stricken!
28.06.2017 - 08:18
![]() Annika wrote:
Annika wrote:
Hej är första mönstervarvet verkligen korrekt?. Jag får 10 maskor över på första varvet på storlek Large. Tacksam för svar. Mvh Annika Kristensson
01.05.2017 - 17:07DROPS Design answered:
Hej Annika 1.a varvet stickar du såhär: 4 rätstickning, 1 am, A.1x2=8, 1 am, 2rm, A.2=8m, 12 rät, A.2=8m, 2 rät, 1 am, A.1x5=20m, 1 am, 2 rät, A.2, 12 rät, A.2, 2 rät, 1 am, A.1x2=8, 1 am, 4 rätstickning = 114 m
03.05.2017 - 14:09
|
|||||||||||||||||||
Roseanne#roseannecardigan |
|||||||||||||||||||
 |
 |
||||||||||||||||||
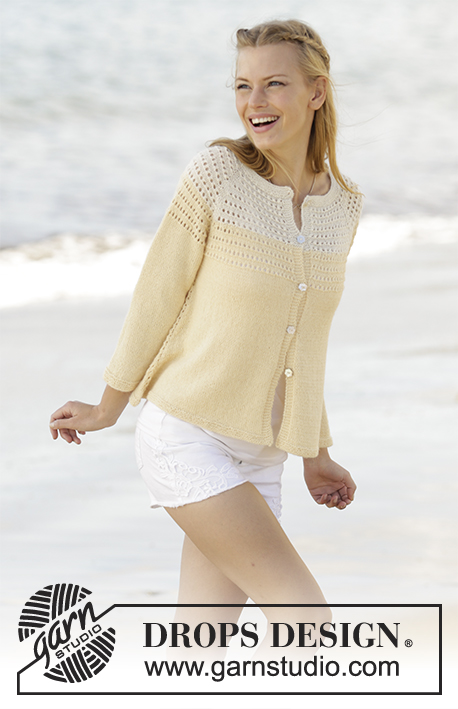
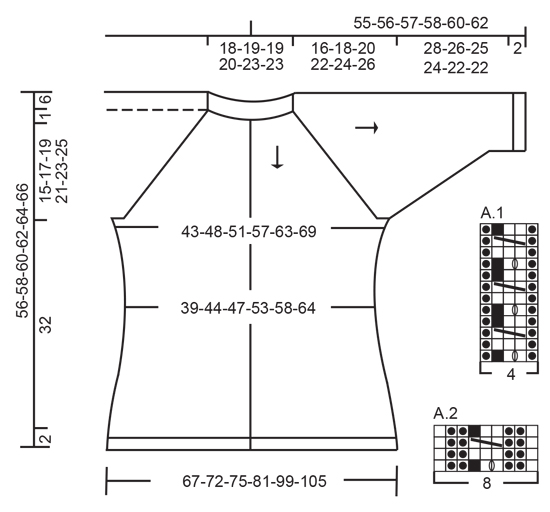
Fitted jacket knitted with raglan and cables, worked top down in DROPS Paris. Size S-XXXL.
DROPS 176-3 |
|||||||||||||||||||
|
GARTER STITCH (back and forth): 1 ridge = knit 2 rows. GARTER STITCH (worked in the round): 1 ridge = 2 rounds. Knit 1 round and purl 1 round. PATTERN: See diagrams A.1 and A.2. Diagrams show all rows in pattern seen from the right side. INCREASE TIP-1: To calculate how to increase evenly, use the total number of stitches on row (e.g. 98 stitches), minus bands (e.g. 8 stitches) and divide the remaining stitches by number of increases to be done (e.g. 12) = 7.5. In this example increase after alternately approx. every 7th and 8th stitch. Do not increase over bands. Increase 1 stitch by making 1 yarn over, on next row work yarn over twisted to avoid holes. RAGLAN FOR FRONT AND BACK PIECE: All increases are done from the right side. Increase first 2 stitches before A.2 on left front piece, after A.2 and before A.2 on back piece and after A.2 on right front piece as follows: Increase 2 stitches before A.2 by working until 1 stitch remains before A.2, make 1 yarn over, knit 1, make 1 yarn over. Increase 2 stitches after A.2 by making 1 yarn over, knit 1, make 1 yarn over (= 8 stitches increased in total). On next row purl yarn overs closest A.2 to make holes. Purl the other yarn overs twisted to avoid holes. Then increase 1 stitch at A.2 on each front piece and 1 stitch in each side at A.2 on back piece as follows: Increase 1 stitch before or after A.2 by making a yarn over (= 4 stitches increased in total). On next row purl yarn over to make holes. RAGLAN SLEEVE: All increases are done from the right side. Increase 1 stitch in each side on sleeves, i.e. after and before A.2 (= 2 stitches increased on each sleeve). Increase 1 stitch by making 1 yarn over, on next row purl yarns over to make holes. KNITTING TIP: When increasing for raglan every 4th row, work a hole before or after A.2 on row from right side without decrease as follows: Before A.2: Begin 2 stitch before A.2, knit 2 together and make 1 yarn over. After A.2: Make 1 yarn over, slip 1 stitch knitwise, knit 1, pass slipped stitch over stitch worked. On next row purl yarn overs to make holes. DECREASE TIP-1 (applies to sides of body): All decreases are done from the right side. Work until 3 stitches remain before marker and knit 2 together, knit 2 (marker is between these 4 stitches), slip 1 stitch knitwise, knit 1, pass slipped stitch over stitch worked (= 2 stitches decreased). DECREASE TIP-2 (applies to mid under sleeve): Work until 2 stitches remain before A.2, knit 2 together, work A.2, slip 1 stitch knitwise, knit 1, pass slipped stitch over stitch worked (= 2 stitches decreased). INCREASE TIP-2 (applies to purl sections on body): All increases are done from the right side. Increase 1 stitch by making 1 yarn over in transition between knit and purl. On next row (wrong side) knit yarn over twisted to avoid hole. Purl increased stitches from right side and knit from wrong side. BUTTONHOLES: Decrease for buttonholes on right band (when garment is worn). 1 buttonhole = work from right side until 4 stitches remain on needle, knit 2 together, make 1 yarn over and knit the last 2 stitches. On next row knit yarn over to make holes. Decrease for first buttonhole on first row from right side after ridges in neck. Then decrease the next 5-5-5-6-6-6 buttonholes, approx. 9-9-9-8-8-9 cm between each. ---------------------------------------------------------- JACKET: Worked back and forth on circular needle from mid front. Work top down. Work sleeves in the round on double pointed needles. YOKE: Cast on 98-100-100-104-110-110 stitches (including 4 band stitches in each side towards mid front) on circular needle size 4.5 mm with Paris. Work 2 ridges in GARTER STITCH - see explanation above. AT THE SAME TIME on third row (= right side) increase 12-14-14-14-16-16 stitches evenly – READ INCREASE TIP-1 = 110-114-114-118-126-126 stitches. Switch to circular needle size 5 mm. Work next row as follows from right side - remember BUTTONHOLES on band - see explanation above: 4 band stitches in garter stitch, purl 1, work A.1 (= 4 stitches on first row) 2-2-2-2-3-3 times in total, purl 1, knit 1-2-2-3-1-1 (= left front piece), A.2 (= 8 stitches on first row), knit 12 (= left sleeve), A.2 (= 8 stitches), knit 1-2-2-3-1-1, purl 1, work A.1 5-5-5-5-7-7 times in total, purl 1, knit 1-2-2-3-1-1 (= back piece), A.2, knit 12 (= right sleeve), A.2, knit 1-2-2-3-1-1, purl 1, work A.1 2-2-2-2-3-3 times in total, purl 1 and 4 band stitches in garter stitch. Work back from wrong side with knit over knit, purl over purl and garter stitch over garter stitch. REMEMBER THE KNITTING TENSION Continue back and forth like this. AT THE SAME TIME on first row from right side begin increase for RAGLAN – see explanation above. NOTE: Increase differently on front/back piece and sleeves as follows: FRONT AND BACK PIECE: Read RAGLAN FOR FRONT AND BACK PIECE. Increase 2 stitches every other row (i.e. on every row from right side) 1-2-2-3-3-6 times in total, then increase 1 stitch on every other row 16-17-19-21-23-22 times in total. SLEEVES: Read RAGLAN SLEEVE. Increase 1 stitch every other row a 11-17-19-20-18-20 times in total, and then on every 4th row 3-1-1-2-4-4 times in total - READ KNITTING TIP. After last increase for raglan there are 238-270-286-314-330-358 stitches on needle. Work next row as follows from wrong side: Work the first 37-41-43-48-52-57 stitches as before (= right front piece), slip the next 48-56-60-64-64-68 stitches on a stitch holder (= right sleeve), cast on 6-6-8-8-10-10 new stitches on needle (= in the side on body), work the next 68-76-80-90-98-108 stitches as before (= back piece), slip the next 48-56-60-64-64-68 stitches on a stitch holder (= left sleeve), cast on 6-6-8-8-10-10 new stitches on needle (= in the side under sleeve) and work the remaining 37-41-43-48-52-57 stitches as before (= left front piece). Piece now measures 16-18-20-22-24-26 cm from cast-on edge mid front and approx. 22-24-26-28-30-32 cm from shoulder and down. Finish body and sleeves separately. NOW MEASURE PIECE FROM HERE! BODY: = 154-170-182-202-222-242 stitches. Insert 1 marker thread in the middle of the 6-6-8-8-10-10 stitches cast on under each sleeve and move the marker threads upwards when working. Continue pattern back and forth as before, work the new stitches that where cast on in stocking stitch. When piece measures 4 cm, decrease 1 stitch on each side of both marker threads - READ DECREASE TIP-1 (= 4 stitches decreased). Repeat decrease when piece measures 10 cm from division. AT THE SAME TIME when piece measures 6 cm, decrease in every purl section between 2 cables (decrease 1 stitch by purling 2 together) = 6-6-6-6-10-10 stitches decreased (i.e. 1-1-1-1-2-2 stitches on each front piece and 4-4-4-4-6-6 stitches on back piece). When all decreases are done, there are 140-156-168-188-204-224 stitches on needle. When piece measures 16 cm from division, increase 1 stitch in every purl section between cables decreased earlier – READ INCREASE TIP-2 (= 6-6-6-6-10-10 stitches increased) = 146-162-174-194-214-234 stitches. On next row from right side increase 1 purl on each side of each cable (= 18-18-18-18-26-26 stitches increased). Repeat increase on each side of every cable every 3 cm 5 times in total = 236-252-264-284-344-364 stitches. When all increases are done, continue pattern back and forth without decreases and increases. When piece measures approx. 31 cm from division - finish after 4th or 8th row in diagram, work 2 rows in stocking stitch back and forth with 4 band stitches in garter stitch in each side. Switch to circular needle size 4.5 mm. Work 3 ridges, switch back to circular needle size 5 mm and cast off with circular needle size 5 mm. SLEEVE: Slip the 48-56-60-64-64-68 stitches from stitch holder in one side of piece on double pointed needles size 5 mm and pick in addition up 1 stitch in each of the 6-6-8-8-10-10 new stitches cast on under sleeve = 54-62-68-72-74-78 stitches. Insert 1 marker thread in the middle of the 6-6-8-8-10-10 new stitches under sleeve and move the marker thread upwards when working. Work in stocking stitch in the round and A.2 over the middle stitches under sleeve (A.2 is 8 stitches on first row). When piece measures 2-2-2-2-3-3 cm, decrease 1 stitch on each side of A.2 - READ DECREASE TIP-2 (= 2 stitches decreased). Decrease 9-13-15-16-16-17 times in total in S: On every 6th round, in M: On every 4th round, in L + XL: On every 3rd round, in XXL + XXXL: On every other round = 36-36-38-40-42-44 stitches. When sleeve measures 28-26-25-24-22-22 cm from division, switch to double pointed needles size 4.5 mm. Work 3 ridges, switch back to double pointed needles size 5 mm and cast off with double pointed needles size 5 mm. Work the other sleeve the same way. ASSEMBLY: Sew the buttons on to the left band. |
|||||||||||||||||||
Diagram explanations |
|||||||||||||||||||
|
|||||||||||||||||||
 |
|||||||||||||||||||
Have you finished this pattern?Tag your pictures with #dropspattern #roseannecardigan or submit them to the #dropsfan gallery. Do you need help with this pattern?You'll find 33 tutorial videos, a Comments/Questions area and more by visiting the pattern on garnstudio.com. © 1982-2026 DROPS Design A/S. We reserve all rights. This document, including all its sub-sections, has copyrights. Read more about what you can do with our patterns at the bottom of each pattern on our site. |
|||||||||||||||||||


With over 40 years in knitting and crochet design, DROPS Design offers one of the most extensive collections of free patterns on the internet - translated to 17 languages. As of today we count 324 catalogues and 12290 patterns translated into English (UK/cm).
We work hard to bring you the best knitting and crochet have to offer, inspiration and advice as well as great quality yarns at incredible prices! Would you like to use our patterns for other than personal use? You can read what you are allowed to do in the Copyright text at the bottom of all our patterns. Happy crafting!
Post a comment to pattern DROPS 176-3
We would love to hear what you have to say about this pattern!
If you want to leave a question, please make sure you select the correct category in the form below, to speed up the answering process. Required fields are marked *.