
Popular categories
Looking for a yarn?


Comments / Questions (41)
![]() Sharon Hunt wrote:
Sharon Hunt wrote:
Hello, am not getting rows per inch in this pattern. Will this affect the length of the raglan/sleeve if so what do i do? Will the raglan be too tight/short if do what do I do? If i have knit extra rows how many and what intervall. Thank you.
18.04.2024 - 14:55DROPS Design answered:
Hi Sharon, if knitting tension is incorrect in height and the knitting is too tight, the raglan dec will be too short and the armholes too small. This can be adjusted by working 1 extra round without dec evenly spaced between dec. Happy knitting!
18.04.2024 - 15:28
![]() Eli wrote:
Eli wrote:
Bonjour, Le dessin A2 pour les augmentations me semble clair, mais sous la manche, il faut le continuer jusqu'au fond de la manche? Est-il possible de faire les manche sans A2? Merci du consegna, bonne journée
26.03.2022 - 22:12DROPS Design answered:
Bonjour Eli, vous pouvez ne pas faire A.2 sous les manches, diminuez alors comme on le montre dans cette vidéo au lieu de diminuer de chaque côté de A.2. Bon tricot!
28.03.2022 - 08:49
![]() Eli wrote:
Eli wrote:
Bonjour, est-il possibile de travailler ce modele aver de la laine?
19.02.2022 - 18:04DROPS Design answered:
Bonjour Eli, bien sur, choisissez la laine du meme groupe de fil, c'est-a-dire C. Bon tricot!
20.02.2022 - 19:32
![]() Esther wrote:
Esther wrote:
Hallo es scheint ja offenbar wirklich nicht einfach zu sein, diese Anleitung umzusetzen. wir haben schon Stunden damit verbracht, das alles zu verstehen. gibt es da evtl. eine neuere Version oder Korrekturen? wir vermuten auch, dass da noch ein Fehler drin ist. danke für die Rückantwort schon im Voraus
07.11.2020 - 11:15DROPS Design answered:
Liebe Esther, können Sie uns bitte mehr sagen, welche Größe stricken Sie? Wo genau haben Sie Schwierigkeiten? An welche Stelle von der Anleitung/Diagram? Haben Sie die Videos (= z.B Wie man diese Zöpfe strickt)/Lektion gesehen?
09.11.2020 - 09:54
![]() Maicen wrote:
Maicen wrote:
Hej! Gällande första varvet på oket: ska A2 stickas på höger framstycke men ej på vänster framstycke? Det står konstigt i beskrivningen som att A2 bara ska stickas på höger framstycke. Gällande ökningstips 2: Vad menas med de aviga partierna på fram och bakstycke?
11.03.2019 - 11:41DROPS Design answered:
Hej. A.2 stickas innan och efter de de slätstickade maskorna på ärmen så det blir riktigt om du följer mönstret (ser att det är otydligt vad som tillhör framstycke och vad som tillhör ärm). De aviga partierna vi menar är de mellan flätorna. Lycka till!
14.03.2019 - 10:03
![]() Elisabeth Bourguignon wrote:
Elisabeth Bourguignon wrote:
Est-il possible de le tricoter sans le motif, juste en jersey endroit, avec les augmentations bien évidemment? Merci de me répondre.
30.05.2018 - 15:27DROPS Design answered:
Bonjour Mme Bourguignon, le nombre de mailles est calculé également avec les mailles point fantaisie des devants, des raglans et du dos, il vous faudra peut-être faire quelques ajustements ou regarder parmi nos autres modèles de gilets raglan. Bon tricot!
30.05.2018 - 16:17
![]() Elisabeth Bourguignon wrote:
Elisabeth Bourguignon wrote:
Est-ce-que j\'ai bien compris? Le travail est partagé ainsi : les devants gauche et droit se tricotent sur 16 mailles chacun, les 2 manches sur 20 mailles chacune et le dos sur 42 mailles pour le premier rang. Ce qui fait 114 mailles. C\'est bien ça? Dommage que ce ne soit pas précisé dès le départ!
30.05.2018 - 15:17DROPS Design answered:
Bonjour Mme Bourguignon, pas tout à fait, car on a entre chaque pièce devant/manche et manche/dos les mailles du raglan soit A.2 (= 8 m au 1er rang). A.2 se tricote après les mailles du devant gauche, avant et après les manches et le dos et avant le devant droit. Les augmentations du raglan vont se faire ainsi soit avant soit après A.2 (cf augmentations raglan). Bon tricot!
30.05.2018 - 16:15
![]() Fabienne wrote:
Fabienne wrote:
Bonjour Et ma seconde question concernant A2 toujours : pour le devant et le dos je crois comprendre qu'on arrête net le motif A2 et on continue en jersey. Est ce correct ? mais là aussi il me semble que ce n'est pas très joli de l'arrêter net. Merci encore de votre aide, Fabienne
03.02.2018 - 17:51DROPS Design answered:
Bonjour Fabienne, tout à fait, comme on le voit sur la photo, on ne tricote plus A.2 sur les côtés après la séparation des manches et du dos/des devants (juste au milieu sous la manche). Bon tricot!
05.02.2018 - 09:06
![]() Fabienne wrote:
Fabienne wrote:
Bonjour, je ne comprends pas comment démarrer A2 sous les manches après la séparation manches/corps. En effet on a : un demi motif A2 qui vent du devant (4 mailles) + 6 mailles que l'on doit rajouter + un demi motif A2 qui vient du dos (4 mailles) =14 mailles. Mais le motif A2 est de 8 mailles et non 14, il faut donc casser les 2 demi motif A2 et en recréer un qui ne sera pas aligné avec le dessus. Est ce correct? Ceci ne me semble pas esthétique... Merci ! Fabienne
03.02.2018 - 17:48DROPS Design answered:
Bonjour Fabienne, sous la manche, on va tricoter A.2 au-dessus des 6 m montées + 1 m de chaque côté = 8 m. On ne continue pas les A.2 de l'empiècement. Bon tricot!
05.02.2018 - 09:05
![]() Kariweggersen wrote:
Kariweggersen wrote:
Hei. Jeg prøver igjen. Ut i fra mønstre skal jeg stikke A 2 på begge sider av armene. A 2 følger med helt til jeg skal dele opp til ermene o.s.v.d. De er jo også med i maskeantallet på 286 masker. Hva gjør jeg for å avslutte A 2 når jeg setter armmaskene på tråd. Det er mulig jeg har misforstått noe vesentlig. Håper du skjønner nå hva jeg mener😊 hilsen Kari som enda er full av håp 😀
11.01.2018 - 15:26DROPS Design answered:
Hei Kari, Du avslutter ikke A.2 når du setter maskene på en tråd. A.2 fortsetter etterpå når du strikker ermene. Håper dette hjelper og god fornøyelse!
12.01.2018 - 07:57
|
|||||||||||||||||||
Roseanne#roseannecardigan |
|||||||||||||||||||
 |
 |
||||||||||||||||||
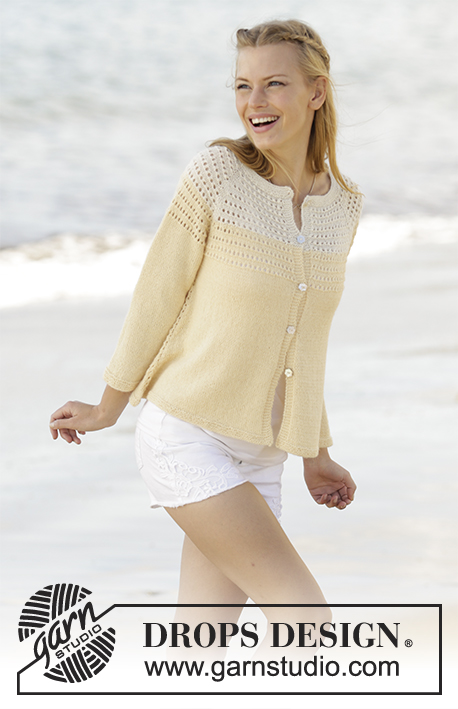
Fitted jacket knitted with raglan and cables, worked top down in DROPS Paris. Size S-XXXL.
DROPS 176-3 |
|||||||||||||||||||
|
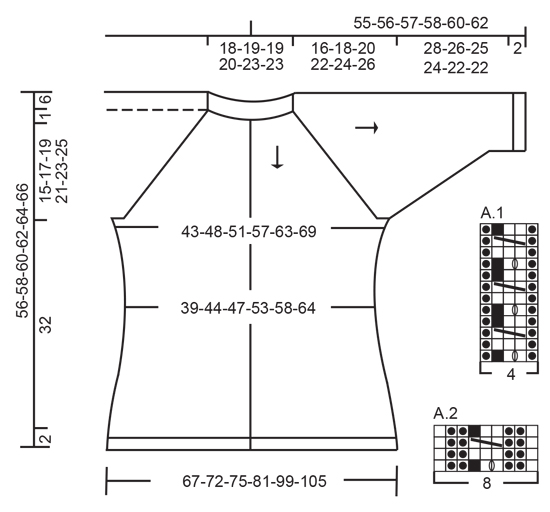
GARTER STITCH (back and forth): 1 ridge = knit 2 rows. GARTER STITCH (worked in the round): 1 ridge = 2 rounds. Knit 1 round and purl 1 round. PATTERN: See diagrams A.1 and A.2. Diagrams show all rows in pattern seen from the right side. INCREASE TIP-1: To calculate how to increase evenly, use the total number of stitches on row (e.g. 98 stitches), minus bands (e.g. 8 stitches) and divide the remaining stitches by number of increases to be done (e.g. 12) = 7.5. In this example increase after alternately approx. every 7th and 8th stitch. Do not increase over bands. Increase 1 stitch by making 1 yarn over, on next row work yarn over twisted to avoid holes. RAGLAN FOR FRONT AND BACK PIECE: All increases are done from the right side. Increase first 2 stitches before A.2 on left front piece, after A.2 and before A.2 on back piece and after A.2 on right front piece as follows: Increase 2 stitches before A.2 by working until 1 stitch remains before A.2, make 1 yarn over, knit 1, make 1 yarn over. Increase 2 stitches after A.2 by making 1 yarn over, knit 1, make 1 yarn over (= 8 stitches increased in total). On next row purl yarn overs closest A.2 to make holes. Purl the other yarn overs twisted to avoid holes. Then increase 1 stitch at A.2 on each front piece and 1 stitch in each side at A.2 on back piece as follows: Increase 1 stitch before or after A.2 by making a yarn over (= 4 stitches increased in total). On next row purl yarn over to make holes. RAGLAN SLEEVE: All increases are done from the right side. Increase 1 stitch in each side on sleeves, i.e. after and before A.2 (= 2 stitches increased on each sleeve). Increase 1 stitch by making 1 yarn over, on next row purl yarns over to make holes. KNITTING TIP: When increasing for raglan every 4th row, work a hole before or after A.2 on row from right side without decrease as follows: Before A.2: Begin 2 stitch before A.2, knit 2 together and make 1 yarn over. After A.2: Make 1 yarn over, slip 1 stitch knitwise, knit 1, pass slipped stitch over stitch worked. On next row purl yarn overs to make holes. DECREASE TIP-1 (applies to sides of body): All decreases are done from the right side. Work until 3 stitches remain before marker and knit 2 together, knit 2 (marker is between these 4 stitches), slip 1 stitch knitwise, knit 1, pass slipped stitch over stitch worked (= 2 stitches decreased). DECREASE TIP-2 (applies to mid under sleeve): Work until 2 stitches remain before A.2, knit 2 together, work A.2, slip 1 stitch knitwise, knit 1, pass slipped stitch over stitch worked (= 2 stitches decreased). INCREASE TIP-2 (applies to purl sections on body): All increases are done from the right side. Increase 1 stitch by making 1 yarn over in transition between knit and purl. On next row (wrong side) knit yarn over twisted to avoid hole. Purl increased stitches from right side and knit from wrong side. BUTTONHOLES: Decrease for buttonholes on right band (when garment is worn). 1 buttonhole = work from right side until 4 stitches remain on needle, knit 2 together, make 1 yarn over and knit the last 2 stitches. On next row knit yarn over to make holes. Decrease for first buttonhole on first row from right side after ridges in neck. Then decrease the next 5-5-5-6-6-6 buttonholes, approx. 9-9-9-8-8-9 cm between each. ---------------------------------------------------------- JACKET: Worked back and forth on circular needle from mid front. Work top down. Work sleeves in the round on double pointed needles. YOKE: Cast on 98-100-100-104-110-110 stitches (including 4 band stitches in each side towards mid front) on circular needle size 4.5 mm with Paris. Work 2 ridges in GARTER STITCH - see explanation above. AT THE SAME TIME on third row (= right side) increase 12-14-14-14-16-16 stitches evenly – READ INCREASE TIP-1 = 110-114-114-118-126-126 stitches. Switch to circular needle size 5 mm. Work next row as follows from right side - remember BUTTONHOLES on band - see explanation above: 4 band stitches in garter stitch, purl 1, work A.1 (= 4 stitches on first row) 2-2-2-2-3-3 times in total, purl 1, knit 1-2-2-3-1-1 (= left front piece), A.2 (= 8 stitches on first row), knit 12 (= left sleeve), A.2 (= 8 stitches), knit 1-2-2-3-1-1, purl 1, work A.1 5-5-5-5-7-7 times in total, purl 1, knit 1-2-2-3-1-1 (= back piece), A.2, knit 12 (= right sleeve), A.2, knit 1-2-2-3-1-1, purl 1, work A.1 2-2-2-2-3-3 times in total, purl 1 and 4 band stitches in garter stitch. Work back from wrong side with knit over knit, purl over purl and garter stitch over garter stitch. REMEMBER THE KNITTING TENSION Continue back and forth like this. AT THE SAME TIME on first row from right side begin increase for RAGLAN – see explanation above. NOTE: Increase differently on front/back piece and sleeves as follows: FRONT AND BACK PIECE: Read RAGLAN FOR FRONT AND BACK PIECE. Increase 2 stitches every other row (i.e. on every row from right side) 1-2-2-3-3-6 times in total, then increase 1 stitch on every other row 16-17-19-21-23-22 times in total. SLEEVES: Read RAGLAN SLEEVE. Increase 1 stitch every other row a 11-17-19-20-18-20 times in total, and then on every 4th row 3-1-1-2-4-4 times in total - READ KNITTING TIP. After last increase for raglan there are 238-270-286-314-330-358 stitches on needle. Work next row as follows from wrong side: Work the first 37-41-43-48-52-57 stitches as before (= right front piece), slip the next 48-56-60-64-64-68 stitches on a stitch holder (= right sleeve), cast on 6-6-8-8-10-10 new stitches on needle (= in the side on body), work the next 68-76-80-90-98-108 stitches as before (= back piece), slip the next 48-56-60-64-64-68 stitches on a stitch holder (= left sleeve), cast on 6-6-8-8-10-10 new stitches on needle (= in the side under sleeve) and work the remaining 37-41-43-48-52-57 stitches as before (= left front piece). Piece now measures 16-18-20-22-24-26 cm from cast-on edge mid front and approx. 22-24-26-28-30-32 cm from shoulder and down. Finish body and sleeves separately. NOW MEASURE PIECE FROM HERE! BODY: = 154-170-182-202-222-242 stitches. Insert 1 marker thread in the middle of the 6-6-8-8-10-10 stitches cast on under each sleeve and move the marker threads upwards when working. Continue pattern back and forth as before, work the new stitches that where cast on in stocking stitch. When piece measures 4 cm, decrease 1 stitch on each side of both marker threads - READ DECREASE TIP-1 (= 4 stitches decreased). Repeat decrease when piece measures 10 cm from division. AT THE SAME TIME when piece measures 6 cm, decrease in every purl section between 2 cables (decrease 1 stitch by purling 2 together) = 6-6-6-6-10-10 stitches decreased (i.e. 1-1-1-1-2-2 stitches on each front piece and 4-4-4-4-6-6 stitches on back piece). When all decreases are done, there are 140-156-168-188-204-224 stitches on needle. When piece measures 16 cm from division, increase 1 stitch in every purl section between cables decreased earlier – READ INCREASE TIP-2 (= 6-6-6-6-10-10 stitches increased) = 146-162-174-194-214-234 stitches. On next row from right side increase 1 purl on each side of each cable (= 18-18-18-18-26-26 stitches increased). Repeat increase on each side of every cable every 3 cm 5 times in total = 236-252-264-284-344-364 stitches. When all increases are done, continue pattern back and forth without decreases and increases. When piece measures approx. 31 cm from division - finish after 4th or 8th row in diagram, work 2 rows in stocking stitch back and forth with 4 band stitches in garter stitch in each side. Switch to circular needle size 4.5 mm. Work 3 ridges, switch back to circular needle size 5 mm and cast off with circular needle size 5 mm. SLEEVE: Slip the 48-56-60-64-64-68 stitches from stitch holder in one side of piece on double pointed needles size 5 mm and pick in addition up 1 stitch in each of the 6-6-8-8-10-10 new stitches cast on under sleeve = 54-62-68-72-74-78 stitches. Insert 1 marker thread in the middle of the 6-6-8-8-10-10 new stitches under sleeve and move the marker thread upwards when working. Work in stocking stitch in the round and A.2 over the middle stitches under sleeve (A.2 is 8 stitches on first row). When piece measures 2-2-2-2-3-3 cm, decrease 1 stitch on each side of A.2 - READ DECREASE TIP-2 (= 2 stitches decreased). Decrease 9-13-15-16-16-17 times in total in S: On every 6th round, in M: On every 4th round, in L + XL: On every 3rd round, in XXL + XXXL: On every other round = 36-36-38-40-42-44 stitches. When sleeve measures 28-26-25-24-22-22 cm from division, switch to double pointed needles size 4.5 mm. Work 3 ridges, switch back to double pointed needles size 5 mm and cast off with double pointed needles size 5 mm. Work the other sleeve the same way. ASSEMBLY: Sew the buttons on to the left band. |
|||||||||||||||||||
Diagram explanations |
|||||||||||||||||||
|
|||||||||||||||||||
 |
|||||||||||||||||||
Have you finished this pattern?Tag your pictures with #dropspattern #roseannecardigan or submit them to the #dropsfan gallery. Do you need help with this pattern?You'll find 33 tutorial videos, a Comments/Questions area and more by visiting the pattern on garnstudio.com. © 1982-2026 DROPS Design A/S. We reserve all rights. This document, including all its sub-sections, has copyrights. Read more about what you can do with our patterns at the bottom of each pattern on our site. |
|||||||||||||||||||


With over 40 years in knitting and crochet design, DROPS Design offers one of the most extensive collections of free patterns on the internet - translated to 17 languages. As of today we count 324 catalogues and 12290 patterns translated into English (UK/cm).
We work hard to bring you the best knitting and crochet have to offer, inspiration and advice as well as great quality yarns at incredible prices! Would you like to use our patterns for other than personal use? You can read what you are allowed to do in the Copyright text at the bottom of all our patterns. Happy crafting!
Post a comment to pattern DROPS 176-3
We would love to hear what you have to say about this pattern!
If you want to leave a question, please make sure you select the correct category in the form below, to speed up the answering process. Required fields are marked *.