
Popular categories
Looking for a yarn?


Comments / Questions (31)
![]() Luciana wrote:
Luciana wrote:
Buongiorno, io dovrei cominciare a lavorare la taglia XL di questo splendido modello. Come mi consigliate di lavorare i due aumenti per lato vicino al segnapunti per le maniche per non rovinare la linea e non creare buchi? Uno saprei come fare ma due vicini mi creano qualche problema..... Grazie per il consiglio!
07.04.2024 - 10:22
![]() Claire wrote:
Claire wrote:
Par exemple : "17x A1 au total, 2 mailles envers, placer 1 marqueur...". Est-ce que c'est 17x la ligne 1 (du bas) de A1 17x ou 17x A1 au complet donc 17 rangs ? Merci
08.09.2022 - 17:16DROPS Design answered:
Bonjour Claire, vous devez tricoter ainsi: *répétez 17 fois A.1 en largeur (= 17 x 4 m = 68 m), 2 m env, placez 1 marqueur, tricotez 6 m end, placez 1 marqueur, 1 m env*, répétez de *-*=(68+2+6+1)x2=154 m. Augmentez aux marqueurs comme indiqué et continuez à tricoter A.1 (= 1 case = 1 maille x 1 rang), vous allez ainsi augmenter d'abord 2 m à chaque marqueur (8 m au total) puis 1 m à chaque marqueur (= 4 m au total) + les mailles à augmenter dans A.1 (cf ovales noirs). Quand A.1 est terminé (= 22 rangs), vous avez 8 m dans chaque A.1, tricotez maintenant A.2 au-dessus de chaque A.1 et continuez les augmentations aux marqueurs. Bon tricot!
09.09.2022 - 08:54
![]() Claire wrote:
Claire wrote:
J'ai du mal à comprendre le tuto... Alors que j'ai déjà tricoté des vêtements. Il est très joli mais pour le moment aucun plaisir à le tricoter. J'ai vraiment l'impression d'être bête...
08.09.2022 - 15:50DROPS Design answered:
Bonjour Claire, si je résume la robe, vous tricotez de haut en bas, en suivant les diagrammes indiqués et les manches en jersey; vous augmentez dans les diagrammes et à la fois de chaque côté des marqueurs comme pour un raglan. N'hésitez pas à nous dire ce qui vous gène pour que nous puissions essayer de vous aider. Bon tricot!
08.09.2022 - 16:23
![]() Isabel wrote:
Isabel wrote:
Para saber qué talla debo elegir, como lo hago? Y tiene holgura positiva este patrón?.Gracias
15.04.2022 - 00:08DROPS Design answered:
Hola Isabel, puedes ver el esquema de medidas de la prenda, en cm, debajo de las instrucciones del patrón y el diagrama, para cada una de las tallas. Si estás en duda entre dos tallas, es mejor elegir la más grande siempre. El modelo tiene buena caída y se asienta mejor, porque se trabaja de arriba abajo.
15.04.2022 - 19:36
![]() Elsemari Iversen wrote:
Elsemari Iversen wrote:
Hvordan kan jeg øke hver 2. Omgang 14 ganger, når mønster A,1 kun er på 22 omganger
07.02.2021 - 17:03DROPS Design answered:
Hei Elsemari, Etter du har strikket ferdig A.1, skal du strikke A.2; økningene fortsetter her. God fornøyelse!
09.02.2021 - 07:37
![]() Anna wrote:
Anna wrote:
Komme mit der Anleitung nicht klar.. Ich glaube bei der Anleitung hat sich ein Fehler eingeschlichen. Ich habe für die Ärmel 50 Maschen und für vorder- bzw. RÜCKENTEIL 99 Maschen. In der Anleitung steht jedoch 60 für Ärmel und 89 für Vorder. Und Rückenteil 89.
26.03.2020 - 07:45DROPS Design answered:
Liebe Anna, bei der Verteilungsrunde werden die ersten 4 Maschen für die Maschen stillgelegt, dann nur die nächsten 89 Maschen (dh nicht alle 99 M) gestrickt, die 6 nächsten Maschen werden mit den Ärmelmaschen stillgelegt. Bei den Ärmeln werden dann die 6 letzten Maschen von Rücken/Vorderteil stillgelegt + die 50 M von der Ärmel + die 4 ersten Maschen von Vorder/Rückenteil damit stillgelegt = 60 M bei den Ärmeln und 89 M beim Vorder- bzw Rücken teil (+ 8 neuen Maschen unter den Armen). Viel Spaß beim stricken!
26.03.2020 - 10:19
![]() Aga wrote:
Aga wrote:
Hello, I have some difficulty understanding the pattern. In the yoke for size M, it says to increase 1 st every 4th row 14 times. Does this mean that I should increase 1 st in total every 4th row or 1 st near every marker, i.e. 4 sts increase in total every 4th row? At the end it says that after increase we have 298 sts on needle but according to my calculations only 206 sts will be on the needle once all increases are done. Am I missing something? Looking forward to your reply.
01.11.2019 - 00:18DROPS Design answered:
Dear Aga, you increase 1 stitch at each marker - see INCREASE TIP (yoke) over the DRESS/ YOKE pattern. There are 130 sts + 14 x 4 inc (= 4 markers) + 4 x 4 inc and at the same time you increase as shown in A.1 = 4 sts in each of the 24 A.1 = 130 + 72 sts inc at markers + 96sts inc in A.1 = 298 sts. Happy knitting!
04.11.2019 - 14:53
![]() Karin wrote:
Karin wrote:
Hallo, Is er al een verbetering van het patroon betreffende het aantal steken op de hulpnaald te zetten voor de mouwen aub? Want deze klopten niet.
11.03.2019 - 15:18DROPS Design answered:
Dag Karin,
Er is inmiddels een correctie op het patroon gekomen aangaande het onderdeel wat je bedoelt. Bedankt voor het geduld!
25.03.2019 - 10:24
![]() Michelle wrote:
Michelle wrote:
Se gerne bort fra mit tidligere spørgsmål i dag. Jeg tror jeg har fundet fejlen. Jeg har vidst lavet udtagningerne forkert, så jeg har fået for få masker i ærmerne, og for mange i mønsterdelen. Jeg strikker en str. L. Jeg har først strikket udtagningerne på ærmerne på hver 2. omgang 16 gange og derefter på hver 4. omgang 4 gange. Hvad gør jeg forkert? Jeg havde 134 masker, inden jeg påbegyndte udtagningerne. MVH Michelle
28.02.2019 - 17:10DROPS Design answered:
Hei Michelle. Vi har nå laget en rettesle på inndelingen til bol og ermer, det skal være 95 masker på for og bakstykkene, og 64 masker på hvert erme. Altså 3 masker fra i hver side på for og bakstykket blir altså en del av ermet. God fornøyelse
18.03.2019 - 09:24
![]() Michelle wrote:
Michelle wrote:
Hej. Jeg skal til at dele til ærmer, for- og bagstykke. Men jeg er aktuelt på 2. omgang af diagram A2. Hvordan får jeg mønstret til at passe, når jeg skal påbegynde kroppen og lave vrangmasker i siden? Har jeg mon lavet fejl? Mvh Michelle
28.02.2019 - 16:09DROPS Design answered:
Hej Michelle, Jeg læser det som at du skal dele arbejdet på første pind i diagrammet. Men det gør ikke noget hvis du bare sørger for at mønteret stemmer over kroppen, men de masker som er nærmest vrangmaskerne midt under ærmet strikker du i glatstrik hvis der ikke er nok til at strikke omslag og indtagning. God fornøjelse!
05.04.2019 - 12:26
|
||||||||||||||||||||||||||||
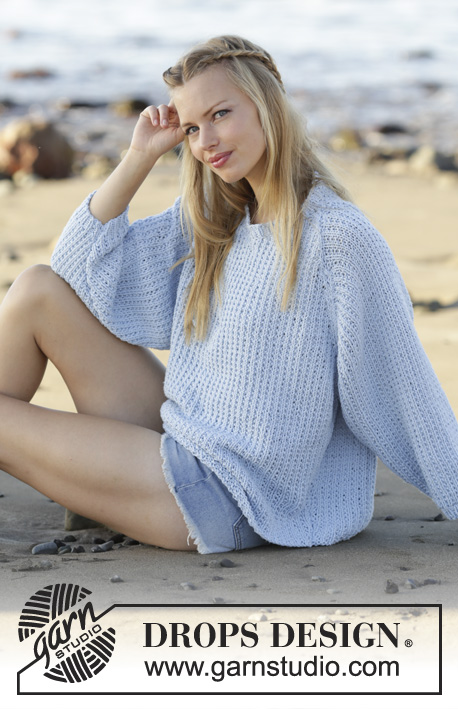
Marie#mariedress |
||||||||||||||||||||||||||||
|
|
||||||||||||||||||||||||||||
Knitted dress with raglan, lace pattern and roll neck, worked top down in DROPS Muskat. Sizes S - XXXL.
DROPS 177-7 |
||||||||||||||||||||||||||||
|
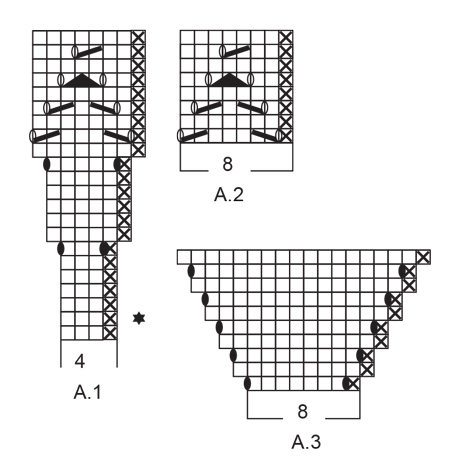
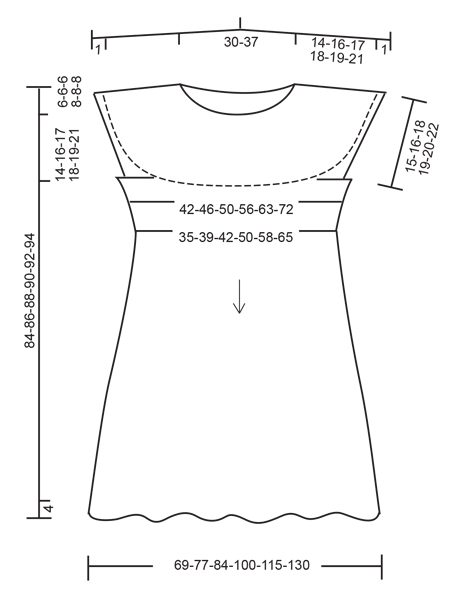
RIDGE/GARTER STITCH (worked in the round): 1 ridge = 2 rounds. Knit 1 round and purl 1 round. PATTERN: See diagrams A.1 to A.3. The diagrams show all rows in the pattern seen from the right side. DECREASE TIP (evenly spaced): To work out how to decrease evenly, count the total number of stitches on the needle (e.g. 142 stitches), divide this number by the number of decreases to be made (e.g. 12) = 11.8. In this example, work every 11th and 12th stitch together. DECREASE TIP (for the sides): Work to the purl stitch in the side, purl the first 2 stitches together, work until there are 2 purl stitches remaining and purl these 2 stitches together. Repeat in the other side (= 4 stitches decreased on the round). INCREASE TIP (yoke): The increases are different in the different sizes. Sizes S, M and L: Increase 1 stitch by each marker. Sizes XL, XXL and XXXL: First increase 2 stitches by each marker, then increase 1 stitch by each marker. INCREASE 2 STITCHES AS FOLLOWS: Work to the first marker, knit 1, 1 yarn over, knit 1, 1 yarn over, knit until there are 2 stitches left before the next marker, 1 yarn over, knit 1, 1 yarn over, knit 1 (the marker sits here). Repeat in the other side (= 8 stitches increased on the round). INCREASE 1 STITCH AS FOLLOWS: Work to the first marker, knit 1, 1 yarn over, knit until there is 1 stitch left before the next marker, 1 yarn over, knit 1 (the marker sits here). Repeat in the other side (= 4 stitches increased on the round). NOTE: On the next round knit all the yarn overs twisted to prevent holes! Then knit the new stitches. ---------------------------------------------------------- DRESS: The dress is worked in the round and top down. YOKE: Cast on 138-142-148-154-162-168 stitches with circular needle size 4 mm and Muskat. Purl 1 round. Insert 1 marker at the start of the round (= the transition between the sleeve in stocking stitch and the pattern on the back of the dress). Knit 1 round and decrease 12-12-14-14-14-14 stitches evenly along the round – READ DECREASE TIP (evenly spaced) = 126-130-134-140-148-154 stitches. Knit 1 more round. Work the pattern as follows: * Work A.1 in total 11-12-13-13-15-17 times, purl 2, insert a marker here, knit 16-14-12-15-11-6 stitches (sleeve), insert a marker here, purl 1 *, repeat from *-* 1 more time. There are now 4 markers in the piece. REMEMBER THE KNITTING TENSION! On the next round (= the round with a star in A.1) start increasing by each of the 4 markers – READ INCREASE TIP! Increase 1-1-1-2-2-2 stitches every 2nd round 11-14-16-4-5-6 times and increase 1 stitch every 4th-4th-4th-2nd-2nd-2nd round 4-4-4-18-20-23 times. When the whole of A.1 has been worked in height, there are 91-99-107-107-123-139 stitches between the markers for both front piece and back piece. Continue by repeating A.2 over each repeat of A.1. When all the increases are finished, there are 274-298-318-348-388-430 stitches on the needle. The piece measures approx. 15-17-18-18-20-22 cm from the cast-on edge and down (including the roll-edge in the neck). The next round is worked as follows: NOTE: In sizes S, M and L in this round, work 4-4-3 stitches of pattern A.2 in each side of the front and back pieces. If there is not room for the lace pattern (both the yarn over and decrease) knit (instead of yarn over and decrease) over the 4-4-3 stitches in each side. Work the first 4-4-3-0-0-0 stitches before placing them on a thread, work the next 81-89-95-105-121-137 stitches in pattern as before (= back piece), place the next 56-60-64-69-73-78 stitches on a thread for sleeve and cast on 8-8-10-12-12-14 new stitches on the needle (= in the side, under sleeve), work the next 81-89-95-105-121-137 stitches in the pattern as before (= front piece), place the next 52-56-61-69-73-78 stitches on a thread for sleeve, and place the 4-4-3-0-0-0 stitches placed on a thread at the beginning, on the same thread (= 56-60-64-69-73-78 stitches on thread for sleeve), cast on 8-8-10-12-12-14 new stitches on the needle (= in the side, under sleeve). BODY: There are now 178-194-210-234-266-302 stitches for the body. Insert a marker in each side of the body where the new stitches are cast on under the sleeve (= 4-4-5-6-6-7 new stitches on each side of the marker). Adjust so that the round starts by one of the markers under the sleeves. THE PIECE IS NOW MEASURED FROM HERE! Work the pattern as follows: Purl 8-8-8-6-6-7 stitches, work A.2 in total 9-10-11-13-15-17 times, purl 17-17-17-13-13-15 stitches, work A.2 in total 9-10-11-13-15-17 times, purl 9-9-9-7-7-8 stitches. There are now 18-18-18-14-14-16 purled stitches in each side including the purl stitch in A.2. When the piece measures 4 cm in all sizes, start the decreases in each side – READ DECREASE TIP (for the sides)! Decrease in this way every 3rd-3rd-3rd-4th-4th-3rd round in total 8-8-8-6-6-7 times (= 2 purl stitches in each side) = 146-162-178-210-242-274 stitches. When the piece measures 14-14-15-15-15-15 cm increase as follows: Work * 1 yarn over, A.2 *, repeat from *-* 8-9-10-12-14-16 more times, purl 1 (the marker sits here). Work * 1 yarn over, A.2 *, repeat from *-* 8-9-10-12-14-16 more times, purl 1 (the marker sits here) = 164-182-200-236-272-308 stitches. On the next round, purl the yarn overs twisted to prevent holes. Continue by purling the new stitches. Continue the increases, i.e. increase alternately on each side of the purl stitches, every 12th round 7 more times = 290-322-354-418-482-546 stitches. Continue working with purl over purl and A.2 over A.2 until the piece measures 60-60-60-61-61-61 cm, but adjust so that a whole repeat is completed in height. Work the purled stitches as before and work A.3 over each repeat of A.2. When the whole of A.3 is completed in height, there are 470-522-574-678-782-886 stitches on the round. The piece measures in total 84-86-88-90-92-94 cm from the shoulder. Cast off with knit over knit and purl over purl. Cut and fasten the strand. SLEEVE EDGE: Place the stitches from the thread back on double pointed needles size 3.5 mm and pick up 1 stitch in each of the new 8-8-10-12-12-14 stitches which were cast on under the sleeve = 64-68-74-81-85-92 stitches. Work 3 RIDGES – see description above, in the round with double pointed needles. Cast off. Cut and fasten the strand. Work the other sleeve edge the same way. |
||||||||||||||||||||||||||||
Diagram explanations |
||||||||||||||||||||||||||||
|
||||||||||||||||||||||||||||
 |
||||||||||||||||||||||||||||
 |
||||||||||||||||||||||||||||
Have you finished this pattern?Tag your pictures with #dropspattern #mariedress or submit them to the #dropsfan gallery. Do you need help with this pattern?You'll find 29 tutorial videos, a Comments/Questions area and more by visiting the pattern on garnstudio.com. © 1982-2026 DROPS Design A/S. We reserve all rights. This document, including all its sub-sections, has copyrights. Read more about what you can do with our patterns at the bottom of each pattern on our site. |
||||||||||||||||||||||||||||


With over 40 years in knitting and crochet design, DROPS Design offers one of the most extensive collections of free patterns on the internet - translated to 17 languages. As of today we count 324 catalogues and 12290 patterns translated into English (UK/cm).
We work hard to bring you the best knitting and crochet have to offer, inspiration and advice as well as great quality yarns at incredible prices! Would you like to use our patterns for other than personal use? You can read what you are allowed to do in the Copyright text at the bottom of all our patterns. Happy crafting!
Post a comment to pattern DROPS 177-7
We would love to hear what you have to say about this pattern!
If you want to leave a question, please make sure you select the correct category in the form below, to speed up the answering process. Required fields are marked *.