DROPS Muskat
DROPS Muskat
100% Cotton
from 1.85 £ /50g
Get the yarn to make this pattern from 20.35£.

The yarn cost is calculated from the pattern’s smallest size and the yarn’s cheapest product type. Looking for an even better price? You might find it on the DROPS Deals!

DROPS SS24

Marie

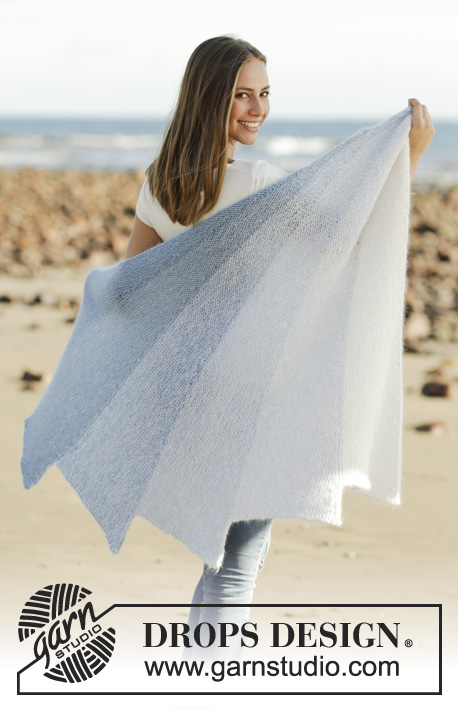
Knitted dress with raglan, lace pattern and roll neck, worked top down in DROPS Muskat. Sizes S - XXXL.

DROPS 177-7
DROPS Design: Pattern no r-715
Yarn group B
----------------------------------------------------------
Sizes: S - M - L - XL - XXL - XXXL
Materials:
DROPS MUSKAT from Garnstudio (belongs to yarn group B)
550-650-700-750-850-900 g colour 60, ice blue

DROPS CIRCULAR NEEDLE (60 and 80 cm) SIZE 4 MM – or the size needed to get 21 stitches and 28 rows stocking stitch on 10 cm in width and 10 cm in height.
DROPS DOUBLE POINTED NEEDLES SIZE 3.5 MM for the garter stitch borders/sleeve edges – or the size needed to get 22 stitches and 30 rows stocking stitch on 10 cm in width and 10 cm in height.
----------------------------------------------------------

-------------------------------------------------------

Alternative Yarn – See how to change yarns here
Yarn Groups A to F – Use the same pattern and change the yarn here
Yarn usage using an alternative yarn – Use our yarn converter here

-------------------------------------------------------

DROPS Muskat
DROPS Muskat
100% Cotton
from 1.85 £ /50g
Get the yarn to make this pattern from 20.35£.

The yarn cost is calculated from the pattern’s smallest size and the yarn’s cheapest product type. Looking for an even better price? You might find it on the DROPS Deals!

Pattern instructions

NOTE: This pattern is written in British English. All measurements in charts are in cm. For conversion from cm to inches - click here. There are different terms for crocheting in British and American English. If this pattern includes crochet, click for "crochet terms" here. For this pattern in American English, please click here.
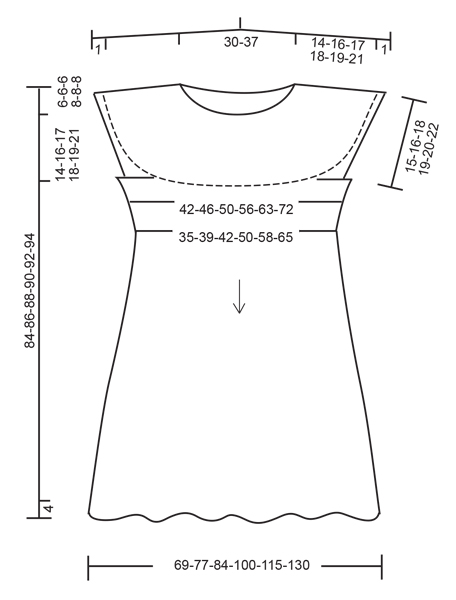
RIDGE/GARTER STITCH (worked in the round):
1 ridge = 2 rounds. Knit 1 round and purl 1 round.

PATTERN:
See diagrams A.1 to A.3. The diagrams show all rows in the pattern seen from the right side.

DECREASE TIP (evenly spaced):
To work out how to decrease evenly, count the total number of stitches on the needle (e.g. 142 stitches), divide this number by the number of decreases to be made (e.g. 12) = 11.8. In this example, work every 11th and 12th stitch together.
DECREASE TIP (for the sides):
Work to the purl stitch in the side, purl the first 2 stitches together, work until there are 2 purl stitches remaining and purl these 2 stitches together. Repeat in the other side (= 4 stitches decreased on the round).

INCREASE TIP (yoke):
The increases are different in the different sizes.
Sizes S, M and L: Increase 1 stitch by each marker.
Sizes XL, XXL and XXXL: First increase 2 stitches by each marker, then increase 1 stitch by each marker.
INCREASE 2 STITCHES AS FOLLOWS:
Work to the first marker, knit 1, 1 yarn over, knit 1, 1 yarn over, knit until there are 2 stitches left before the next marker, 1 yarn over, knit 1, 1 yarn over, knit 1 (the marker sits here). Repeat in the other side (= 8 stitches increased on the round).
INCREASE 1 STITCH AS FOLLOWS:
Work to the first marker, knit 1, 1 yarn over, knit until there is 1 stitch left before the next marker, 1 yarn over, knit 1 (the marker sits here). Repeat in the other side (= 4 stitches increased on the round).
NOTE: On the next round knit all the yarn overs twisted to prevent holes! Then knit the new stitches.
----------------------------------------------------------

DRESS:
The dress is worked in the round and top down.

YOKE:
Cast on 138-142-148-154-162-168 stitches with circular needle size 4 mm and Muskat. Purl 1 round. Insert 1 marker at the start of the round (= the transition between the sleeve in stocking stitch and the pattern on the back of the dress). Knit 1 round and decrease 12-12-14-14-14-14 stitches evenly along the round – READ DECREASE TIP (evenly spaced) = 126-130-134-140-148-154 stitches. Knit 1 more round.
Work the pattern as follows: * Work A.1 in total 11-12-13-13-15-17 times, purl 2, insert a marker here, knit 16-14-12-15-11-6 stitches (sleeve), insert a marker here, purl 1 *, repeat from *-* 1 more time. There are now 4 markers in the piece. REMEMBER THE KNITTING TENSION!
On the next round (= the round with a star in A.1) start increasing by each of the 4 markers – READ INCREASE TIP! Increase 1-1-1-2-2-2 stitches every 2nd round 11-14-16-4-5-6 times and increase 1 stitch every 4th-4th-4th-2nd-2nd-2nd round 4-4-4-18-20-23 times. When the whole of A.1 has been worked in height, there are 91-99-107-107-123-139 stitches between the markers for both front piece and back piece. Continue by repeating A.2 over each repeat of A.1. When all the increases are finished, there are 274-298-318-348-388-430 stitches on the needle. The piece measures approx. 15-17-18-18-20-22 cm from the cast-on edge and down (including the roll-edge in the neck).
The next round is worked as follows:
NOTE: In sizes S, M and L in this round, work 4-4-3 stitches of pattern A.2 in each side of the front and back pieces. If there is not room for the lace pattern (both the yarn over and decrease) knit (instead of yarn over and decrease) over the 4-4-3 stitches in each side.
Work the first 4-4-3-0-0-0 stitches before placing them on a thread, work the next 81-89-95-105-121-137 stitches in pattern as before (= back piece), place the next 56-60-64-69-73-78 stitches on a thread for sleeve and cast on 8-8-10-12-12-14 new stitches on the needle (= in the side, under sleeve), work the next 81-89-95-105-121-137 stitches in the pattern as before (= front piece), place the next 52-56-61-69-73-78 stitches on a thread for sleeve, and place the 4-4-3-0-0-0 stitches placed on a thread at the beginning, on the same thread (= 56-60-64-69-73-78 stitches on thread for sleeve), cast on 8-8-10-12-12-14 new stitches on the needle (= in the side, under sleeve).


BODY:
There are now 178-194-210-234-266-302 stitches for the body. Insert a marker in each side of the body where the new stitches are cast on under the sleeve (= 4-4-5-6-6-7 new stitches on each side of the marker). Adjust so that the round starts by one of the markers under the sleeves. THE PIECE IS NOW MEASURED FROM HERE!
Work the pattern as follows: Purl 8-8-8-6-6-7 stitches, work A.2 in total 9-10-11-13-15-17 times, purl 17-17-17-13-13-15 stitches, work A.2 in total 9-10-11-13-15-17 times, purl 9-9-9-7-7-8 stitches. There are now 18-18-18-14-14-16 purled stitches in each side including the purl stitch in A.2. When the piece measures 4 cm in all sizes, start the decreases in each side – READ DECREASE TIP (for the sides)! Decrease in this way every 3rd-3rd-3rd-4th-4th-3rd round in total 8-8-8-6-6-7 times (= 2 purl stitches in each side) = 146-162-178-210-242-274 stitches. When the piece measures 14-14-15-15-15-15 cm increase as follows:
Work * 1 yarn over, A.2 *, repeat from *-* 8-9-10-12-14-16 more times, purl 1 (the marker sits here). Work * 1 yarn over, A.2 *, repeat from *-* 8-9-10-12-14-16 more times, purl 1 (the marker sits here) = 164-182-200-236-272-308 stitches. On the next round, purl the yarn overs twisted to prevent holes. Continue by purling the new stitches. Continue the increases, i.e. increase alternately on each side of the purl stitches, every 12th round 7 more times = 290-322-354-418-482-546 stitches.
Continue working with purl over purl and A.2 over A.2 until the piece measures 60-60-60-61-61-61 cm, but adjust so that a whole repeat is completed in height. Work the purled stitches as before and work A.3 over each repeat of A.2. When the whole of A.3 is completed in height, there are 470-522-574-678-782-886 stitches on the round. The piece measures in total 84-86-88-90-92-94 cm from the shoulder. Cast off with knit over knit and purl over purl. Cut and fasten the strand.

SLEEVE EDGE:
Place the stitches from the thread back on double pointed needles size 3.5 mm and pick up 1 stitch in each of the new 8-8-10-12-12-14 stitches which were cast on under the sleeve = 64-68-74-81-85-92 stitches. Work 3 RIDGES – see description above, in the round with double pointed needles. Cast off. Cut and fasten the strand.
Work the other sleeve edge the same way.

This pattern has been corrected.

Updated online: 18.03.2019
Correction - YOKE: Work the first 4-4-3-0-0-0 stitches before placing them on a thread...place the next 52-56-61-69-73-78 stitches on a thread for sleeve, and place the 4-4-3-0-0-0 stitches placed on a thread at the beginning, on the same thread (= 56-60-64-69-73-78 stitches on thread for sleeve)

Diagram

symbols = Knit
symbols = Purl
symbols = 1 yarn over between 2 stitches. On the next round knit the yarn overs so that there are holes
symbols = 1 yarn over between 2 stitches. On the next round knit the yarn overs twisted to prevent holes.
symbols = Knit 2 stitches together
symbols = Slip 1 stitch as if to knit, knit 1, pass the slipped stitch over
symbols = Slip 1 stitch as if to knit, knit 2 together, pass the slipped stitch over
symbols = direction of knitting
symbols = On this round, the increases start in the sections with knitted stitches on each shoulder – see the description in the text!
diagram
diagram

Each of our patterns has specific tutorial videos to help you.

Do you have a question? See a list of frequently asked questions (FAQ)

Knitting tension is what determines the final measurements of your work, and is usually measured per 10 x 10 cm. It is provided like so: number of stitches in width x number of rows in height - eg: 19 stitches x 26 rows = 10 x 10 cm.

The knitting tension is very individual; some people knit/crochet loosely while others work tightly. You adjust the knitting tension with the needle size, which is why the suggested needle size is only meant as a guide! You need to adjust this (up or down) to ensure that YOUR knitting tension matches the knitting tension provided in the pattern. If you work with a different knitting tension than provided you will have a different yarn consumption, and your work will have different measurements than what the pattern suggests.

The knitting tension also determines which yarns can replace each other. As long as you achieve the same knitting tension you can replace one yarn with another.

See DROPS lesson: How to measure your tension/gauge

See DROPS video: How to make a gauge tension swatch

The required amount of yarn is provided in grams, eg: 450 g. To calculate how many balls you’ll need you first need to know how many grams are in 1 ball (25g, 50g or 100g). This information is available if you click on the individual yarn quality on our pages. Divide the amount required with the amount of each ball. For example, if each ball is 50g (the most common amount), the calculation will be as follows: 450 / 50 = 9 balls.

The important thing when changing from one yarn to another is that the knitting/crochet tension remains the same. This is so that the measurements of the finished piece will be the same as on the sketch provided. It is easier to achieve the same knitting tension using yarns from the same yarn group. It is also possible to work with multiple strands of a thinner yarn to achieve the knitting tension of a thicker one. Please try our yarn converter. We recommend you to always work a test swatch.

Please NOTE: when changing yarn the garment might have a different look and feel to the garment in the photo, due to individual properties and qualities of each yarn.

See DROPS lesson: Can I use a different yarn than the one mentioned in the pattern?

All our yarns are categorised into yarn groups (from A to F) according to thickness and knitting tension – group A contains the thinnest yarns and group F the thickest. This makes it easier for you to find alternative yarns to our patterns, should you wish to switch yarn. All yarns within the same group have a similar knitting tension and can easily replace each other. However, different yarn qualities have different structures and properties which will give the finished work a unique look and feel.

Click here for an overview of the yarns in each yarn group

At the top of all our patterns you’ll find a link to our yarn calculator, which is a helpful tool should you wish to use a different yarn than suggested. By filling in the yarn quality you wish to replace, the amount (in your size) and number of strands, the calculator will present good alternative yarns with the same knitting tension. Additionally it will tell you how much you’ll require in the new qualities and whether you’ll need to work with multiple strands. Most skeins are 50g (some are 25g or 100g).

If the pattern is worked with multiple colours, every colour will have to be calculated separately. Similarly, if the pattern is worked with several strands of different yarns (for example 1 strand Alpaca and 1 strand Kid-Silk) you will have to find alternatives for each, individually.

Click here to see our yarn calculator

Since different yarns have different qualities and textures we have chosen to keep the original yarn in our patterns. However, you can easily find options among our available qualities by using our yarn calculator, or simply pick a yarn from the same yarn group.

It is possible that some retailers still have discontinued yarns in stock, or that someone has a few skeins at home that they would like to find patterns for.

The yarn calculator will provide both alternative yarn as well as required amount in the new quality.

If you think it's hard to decide what size to make, it can be a good idea to measure a garment you own already and like the size of. Then you can pick the size by comparing those measures with the ones available in the pattern's size chart.

You'll find the size chart at the bottom of the pattern.

See DROPS lesson: How to read size chart

The needle size provided in the pattern serves only as a guide, the important thing is to follow the knitting tension. And since knitting tension is very individual, you will have to adjust the needle size to ensure that YOUR tension is the same as in the pattern – maybe you’ll have to adjust 1, or even 2 needle sizes, up or down to achieve the correct tension. For this, we recommend that you work test swatches.

Should you work with a different knitting tension than the one provided, the measurements of the finished garment might deviate from the measurement sketch.

See DROPS lesson: How to measure your tension/gauge

See DROPS video: How to make a tension/gauge swatch

Working a garment top-down provides more flexibility and room for personal adjustment. For example it is easier to try the garment on while working, as well as making adjustments to length of yoke and shoulder caps.

The instructions are carefully explaining every step, in the correct order. Diagrams are adjusted to the knitting direction and are worked as usual.

The diagram depicts all rows/rounds, and every stitch seen from the right side. It is read from bottom to top, from right to left. 1 square = 1 stitch.

When working back and forth, every other row is worked from the right side and every other row is worked from the wrong side. When working from the wrong side, the diagram will have to be worked reversed: from left to right, knit stitches are purled, purl stitches are knit etc.

When working in the round every round is worked from the right side and the diagram are worked from right to left on all rounds.

See DROPS lesson: How to read knitting diagrams

The diagram depicts all rows/rounds, and every stitch seen from the right side. It is worked from bottom to top, from right to left.

When working back and forth every other row is worked from the right side: from right to left and every other row is worked from the wrong side: from left to right.

When working in the round, every row in the diagram are worked from the right side, from right to left.

When working a circular diagram you start in the middle and work your way outwards, counter clockwise, row by row.

The rows usually start with a given number of chain stitches (equivalent to the height of the following stitch), this will either be depicted in the diagram or explained in the pattern.

See DROPS lesson: How to read crochet diagrams

Instructions for working several diagrams after each other on the same row/round, will often be written like so: “work A.1, A.2, A.3 a total of 0-0-2-3-4 times". This means you work A.1 once, then A.2 is worked once, and A.3 is repeated (in width) the number of times provided for your size – in this case like so: S = 0 times, M = 0 times, L=2 times, XL= 3 times and XXL = 4 times.

The diagrams are worked as usual: begin with the first row in A.1, then work the first row in A.2 etc.

See DROPS lesson: How to read knitting diagrams

See DROPS lesson: How to read crochet diagrams

The total width of the garment (from wrist-to-wrist) will be larger in the larger sizes, despite the actual sleeves being shorter. The larger sizes have longer sleeve caps and wider shoulders, so there will be a good fit in all sizes.

The measurement sketch/schematic drawing provides information regarding the full length of the garment. If it’s a jumper or a jacket the length is measured from the highest point on the shoulder closest to the neckline, and straight down to the bottom of the garment. It is NOT measured from the tip of shoulder. Similarly, the length of yoke is measured from the highest point on the shoulder and down to where yoke is split into body and sleeves.

On a jacket measures are never taken along bands, unless specifically stated. Always measure inside band stitches when measuring the length.

See DROPS lesson: How to read a schematic drawing

Diagrams are often repeated on the round or in height. 1 repeat is the diagram the way it appears in the pattern. If it says to work 5 repeats of A.1 in the round, then you work A.1 a total of 5 times after/next to each other in the round. If it says to work 2 repeats of A.1 vertically/in height you work the entire diagram once, then begin again at the start and work the entire diagram one more time.

Chain stitches are slightly narrower than other stitches and to avoid working the cast-on edge too tight, we simply chain more stitches to begin with. The stitch count will be adjusted on the following row to fit the pattern and measurement sketch.

The rib edge is more elastic and will contract slightly compared to, for example, stocking stitch. By increasing before the rib edge, you avoid a visible difference in width between the rib edge and the rest of the body.

It’s very easy to cast off too tightly, and by making yarn overs while casting off (and simultaneously casting these off) you avoid a too tight cast off edge.

See DROPS video: How to bind off with yarn overs (yo)

To achieve an even increase (or decrease) you can increase on, for example: every 3rd and 4th row alternately, like so: work 2 rows and increase on the 3rd row, work 3 rows and increase on the 4th. Repeat this until the increase is complete.

See DROPS lesson: Increase or decrease 1 st on every 3rd and 4th row alternately

Should you prefer to work in the round instead of back and forth, you may of course adjust the pattern. You’ll need to add steeks mid-front (usually 5 stitches), and follow the instructions. When you would normally turn and work from the wrong side, simply work across the steek and continue in the round. At the end you’ll cut the piece open, pick up stitches to work bands, and cover the cut edges.

See DROPS video: How to knit steeks and cut open

Should you prefer to work back and forth instead of in the round, you may of course adjust the pattern so you work the pieces separately and then assemble them at the end. Divide the stitches for the body in 2, add 1 edge stitch in each side (for sewing) and work the front and back pieces separately.

See DROPS lesson: Can I adapt a pattern for circular needles into straight needles?

Pattern repeats can vary slightly in the different sizes, in order to get the correct proportions. If you’re not working the exact same size as the garment in the photo, yours might deviate slightly. This has been carefully developed and adjusted so that the complete impression of the garment is the same in all sizes.

Make sure to follow instructions and diagrams for your size!

If you have found a pattern you like which is available in women’s size it’s not very difficult to convert it to men’s size. The biggest difference will be the length of sleeves and body. Start working on the women size that you think would fit across the chest. The additional length will be worked right before you cast off for the armhole/sleeve cap. If the pattern is worked top-down you can add the length right after the armhole or before the first decrease on sleeve.

Regarding additional yarn amount, this will depend on how much length you add, but it is better with a skein too many than too few.

All yarns will have excess fibres (from production) that might come off as lint or shedding. Brushed yarns (ie hairier yarns) have more of these loose, excess fibres, causing more shedding.

Shedding also depends on what is worn under or over the garment, and whether this pulls at the yarn fibres. It’s therefore not possible to guarantee that there will be no shedding

Below are some tips on how to get the best result when working with hairier yarns:

1. When the garment is finished (before you wash it) shake it vigorously so the looser hairs come off. NOTE: do NOT use a lint roller, brush or any method that pulls at the yarn.

2. Place the garment in a plastic bag and put it in your freezer - the temperature will cause the fibres to become less attached to each other, and excess fibres will come off easier.

3. Leave in the freezer for a few hours before taking it out and shaking it again.

4. Wash the garment according to the instructions on the yarn label.

Pilling is a natural process that happens to even the most exclusive of fibers. It's a natural sign of wear and tear that is hard to avoid, and that is most visible in high friction areas of your garment like a sweater's arms and cuffs.

You can make your garment look as new by removing the pilling, using a fabric comb or a pill/lint remover.

Still can't find the answer you need? Then scroll down and leave your question so one of our experts can try to help you. This will be done normally within 5 to 10 working days.
In the meantime, you can read the questions and answers that others have left to this pattern or join the DROPS Workshop on Facebook to get help from fellow knitters/crocheters!

You might also like...

Post a comment to pattern DROPS 177-7

We would love to hear what you have to say about this pattern!

If you want to leave a question, please make sure you select the correct category in the form below, to speed up the answering process. Required fields are marked *.

Comments / Questions (31)

country flag ADRIANA wrote:

Ciao. Sto lavorando la taglia M, ma alla fine degli aumenti dello sprone mi risultano 300 maglie e non 298. Sono 96+96 (motivo A2 * 12 davanti e dietro) +8 (4*2 maglie legaccio alla fine dei motivi) + 50 *2 (punti a maglia rasata) = 96+96+8+50+50=300. Dove ho sbagliato? Grazie mille

24.02.2019 - 23:18

DROPS Design answered:

Buongiorno Adriana. Dopo gli aumenti, le maglie sono: 96 m per il diag A2, 2 m rov, segno, 50 m dir, segno, 1 m rov, 96 m per il diag A2, 2 m rov, segno, 50 m dir, segno, 1 m rov, in tutto 298 m. Molto probabilmente c'è 1 m in più prima dei diagrammi A2. Buon lavoro!

25.02.2019 - 14:56

country flag Christina wrote:

Hallo liebes Drops Team, ich bin mit dem Rapport A1 mit allen Zunahmen fertig, Gr. M 298 Maschen. Laut Anleitung, soll ich je 60 M für die Ärmel und je 89 M im Muster stricken. Ich habe aber je 50 M für die Ärmel und 99 M je Mustersatz. Ist meine Aufteilung falsch oder hat sich ein Fehler in der Anleitung eingeschlichen? Danke und VG

11.08.2018 - 13:15

DROPS Design answered:

Liebe Christina, entschulding für die späte Antwort, Anleitung wird hier korrigiert, danke für Ihren Geduld. Viel Spaß beim stricken!

18.03.2019 - 09:25

country flag Christina wrote:

Hallo, ich grüble über die Raglanlinie. In der Anleitung steht, bis 1 Masche vor Markierer, 1 Umschlag, 1 rechts, dann bis eine Masche vor dem nächsten Markierer. Beim ersten Markierer sind aber zwei linke Maschen. Stricke ich die letzte linke Masche vor dem ersten Markierer dann rechts ab? VG Christina

07.08.2018 - 08:07

DROPS Design answered:

Liebe Christina, Sie stricken bis zum ersten Markierer (= nach den 2 M li), dann Markierer, 1 M re, 1 Umschlag, dann rechts stricken bis 1 M vor dem nächsten Markierer übrig ist (=Ende der Ärmel), 1 Umschlag, 1 M re, Markierer, 1 M li. Viel Spaß beim stricken!

07.08.2018 - 09:30

country flag Shadé Sidihakis wrote:

Hee, nog een vraagje: Er staat dat ik de eerste 52 steken op een hulpdraad moet zetten voor de mouw, maar de eerste paar steken zijn niet de rechte steken voor de mouw maar steken in het patroon. Hoe moet ik verder?

20.06.2018 - 21:08

DROPS Design answered:

Dag Shadé, Je hebt inderdaad gelijk dat de rechte steken op de hulpdraad moeten staan voor de mouw en niet de steken in patroon. Momenteel wordt het patroon gecontroleerd door het design-team en hopelijk komt er spoedig een antwoord in de vorm van een correctie.

25.06.2018 - 10:32

country flag Shadé Sidihakis wrote:

Ik heb een vraagje. Nadat ik A1 heb afgemaakt, hoor ik te beginnen aan A2 en dan elke 4e naald 1 steek te meerderen bij de markeerders. Dat zou betekenen dat ik 16 naalden zou moeten breien, maar A2 is maar 8 naalden hoog. Moet ik A2 in de hoogte herhalen of ben ik ergens de fout in gegaan?

10.06.2018 - 22:15

DROPS Design answered:

Dag Shadé, Klopt! A.2 herhaal je steeds in de hoogte. Dit is het patroon dat bijna over de hele lengte van de jurk steeds herhaald wordt.

12.06.2018 - 10:23

country flag Vicky wrote:

Hi. With regards to my query on 26/04 - do you have an update yet please? I'm really keen to continue with my knitting. Thanks.

05.06.2018 - 15:56

DROPS Design answered:

Dear Vicky, Yes the sleeves do not have the lace pattern. You knit the lace pattern (A.2) in the back and front when you separate sleeves from front and back. Happy Knitting!

03.09.2018 - 15:43

country flag Sabine Krämer wrote:

Da fehlen immer noch die 4 zunahmen in jeder 4 Zen runde bevor ich A2 beginne

04.06.2018 - 15:10

DROPS Design answered:

Liebe Frau Krämer, die Zunahmen werden nur über die Ärmel gearbeitet, nicht über die Maschen für Vorder- und Rückenteil = 16 M (Größe S) + (1 Zunahme x 11 Mal in jeder 2. Runde + 1 Zunahme x 4 M in jeder 4. Runde x 2 (Anfang und Ende von Ärmel) = 16 + 22 + 8 = 46 M für jeden Ärmel - und wenn A.1 1 Mal in der Höhe gestrickt wird haben Sie 88 M für je Vorder- und Rückenteil. Wenn die Zunahmen für die Ärmel fertig sind haben Sie: 88x2 + 46x2 + 6 li. M = 274 M. Viel Spaß beim stricken

04.06.2018 - 16:02

country flag Susi Krämer wrote:

Die Anleitung stimmt nicht A1wurde komplett gestrickt und mit 11zunahmen Und dann in jeder 4ten runde 4 mal zunehmen das reicht für A2 nicht Anleitung korigieren

03.06.2018 - 14:08

DROPS Design answered:

Liebe Frau Krämer, wenn A.1 1x in der Höhe gestrickt wird, haben Sie 8 M in jedem A.1. Jetzt A.2 (= 8 M) über jedes A.1 stricken. Viel Spaß beim stricken!

04.06.2018 - 10:05

country flag Martina wrote:

Selbes Problem wie Vicky (Englisch): Ich denke, man müsste nach allen Zunahmen in der Passee die ersten 96 Maschen im Muster weiterstricken und dann 50 Maschen für die Ärmel stilllegen (Gr. M). Falls ich falsch liege, wo liegt mein Denkfehler?

28.04.2018 - 19:58

DROPS Design answered:

Liebe Martina, die Frage wurde unser Design-Team weitergeleitet, sie werden die Anleitung so bald wie möglich überprüfen. Danke im voraus für Ihren Geduld.

30.04.2018 - 10:07

country flag Vicky wrote:

Hi. I'm looking for some help. I'm struggling separating off for the sleeves. (Size M) I think the first 56 stitches (first 96 actually ) are patterned and part of the front (or back?) and not sleeves?

26.04.2018 - 11:00

DROPS Design answered:

Dear Vicky, thanks for your feedback, our Design Team will have a look. Thank you very much in advance for your patience.

26.04.2018 - 13:16