
Popular categories
Looking for a yarn?


Comments / Questions (52)
![]() Lena wrote:
Lena wrote:
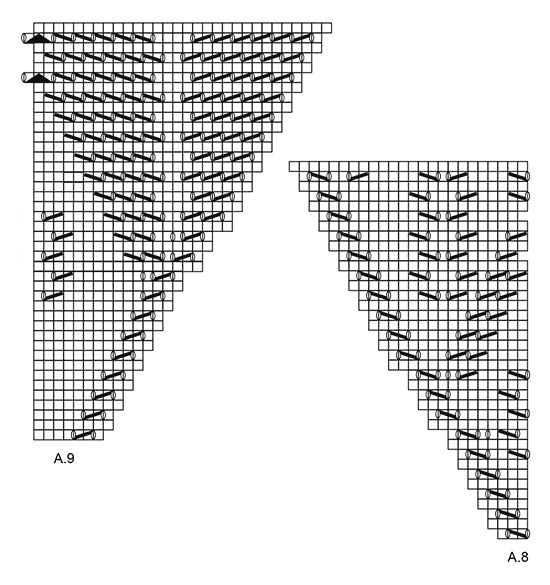
A.10 får jag ihop men inte A.9.
29.09.2016 - 13:15DROPS Design answered:
Hej Lena. Hvad gaar der galt med A.9?
13.10.2016 - 16:02
![]() Lena wrote:
Lena wrote:
A.10 får jag ihop men inte A.9.
28.09.2016 - 21:40
![]() Lena wrote:
Lena wrote:
A.10 får jag ihop men inte A.9.
28.09.2016 - 17:26
![]() Lena wrote:
Lena wrote:
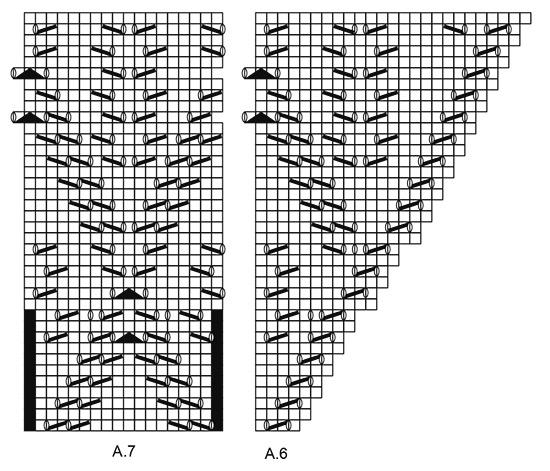
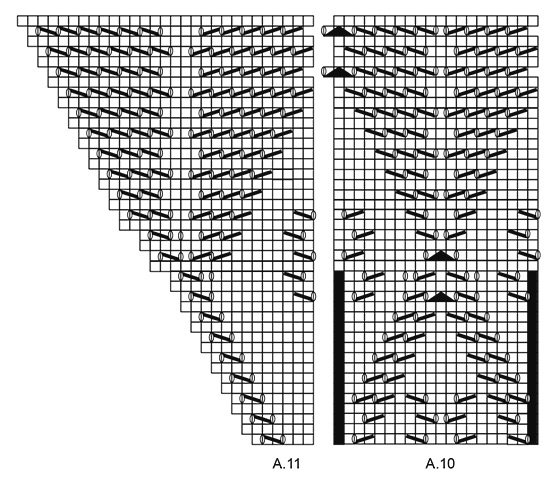
Får inte övergången mellan A.6-A.8 och A.9-A.11 att stämma. I början av A.9 verkar det fattas en maska och på A.10 är det en för mycket mellan första minskningarna.
28.09.2016 - 15:43DROPS Design answered:
Hej Lena. Mon du har lavet en fejl i strikningen. Du skal strikke A.9 over A.6 = 25 m i sidst p af A.6 og der er ogsaa 25 m i förste p af A.9, saa ska du gentage A.10 21 gange (= 18 m per gentagelse i sidste p af A.7 og start af A.10) = 1+25 + 378 = 404. Og du afslutter med A.11 over de naeste 24 m (= 24 m til sidst i A.8 og start A.11) + 1 kantmaske = 429 m i alt.
27.10.2016 - 16:28
![]() Louise wrote:
Louise wrote:
I would love to make this pattern, but the charts are missing. I can see the charts on your page but when I select print pattern.all I get are 2 blank pages.
01.09.2016 - 14:37DROPS Design answered:
Dear Louise, a print-test have been made and diagrams were printed, you may have to check your printer settings. Happy knitting!
01.09.2016 - 15:25Caroline wrote:
I have knitted now the patterns A1 - A5 once and I have a total of 47 stitches, but the instructions says it should be 51 stitches. I have counted in the pattern A1- A5 and still come to a total of 47 stitches. Is the pattern right?
29.07.2016 - 18:46DROPS Design answered:
Dear Caroline, you are correct - pattern and diagrams A.1-A.5 have been edited. You can adjust inc like first inc in A.A one more before starting next part. Happy knitting!
01.08.2016 - 09:18
![]() Alida Drijkoningen wrote:
Alida Drijkoningen wrote:
Wow super mooi en elegant patroon. Mijn favoriet. Fijn om dragen het hele jaar door totdat het versleten is. Wow super beautiful and elegant pattern. My favorite. Fine to wear all year round until it is worn out.
15.06.2016 - 09:18
![]() Alida wrote:
Alida wrote:
Wow super mooi en elegant patroon. Mijn favoriet. Fijn om dragen het hele jaar door totdat het versleten is. Wow super beautiful and elegant pattern. My favorite. Fine to wear all year round until it is worn out.
15.06.2016 - 09:14Cherie wrote:
This is an elegant piece, perfect for a cool summer night.
12.06.2016 - 15:36
![]() Monika wrote:
Monika wrote:
Ein hauchzartes Elfentuch, das gefällt mir!
04.06.2016 - 22:22
|
|||||||||||||||||||
Angelique#angeliquescarf |
|||||||||||||||||||
 |
 |
||||||||||||||||||
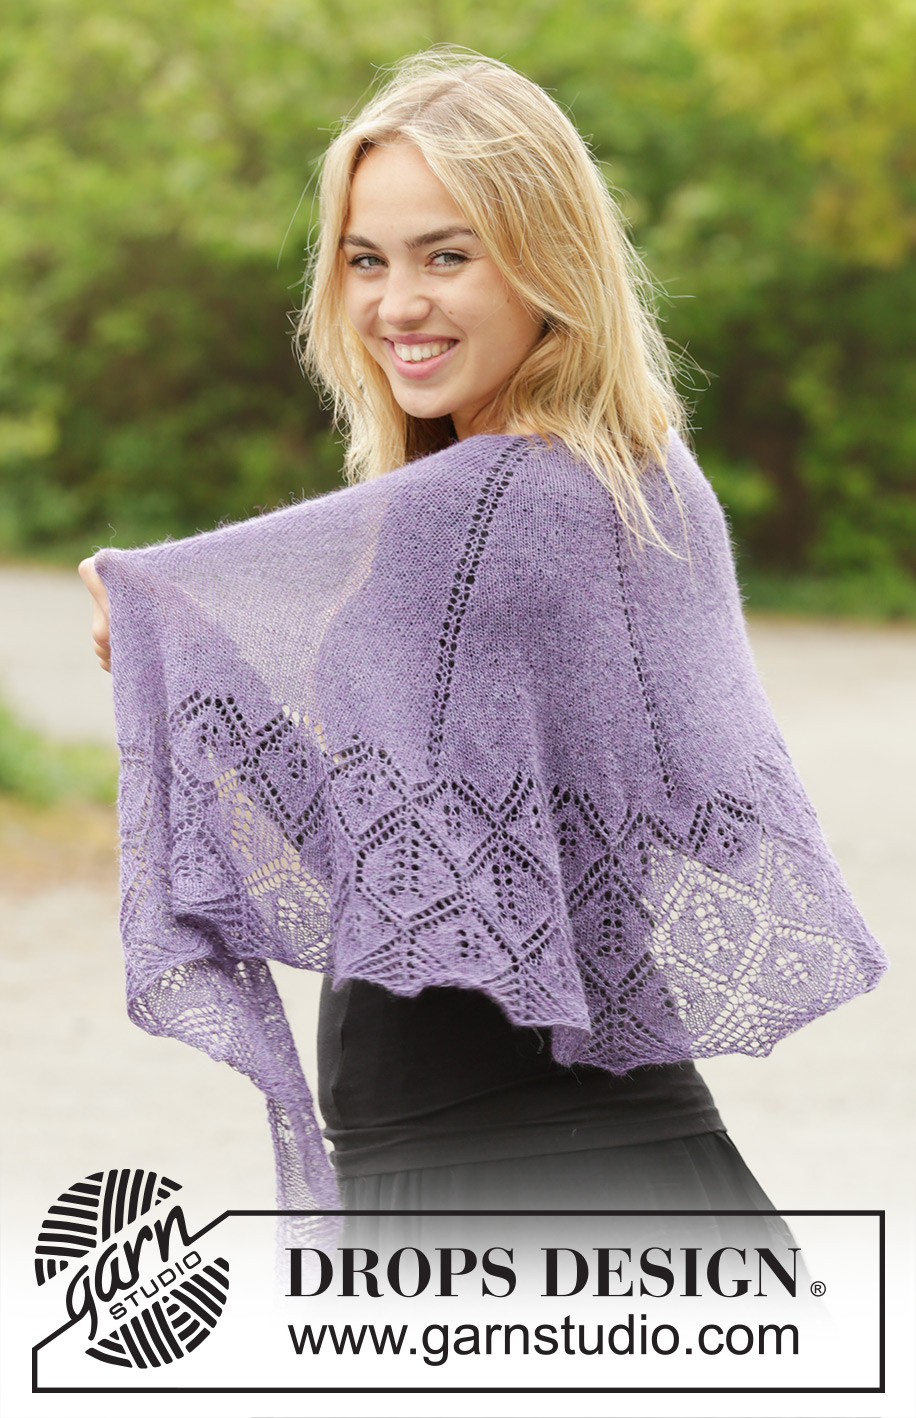
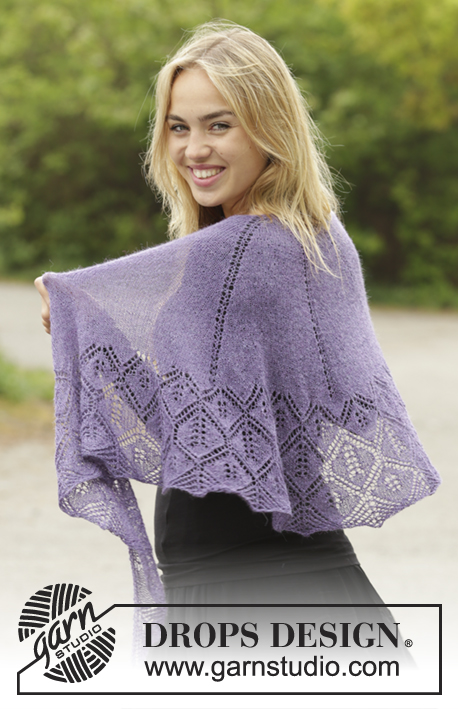
Knitted DROPS half-moon shaped shawl in stocking st with lace pattern in ”Lace”.
DROPS 171-47 |
|||||||||||||||||||
|
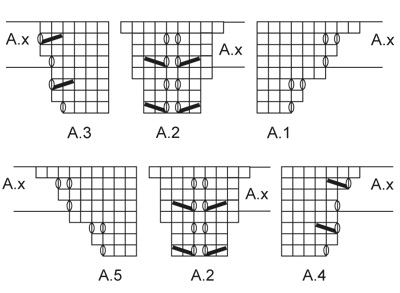
GARTER ST (back and forth): K all rows. 1 ridge = 2 rows K. PATTERN: See diagrams A.1 to A.11. The diagrams show all rows in pattern seen from RS. KNITTING TIP: The shawl can be knitted with other needle sizes than those given here. Use smaller needles for a smaller shawl and larger needles for a larger shawl. Stretch the shawl to shape at the end, possible uneven places should then even out. SHAPING: When using another yarn from yarn group A, there is no need to stretch the shawl to measurements, but place it gently out in shape. Leave to dry. Repeat the process when the shawl has been washed. ---------------------------------------------------------- SHAWL: Cast on 3 sts on circular needle size 3 mm with Lace - read KNITTING TIP above. Then work and inc as follows: ROW 1: 1 edge st in GARTER ST - see explanation above, 1 YO, 1 st in stocking st, 1 YO, 1 edge st in garter st. Insert a marker in the middle st = 5th st. ROW 2 and all rows from WS: Work 1 edge st in garter st in each side (K from WS) and P all sts and YOs. ROW 3: 1 edge st in garter st, K 1, 1 YO, K 1, 1 YO, K 1 and 1 edge st in garter st = 7 sts. ROW 5: 1 edge st in garter st, 1 YO, K 1, 1 YO, K 3, 1 YO, K 1, 1 YO and 1 edge st in garter st = 11 sts. ROW 7: 1 edge st in garter st, 1 YO, K 3, 1 YO, K 3, 1 YO, K 3, 1 YO and 1 edge st in garter st = 15 sts. ROW 9: 1 edge sts in garter st, 1 YO, K 1, 1 YO, K 3 and insert a marker in the middle of these st, 1 YO, K 1, 1 YO, K 3 (there is a marker in the sts in the middle of these sts = mid st), 1 YO, K 1, 1 YO, K 3 and insert a marker in the middle of these sts, 1 YO, K 1, 1 YO and 1 edge st in garter st = 23 sts. Row 11: 1 edge st in garter st, 1 YO, K until mid st, 1 YO, K1 (= mid st), 1 YO and K until 1 edge st remain, 1 YO and 1 edge st in garter st = 27 sts. Work according to diagram A.1 to A.5 as follows from RS: Work 1 edge st in garter st, A.1 over 3 sts, A.2 over 5 sts (first marker is in the middle of A.2), A.3 over 4 sts, 1 st in stocking st (second marker is in the middle of this st = mid st), A.4 over 4 sts, A.2 over 5 sts (third marker is in the middle of A.2), A.5 over 3 sts and 1 edge st in garter st = 31 sts. REMEMBER THE KNITTING TENSION. When A1-A.5 has been worked 1 time vertically, there are 51 sts on needle. Repeat inc as shown in A.x, inc alternately 4 and 8 sts on every row from RS (i.e. 12 sts for every repetition vertically), work the inc sts in stocking st on each side of every A.2. Move the markers upwards when working to mark mid st and middle of A.2. Repeat as shown in A.x 24 times in total vertically, there are 339 sts in total on needle (piece measures approx. 35 cm). On next row from RS work and inc 4 sts as shown on first row of A.x = 343 sts. P 1 row from WS (work edge sts in each side of piece in garter st until finished measurements). K 1 row from RS and inc 1 st inside 1 edge st in garter st in each side = 345 sts on needle and P 1 row from WS. Work according to diagram A.6 to A.8 as follows from RS: 1 edge st in garter st, A.6 over 4 sts, repeat A.7 21 times (4 sts remain on needle), A.8 over 3 sts and 1 edge st in garter st. NOTE: In diagram 2 sts are inc on the 11th row in every repetition of diagram A.7, A.6 and A.8. And 2 sts are inc on 17th row of A.6 and A.8. Work diagrams 1 time vertically = 429 sts. Work according to diagram A.9 to A.11 as follows from RS: 1 edge st in garter st, A.9 over 7 sts, repeat A.10 23 times (7 sts remain on needle), A.11 over 6 sts and 1 edge st in garter st. NOTE: In diagram 2 sts are inc on the 17th row in every repetition of diagram A.9, A.11 and A.10. And 2 sts are inc on 21st row in A.9 and A.11. Work diagrams 1 time vertically = 521 sts, but on last row from WS loosely cast off with P. BLOCKING: Place the shawl in lukewarm water until it is soaking wet. Carefully squeeze the water out of the shawl - do not twist the shawl - then roll the shawl in a towel and squeeze to remove more water - the shawl will now only be moist. If another yarn from yarn group A is used - read SHAPING above. Place the shawl on a carpet or mattress - carefully stretch it out to size and fasten it with pins. If desired shape the edge by stretching a little bit in the area between the leaves to form tips and fasten these tips with pins along the cast off edge. Leave shawl to dry. Repeat the process when the shawl has been washed. |
|||||||||||||||||||
Diagram explanations |
|||||||||||||||||||
|
|||||||||||||||||||
 |
|||||||||||||||||||
 |
|||||||||||||||||||
 |
|||||||||||||||||||
 |
|||||||||||||||||||
Have you finished this pattern?Tag your pictures with #dropspattern #angeliquescarf or submit them to the #dropsfan gallery. Do you need help with this pattern?You'll find 20 tutorial videos, a Comments/Questions area and more by visiting the pattern on garnstudio.com. © 1982-2026 DROPS Design A/S. We reserve all rights. This document, including all its sub-sections, has copyrights. Read more about what you can do with our patterns at the bottom of each pattern on our site. |
|||||||||||||||||||


With over 40 years in knitting and crochet design, DROPS Design offers one of the most extensive collections of free patterns on the internet - translated to 17 languages. As of today we count 325 catalogues and 12298 patterns translated into English (UK/cm).
We work hard to bring you the best knitting and crochet have to offer, inspiration and advice as well as great quality yarns at incredible prices! Would you like to use our patterns for other than personal use? You can read what you are allowed to do in the Copyright text at the bottom of all our patterns. Happy crafting!
Post a comment to pattern DROPS 171-47
We would love to hear what you have to say about this pattern!
If you want to leave a question, please make sure you select the correct category in the form below, to speed up the answering process. Required fields are marked *.