
Popular categories
Looking for a yarn?


Comments / Questions (19)
![]() Brigitte wrote:
Brigitte wrote:
Bonjour. Pouvez-vous me préciser le dernier tour svp ? 1 jeté au dessus de chaque jeté du tour endroit précédent : dois-je rabattre la maille précédente sur le jeté ou dois-je faire 1 jeté 1 m endroit et passer la maille précédente sur ces 2 là ?
07.07.2025 - 12:51DROPS Design answered:
Bonjour Brigitte, vous rabattez les mailles, la ou il y avait un jete au tour endroit précédent, vous faites un jete et vous le rabattez comme la maille normale. Grace a cela, le dernier rang se sera pas trop serre. Bon tricot!
11.07.2025 - 15:34
![]() Kristina wrote:
Kristina wrote:
Går det att göra sjalen mindre än den mindre storleken - alltså, går det att sticka delen A1,A3,A5,A7,A7,A6,A4,A2 bara 1 gång på höjden i stället för 2 eller 3 ggr? Funkar kanten då? Jag valde lite tjockare garn, och den håller på att bli alldeles för stor.
29.03.2021 - 18:23DROPS Design answered:
Hei Kristina. Om du har 283 masker på pinnen etter første gang / før du starter med A-8, A.9 og A.10 burde det gå greit. Husk at diagrammene må strikkes i sin helhet før man kan strikke kant. mvh DROPS design
12.04.2021 - 14:51
![]() Ritva wrote:
Ritva wrote:
Hei! En saa ohjeen mukaista silmukkamäärää 155, vaan se jää noin 100 silmukkaan. Mikähän voisi olla vikana?
18.10.2020 - 14:25
![]() Eva-Lena Oscarsson wrote:
Eva-Lena Oscarsson wrote:
Fick någon ihop den efter beskrivningen min blir oliksidig?
15.09.2020 - 11:48DROPS Design answered:
Hej Eva-Lena, ja der er flere som har strikket sjalet og er tilfreds med det. Billederne ligger inde på Ravelry - søg på DROPS 173-49. God fornøjelse!
16.09.2020 - 13:33
![]() Ruth wrote:
Ruth wrote:
Hej Jeg er lidt forvirret over jeres forklaring på dette sjal. Der står at arbejdet strikkes retstrik fra nakken og ned til og med 27 masker, ret på retten og ret på vrangen, men hvad med midtermasken, skal den strikkes vrang på vrangen? Så kommer jeg til Diagrammerne, skal der strikkes vrang på vrangsiden? Og hvad med omslagene, hvordan strikkes de på vrangen?
05.02.2019 - 23:22DROPS Design answered:
Hei Ruth. De første omgangene strikker du rettstrikk over alle maskene. Når du har 27 masker strikkes det slik: De 2 ytterste maskene i hver side strikkes i rettstrikk, midtmasken strikkes i glattstrikk og de resterende maskene strikkes etter diagram. Diagrammene viser alle pinner sett fra rettsiden. Fra vrangen må du lese dem motsatt vei (fra venstre mot høyre) og i motsatt rekkefølge - slik at diagrammene strikkes over de samme maskene oppover. Ja, maskene strikkes vrang fra vrangen. Kastene strikkes også vrang slik at det blir hull. God fornøyelse
08.02.2019 - 14:56
![]() Fritzsch wrote:
Fritzsch wrote:
Wenn ich das Tuch größer haben möchte. Wie ist das dann gemeint die Diagramme 3x statt 2x zu stricken. In der Anleitung steht nur 1x. Fänge ich dann wieder von vorn an?
03.05.2018 - 17:22DROPS Design answered:
Liebe Frau Fritsch, fast am Ende stricken Sie A.1, A.3, A.5, A.7, A.6, A.4, A.2 auf beiden Seiten der Mittel-M, die Diagramme werden hier 3 x in der Höhe gestrickt. Diese Diagramme können Sie dann nur 2 x wiederholen. Viel Spaß beim stricken!
04.05.2018 - 08:31
![]() Tina Kristensen Nielsen wrote:
Tina Kristensen Nielsen wrote:
Der er fejl i opskriften, på 13. pind i stykket: A.1-A.3-A.5-A.7-A.6-A.4-A.2. Der passer maskeantallet ikke længere.
11.06.2017 - 20:26Heather wrote:
What do you mean at the beginning when you say k2, 1YO, 1 st? Is 1 st to be k1 or slip one or created one st with the YO? I read it as k2, yarn over, k1 etc?
28.04.2017 - 13:47DROPS Design answered:
Dear Heather, this should be: ROW 1: K 2, 1 YO, K 1, 1 YO, K 1 (= mid st), 1 YO, K 1, 1 YO and K 2 - thanks for noticing, correction will be done. Happy knitting!
28.04.2017 - 14:00
![]() Hansi Koekkoek wrote:
Hansi Koekkoek wrote:
Heb 2 keer patroon A5-7-6 gebreid is 347 st + rand is totaal 411 st. In 31e naald van de rand zitten 156 omslagen. Moeten al deze omslagen ook bij het afkanten gemaakt worden? Volgens mij is de naald vóór het afkanten averecht gebreid.Klopt dit?Hoe ontstaan de puntjes?
13.04.2017 - 13:19DROPS Design answered:
Hallo Hansi, Ja, het is inderdaad de bedoeling dat de omslagen ook bij het afkanten worden gemaakt. Dit om te voorkomen dat de afkantrand te strak wordt. In deze video kun je zien hoe je met omslagen af kunt kanten. Na het afkanten zul je zien dat de puntjes ontstaan.
18.04.2017 - 08:24
![]() Astrid Gjersdal wrote:
Astrid Gjersdal wrote:
Gjeld sjalet cinderella. Det står at det skal vere rett på retten og rangt på vranga. Betyr det at det skal strikkast vrangt eller rett på returen etter alle mønsteromgangane?
22.03.2017 - 20:00DROPS Design answered:
Hej Astrid. Saa strikker du ret paa retsiden og vrang paa vrangsiden. Men hver raekke er 1 p i mönstret. Laes her hvordan du laeser vores diagrammer
23.03.2017 - 15:35
|
||||||||||||||||
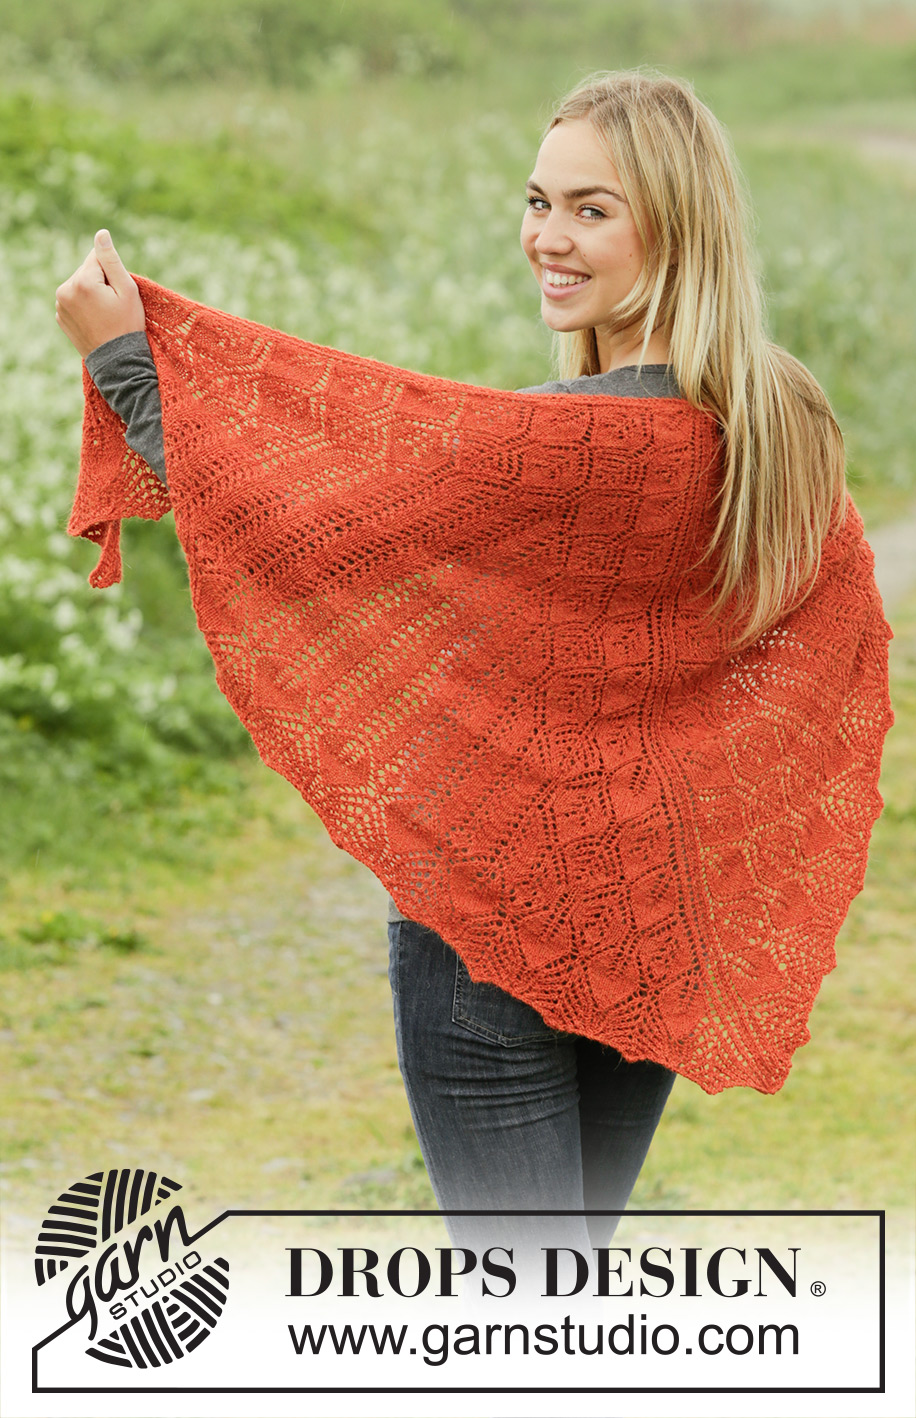
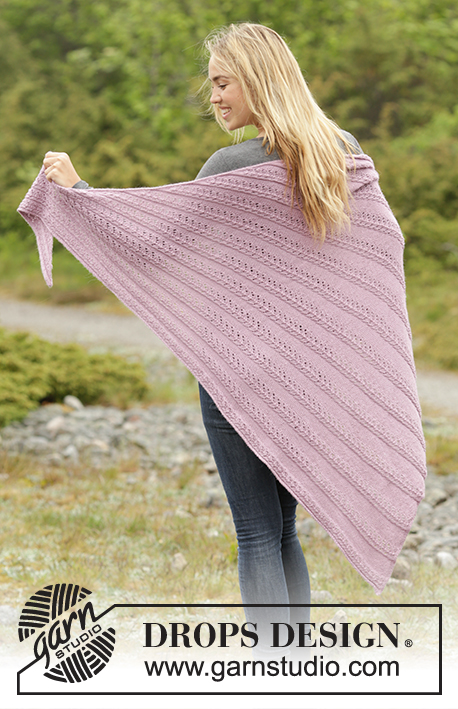
Cornucopia#cornucopiascarf |
||||||||||||||||
|
|
||||||||||||||||
Knitted DROPS shawl with leaves and lace pattern, worked top down in ”Alpaca”.
DROPS 173-49 |
||||||||||||||||
|
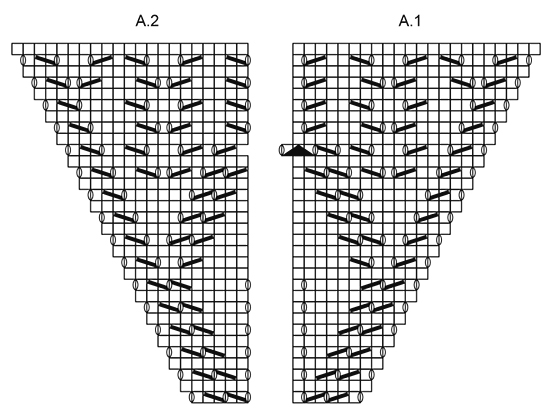
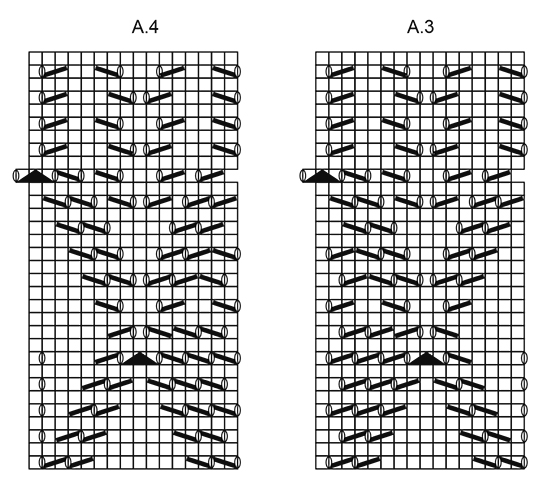
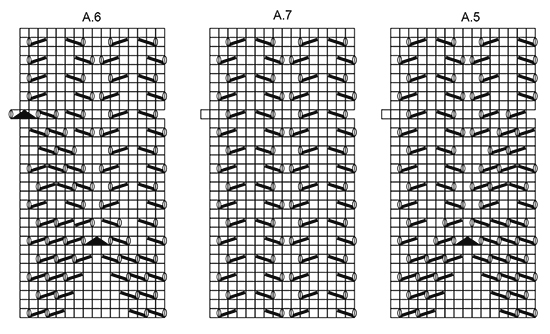
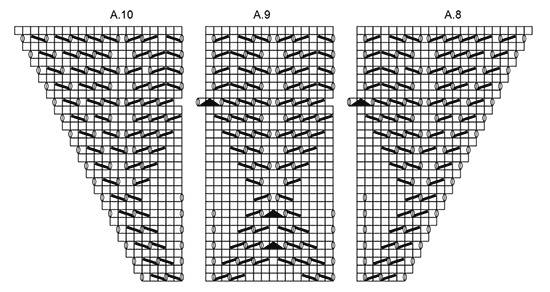
GARTER ST (back and forth on needle): K all rows. 1 ridge = 2 rows K. PATTERN: See diagrams A.1 to A.10. The diagrams show all rows in pattern seen from RS. KNITTING TIP: Can be worked in different sizes. If you want a smaller shawl repeat diagram 2 times vertically instead of 3 times. Sts in A.7 are worked over twice as many sts for every time the diagram is worked vertically. Diagrams need to be worked in whole before EDGE can be worked. If A.7 is worked 2 times vertically, the shawl will be approx. 60 cm along mid st after EDGE. ---------------------------------------------------------- SHAWL: Worked from the neck and down. Cast on 7 sts on circular needle size 3 mm with Alpaca. Work in GARTER ST- see explanation above and inc as follows: ROW 1: K 2, 1 YO, K 1, 1 YO, K 1 (= mid st), 1 YO, K 1, 1 YO and K 2. ROW 2: K all sts, K YOs to make holes. ROW 3: K 2, 1 YO, work until mid st, 1 YO, K 1 (=mid st), 1 YO and work until 2 sts remain, 1 YO and K 2 = 4 sts inc. ROW 4: As 2nd row. Repeat 3rd-4th ROW until there are 27 sts in total. Then work according to diagram as follows: Work 2 sts in garter st (= edge st), * A.1 over 6 sts, A.2 over 5 sts *, 1 st in stocking st (= mid st), repeat from *-* until 2 sts remain, 2 sts in garter st (= edge st). Work diagrams 1 time vertically = 91 sts. REMEMBER THE KNITTING TENSION Work 2 sts in garter st, * A.1 over 6 sts, A.3 over 16 sts, A.4 over 16 sts and A.2 over 5 sts *, 1 st in stocking st (= mid st), repeat from *-* and 2 sts in garter st. Work diagrams 1 time vertically = 155 sts. Work 2 sts in garter st, * A.1 over 6 sts, A.3 over 16 sts, A.5 over 16 sts, A.6 over 16 sts, A.4 over 16 sts and A.2 over 5 sts *, 1 st in stocking st (= mid st), repeat from *-* and 2 sts in garter st. Work diagrams 1 time vertically = 219 sts. Work 2 sts in garter st, * A.1 over 6 sts, A.3 over 16 sts, A.5 over 16 sts, A.7 over 32 sts, A.6 over 16 sts, A.4 over 16 sts, A.2 over 5 sts *, 1 st in stocking st (= mid st), repeat from *-* and 2 sts in garter st. Read KNITTING TIP above. Work diagrams 3 times vertically, i.e. on every repetition work A.7 over 32 sts more on each side of shawl (64 sts in A.7 the second time and 96 sts in A.7 the third time) = 283 sts on row after first time, 347 sts after second time and 411 sts after third time. EDGE: Work 2 sts in garter st, * A.8 over 6 sts, repeat A.9 until 5 sts remain before mid st, A.10 over 5 sts *, 1 st in stocking st (= mid st), repeat from *-* and finish with 2 sts in garter st. Work diagrams 1 time vertically = 475 sts. NOTE: Loosely cast off with K from RS, make 1 YO when casting off over every YO from previous K row. Fasten off. |
||||||||||||||||
Diagram explanations |
||||||||||||||||
|
||||||||||||||||
|
||||||||||||||||
|
||||||||||||||||
|
||||||||||||||||
|
||||||||||||||||
Have you finished this pattern?Tag your pictures with #dropspattern #cornucopiascarf or submit them to the #dropsfan gallery. Do you need help with this pattern?You'll find 19 tutorial videos, a Comments/Questions area and more by visiting the pattern on garnstudio.com. © 1982-2025 DROPS Design A/S. We reserve all rights. This document, including all its sub-sections, has copyrights. Read more about what you can do with our patterns at the bottom of each pattern on our site. |
||||||||||||||||


With over 40 years in knitting and crochet design, DROPS Design offers one of the most extensive collections of free patterns on the internet - translated to 17 languages. As of today we count 314 catalogues and 11821 patterns translated into English (UK/cm).
We work hard to bring you the best knitting and crochet have to offer, inspiration and advice as well as great quality yarns at incredible prices! Would you like to use our patterns for other than personal use? You can read what you are allowed to do in the Copyright text at the bottom of all our patterns. Happy crafting!
Post a comment to pattern DROPS 173-49
We would love to hear what you have to say about this pattern!
If you want to leave a question, please make sure you select the correct category in the form below, to speed up the answering process. Required fields are marked *.