Angelique

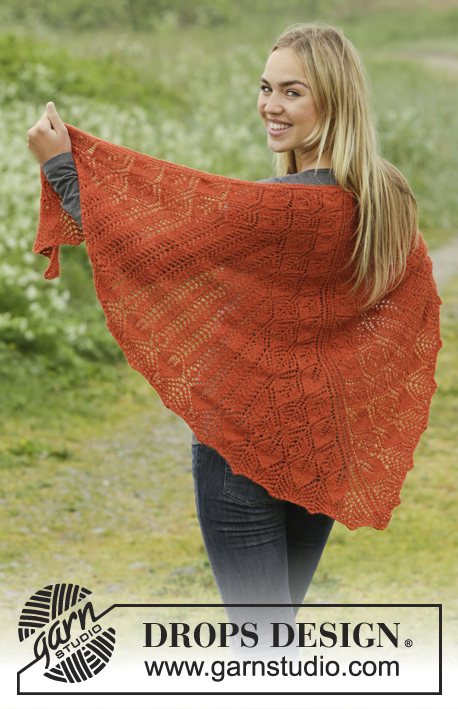
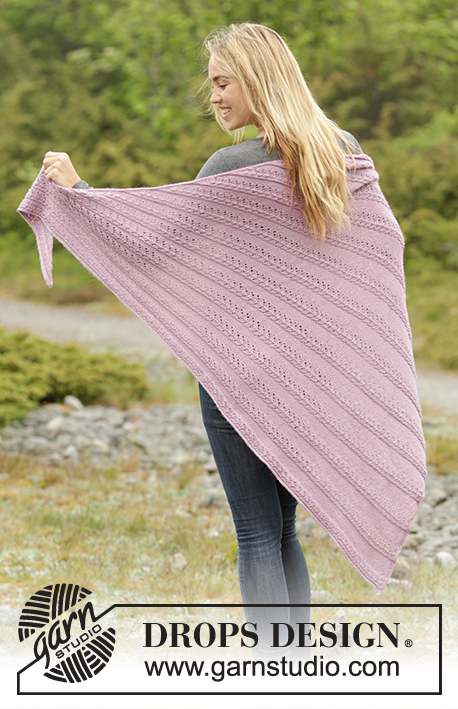
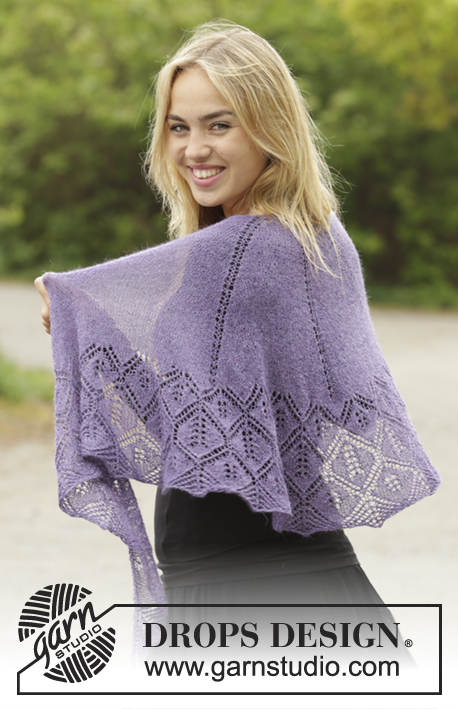
Knitted DROPS half-moon shaped shawl in stockinette st with lace pattern in ”Lace”.

DROPS 171-47
DROPS design: Pattern no la-031
Yarn group A
----------------------------------------------------------
Measurements: approx. 50 cm / 19¾" mid back, and approx. 170 cm / 67" measured along upper edge after shaping.
Materials:
DROPS LACE from Garnstudio
100 g color no 4434, purple/violet

DROPS CIRCULAR NEEDLE (80 cm / 32") SIZE 3 mm/US 2.5 - or size needed to get 24 sts x 32 rows in stockinette st = 4" x 4" (10 x 10 cm).

KNITTING GAUGE:
This garment is to be soaked and blocked/stretched to size afterwards so the knitting gauge is not that important. But to get a sense of whether you are working too loose/tight, work a test on needle size 3 mm / US 2.5 in stockinette st and get approx. 24 sts x 32 rows in stockinette st = 4" x 4" (10 x 10 cm).

-------------------------------------------------------

Alternative Yarn – See how to change yarns here
Yarn Groups A to F – Use the same pattern and change the yarn here
Yarn usage using an alternative yarn – Use our yarn converter here

-------------------------------------------------------

Pattern instructions

NOTE: This pattern is written in American English. All measurements in charts are in cm. For conversion from inches to cm - click here. There are different terms for crocheting in American and British English. If this pattern includes crochet, click for "crochet terms" here. For this pattern in British English, please click here.
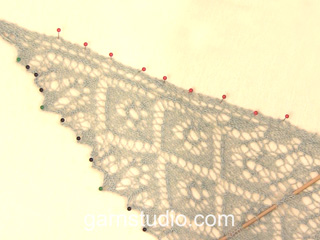
GARTER ST (back and forth):
K all rows. 1 ridge = K2 rows.

PATTERN:
See diagrams A.1 to A.11. The diagrams show all rows in pattern seen from RS.

KNITTING TIP:
The shawl can be knitted with other needle sizes than those given here. Use smaller needles for a smaller shawl and larger needles for a larger shawl. Stretch the shawl to shape at the end, possible uneven places should then even out.

SHAPING:
When using another yarn from yarn group A, there is no need to stretch the shawl to measurements, but place it gently out in shape. Leave to dry. Repeat the process when the shawl has been washed.
----------------------------------------------------------

SHAWL:
Cast on 3 sts on circular needle size 3 mm / US 2.5 with Lace - read KNITTING TIP above. Then work and inc as follows:
ROW 1: 1 edge st in GARTER ST - see explanation above, 1 YO, 1 st in stockinette st, 1 YO, 1 edge st in garter st. Insert a marker in the middle st = 5th st.
ROW 2 and all rows from WS: Work 1 edge st in garter st in each side (K from WS) and P all sts and YOs.
ROW 3: 1 edge st in garter st, K 1, 1 YO, K 1, 1 YO, K 1 and 1 edge st in garter st = 7 sts.
ROW 5: 1 edge st in garter st, 1 YO, K 1, 1 YO, K 3, 1 YO, K 1, 1 YO and 1 edge st in garter st = 11 sts.
ROW 7: 1 edge st in garter st, 1 YO, K 3, 1 YO, K 3, 1 YO, K 3, 1 YO and 1 edge st in garter st = 15 sts.
ROW 9: 1 edge sts in garter st, 1 YO, K 1, 1 YO, K 3 and insert a marker in the middle of these st, 1 YO, K 1, 1 YO, K 3 (there is a marker in the sts in the middle of these sts = mid st), 1 YO, K 1, 1 YO, K 3 and insert a marker in the middle of these sts, 1 YO, K 1, 1 YO and 1 edge st in garter st = 23 sts.
ROW 11: 1 edge st in garter st, 1 YO, K until marker, 1 YO, K 1 st
(= mid st), 1 YO, K until 1 st remain, 1 YO and 1 edge st in garter
st = 27 sts.

Work according to diagram A.1 to A.5 as follows from RS:
Work 1 edge st in garter st, A.1 over 3 sts, A.2 over 5 sts (first marker is in the middle of A.2), A.3 over 5 sts, 1 st in stockinette st (second marker is in the middle of this st = mid st), A.4 over 4 sts, A.2 over 5 sts (third marker is in the middle of A.2), A.5 over 3 sts and 1 edge st in garter st = 31 sts. REMEMBER THE KNITTING GAUGE When A1-A.5 has been worked 1 time vertically, there are 51 sts on needle. Repeat inc as shown in A.x, inc alternately 4 and 8 sts on every row from RS (i.e. 12 sts for every repetition vertically), work the inc sts in stockinette st on each side of every A.2. Move the markers upwards when working to mark mid st and middle of A.2. Repeat as shown in A.x 24 times in total vertically, there are 339 sts in total on needle (piece measures approx. 35 cm / 13¾"). On next row from RS work and inc 4 sts as shown on first row of A.x = 343 sts. P 1 row from WS (work edge sts in each side of piece in garter st until finished measurements). K 1 row from RS and inc 1 st inside 1 edge st in garter st in each side = 345 sts on needle and P 1 row from WS.

Work according to diagram A.6 to A.8 as follows from RS:
1 edge st in garter st, A.6 over 4 sts, repeat A.7 21 times (4 sts remain on needle), A.8 over 3 sts and 1 edge st in garter st. NOTE: In diagram 2 sts are inc on the 11th row in every repetition of diagram A.7, A.6 and A.8. And 2 sts are inc on 17th row of A.6 and A.8. Work diagrams 1 time vertically = 429 sts.

Work according to diagram A.9 to A.11 as follows from RS: 1 edge st in garter st, A.9 over 7sts, repeat A.10 23 times (7 sts remain on needle), A.11 over 6 sts and 1 edge st in garter st. NOTE: In diagram 2 sts are inc on the 17th row in every repetition of diagram A.9, A.11 and A.10. And 2 sts are inc on 21st row in A.9 and A.11. Work diagrams 1 time vertically = 521 sts, but on last row from WS loosely bind off with P.

BLOCKING:
Place the shawl in lukewarm water until it is soaking wet. Carefully squeeze the water out of the shawl - do not twist the shawl - then roll the shawl in a towel and squeeze to remove more water - the shawl will now only be moist. If another yarn from yarn group A is used - read SHAPING above. Place the shawl on a carpet or mattress - carefully stretch it out to size and fasten it with pins. If desired shape the edge by stretching a little bit in the area between the leaves to form tips and fasten these tips with pins along the bind off edge. Leave shawl to dry. Repeat the process when the shawl has been washed.

This pattern has been corrected.

Updated online: 13.03.2017
The pattern has been edited from where diagram A.9, A.10 and A.11 starts. The diagrams have been edited, A.6 and A.8 has been edited on the last 14 rows. Diagram A.9 and A.11 has been devided in a new way and have been edited in the first 3 rows and in the last 24 rows.
Updated online: 28.06.2019
New charts: A.2, A.3 and A.4.

Diagram

All measurements in charts are in cm.

symbols = K from RS, P from WS
symbols = 1 YO between 2 sts
symbols = K 2 tog
symbols = slip 1 st as if to K, K 1 and psso.
symbols = slip 1 st as if to K, K 2 tog, psso
symbols = no st
diagram
diagram
diagram
diagram
Do you have a question? See a list of frequently asked questions (FAQ)

Knitting tension is what determines the final measurements of your work, and is usually measured per 10 x 10 cm. It is provided like so: number of stitches in width x number of rows in height - eg: 19 stitches x 26 rows = 10 x 10 cm.

The knitting tension is very individual; some people knit/crochet loosely while others work tightly. You adjust the knitting tension with the needle size, which is why the suggested needle size only serve as a guide! You need to adjust this (up or down) to ensure that YOUR knitting tension matches the knitting tension provided in the pattern. If you work with a different knitting tension than provided you will have a different yarn consumption, and your work will have different measurements than what the pattern suggests.

The knitting tension also determines which yarns can replace each other. As long as you achieve the same knitting tension you can replace one yarn with another.

See DROPS lesson: How to measure your tension/gauge

See DROPS video: How to make a gauge tension swatch

The required amount of yarn is provided in grams, eg: 450 g. To calculate how many balls you’ll need you first need to know how many grams are in 1 ball (25g, 50g or 100g). This information is available if you click on the individual yarn quality on our pages. Divide the amount required with the amount of each ball. For example, if each ball is 50g (the most common amount), the calculation will be as follows: 450 / 50 = 9 balls.

The important thing when changing from one yarn to another is that the knitting/crochet tension remains the same. This is so that the measurements of the finished piece will be the same as on the sketch provided. It is easier to achieve the same knitting tension using yarns from the same yarn group. It is also possible to work with multiple strands of a thinner yarn to achieve the knitting tension of a thicker one. Please try our yarn converter. We recommend you to always work a test swatch.

Please NOTE: when changing yarn the garment might have a different look and feel to the garment in the photo, due to individual properties and qualities of each yarn.

See DROPS lesson: Can I use a different yarn than the one mentioned in the pattern?

All our yarns are categorised into yarn groups (from A to F) according to thickness and knitting tension – group A contains the thinnest yarns and group F the thickest. This makes it easier for you to find alternative yarns to our patterns, should you wish to switch yarn. All yarns within the same group have a similar knitting tension and can easily replace each other. However, different yarn qualities have different structures and properties which will give the finished work a unique look and feel.

Click here for an overview of the yarns in each yarn group

At the top of all our patterns you’ll find a link to our yarn converter, which is a helpful tool should you wish to use a different yarn than suggested. By filling in the yarn quality you wish to replace, the amount (in your size) and number of strands, the converter will present good alternative yarns with the same knitting tension. Additionally it will tell you how much you’ll require in the new qualities and whether you’ll need to work with multiple strands. Most skeins are 50g (some are 25g or 100g).

If the pattern is worked with multiple colours, every colour will have to be converted separately. Similarly, if the pattern is worked with several strands of different yarns (for example 1 strand Alpaca and 1 strand Kid-Silk) you will have to find alternatives for each, individually.

Click here to see our yarn converter

Since different yarns have different qualities and textures we have chosen to keep the original yarn in our patterns. However, you can easily find options among our available qualities by using our yarn converter, or simply pick a yarn from the same yarn group.

It is possible that some retailers still have discontinued yarns in stock, or that someone has a few skeins at home that they would like to find patterns for.

The yarn converter will provide both alternative yarn as well as required amount in the new quality.

If you think it's hard to decide what size to make, it can be a good idea to measure a garment you own already and like the size of. Then you can pick the size by comparing those measures with the ones available in the pattern's size chart.

You'll find the size chart at the bottom of the pattern.

See DROPS lesson: How to read size chart

The needle size provided in the pattern serves only as a guide, the important thing is to follow the knitting tension. And since knitting tension is very individual, you will have to adjust the needle size to ensure that YOUR tension is the same as in the pattern – maybe you’ll have to adjust 1, or even 2 needle sizes, up or down to achieve the correct tension. For this, we recommend that you work test swatches.

Should you work with a different knitting tension than the one provided, the measurements of the finished garment might deviate from the measurement sketch.

See DROPS lesson: How to measure your tension/gauge

See DROPS video: How to make a gauge tension swatch

Working a garment top-down provides more flexibility and room for personal adjustment. For example it is easier to try the garment on while working, as well as making adjustments to length of yoke and shoulder caps.

The instructions are carefully explaining every step, in the correct order. Diagrams are adjusted to the knitting direction and are worked as usual.

The diagram depicts all rows/rounds, and every stitch seen from the right side. It is read from bottom to top, from right to left. 1 square = 1 stitch.

When working back and forth, every other row is worked from the right side and every other row is worked from the wrong side. When working from the wrong side, the diagram will have to be worked reversed: from left to right, knit stitches are purled, purl stitches are knit etc.

When working in the round every round is worked from the right side and the diagram are worked from right to left on all rounds.

See DROPS lesson: How to read knitting diagrams

The diagram depicts all rows/rounds, and every stitch seen from the right side. It is worked from bottom to top, from right to left.

When working back and forth every other row is worked from the right side: from right to left and every other row is worked from the wrong side: from left to right.

When working in the round, every row in the diagram are worked from the right side, from right to left.

When working a circular diagram you start in the middle and work your way outwards, counter clockwise, row by row.

The rows usually start with a given number of chain stitches (equivalent to the height of the following stitch), this will either be depicted in the diagram or explained in the pattern.

See DROPS lesson: How to read crochet diagrams

Instructions for working several diagrams after each other on the same row/round, will often be written like so: “work A.1, A.2, A.3 a total of 0-0-2-3-4 times". This means you work A.1 once, then A.2 is worked once, and A.3 is repeated (in width) the number of times provided for your size – in this case like so: S = 0 times, M = 0 times, L=2 times, XL= 3 times and XXL = 4 times.

The diagrams are worked as usual: begin with the first row in A.1, then work the first row in A.2 etc.

See DROPS lesson: How to read knitting diagrams

See DROPS lesson: How to read crochet diagrams

The total width of the garment (from wrist-to-wrist) will be larger in the larger sizes, despite the actual sleeves being shorter. The larger sizes have longer sleeve caps and wider shoulders, so there will be a good fit in all sizes.

The measurement sketch/schematic drawing provides information regarding the full length of the garment. If it’s a jumper or a jacket the length is measured from the highest point on the shoulder (usually closest to the neckline), and straight down to the bottom of the garment. It is NOT measured from the tip of shoulder. Similarly, the length of yoke is measured from the highest point on the shoulder and down to where yoke is split into body and sleeves.

See DROPS lesson: How to read a schematic drawing

Diagrams are often repeated on the round or in height. 1 repeat is the diagram the way it appears in the pattern. If it says to work 5 repeats of A.1 in the round, then you work A.1 a total of 5 times after/next to each other in the round. If it says to work 2 repeats of A.1 vertically/in height you work the entire diagram once, then begin again at the start and work the entire diagram one more time.

Chain stitches are slightly narrower than other stitches and to avoid working the cast-on edge too tight, we simply chain more stitches to begin with. The stitch count will be adjusted on the following row to fit the pattern and measurement sketch.

The rib edge is more elastic and will contract slightly compared to, for example, stocking stitch. By increasing before the rib edge, you avoid a visible difference in width between the rib edge and the rest of the body.

It’s very easy to cast off too tightly, and by making yarn overs while casting off (and simultaneously casting these off) you avoid a too tight cast off edge.

See DROPS video: How to bind off with yarn overs (yo)

To achieve an even increase (or decrease) you can increase on, for example: every 3rd and 4th row alternately, like so: work 2 rows and increase on the 3rd row, work 3 rows and increase on the 4th. Repeat this until the increase is complete.

See DROPS lesson: Increase or decrease 1 st on every 3rd and 4th row alternately

Should you prefer to work in the round instead of back and forth, you may of course adjust the pattern. You’ll need to add steeks mid-front (usually 5 stitches), and follow the instructions. When you would normally turn and work from the wrong side, simply work across the steek and continue in the round. At the end you’ll cut the piece open, pick up stitches to work bands, and cover the cut edges.

See DROPS video: How to knit steeks and cut open

Should you prefer to work back and forth instead of in the round, you may of course adjust the pattern so you work the pieces separately and then assemble them at the end. Divide the stitches for the body in 2, add 1 edge stitch in each side (for sewing) and work the front and back pieces separately.

See DROPS lesson: Can I adapt a pattern for circular needles into straight needles?

Pattern repeats can vary slightly in the different sizes, in order to get the correct proportions. If you’re not working the exact same size as the garment in the photo, yours might deviate slightly. This has been carefully developed and adjusted so that the complete impression of the garment is the same in all sizes.

Make sure to follow instructions and diagrams for your size!

If you have found a pattern you like which is available in women’s size it’s not very difficult to convert it to men’s size. The biggest difference will be the length of sleeves and body. Start working on the women size that you think would fit across the chest. The additional length will be worked right before you cast off for the armhole/sleeve cap. If the pattern is worked top-down you can add the length right after the armhole or before the first decrease on sleeve.

Regarding additional yarn amount, this will depend on how much length you add, but it is better with a skein too many than too few.

All yarns will have excess fibres (from production) that might come off as lint or shedding. Brushed yarns (ie hairier yarns) have more of these loose, excess fibres, causing more shedding.

Shedding also depends on what is worn under or over the garment, and whether this pulls at the yarn fibres. It’s therefore not possible to guarantee that there will be no shedding

Below are some tips on how to get the best result when working with hairier yarns:

1. When the garment is finished (before you wash it) shake it vigorously so the looser hairs come off. NOTE: do NOT use a lint roller, brush or any method that pulls at the yarn.

2. Place the garment in a plastic bag and put it in your freezer - the temperature will cause the fibres to become less attached to each other, and excess fibres will come off easier.

3. Leave in the freezer for a few hours before taking it out and shaking it again.

4. Wash the garment according to the instructions on the yarn label.

Pilling is a natural process that happens to even the most exclusive of fibers. It's a natural sign of wear and tear that is hard to avoid, and that is most visible in high friction areas of your garment like a sweater's arms and cuffs.

You can make your garment look as new by removing the pilling, using a fabric comb or a pill/lint remover.

Still can't find the answer you need? Then scroll down and leave your question so one of our experts can try to help you. This will be done normally within 5 to 10 working days.
In the meantime, you can read the questions and answers that others have left to this pattern or join the DROPS Workshop on Facebook to get help from fellow knitters/crocheters!

You might also like...

Post a comment to pattern DROPS 171-47

We would love to hear what you have to say about this pattern!

If you want to leave a question, please make sure you select the correct category in the form below, to speed up the answering process. Required fields are marked *.

Comments / Questions (43)

country flag Ana María wrote:

Trabajar según el diagrama A.9-A.11 como sigue por el LD: 1 pt orillo en pt musgo. A.9 sobre 25 pts, repetir A.10 21 vcs (quedan 25 pts en ag), A.11 sobre 24 pts y 1 pt orillo en pt musgo. “ Esto está equivocado. Busqué las instrucciones en inglés: Work according to diagram A.9 to A.11 as follows from RS: 1 edge st in garter st, A.9 over 7sts, repeat A.10 23 times (7 sts remain on needle), A.11 over 6 sts and 1 edge st in garter st. Así resulta bien.

30.05.2023 - 01:32

country flag Charlyne P wrote:

Bonjour, Au rang numéro 11, vous dîtes de tricoter jusqu'au marqueur, de faire un jeté et ensuite vous mentionnez la maille centrale. Se pourrait-il que lorsque vous mentionnez de tricoter jusqu'au marqueur, il s'agirait en fait du deuxième marqueur (celui contenant la maille centrale) et non le premier? Merci.

30.12.2022 - 20:37

DROPS Design answered:

Bonjour Charlyne, il s'agit ici effectivement du 2ème marqueur, celui qui est dans la maille centrale. Bon tricot!

02.01.2023 - 16:48

country flag Janie Bolduc wrote:

Est-ce possible d'avoir le nombre de mailles a la fin de chaque rangs de A1 a A5 car moi j'arrive toujours avec plus selon le diagramme. Autrement dit au rangs 13 j'arrive a 31 mailles . Voici ce que je fait: 1m.lis., 1jete, 3end.,2ens.,1jete,1end.,1jete,2ens.,4end.,1jete,jete,4end.,2ens.,jete,end.,2ens.,3end.,1jete,1m.lis. On finis le rang 12 a 27m. si on compte les jetes il y en a 8 donc 27 +8=35, moins le 4 m.ens= 31 mais le diagramme donne 30 mailles. Merci de votre aide

31.05.2022 - 17:38

DROPS Design answered:

Bonjour Mme Bolduc, placez un marqueur entre chaque diagramme pourra vous permettre de bien vérifier le nombre de mailles à chaque fois; au 1er rang de A.1 à A.5 vous aurez augmentez 4 mailles: 1 dans chaque diagramme; au 3ème rang des diagrammes, vous aurez augmenté 2 m dans chaque A.2 et 2 m dans A.1 et A.5 etc... Bon tricot!

01.06.2022 - 08:04

country flag Diane Gervais wrote:

Je cherche version en français s.v.p.

16.12.2021 - 06:59

DROPS Design answered:

Bonjour Mme Gervais, cliquez sur le menu déroulant sous la photo pour changer la langue et trouver les explications en français. Bon tricot!

16.12.2021 - 07:53

country flag Monika wrote:

Hallo, ich bin jetzt mit der letzten Reihe der Anleitung fertig und würde nun die Abkettreihe beginnen. Allerdings basiert das Lochmuster ja auf einem glatt rechts gestrickten Untergrund. Wenn ich jetzt einfach wie angegeben in der Rückreihe abkette, rollt sich doch der Rand, oder nicht? Vielen Dank im Voraus für Ihre Antwort.

15.11.2021 - 14:05

DROPS Design answered:

Liebe Monika, stimmt, aber das Tuch spannen Sie dann (siehe Video, dann rollt sich der Rand nicht mehr. Viel Spaß beim stricken!

16.11.2021 - 08:14

country flag Mary wrote:

I got this lace shawl pattern from my mum, ‘How to Knit Lace’ What I would like are the abbreviations to follow the pattern. I really enjoy lace. Thanks, Mary

12.07.2021 - 19:11

DROPS Design answered:

Dear Mary, the symbols are the following (from top down): 1. knit from right side, purl from wrong side - 2. 1 yarn over between 2 stitches - 3. knit 2 together - 4. slip 1 as if to knit, knit 1 pass the slipped stitch over the knitted stitch - 5. slip 1 as if to knit, knit 2 together, pass the slipped stitch over the knitted stitches together - 6. no stitch (doesn't exist yet). Happy knitting!

13.07.2021 - 08:13

country flag Louise Brousseau wrote:

Quand on fini le rang 11 on est à l'endroit. Quand on commence A1 je suis à l'envers doit on faire un rang envers avant de commencer A1.Quand je fait A1 j'ai trop de maille je n'arrive pas à 27 mailles.merci

20.04.2021 - 16:38

DROPS Design answered:

Bonjour Mme Brousseau, tricotez encore 1 rang sur l'envers afin de pouvoir tricoter les diagrammes A.1-A.5 sur l'endroit: 1 m lis, A.1 (= 3 m), A.2 (= 5 m), A.3 (= 4 m), 1 m jersey, A.4 (= 4 m), A.2 (= 5 m), A.5 (= 3 m), 1 m lis = 1+3+5+4+1+4+5+3+1=27 m. Mais à la fin de ce 1er rang, vous aurez naturellement davantage de mailles car vous avez augmenté dans A.1, A.3, A.4 et A.5 (= 31 m à la fin du 1er rang); mais les diagrammes se tricotent ainsi sur les 27 m. Bon tricot!

21.04.2021 - 07:11

country flag Aline wrote:

Jusqu'au 20ième rang J'ai 51 mailles ca va , mais après je ne comprend pas comment vous pouvez augmenter seulement 12 mailles au 2 ième rangs. .

29.03.2021 - 22:47

DROPS Design answered:

Bonjour Aline, vous répétez ensuite les 4 derniers rangs de A.x= vous augmentez alternativement 4 m (rang 1 de A.x) et 8 m (rang 3 de A.x) = quand les 4 rangs de A.x sont faits, vous avez augmenté 12 m. Vous répétez 24 x les 4 rangs de A.x = 24x 12 augm=288m+51m=339m. Bon tricot!

07.04.2021 - 09:22

country flag Aline wrote:

Vous dites qu'après le 20 ième rang ont fait les 4 derniers rangs de AX. Comme il y a plus de mailles à chaque rang est-ce que je répètes le A2 . Moi cela me donne beaucoup plus de mailles à augmenter surtout quand on répète le rang 7

29.03.2021 - 14:56

country flag Kerstin wrote:

Ich habe einen Fehler in der deutschen Anleitung gefunden: in der 11. Reihe wurde der Umschlag vor der letzten Randmasche vergessen, sonst kommt man nicht auf 27 Maschen. Es muss also heissen: 1 Randmasche kraus rechts, 1 Umschlag, re bis zur Mittel-m, 1 Umschlag, 1 m re (= Mittel-M), 1 Umschlag und bis zur Rand-M re str, 1 Umschlag, 1 Rand-m kraus re = 27Maschen. Freundliche Gruesse Kerstin

14.03.2021 - 10:20

DROPS Design answered:

Liebe Kerstin, danke für Ihren Hinweis, die Anleitung wurde korrigiert! Viel Spaß beim Stricken weiterhin!

16.03.2021 - 23:50