
Popular categories
Looking for a yarn?


Comments / Questions (13)
![]() Alexa wrote:
Alexa wrote:
Hi again, there is another discrepancy: the german pattern says after 17 stitches on needle, the english pattern says after 15 stitches on needle. I don’t know if it’s me not being proficient enough at knitting, but this pattern is impossible for me. I frogged about 5 times already. Now I have 15 stitches on the needle and I’m confused again. The description is too cryptic. Explanatory written pattern for more rows would have been helpful to establish the logic of the design.
13.06.2022 - 21:50DROPS Design answered:
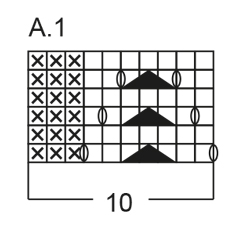
Dear Alexa, thanks for your feedback, German pattern will be checked again - you have to work as follows: K2, P3, then you will work the next stitches as shown in A.1 (even if not all sts can be worked in A.1), increase and end with K2 (from RS). The number of stitches will increase on every row from RS and when you have 15 sts, you can start A.1: K2, P3, A.1 = K7, P1, increase (= 9th st in A.1), K2 and continue that way increasing as before and incorporating the new stitches in A.1. Can this help?
14.06.2022 - 09:23
![]() Alexa wrote:
Alexa wrote:
There is a mistake in the english pattern. In the continuation section after row 6 it should read „ From RS K 2, P 3, k (not A.1) until 2 sts remain, 1 YO and K 2“ Found this out because the pattern made no sense to me. The german pattern had the “knit” instead of “A.1”.
12.06.2022 - 23:05DROPS Design answered:
Dear Alexa, german pattern was wrong, thanks for noticing, you are supposed to work the next stiches as shown in diagram A.1, of course, there are not enough stitches yet to work the whole repeat, so that you will first knit them, but then you will have to purl the next increases so that you you have K7, P3 in A.1. Happy knitting!
13.06.2022 - 12:02
![]() Marinella wrote:
Marinella wrote:
Nel paragrafo AUMENTARE NELLE SEZIONI A ROVESCIO DICE: ferro successivo(dal diritto dl lavoro): 2 maglie diritte , P 3........ cosa significa P3 ? grazie , Marinella
28.12.2020 - 20:56DROPS Design answered:
Buonasera Marinella, abbiamo corretto il testo, P3 corrisponde a 3 maglie rovescio. Buon lavoro!
28.12.2020 - 22:13
![]() Ghislaine Ethier wrote:
Ghislaine Ethier wrote:
Bonjours ma question est J’ai fait 6 rangs je suis rendue au paragraphe 2 continuez de la même façon sur l’endroit 2 endroit,3 envers A1 mais c’est la que je suis bloqué car A1 a 10 mailles et en tricotant 2 endroit et 3 envers ils est impossible de faire A1 car je n’ai que 9 mailles sur ma broche !!! J’attends votre réponse merci !!!!
26.12.2020 - 14:07DROPS Design answered:
Bonjour Mme Ethier, au tout premier rang, vous tricotez les 2 premières mailles de A.1 (= les 2 seules mailles possibles), et comme vous augmentez 1 maille avant les 2 dernières mailles, vous pourrez tricoter A.1 sur 3 mailles au rang suivant. Autrement dit, vous augmentez progressivement le nombre de mailles de A.1 et les tricotez comme le montre le diagramme. En même temps, tricotez les mailles de A.1 à l'endroit (et non au point ajouré) tant que vous n'avez pas 8 mailles pour A.1 (= 7 m point ajouré + 1 m env). Bon tricot!
04.01.2021 - 08:44
![]() Anneke wrote:
Anneke wrote:
Na het meerderen in de averechte delen bij 50 cm: als ik in A1 een nieuw averecht deel brei, meerder ik dan door totdat er in dat averechte deel net zoveel steken staan als in de andere averechte delen? Of meerder ik pas in de naald waarin bij alle averechte delen een steek wordt gemeerderd? Dan hebben de averechte delen die na 50 cm zijn ontstaan aan het eind dus geen 13 steken.
22.08.2020 - 13:59DROPS Design answered:
Dag Anneke,
Bij 50 cm meerder je in ieder averecht deel van A.1, dus dan heb je 4 steken averecht in plaats van 3 steken averecht in A.1 Daarnaast blijf je steeds meerderen aan de zijkant en als je genoeg steken hebt gemeerderd aan de zijkant om A8 steken van A.1 te kunnen breien, kun je dus een nieuwe herhaling van A.1 erbij maken op de toer. Deze brei je dan met hetzelfde aantal averechte steken als de andere A.1
26.08.2020 - 14:56
![]() Annika wrote:
Annika wrote:
Hej, det står att jag ska fortsätta ökningen i slutet på varje v från rätsidan tills arb mäter ca 130 cm från uppläggningskanten (i stickriktningen) och de sista ökade m är 1 hel rapport av A.1. Ska jag mäta lodrätt eller vågrätt? Fortsätt med mönster som förut tills arb mäter ca 150 cm längs sidan i början av v från rätsidan. Ska jag mäta lodrätt eller vågrätt?
27.04.2020 - 21:18DROPS Design answered:
Hej Annika, når du måler i strikkeretningen så må det være lodret, den sidste side skal måle 150 cm. Mått: Längd mitt bak: ca 106 cm. Bredd överst: ca 170 cm. Lycka till :)
29.04.2020 - 10:38
![]() Pia Titz wrote:
Pia Titz wrote:
Förstår inte riktigt hur många gånger jag ska öka i : Öka i partierna med aviga. Bara det varvet eller flera varv? Mvh Pia Titz
25.02.2020 - 19:37DROPS Design answered:
Hej Pia, Om du läser 2 rader till, så ser du att man öker igen när arb mäter 60 cm (efter 10 cm). Lycka till :)
26.02.2020 - 09:53
![]() Agnieszka wrote:
Agnieszka wrote:
Dzień dobry, w jaki sposób mam na początku (od rzędu 7) przerabiać schemat A1, gdy moja robótka nie ma nawet 10 oczek, a schemat A1 składa się z 10 oczek? Który fragment schematu mam przerabiać? W jaki sposób mam zacząć następny schemat A1?
03.05.2018 - 10:43DROPS Design answered:
Witaj Agnieszko, na prawej stronie robótki ptrzerabiać 2 o.p., 3 o.l., a dalej na prawo do końca (dodawać oczko w odl. 2 o. od brzegu na końcu rzędu na prawej stronie robótki). UWAGA: gdy na drucie jest 15 o. (= 8 o. w schemacie A.1) zacząć ścieg ażurowy schematu A.1 w nast. rzędzie na prawej stronie robótki. Pozdrawiam i powodzenia
04.05.2018 - 13:03
![]() Jutta Bayer wrote:
Jutta Bayer wrote:
In der Anleitung heisst es : In dieser Weise weiterstricken, bis die Arb. eine Gesamtlänge von 50 cm hat was heisst das, 50 cm auf der Stricknadel oder Seitenlänge rechts oder links, evtl. Maschenanzahl angeben. Danke
04.03.2017 - 02:05DROPS Design answered:
Liebe Frau Bayer, Sie müssen wie zuvor weiterstricken, bis die Arbeit ca 150 cm an der rechten Seite (von der Vorderseite gesehen) misst, dh an der Seite des Beginns der Hin-R. Viel Spaß beim stricken!
06.03.2017 - 08:58
![]() Sonja Føhre wrote:
Sonja Føhre wrote:
Et der en mål-tegning til den?
16.12.2016 - 17:13DROPS Design answered:
Hej Sonja. Nej, det har vi ikke paa vores sjaler. Men ca. maalene staar i starten af opskriften: Mål: Længde midt bagpå: ca 106 cm. Bredde øverst: ca 170 cm.
19.12.2016 - 14:47
|
|||||||||||||
Pink Cascade |
|||||||||||||
|
|
|||||||||||||
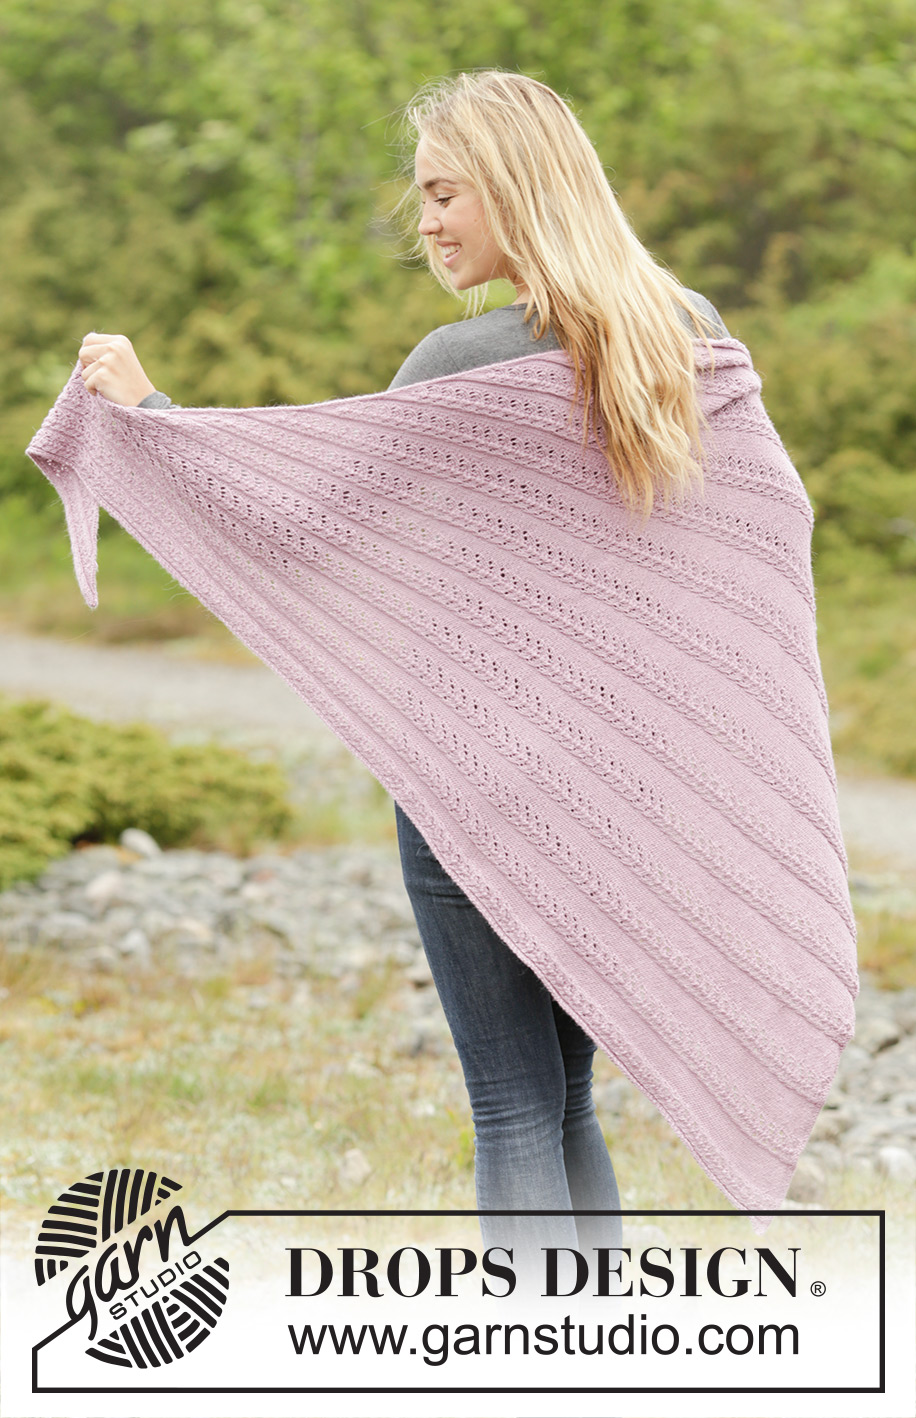
Knitted shawl with lace pattern in DROPS BabyAlpaca Silk, worked from side to side.
DROPS Extra 0-1319 |
|||||||||||||
|
GARTER ST (back and forth): K all rows. 1 ridge = 2 rows K. PATTERN: See diagram A.1. The diagram shows all rows in pattern seen from RS. ---------------------------------------------------------- SHAWL: Work back and forth on circular needle sideways. Cast on 5 sts on circular needle size 3 mm with BabyAlpaca Silk. ROW 1 (= RS): K 2, 1 YO, P 1, 1 YO, K 2 = 7 sts. ROW 2 (= WS): K YOs twisted to avoid holes. P 2, K 3, P 2. ROW 3: K 2, P 3, 1 YO, K 2 = 8 sts. ROW 4: P 2, P YO twisted, K 3, P 2. ROW 5: K 2, P 3, K 1, 1 YO, K 2 = 9 sts. ROW 6: P 2, P YO twisted, P 1, K 3, P 2. REMEMBER THE KNITTING TENSION Continue the same way: From RS K 2, P 3, A.1 until 2 sts remain, 1 YO and K 2. From WS work K over K and P over P. I.e. inc 1 st on every row from RS. Work the inc sts (YO’s) twisted, AND AT THE SAME TIME work the inc sts K over K and P og P as shown in diagram A.1. NOTE! When there are 15 sts on needle (= 8 sts in A.1), beg lace pattern in A.1 on next row from RS. Continue like this until piece measures 50 cm (adjust so that next row is 3rd or 5th row in A.1). READ ALL OF THE FOLLOWING SECTION BEFORE CONTINUING! Inc in sections with P and at the end of every row from RS as before as follows: INC IN SECTIONS WITH P: Next row (from RS): K 2, P 3, * A.1, 1 YO *, repeat from *-* until 2 sts remain on needle, make a YO and K 2. On next row from WS K YOs twisted. Then P the new sts (seen from RS). 1 st P has been inc in every P section after K 2 and P 3 at beg of row from RS. When piece measures approx. 60 cm (approx. 10 cm after first inc in sections with P), inc on opposite side of sections with P (i.e. at beg of sections with P). Inc like this alternately before and after sections with P every 10 cm 8 more times (= 10 times in total) = 13 P sts between each lace pattern. INC AT END OF EVERY ROW FROM RS: Continue inc at the end of every row from RS until piece measures 130 cm from cast on edge (in knitting direction) and the last inc sts are 1 whole repetition of A.1. Continue pattern as before until piece measures approx. 150 cm along the side at beg of row from RS. Work 2 ridges in GARTER ST - see explanation above. Loosely cast off. |
|||||||||||||
Diagram explanations |
|||||||||||||
|
|||||||||||||
|
|||||||||||||
Have you finished this pattern?Tag your pictures with #dropspattern or submit them to the #dropsfan gallery. Do you need help with this pattern?You'll find 17 tutorial videos, a Comments/Questions area and more by visiting the pattern on garnstudio.com. © 1982-2025 DROPS Design A/S. We reserve all rights. This document, including all its sub-sections, has copyrights. Read more about what you can do with our patterns at the bottom of each pattern on our site. |
|||||||||||||


With over 40 years in knitting and crochet design, DROPS Design offers one of the most extensive collections of free patterns on the internet - translated to 17 languages. As of today we count 314 catalogues and 11822 patterns translated into English (UK/cm).
We work hard to bring you the best knitting and crochet have to offer, inspiration and advice as well as great quality yarns at incredible prices! Would you like to use our patterns for other than personal use? You can read what you are allowed to do in the Copyright text at the bottom of all our patterns. Happy crafting!
Post a comment to pattern DROPS Extra 0-1319
We would love to hear what you have to say about this pattern!
If you want to leave a question, please make sure you select the correct category in the form below, to speed up the answering process. Required fields are marked *.