
Popular categories
Looking for a yarn?


Comments / Questions (85)
![]() Verleysen wrote:
Verleysen wrote:
Ik wil voorste en rug apart breien. Dus niet met een rondbreinaald. Hoeveel steken moet ik dan opzetten en hoe gaat het dan verder?
24.09.2021 - 14:04DROPS Design answered:
Dag Verleysen,
Om een patroon aan te passen om op rechte naalden te breien hebben we een instructie gemaakt. Deze vind je hier.
02.10.2021 - 12:52
![]() Madelon wrote:
Madelon wrote:
Hallo! Ik ben vol enthousiasme begonnen aan deze trui. Ik ben nu beland bij het patroon. Daar heb ik een jaar vragen over. Er staat: brei tot een hoogte van 10cm, is dat vanaf dat ik begin met het patroon of vanaf het begin? En het minderen in de averechte steken: is dat meteen vanaf het begin of na die 10cm? En bedoelt u met het minderen in tricotsteek dan de eerste (14) steken? En geldt die mindering dan per 4cm of gelijktijdig met de mindering in de av delen? Ik hoor het graag?
23.02.2021 - 21:36DROPS Design answered:
Dag Madelon,
De 10 cm is vanaf het opzetten en het minderen in de averechte steken dus ook. Het tricotsteekdeel is het deel in tricotsteek naast het kantpatroon, dus inderdaad de 14 steken (in maat M). Het minderen in het averechte deel en het tricotsteekdeel gaat gelijk op, dus elke 4 cm 6 keer in totaal (de ene keer links, de andere keer rechts van het averechte deel)
02.03.2021 - 09:32
![]() Joana wrote:
Joana wrote:
Olá, tenho uma dúvida no início do trabalho onde diz "Repetir as 2 primeiras carreiras de A.1 - A.3", "A.1-A.3" quer dizer de A.1 a A.3 ou A.1 e A.3 ?
23.02.2021 - 21:11
![]() Diane Michaud wrote:
Diane Michaud wrote:
Je vais tenter de mieux me faire comprendre: pour chacune des tailles, le nombre de mailles à monter de plus d’une taille à l’autre est de 16 mailles : 222 + 16 =238 mailles ainsi de suite . Pour la taille XL , le nombre de mailles de plus est 32 mailles 254+32=286 . Le nombre de mailles à monter est il exact ?
14.02.2021 - 15:43DROPS Design answered:
Bonjour Mme Michaud, tout à fait, le nombre de mailles est exact et vous permettra d'obtenir les mesures du schéma, sur la base de l'échantillon - notez qu'après les 8 premiers cm de côtes et A.1-A.3, vous diminuerez et il ne restera que 216 mailles en taille XL. Bon tricot!
15.02.2021 - 09:37
![]() Diane Michaud wrote:
Diane Michaud wrote:
Pourquoi le nombre de mailles passe de 254 à 286 modifiant l'intervalle de 16 mailles
11.02.2021 - 20:44DROPS Design answered:
Bonjour Mme Michaud, je ne suis pas sûre de bien comprendre votre question, quelle taille tricotez-vous? Vous commencez par 254 mailles en taille L et 286 mailles en taille XL, mais après avoir diminué dans les diagrammes et entre les diagrammes, il doit vous rester 196 mailles en L et 216 mailles en XL; En espérant que ceci puisse vous aider. Bon tricot!
12.02.2021 - 08:23
![]() Inmaculada Santos Hernandez wrote:
Inmaculada Santos Hernandez wrote:
Este jersey, entiendo que está formado por dos piezas,pues el cuello es independiente, gracias y felicidades por su trabajo.compre para hacerlo con dos hilos
05.12.2020 - 08:36
![]() Inmaculada Santos wrote:
Inmaculada Santos wrote:
He realizado varios de sus trabajos,para mis hijas nietos y nietas,solo darles las gracias por su trabajo felicidades para todos,estoy encantada y pienso . Si mi madre lo pudiera ver....
05.12.2020 - 08:34
![]() Inmaculada Santos wrote:
Inmaculada Santos wrote:
Este jersey, entiendo que está formado por dos piezas,pues el cuello es independiente, gracias y felicidades por su trabajo.compre para hacerlo con dos hilos
05.12.2020 - 08:28
![]() Françoise Lemaire wrote:
Françoise Lemaire wrote:
Dans l'explication, il n'y a pas de côtes. Combien de cm de hauteur font les côtes du début du pull ?
27.10.2020 - 22:03DROPS Design answered:
Bonjour Mme Lemaire, le bas du pull commence par des côtes tricotées en 2 m end/2 m env et en suivant les 2 premiers tours des diagrammes A.1-A.3 conformément à la répartition des mailles indiquées - vous tricotez ainsi pendant 8 cm avant de tricoter les 2 derniers tours des diagrammes en diminuant en même temps (2ème paragraphe DOS & DEVANT). Bon tricot!
28.10.2020 - 07:51
![]() Annette wrote:
Annette wrote:
Der står i opskriften, at man skal bruge pinde 5, Men jeg kan se, at man skal slå op på pinde 4 1/2, men jeg kan ikke se, at der står noget sted, at man skal skifte til pinde nr. 5. Mvh. Annette
17.10.2020 - 15:16DROPS Design answered:
Hei Annette. Du strikker vrangborden med diagram til arbeidet måler ca 8 cm, deretter strikkes de 2 siste omg i A.1 - A.3, SAMTIDIG felles det 10-10-14-20-18-16 m jevnt fordelt over de 30-38-46-62-70-78 m vrbord i hver side = 172-188-196-216-236-256 m. Så bytter du til rundp 5. Ved ermene strikkes det vrangbord i ca 10 cm før det byttes til pinne 5,0. God Fornøyelse!
19.10.2020 - 13:15
|
||||||||||||||||||||||||||||
Snow Tracks#snowtrackssweater |
||||||||||||||||||||||||||||
 |
 |
|||||||||||||||||||||||||||
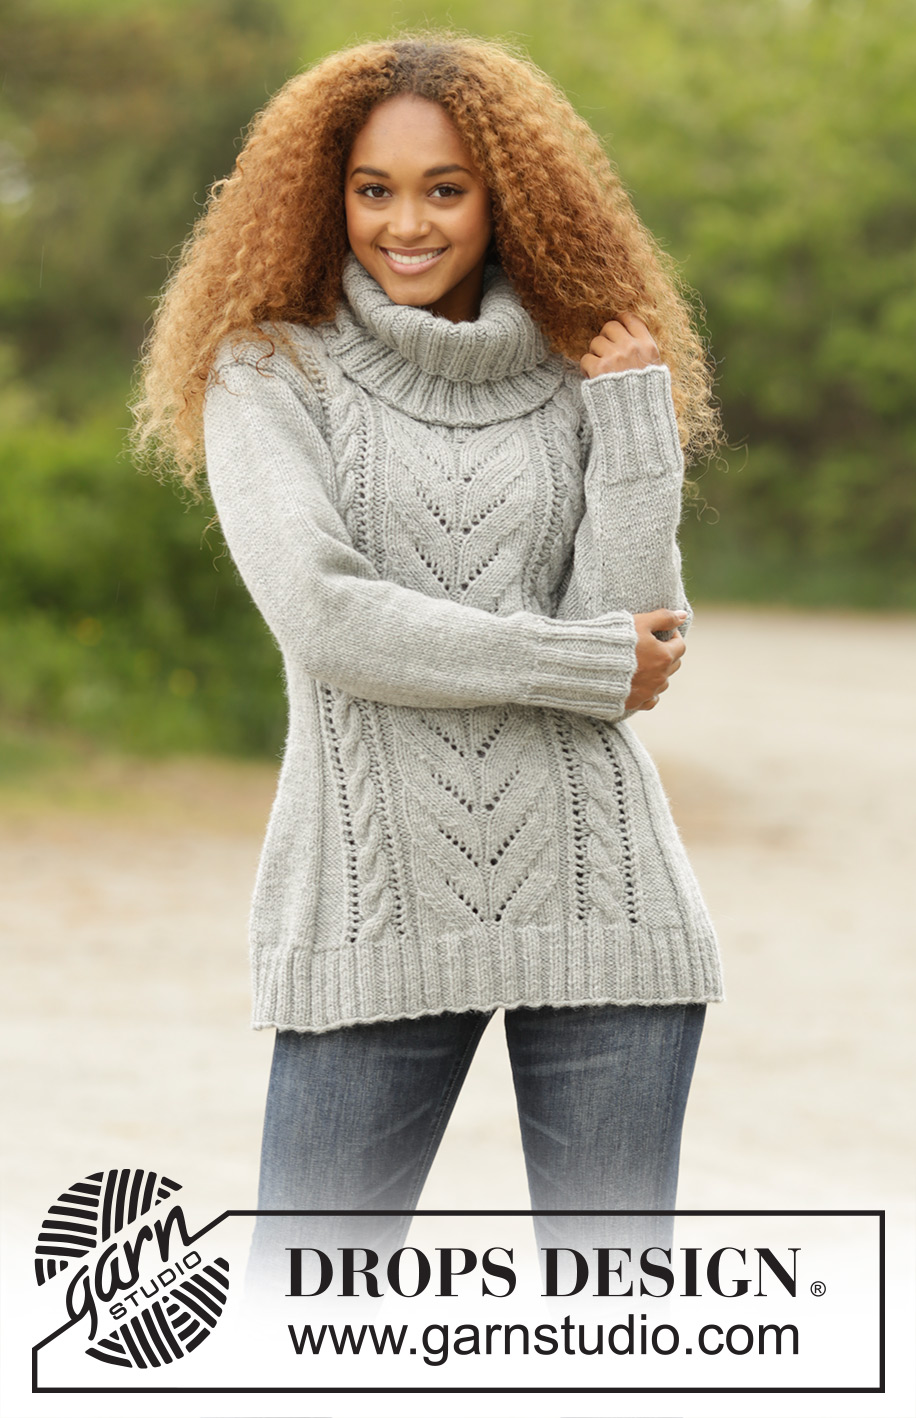
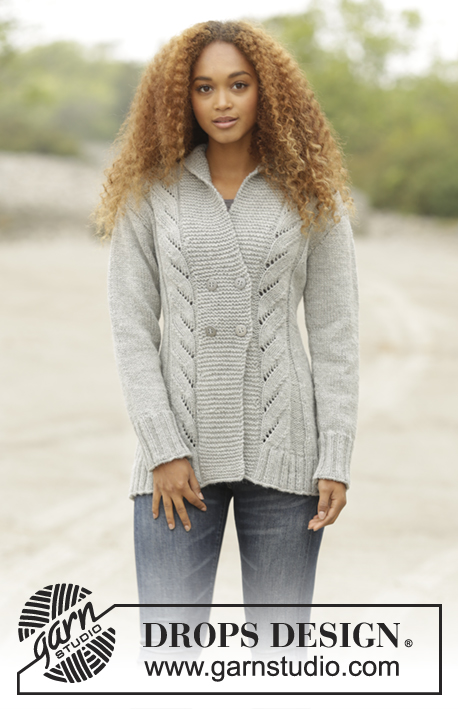
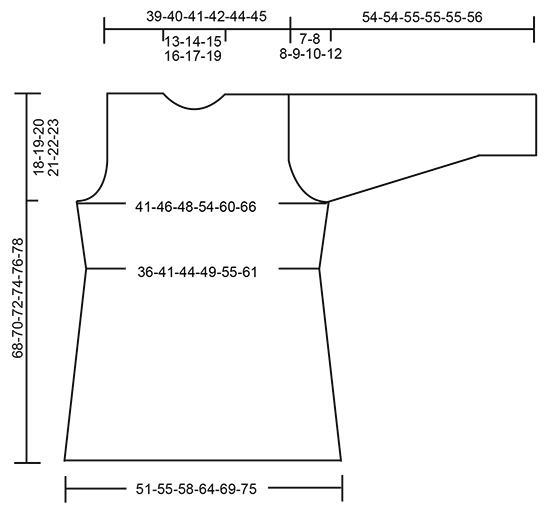
Knitted DROPS jumper with cables and detachable collar in ”Nepal”. Size: S - XXXL.
DROPS 171-20 |
||||||||||||||||||||||||||||
|
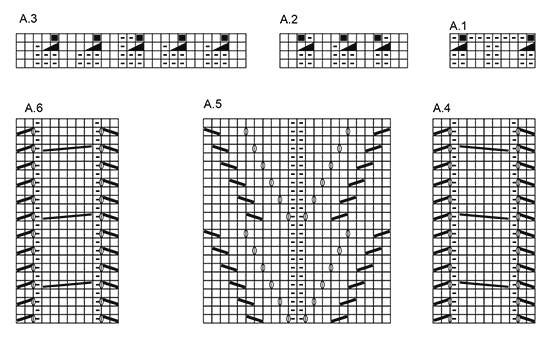
PATTERN: See diagrams A.1 to A.6. DECREASE TIP: Dec 1 st in each side of section in stocking st as follows: K 1, slip next st as if to K, K 1, psso, work until 3 sts remain, K 2 tog, K 1. INCREASE TIP: Inc with 1 YO inside first and last st in stocking st, work the inc sts twisted on next round to avoid holes. GARTER ST (worked in the round): 1 ridge = 2 rounds. * K 1 round and P 1 round *, repeat from *-*. ---------------------------------------------------------- JUMPER: Worked in the round on circular needle. BODY: Cast on 222-238-254-286-302-318 sts on circular needle size 4.5 mm with Nepal. K 1 round, then work as follows: * P 1, rib K 2/P 2 over the first 12-16-20-28-32-36 sts, K 2, A.1 (= 10 sts) A.2 (= 15 sts), P 2, A.3 (= 27 sts), P 2, A.2, A.1, K 2, rib P 2/K 2 over the next 12-16-20-28-32-36 sts, P 1 *, repeat from *-* 1 more time. REMEMBER THE KNITTING TENSION Repeat the first 2 rounds in A.1 - A.3 until piece measures 8 cm, then work the last 2 rounds in A.1 - A.3, AT THE SAME TIME dec 10-10-14-20-18-16 sts evenly over the 30-38-46-62-70-78 sts rib in each side = 172-188-196-216-236-256 sts. Switch to circular needle size 5 mm. Then work as follows: * K 10-14-16-21-26-31, P 8, A.4 (= 12 sts), P 2, A.5 (= 22 sts), P 2, A.6 (= 12 m), P 8, K 10-14-16-21-26-31 *, repeat from *-* 1 more time. When piece measures 10 cm, dec 1 st in every P section with P 8 and dec 1 st in each side of section in stocking st - READ DECREASE TIP (= 8 sts dec), dec the same way every 4 cm, 6 times in total, dec alternately on right and left side of P sections = 124-140-148-168-188-208 sts. When piece measures 34 cm, inc 1 st in every P section with a dec, and 1 st in every section in stocking st (= 8 sts inc) - READ INCREASE TIP, repeat inc when piece measures 46-47-48-49-50-51 cm = 140-156-164-184-204-224 sts. When piece measures 50-51-52-53-54-55 cm, work as follows from RS: Cast off the first 2-3-3-3-3-3 sts, work the next 66-72-76-86-96-106 sts as before, cast off the next 4-6-6-6-6-6 sts, work the next 66-72-76-86-96-106 sts as before and cast off the last 2-3-3-3-3-3 sts. Each part is worked separately back and forth on circular needle. BACK PIECE: = 66-72-76-86-96-106 sts. Continue pattern as before, AT THE SAME TIME continue to cast off in each side for armholes on every other row: Cast off 2 sts 0-1-1-2-3-4 times and 1 st 0-0-1-3-5-7 times = 66-68-70-72-74-76 sts. Continue the pattern as before. When piece measures 66-68-70-72-74-76 cm, cast off the middle 24-26-28-30-32-34 sts for neck and finish each shoulder separately. On next row cast off 1 st towards the neck = 20 sts remain on each shoulder. Cast off when piece measures 68-70-72-74-76-78 cm. FRONT PIECE: = 66-72-76-86-96-106 sts. Continue pattern as before and cast off for armholes as on back piece = 66-68-70-72-74-76 sts. Continue the pattern like this. When piece measures 60-62-64-66-68-70 cm, slip the middle 18-20-22-24-26-28 sts on a stitch holder for neck and finish each shoulder separately. Then cast off on every row towards neck, 2 sts 1 time, 1 st 2 times = 20 sts remain on shoulder. Work sts that do not fit the pattern in stocking st. Cast off when piece measures 68-70-72-74-76-78 cm. SLEEVE: Worked in the round on double pointed needles. Cast on 45-45-50-50-50-50 sts on double pointed needles size 4.5 mm with Nepal. K 1 round, then work rib = K 2/P 3. When rib measures 10 cm, K 1 round while dec 11-9-12-10-10-8 sts evenly = 34-36-38-40-40-42 sts. Switch to double pointed needles size 5 mm and continue in stocking st. Insert 1 marker at the beg of round. When piece measures 11 cm, inc 1 st on each side of marker, inc every 4-3½-3-2½-2-1½ cm a total of 9-10-11-13-15-17 times = 52-56-60-66-70-76 sts. When piece measures 47-47-47-46-45-44 cm (NOTE! Shorter measurements in the larger sizes because of broader shoulders), cast off 6 sts mid under sleeve (= 3 sts on each side of marker), now finish piece back and forth on needle. Cast off for sleeve cap at beg of every row in each side as follows: 2 sts 3 times and 1 st 0-1-1-2-3-5 times, cast off 2 sts in each side of piece until piece measures 53-53-54-54-54-55 cm, cast off 3 sts in each side and cast off the remaining sts. Piece measures 54-54-55-55-55-56 cm in total. NECK EDGE: Pick up approx. 64 to 86 sts around the neck (incl sts on stitch holder) on a short circular needle size 5 mm with Nepal. Work 2 ridges in GARTER ST – see explanation above, then cast off. DETACHABLE COLLAR: Cast on 108 sts on a short circular needle size 4.5 mm with grey. K 1 round, then work rib = K 2/P 2. Work rib for 25 cm, then cast off with K over K and P over P. ASSEMBLY: Sew shoulder seams and sew in sleeves. |
||||||||||||||||||||||||||||
Diagram explanations |
||||||||||||||||||||||||||||
|
||||||||||||||||||||||||||||
 |
||||||||||||||||||||||||||||
 |
||||||||||||||||||||||||||||
Have you finished this pattern?Tag your pictures with #dropspattern #snowtrackssweater or submit them to the #dropsfan gallery. Do you need help with this pattern?You'll find 27 tutorial videos, a Comments/Questions area and more by visiting the pattern on garnstudio.com. © 1982-2026 DROPS Design A/S. We reserve all rights. This document, including all its sub-sections, has copyrights. Read more about what you can do with our patterns at the bottom of each pattern on our site. |
||||||||||||||||||||||||||||


With over 40 years in knitting and crochet design, DROPS Design offers one of the most extensive collections of free patterns on the internet - translated to 17 languages. As of today we count 324 catalogues and 12290 patterns translated into English (UK/cm).
We work hard to bring you the best knitting and crochet have to offer, inspiration and advice as well as great quality yarns at incredible prices! Would you like to use our patterns for other than personal use? You can read what you are allowed to do in the Copyright text at the bottom of all our patterns. Happy crafting!
Post a comment to pattern DROPS 171-20
We would love to hear what you have to say about this pattern!
If you want to leave a question, please make sure you select the correct category in the form below, to speed up the answering process. Required fields are marked *.