
Popular categories
Looking for a yarn?


Comments / Questions (23)
![]() Marijke wrote:
Marijke wrote:
Ik ben bij de diagonale schouders. Als ik precies doe wat er staat (8 minder breien, terug en dat nog 3 keer) heb ik nog maar 7 steken over??? Dan- brei nu en minder net een rand over de schouderstrken?? Dank alvast
06.11.2025 - 09:51
![]() Truus wrote:
Truus wrote:
Patroon A5a _Kabelnaald voor het werk_ Slip de twee steken knitwise 1 voor 1 naar rechternaald. Steek de linkernaald knitwise in beide steken, te beginnen bij de achterste, en haal ze weer naar linkernaald. = left slanting cable. _Right slanting cable = naald achter het werk_ Met rechternaald beide steken tegelijk ophalen as if to knit k2tog. Hierdoor zijn ze al van plek gewisseld. Nu purlwise weer naar de linkernaald. _ze zitten nu verdraaid dat moet nog gecorrigeerd_
04.11.2025 - 11:02
![]() Truus wrote:
Truus wrote:
Patroon A5a vervolg https://youtu.be/OZqJOOOQE0A?feature=shared
04.11.2025 - 10:59
![]() Truus wrote:
Truus wrote:
De garenvervanger gaat over één garen tegen één ander. In dit patroon gaat het om 2 garens (alpaca + kid silk) en dan weet ik niet hoe ik met de garenvervanger naar één type garen (air) kan ruilen. Dus graag wel gericht advies alstublieft.
03.02.2025 - 23:00
![]() Truus wrote:
Truus wrote:
Ik wil deze trui breien in de grootste maat. Met drops Air (garengroep C). En dan 1 cm langer dan het patroon (van 64 cm naar 65 cm). Hoeveel wol heb ik dan nodig?
02.02.2025 - 14:05DROPS Design answered:
Dag Truus,
Om te berekenen hoeveel je nodig hebt, kun je de garenvervanger gebruiken, hiervan vindt je een link onderaan de materialenlijst bij ieder patroon. Omdat je de trui wat langer wilt maken zou je een bol extra kunnen bestellen.
03.02.2025 - 21:29
![]() Truus wrote:
Truus wrote:
Ik wil deze trui breien in de grootste maat. Met drops Air (garengroep C). En dan 5 cm langer dan het patroon. Hoeveel wol heb ik dan nodig?
02.02.2025 - 13:05
![]() Snjezana wrote:
Snjezana wrote:
Hej! Jag undrar om ni vet vilket nummer på respektive garn motsvarar den blåa färgen som finns i droppsfan gallery, version i blå färg från Edyta, Poland?
19.11.2024 - 22:48DROPS Design answered:
Hej Snjezana. Nej det vet vi dessvärre inte, men om du klickar in dig på hennes instagram via dropsfan gallery så kan du fråga henne där och se om du får svar. Mvh DROPS Design
20.11.2024 - 10:13
![]() Nicole wrote:
Nicole wrote:
Bonjour Pourquoi faites vous autant de diminution en partant Est-ce afin de donner du volume vers le bas Peux t'on évité ces diminutions Merci
02.03.2024 - 15:25DROPS Design answered:
Bonjour Nicole, dans ce modèle, on ne souhaite pas que les côtes resserrent le bas du pull, ainsi, on va monter suffisamment de mailles pour avoir la bonne largeur dans les points fantaisie, avec les petites aiguilles, il faudra alors diminuer avant de continuer avec les aiguilles plus grosses. Bon tricot!
04.03.2024 - 07:57
![]() Nicole wrote:
Nicole wrote:
Bonjour Vous afficher deux sortes de laine pour ce modèle Est-ce par choix Merci
01.03.2024 - 16:38DROPS Design answered:
Bonjour Nicole, ce pull se tricote avec les deux laines: on va tricoter avec 1 fil Alpaca + 1 fil Kid-Silk (= 2 fils tricotés ensemble) - cf échantillon. Bon tricot!
04.03.2024 - 07:12
![]() Nicole wrote:
Nicole wrote:
Bonjour Peux t'on faire ce chandail en deux partie Le dos et le devant Merci pour votre réponse
27.02.2024 - 23:46DROPS Design answered:
Bonjour Nicole, probablement, vous devrez juste ajuster le nombre de mailles, les motifs etc.. avant la division des emmanchures; retrouvez plus d'infos ici. Bon tricot!
28.02.2024 - 09:26
|
|||||||||||||||||||||||||||||||||||||
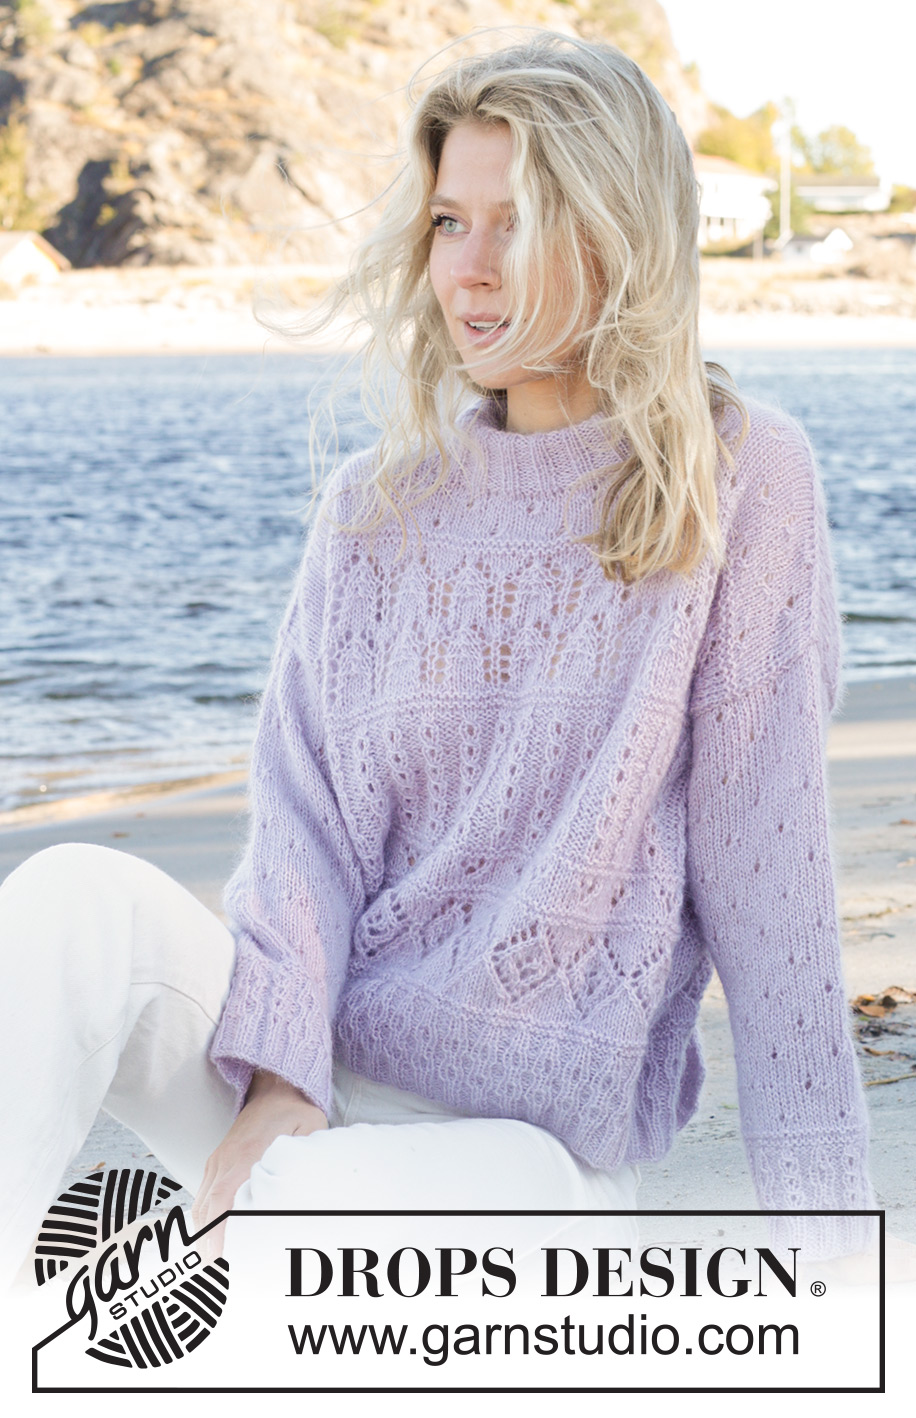
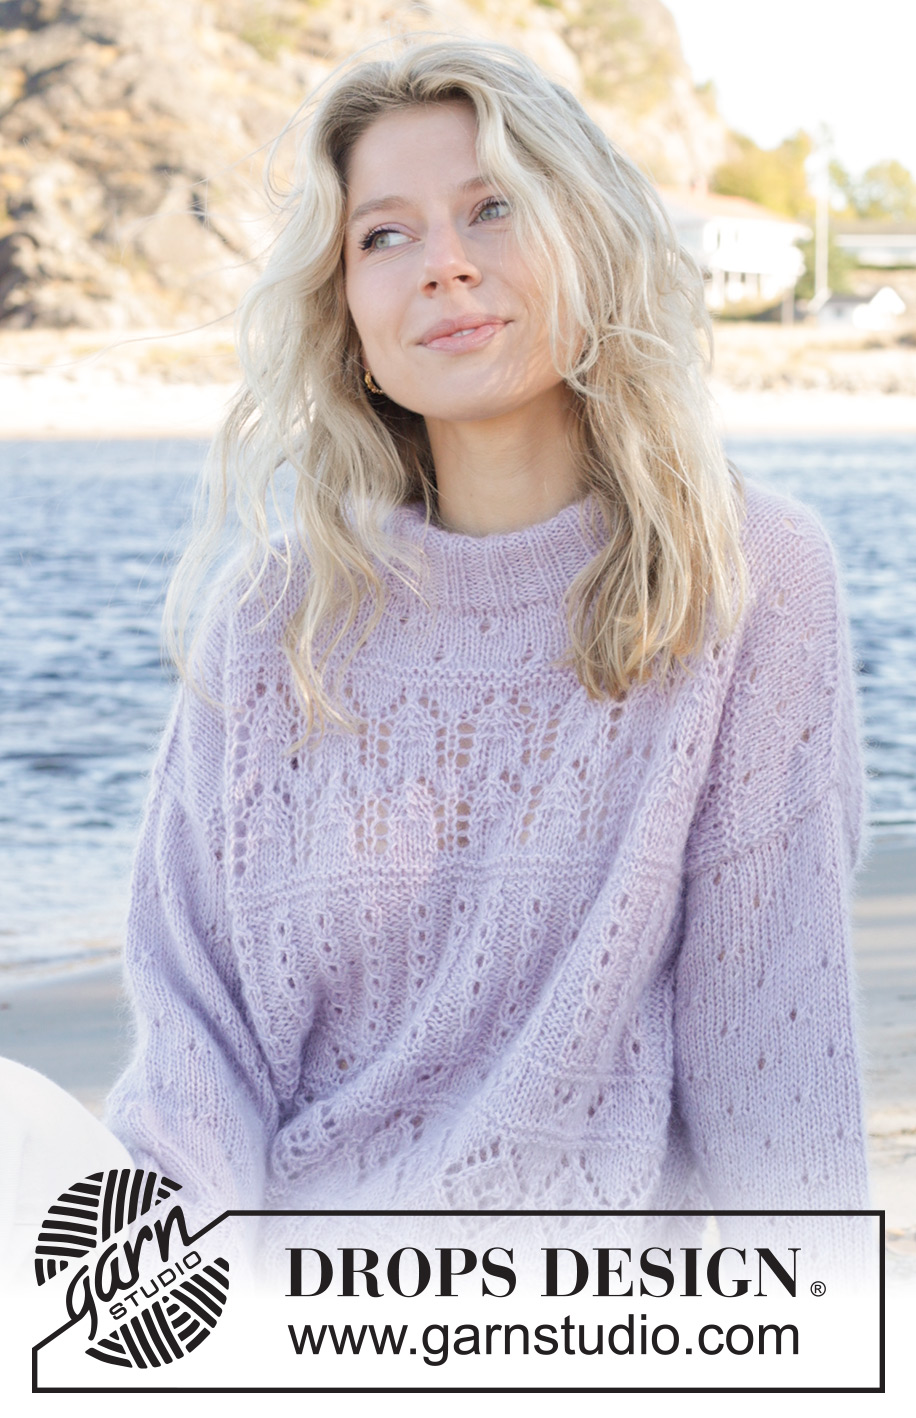
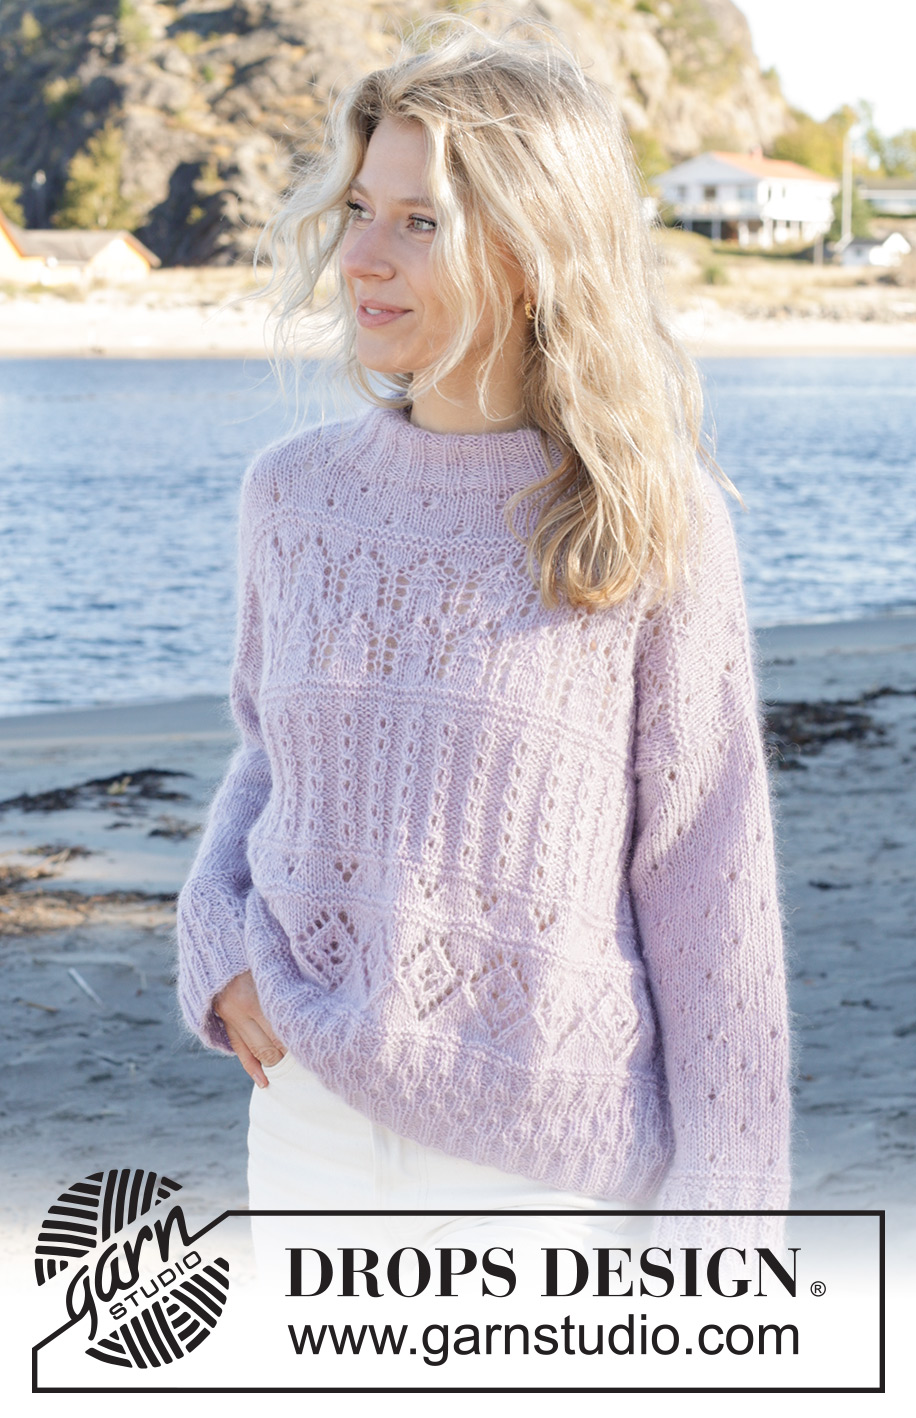
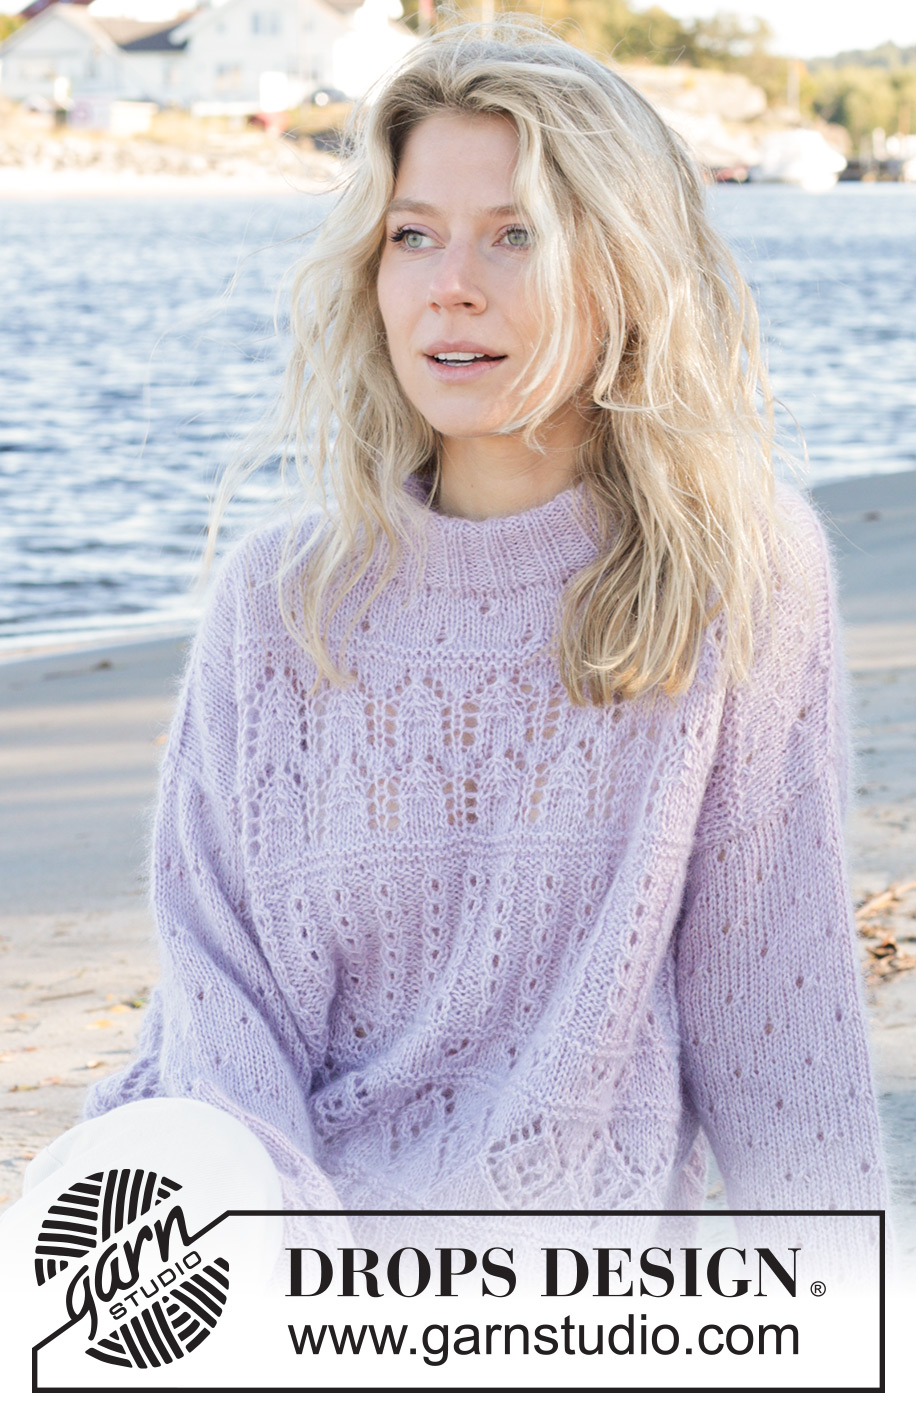
Fabled Harbour Sweater#fabledharboursweater |
|||||||||||||||||||||||||||||||||||||
 |
 |
||||||||||||||||||||||||||||||||||||
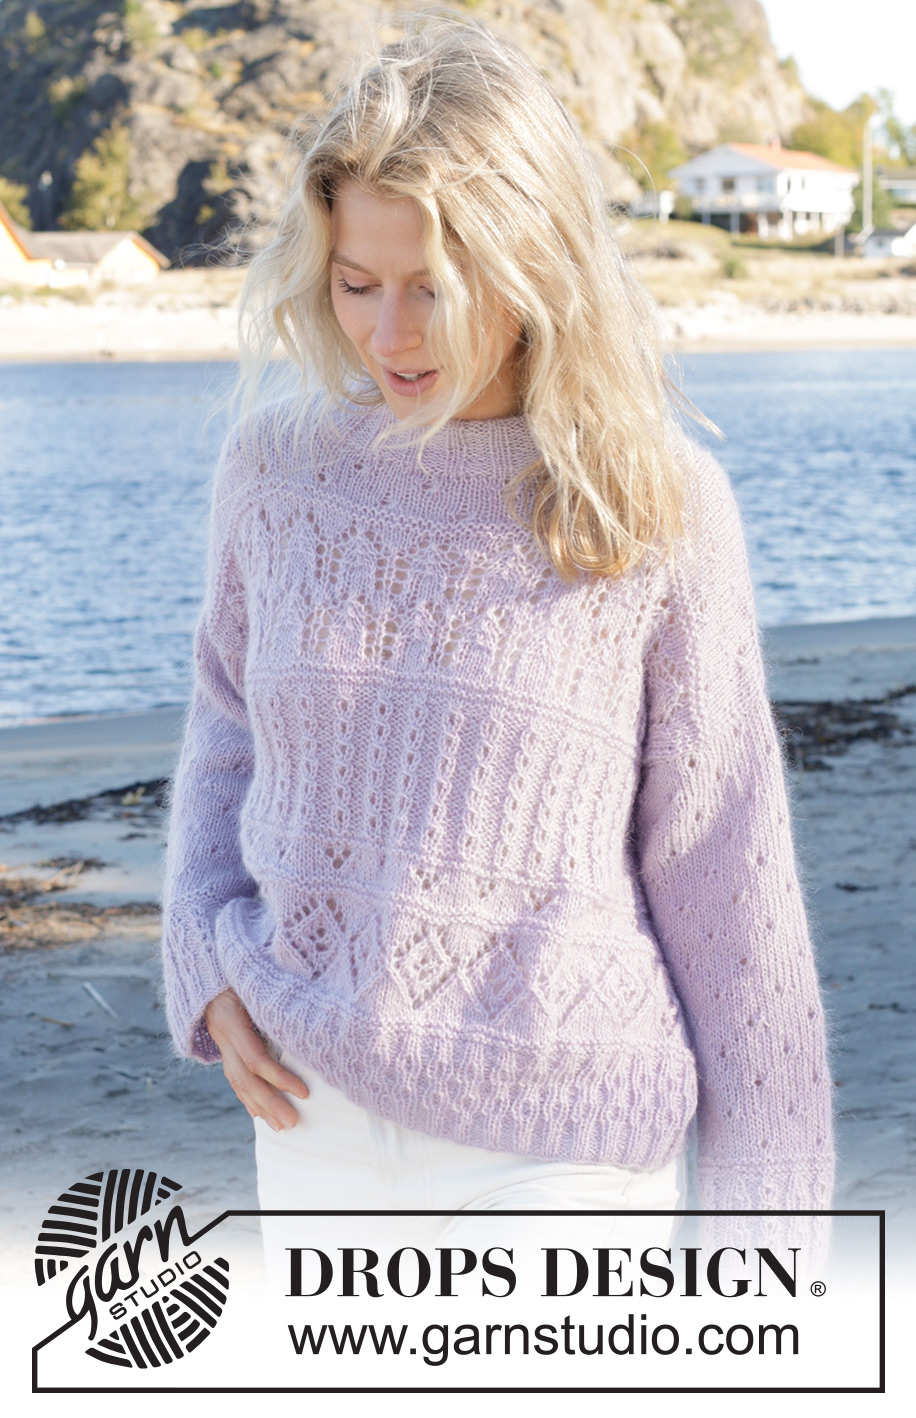
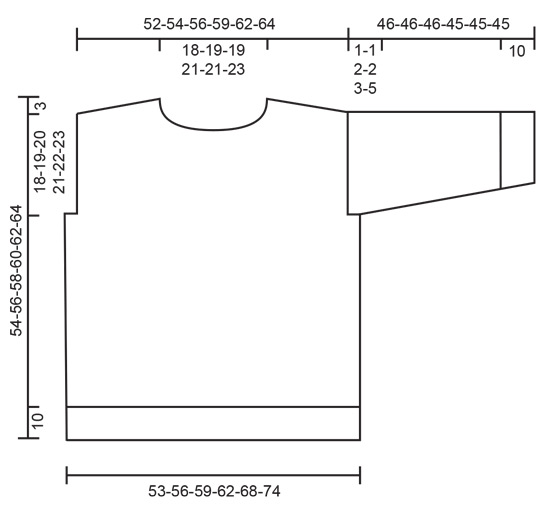
Knitted jumper in DROPS Alpaca and DROPS Kid-Silk. The piece is worked bottom up with lace pattern. Sizes S - XXXL.
DROPS 241-9 |
|||||||||||||||||||||||||||||||||||||
|
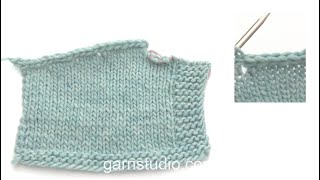
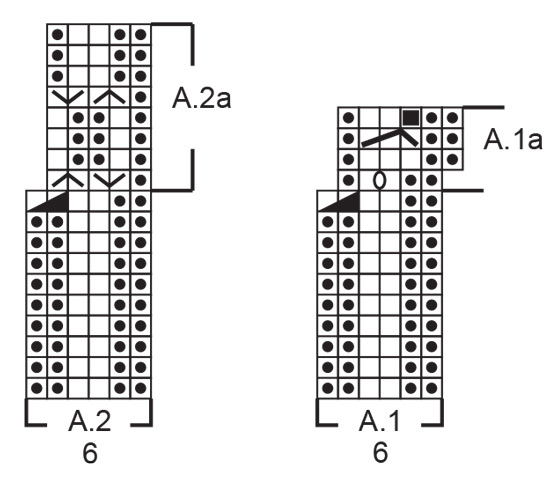
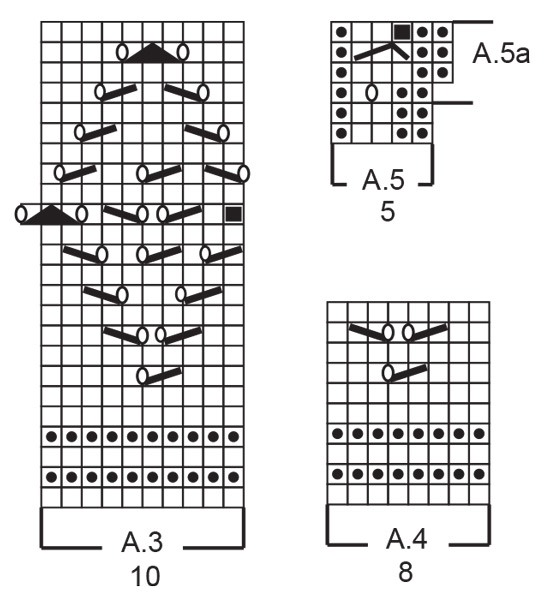
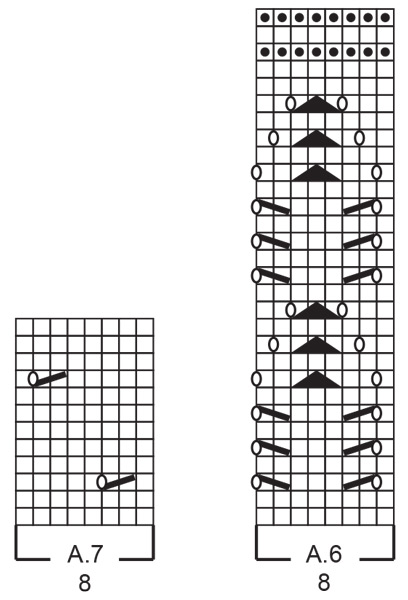
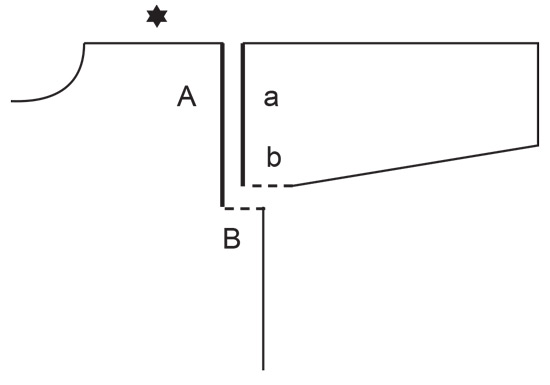
------------------------------------------------------- EXPLANATIONS FOR THE PATTERN ------------------------------------------------------- RIDGE/GARTER STITCH (worked in the round): 1 ridge in height = 2 rounds; Knit 1 round and purl 1 round. RIDGE/GARTER STITCH (worked back and forth): Knit all rows. 1 ridge = knit 2 rows. PATTERN: See diagrams A.1 to A.7. The diagrams show all rows in the pattern from the right side. When following a stitch-count, A.1a and A.5a are always 5 stitches, even though they are 6 stitches on some rows (due to decreases/increases in the pattern). WORKING TOGETHER: FROM RIGHT SIDE: Slip 1 stitch as if to knit, knit 1 and pass the slipped stitch over the knitted stitch. FROM WRONG SIDE: Purl 2 together. STOCKING STITCH: Purl from the wrong side, knit from the right side. INCREASE TIP (for sleeves): Start 1 stitch before the marker thread, 1 yarn over, knit 2 (marker thread sits between these 2 stitches), 1 yarn over. On the next round knit the yarn overs twisted to avoid holes (2 stitches increased). ------------------------------------------------------- START THE PIECE HERE: ------------------------------------------------------- JUMPER – SHORT OVERVIEW OF THE PIECE: The body is worked in the round with circular needle, bottom up as far as the armholes, then it is divided and the front and back pieces finished separately, back and forth. The sleeves are worked in the round with double pointed needles/short circular needle as far as the sleeve cap and finished back and forth. The piece is sewn together and the neck worked to finish. BODY: Cast on 264-276-300-312-336-360 stitches with circular needle size 4 mm and 1 strand of each quality (2 strands). Insert 1 marker-thread at the beginning of the round; allow it to follow your work onwards. Knit 1 round. Work rib according to A.2 over all stitches. When A.2 is finished in height there are 220-230-250-260-280-300 stitches. Work A.2a over all stitches, 2 times in height. Change to circular needle size 5 mm. Work A.3 over all stitches, decreasing AT THE SAME TIME 40-40-50-50-50-50 stitches evenly spaced on the first round = 180-190-200-210-230-250 stitches. REMEMBER THE KNITTING TENSION! When A.3 is finished in height, the piece measures approx. 21 cm. Work A.4 and increase 4-2-0-6-2-6 stitches evenly spaced on the first round = 184-192-200-216-232-256 stitches. When A.4 is finished in height, the piece measures approx. 25 cm. Work 2 ridges - read GARTER STITCH and decrease 4-2-0-6-2-6 stitches evenly on the first round = 180-190-200-210-230-250 stitches. Work A.5. Now work A.5a over A.5. When the piece measures 33-34-35-36-37-38 cm, cast off for the armholes as follows (making sure the next round has 5 stitches in A.5a): Start 1-2-3-2-5-8 stitches before the marker-thread, cast off 1-4-5-4-10-16 stitches for the armhole, work 89-91-95-101-105-109 stitches as before, cast off 1-4-5-4-10-16 stitches for the armhole, work the remaining 89-91-95-101-105-109 stitches as before. Back and front pieces are finished separately. BACK PIECE: = 89-91-95-101-105-109 stitches. Work the first row from the wrong side. Knit 3 rows. Continue as follows from the right side: 1 garter stitch, 3-0-2-1-3-1 stocking stitches, work A.6 until there are 5-2-4-3-5-3 stitches left, 4-1-3-2-4-2 stocking stitches, 1 garter stitch. When A.6 is finished in height, the piece measures approx. 46-47-48-49-50-51 cm. Work the following pattern, starting from the right side: 1 garter stitch, 3-0-2-1-3-1 stocking stitches, work A.7 until there are 5-2-4-3-5-3 stitches left, 4-1-3-2-4-2 stocking stitches, 1 garter stitch. Continue this pattern to finished length. When the piece measures 50-52-54-56-58-60 cm, cast off the middle 29-31-31-33-33-37 stitches for the neck and finish each shoulder separately (30-30-32-34-36-36 stitches on each shoulder). Continue the pattern; the stitches which do not fit into the pattern are worked in stocking stitch. On the next row from the neck cast off 1 stitch at the beginning of the row = 29-29-31-33-35-35 stitches. When the piece measures 51-53-55-57-59-61 cm, work diagonal shoulders, starting from the neck as follows: * Work pattern until there are 7-7-8-8-9-9 stitches left, turn and work back *, work from *-* 2 more times (i.e. working 7-7-8-8-9-9 fewer stitches on each row from the neck). On the last row towards the neck cast on 2 stitches at the end of the row = 31-31-33-35-37-37 stitches. Now work and decrease with an edge over the shoulder stitches. The cast-on stitches are worked together with the shoulder stitches as follows: Work * 1 stitch in STOCKING STITCH – read explanation above, work the next stitch together with the first/next stitch from the shoulder – read WORKING TOGETHER, place the 2 stitches back on the left needle, with the strand loosely on the back side of piece*, work from *-* until all the shoulder stitches are worked together with the 2 cast-on stitches. Cast off the 2 stitches. Work the other shoulder in the same way. FRONT PIECE: = 89-91-95-101-105-109 stitches. Starting from the wrong side work pattern in the same way as the back piece. When the piece measures 47-48-49-51-52-54 cm, slip the 25-27-27-29-29-33 middle stitches for the neck on a thread and finish each shoulder separately (32-32-34-36-38-38) stitches on each shoulder). Continue the pattern; the stitches which do not fit into the pattern are worked in stocking stitch. On the next row from the neck cast off 2 stitches 1 time and 1 stitch 1 time at the beginning of the row = 29-29-31-33-35-35 stitches. When the piece measures 51-53-55-57-59-61 cm, work diagonal shoulders, starting from the neck as follows: * Work pattern until there are 7-7-8-8-9-9 stitches left, turn and work back *, work from *-* 2 more times (i.e. working 7-7-8-8-9-9 fewer stitches on each row from the neck). On the last row towards the neck cast on 2 stitches at the end of the row = 31-31-33-35-37-37 stitches. Now work and decrease with an edge over the shoulder stitches. The cast-on stitches are worked together with the shoulder stitches as follows: Work * 1 stitch in stocking stitch, work the next stitch together with the first/next stitch from the shoulder, place the 2 stitches back on the left needle, with the strand loosely on the back side of piece*, work from *-* until all the shoulder stitches are worked together with the 2 cast-on stitches. Cast off the 2 stitches. Work the other shoulder in the same way. SLEEVES: Cast on 60-60-60-72-72-72 stitches with double pointed needles size 4 mm and 1 strand of each quality. Knit 1 round. Insert 1 marker at the beginning of the round. Work * A.1 then A.2 *, work from *-* over all stitches. When A.1 and A.2 are finished in height there are 50-50-50-60-60-60 stitches. Repeat A.1a and A.2a in height until A.2a has been worked a total of 2 times (A.1a = 4 times). Knit 1 round and decrease 2-2-2-4-4-4 stitches evenly spaced = 48-48-48-56-56-56 stitches. Change to double pointed needles size 5 mm. Purl 1 round. Work 1 ridge. Work A.7 over all stitches. Repeat A.7 in height to finished length. When the sleeve measures 14-14-13-13-13-12 cm, increase 1 stitch on each side of the marker – read INCREASE TIP. Increase like this every 4½-3½-3-3½-2½-2 cm a total of 6-8-10-7-9-11 times = 60-64-68-70-74-78 stitches. The increased stitches are worked into the pattern. When the sleeve measures 45-45-44-43-42-40 cm, work back and forth from the marker for the sleeve cap. Cast off when the sleeve measures 46-46-46-45-45-45 cm (a split of 1-1-2-2-3-5 cm at the top of the sleeve). Work the other sleeve in the same way. ASSEMBLY: Sew the shoulder seams inside 1 stitch on the I-cord edge. Sew the sleeve cap to the armhole - see sketch. DOUBLE NECK: Start at one shoulder seam and knit up from the right side 80 to 105 stitches around the neck (including the stitches from the thread) using short circular needle size 4 mm and 1 strand of each quality. The stitch number should be divisible by 5. Work rib (purl 3, knit 2) for 10 cm. Cast off with knit over knit and purl over purl, using needle size 5 mm (to avoid the cast-off edge being tight). Fold the neck double to the inside and sew down. To avoid the neck being tight and rolling outwards, it is important that the seam is elastic. |
|||||||||||||||||||||||||||||||||||||
Diagram explanations |
|||||||||||||||||||||||||||||||||||||
|
|||||||||||||||||||||||||||||||||||||
 |
|||||||||||||||||||||||||||||||||||||
 |
|||||||||||||||||||||||||||||||||||||
 |
|||||||||||||||||||||||||||||||||||||
 |
|||||||||||||||||||||||||||||||||||||
 |
|||||||||||||||||||||||||||||||||||||
Have you finished this pattern?Tag your pictures with #dropspattern #fabledharboursweater or submit them to the #dropsfan gallery. Do you need help with this pattern?You'll find 44 tutorial videos, a Comments/Questions area and more by visiting the pattern on garnstudio.com. © 1982-2026 DROPS Design A/S. We reserve all rights. This document, including all its sub-sections, has copyrights. Read more about what you can do with our patterns at the bottom of each pattern on our site. |
|||||||||||||||||||||||||||||||||||||


With over 40 years in knitting and crochet design, DROPS Design offers one of the most extensive collections of free patterns on the internet - translated to 17 languages. As of today we count 325 catalogues and 12298 patterns translated into English (UK/cm).
We work hard to bring you the best knitting and crochet have to offer, inspiration and advice as well as great quality yarns at incredible prices! Would you like to use our patterns for other than personal use? You can read what you are allowed to do in the Copyright text at the bottom of all our patterns. Happy crafting!
Post a comment to pattern DROPS 241-9
We would love to hear what you have to say about this pattern!
If you want to leave a question, please make sure you select the correct category in the form below, to speed up the answering process. Required fields are marked *.