
Popular categories
Looking for a yarn?


Comments / Questions (59)
![]() Hanne wrote:
Hanne wrote:
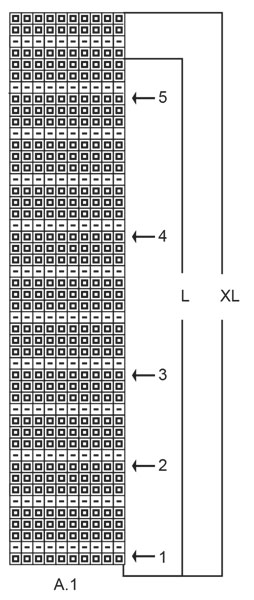
Hej. Jeg er i gang med at strikke den fine bluse, men jeg har fået et problem nu, hvor jeg er færdig med at strikke A2. Jeg strikker str L og har senest taget 14 m ud jævnt fordelt - og har nu 290 m på omgangen. MEN i opskriften står der, at jeg skal have 336 masker. Hvordan skulle det være gået til?
17.02.2019 - 09:17DROPS Design answered:
Hei Hanne. Når du har strikket A.2 i gang i høyden har du økt totalt 4 masker i hver rapport av A.2 (2 masker økt på 1 omgang og 2 masker økt på 21 omgang). Det vil si du har økt totalt 92 masker (4 masker x 23 rapporter). I tillegg øker du 14 masker jevnt fordelt på nest siste omgang. Det vil si du har 230 + 92 + 14 = 336 masker når A.2 er strikket 1 gang i høyden. Kan det være du har glemt å øke 4 masker i hver rapport på en av økeomgangene? God fornøyelse.
20.02.2019 - 15:29
![]() Ulrike Müller wrote:
Ulrike Müller wrote:
Da kommt man aber nicht auf die angegebenen Maschen Zahl
06.02.2019 - 17:32
![]() Ulrike Muller wrote:
Ulrike Muller wrote:
Wie werden die zunahmen in der strickschrift a1 Größe L gestrickt bei den Pfeilen
06.02.2019 - 10:39DROPS Design answered:
Liebe Frau Muller, hier wird erklärt wie man regelmäßig zunimmt. Viel Spaß beim stricken!
06.02.2019 - 14:14
![]() Tove wrote:
Tove wrote:
Er der ikke en fejl i opskriften? Under for og bagstykke står der, Skift til rundpind strik rib * strik 1ret, og 2 retmasker* fortsæt fra * *. Det samme under ærmerne.
17.01.2019 - 14:07DROPS Design answered:
Hei Tove. Om du ser på bildet ser du at det er slik det er strikket: 1 maske rett, 2 masker rettstrikk. Vrangborden nederst på bolen er ikke lik som vrangborden rundt halsen, hvis det var det du mente. Men det er selvfølgelig ikke noe i veien for at du strikker vrangbordene like om du heller ønsker det. God fornøyelse.
23.01.2019 - 15:04
![]() Catherine wrote:
Catherine wrote:
Bonjour, comment faire pour ne pas avoir de démarcation entre 2 tours de côtes au point mousse ? Merci de votre réponse.
07.01.2019 - 07:04DROPS Design answered:
Bonjour Catherine, en serrant légèrement le fil (suffisamment pour resserrer les côtes mousse sans resserrer tous les rangs), la démarcation devrait être presque invisible. Bon tricot!
07.01.2019 - 12:12
![]() Rita wrote:
Rita wrote:
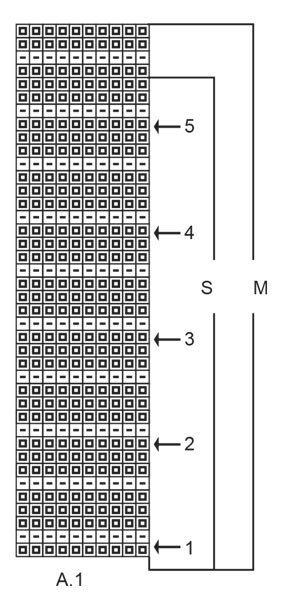
Buongiorno...avrei necessità di capire meglio il passaggio dal diagramma A1 al diagramma A2 nel senso che non mi torna il conto delle maglie. Sto seguendo la taglia m del progetto e da 220 maglie non riesco a capire come si arriva a 320.... se considero gli aumenti dei gettati che vedo in A1 il conto non mi torna. Ringrazio tantissimo a presto Rita
26.10.2018 - 08:49DROPS Design answered:
Buongiorno Rita. Quando inizia a lavorare il diagramma A2, ogni ripetizione è formata da 10 maglie. Quindi ripete il diagramma A2 22 volte. Alla fine del diagramma A2, ogni ripetizione è formata da 14 maglie. Quindi 14 m x 22 ripetizioni = 308 m. A queste deve aggiungere le 12 m che aumenta al penultimo giro del diagramma A2: 308 + 12 = 320 m. Buon lavoro!
26.10.2018 - 09:06
![]() Sibille L. wrote:
Sibille L. wrote:
Ich habe das Modell in Größe M nach Anleitung bis zum Ende von A 2. gestrickt. Punkt Nr. Die Zunahmen nach Beschreibung sieht man deutlich. 2. Am Ende von A 2. hat man 220 Maschen. Laut Anleitung soll man 12 Maschen gleichmässig verteilt zunehmen. Danach soll man 320 Maschen auf der Nadel haben. Wie soll das gehen?
25.10.2018 - 14:05DROPS Design answered:
Liebe Sibille, die Umschläge sollen nicht zu locker gestrickt, gerne dürfen Sie eine andere Zunahmentechnik stricken, wenn Sie es möchten. A.2 wird über 220 Maschen gestrickt (= 10 Maschen x 22 Mal) - bei der 1. Reihe in A.2 werden 2 Maschen in jedem Rapport zugenommen = 12 M in jedem A.2 (12 M x 22 = 264 M.). Dann werden 2 neuen Maschen in jedem A.2 bei der 21. Reihe (= 14 M x 22 = 308 M), und in der vorletztenden Runde von A.2 werden 12 M. regelmäßig zugenommne = 308+12= 320 M. Viel Spaß beim stricken!
25.10.2018 - 14:53
![]() Lisbeth Gille wrote:
Lisbeth Gille wrote:
Tak for jeres svar: Hej Lisbeth, nej desværre, men vi sætter den på ønskelisten. Du kan jo prøve at finde en bluse til børn i garngruppe A og så sætte mønsteret ind på bærestykket. Jeg har ikke brug for at sætte mønster ind i bærestykket men en bluse, der er strikket oppefra og ned
17.09.2018 - 17:37
![]() Grete B Persson wrote:
Grete B Persson wrote:
Hei - forsøker å strikke denne flotte genseren men forstår ikke oppskriften. På bærestykket står det at det skal strikkes mønster A1 og økes 5 ganger til 260 masker (str XXL). På nest siste omgangen skal det med 12 masker til 376 masker. Hva skjer i mellom 260 masker og 376 masker? Håper på hjelp til å forstå dette da genseren er så utrolig fin. Tusen takk
13.09.2018 - 22:13DROPS Design answered:
Hei Grete. Etter at du har strikket A.1 skal det strikkes etter A.2. Når A.2 er strikket 1 gang i høyden har du økt 4 masker per rapprt = 104 masker økt i str XXL. Økningene er markert som kast på den 1 og den 21 omgangen i diagrammet. Da har du 364 masker på pinnen når A.2 er strikket 1 gang i høyden, og så øker du 12 masker jevnt fordelt = 376 masker. God fornøyelse.
17.09.2018 - 14:16
![]() Lisbeth Gille wrote:
Lisbeth Gille wrote:
Daisy Delight by DROPS Design: Findes denne model i Baby Merino til børn ca str. 10 år ?
13.09.2018 - 08:50DROPS Design answered:
Hej Lisbeth, nej desværre, men vi sætter den på ønskelisten. Du kan jo prøve at finde en bluse til børn i garngruppe A og så sætte mønsteret ind på bærestykket. God fornøjelse!
17.09.2018 - 13:01
|
||||||||||||||||||||||
Daisy Delight#daisydelightsweater |
||||||||||||||||||||||
 |
 |
|||||||||||||||||||||
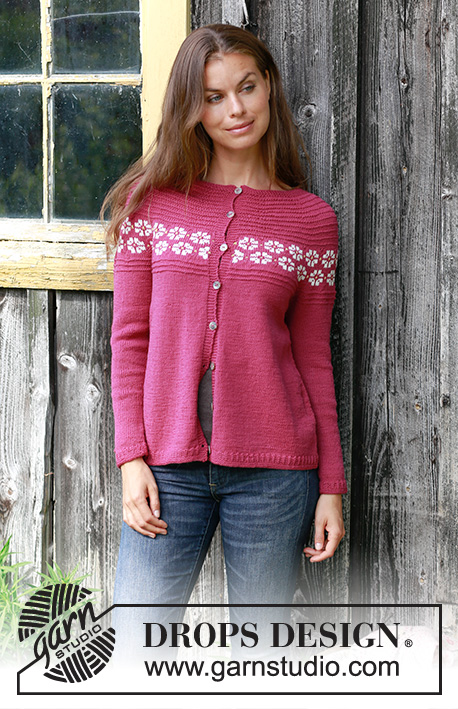
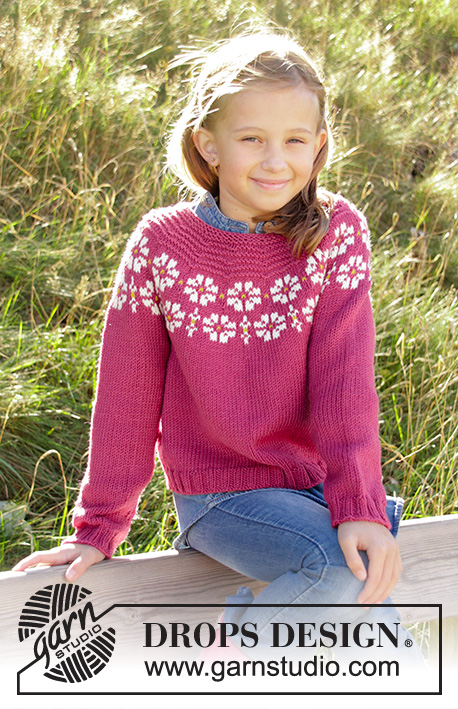
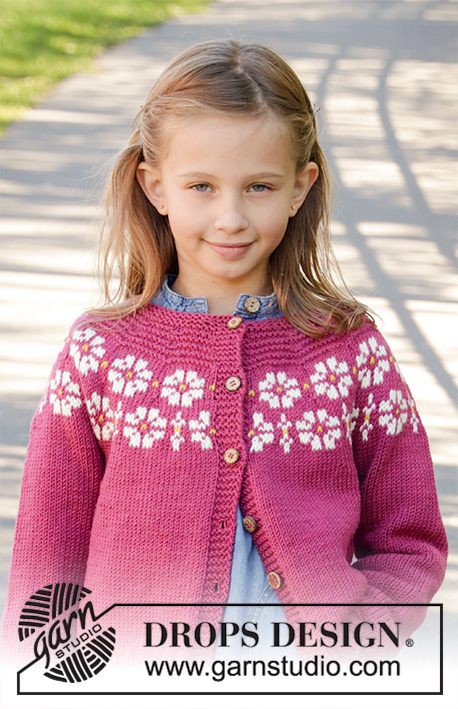
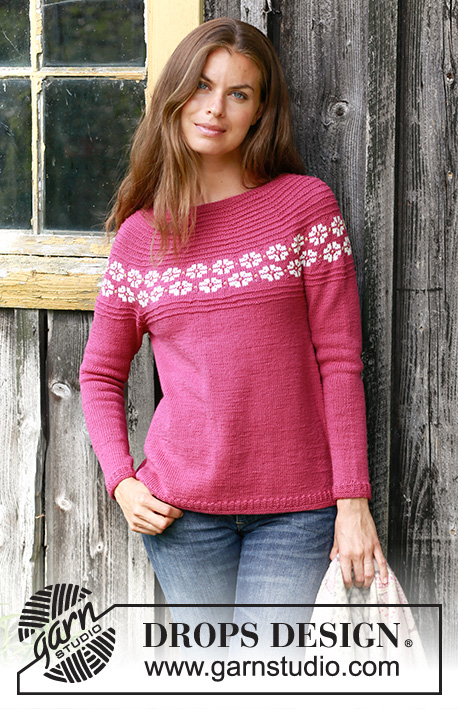
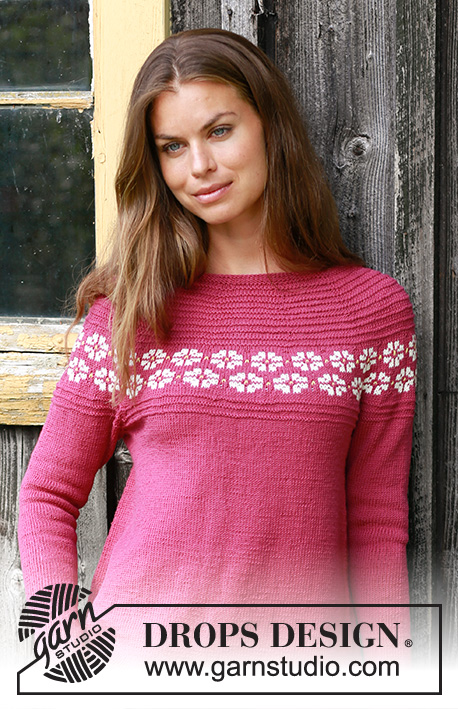
Knitted jumper with round yoke in DROPS BabyMerino. Piece is knitted top down with Nordic pattern and garter stitch. Size: S - XXXL
DROPS 196-2 |
||||||||||||||||||||||
|
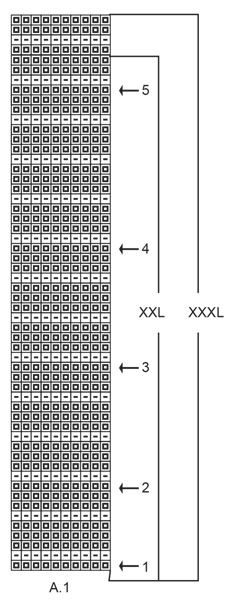
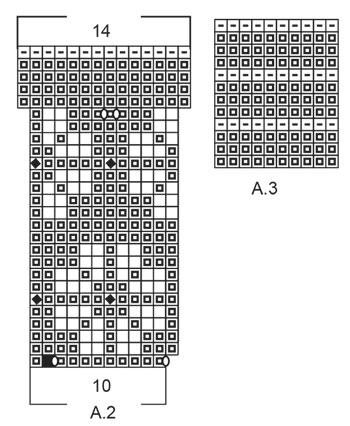
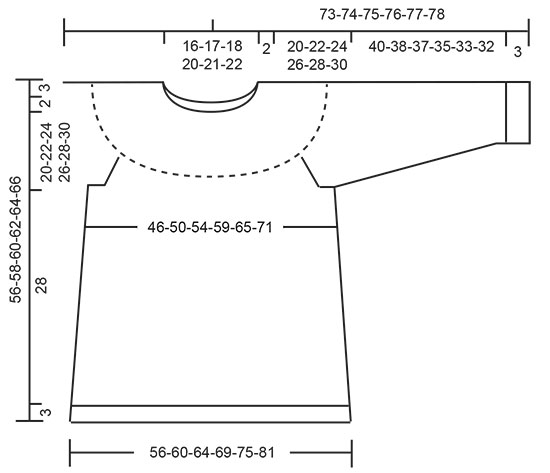
EXPLANATION FOR THE PATTERN: ---------------------------------------------------------- GARTER STITCH (worked in the round): 1 ridge = 2 rounds. Knit 1 round and purl 1 round. PATTERN: See diagrams A.1 to A.3. Choose diagram for your size (applies to A.1). KNITTING TIP: To avoid the garment losing elasticity when working pattern, it is important not to tighten the strands on back side of piece. Switch to a higher needle number when working pattern if the pattern is somewhat tight. INCREASE TIP-1 (evenly): To calculate how to increase evenly, use the total number of stitches on row (e.g. 106 stitches) and divide stitches by number of increases to be done (e.g. 4) = 26.5. In this example increase by making 1 yarn over after alternately every 26th and 27th stitch. On next round work yarn over twisted to avoid hole. INCREASE TIP-2 (applies to sides of body): Work until 8 stitches remain before marker thread, make 1 yarn over, knit 16 (marker thread is in the middle of these stitches), make 1 yarn over. On next round knit yarn over twisted to avoid holes. ELEVATION: Insert a marker thread mid back = beginning of round. Begin from right side with plum and work in stocking stitch until 8-8-8-9-9-10 stitches have been worked past marker, turn, tighten yarn and work 16-16-16-18-18-20 stitches in stocking stitch. Turn, tighten yarn and work 24-24-24-27-27-30 stitches in stocking stitch, turn, tighten yarn and work 32-32-32-36-36-40 stitches in stocking stitch, turn, tighten yarn and work until mid back. RAGLAN: Increase 1 stitch on each side of every marker thread (= 8 stitches increased on round) as follows: Work until 1 stitch remains before marker thread, make 1 yarn over, knit 2 (marker thread is between these stitches), make 1 yarn over. Repeat at the other marker threads. On next round work yarn overs twisted to avoid holes. DECREASE TIP (applies to sleeves): Decrease 1 stitch on each side of marker thread as follows: Work until 3 stitches remain before marker thread and knit 2 together, knit 2 (marker thread is between these stitches), slip 1 stitch knitwise, knit 1, pass slipped stitch over stitch worked. ---------------------------------------------------------- START THE PIECE HERE: ---------------------------------------------------------- JUMPER - SHORT OVERVIEW OF THE PIECE: Worked in the round on circular needle, top down. Work sleeves in the round on double pointed needles/a short circular needle. NECK EDGE: Cast on 106-110-115-125-130-134 stitches on a short circular needle size 2.5 mm with plum. Work 5 ridges in GARTER STITCH - read explanation above. YOKE: Switch to circular needle size 3 mm. Knit 1 round while increasing 4-10-15-15-20-26 stitches evenly - read INCREASE TIP-1 = 110-120-130-140-150-160 stitches. Knit 1 round (all stitches are knitted twisted to avoid holes). For better fit work an elevation at the back of neck so that yoke is somewhat higher on back piece. This elevation can be skipped, to make the neck the same at the front and back - read ELEVATION. Insert 9-10-10-10-11-11 marker threads in piece without working as follows: Insert first marker thread after 7-6-7-7-5-5 stitches, insert each of the next 8-9-9-9-10-10 marker threads after 12-12-13-14-14-15 stitches, 7-6-6-7-5-5 stitches remain on round after last marker thread. Move the marker threads upwards when working. Now work pattern A.1 (choose diagram for your size) the entire round – read KNITTING TIP, AT THE SAME TIME on every round with arrow in diagram increase on each side of marker threads as follows: REMEMBER THE KNITTING TENSION! ARROW-1: Increase 1 stitch on each side of every marker thread (= 18-20-20-20-22-22 stitches increased) = 128-140-150-160-172-182 stitches. ARROW-2: Increase 1 stitch on each side of every marker thread (= 18-20-20-20-22-22 stitches increased) = 146-160-170-180-194-204 stitches. ARROW-3: Increase 1 stitch on each side of every marker thread (= 18-20-20-20-22-22 stitches increased) = 164-180-190-200-216-226 stitches. ARROW-4: Increase 1 stitch on each side of every marker thread (= 18-20-20-20-22-22 stitches increased) = 182-200-210-220-238-248 stitches. ARROW-5: Increase 1 stitch on each side of every marker thread (= 18-20-20-20-22-22 stitches increased) = 200-220-230-240-260-270 stitches. When entire A.1 has been worked vertically, piece measures approx. 11-12-13-14-15-16 cm from cast-on edge and down mid front. Remove the marker threads. Now work pattern A.2 (= 20-22-23-24-26-27 repetitions of 10 stitches) in the round. On next to last round in A.2 increase 10-12-14-16-12-12 stitches evenly = 290-320-336-352-376-390 stitches. When entire A.2 has been worked vertically, piece measures approx. 19-20-21-22-23-24 cm from cast-on edge and down mid front. Now insert 4 marker threads in the piece as follows: Insert 1st marker thread after the first 45-49-51-55-60-64 stitches (= half back piece), insert 2nd marker thread after the next 55-62-66-66-68-67 stitches (= sleeve), insert 3rd marker thread after the next 90-98-102-110-120-128 stitches (= front piece) and insert 4th marker thread after the next 55-62-66-66-68-67 stitches (= sleeve). 45-49-51-55-60-64 stitches remain on round after last marker thread (= half back piece). Now work pattern A.3 in the round, at the same time on first round begin increase for RAGLAN – read explanation above. Increase like this every other round 5-6-8-10-11-13 times in total = 330-368-400-432-464-494 stitches. NOTE: When A.3 has been worked vertically 1 time, continue with stocking stitch until all increases for raglan are done and piece measures 22-24-26-28-30-32 cm from cast-on edge. Work next round as follows: 50-55-59-65-71-77 stitches in stocking stitch (= half back piece), slip the next 65-74-82-86-90-93 stitches on 1 stitch holder for sleeve, cast on 10-10-12-12-14-16 new stitches on row (= in the side under sleeve), work 100-110-118-130-142-154 stitches in stocking stitch (= front piece), slip the next 65-74-82-86-90-93 stitches on 1 stitch holder for sleeve edges, cast on 10-10-12-12-14-16 new stitches on row (= in the side under sleeve) and work the remaining 50-55-59-65-71-77 stitches in stocking stitch (= half back piece). Finish body and sleeves separately. NOW MEASURE THE PIECE FROM HERE! BODY: = 220-240-260-284-312-340 stitches. Insert 1 marker thread in each side in the middle of the 10-10-12-12-14-16 stitches cast on under each sleeve (= 110-120-130-142-156-170 stitches between marker threads). Continue in the round with plum and in stocking stitch. When piece measures 4 cm from division, increase 2 stitches in each side - read INCREASE TIP-2 (= 4 stitches increased). Increase like this approx. every 2 cm 12 times in total = 268-288-308-332-360-388 stitches. Work the new stitches in stocking stitch. When piece measures 28 cm from division, increase 8-12-13-13-15-17 stitches = 276-300-321-345-375-405 stitches. Switch to circular needle size 2.5 mm. Work rib * knit 1, 2 stitches in garter stitch *, work from *-* in the round for 2 cm. Work 2 ridges and cast off. Jumper measures approx. 56-58-60-62-64-66 cm from shoulder and down. SLEEVE: Slip the 65-74-82-86-90-93 stitches from stitch holder in one side of piece on double pointed needles or a short circular needle size 3 mm and pick in addition up 1 stitch in each of the 10-10-12-12-14-16 new stitches cast on under sleeve = 75-84-94-98-104-109 stitches. Insert 1 marker thread in the middle of the 10-10-12-12-14-16 stitches mid under sleeve and begin round here. Continue with plum and in stocking stitch. When piece measures 4 cm, decrease 2 stitches mid under sleeve - read DECREASE TIP. Decrease like this every 8th-6th-5th-4th-4th-3rd round 13-17-21-22-23-24 times in total = 49-50-52-54-58-61 stitches. Continue until piece measures 40-38-37-35-33-32 cm from division (shorter measurements in the larger sizes because of wider neck and longer yoke). Knit 1 round while increasing 2-4-5-6-5-5 stitches evenly = 51-54-57-60-63-66 stitches. Switch to double pointed needles size 2.5 mm. Now work rib * knit 1, 2 stitches in garter stitch *, work from *-* in the round for 2 cm. Work 2 ridges and cast off. Work the other sleeve the same way. |
||||||||||||||||||||||
Diagram explanations |
||||||||||||||||||||||
|
||||||||||||||||||||||
 |
||||||||||||||||||||||
 |
||||||||||||||||||||||
 |
||||||||||||||||||||||
 |
||||||||||||||||||||||
 |
||||||||||||||||||||||
Have you finished this pattern?Tag your pictures with #dropspattern #daisydelightsweater or submit them to the #dropsfan gallery. Do you need help with this pattern?You'll find 29 tutorial videos, a Comments/Questions area and more by visiting the pattern on garnstudio.com. © 1982-2026 DROPS Design A/S. We reserve all rights. This document, including all its sub-sections, has copyrights. Read more about what you can do with our patterns at the bottom of each pattern on our site. |
||||||||||||||||||||||


With over 40 years in knitting and crochet design, DROPS Design offers one of the most extensive collections of free patterns on the internet - translated to 17 languages. As of today we count 325 catalogues and 12298 patterns translated into English (UK/cm). 12298
We work hard to bring you the best knitting and crochet have to offer, inspiration and advice as well as great quality yarns at incredible prices! Would you like to use our patterns for other than personal use? You can read what you are allowed to do in the Copyright text at the bottom of all our patterns. Happy crafting!
Post a comment to pattern DROPS 196-2
We would love to hear what you have to say about this pattern!
If you want to leave a question, please make sure you select the correct category in the form below, to speed up the answering process. Required fields are marked *.