
Popular categories
Looking for a yarn?


Comments / Questions (33)
![]() Jude wrote:
Jude wrote:
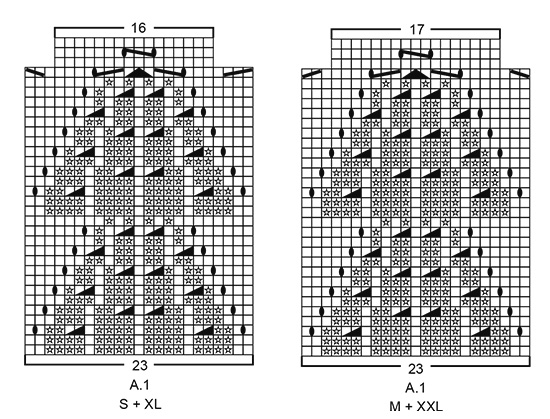
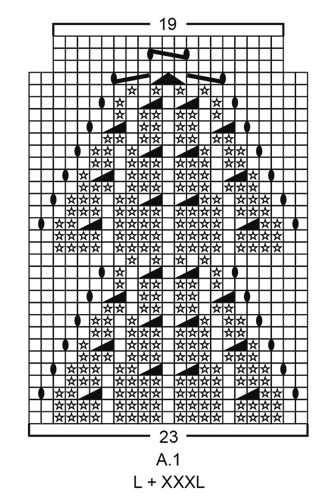
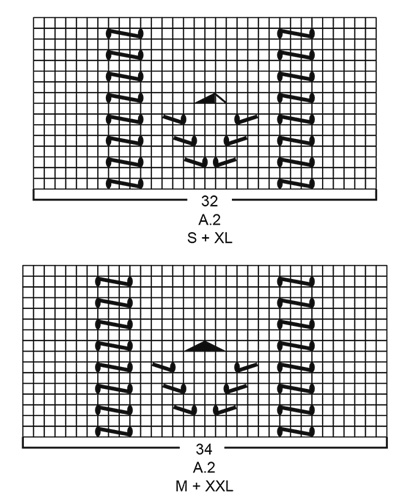
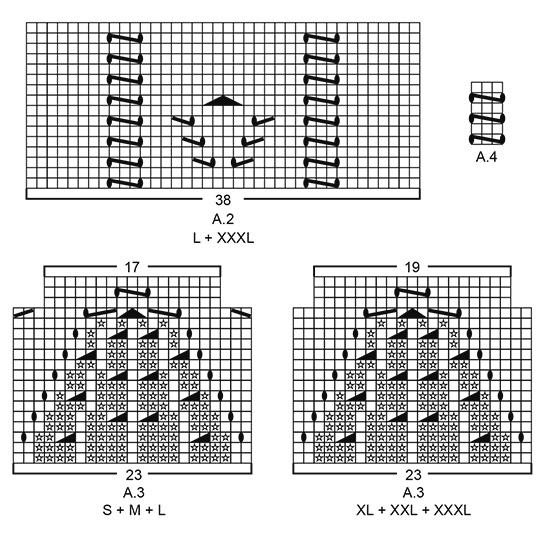
I am puzzled by the last 3 lines of the chart A1 and charts A2 and A3 as the symbols show there (with the exception of the central triangle on A1) are not described in the diagram explanations. Also the last diagram explanation -describd as a 3 stitch knot, dos not appear in any of the diagrams A1, A2 or A3. I have tried to guess but this does not resut in the correxct number of stitches remaining. How do you knit these 5 symbols?
27.12.2019 - 12:29DROPS Design answered:
Dear Jude, it looks like the 2 symbols you are missing are the decreases (see 8th and 9th symbol under diagram key): ie decrease 2 stitches and make 1 yarn over. The last symbol of diagram key appears in A.2 size S + XL so it might not apply to the size you are working. Happy knitting!
02.01.2020 - 11:33
![]() Lucia Milti wrote:
Lucia Milti wrote:
Sto facendo la fascia davanti A2 ma vi siete dimenticati di scrivere che il diagramma A2 va fatto di continuo fino al collo? grazie
10.08.2019 - 20:02DROPS Design answered:
Buongiorno Lucia. Viene indicato di proseguire con il motivo, che comporta proseguire lavorando le maglie come sono state impostate in precedenza, quindi continuando con il diagramma. Nello sprone è indicato espressamente di proseguire con il diagramma. Buon lavoro!
10.08.2019 - 20:49
![]() Lucia wrote:
Lucia wrote:
Sto per iniziare questo modello, ho letto i commenti ma non ce ne sono in italiano, ci sono correzioni o posso iniziare le spiegazioni? grazie
19.07.2019 - 18:32DROPS Design answered:
Buongiorno Lucia. Le spiegazioni in linea sono corrette, salvo errori non ancora individuati. Può quindi iniziare il suo lavoro. Per eventuali dubbi o difficoltà può riscriverci. Buon lavoro!
19.07.2019 - 18:44
![]() Liv wrote:
Liv wrote:
Hvordan få vrang over rett i omgang 6. I flg. mønsteret så skal det strikkes 4 rett og 3 vrange og den siste vrange skal komme over en rett fra forrige omgang. Det ble strikket 2 rett og 1 kast rett og så en rett i forrige omgang (altså 4 rett) samme som omgang 6. Det er jo ikke blitt færre masker i omgang 5. Er det mønsteret som ser slik ut mens det som skjer er at maskene blir dratt mot venstre på grunn av at det ble felt vrangmasker i omgang ? Jeg klarer ikke helt å lese mønsteret.
02.06.2019 - 16:52DROPS Design answered:
Hei Liv. Ja det stemmer som du sier: du strikket på forrige omgang 2 rett, 1 kast, 1 rett (=3 rett + 1 kast), så 3 vrang. På neste omgang strikkes 4 rett, og så 3 vrang. Dvs det strikkes rett over de samme 3 maskene som på forrige omgang + kastet, og videre strikkes 3 vrang over de samme maskene som på forrige omgang. God fornøyelse
03.06.2019 - 08:11
![]() Ewa Jansson wrote:
Ewa Jansson wrote:
Finner inte diagram A4 som ska stickas på armen.
04.04.2019 - 18:40DROPS Design answered:
Hej. Du hittar det till höger om diagram A.2 (strl L+XXXL). Lycka till!
05.04.2019 - 07:50
![]() Sve wrote:
Sve wrote:
Hallo! Ich bin beim Ärmel. Da steht genau über A3 soll ich A4 stricken - wie geht das?
02.10.2018 - 18:30DROPS Design answered:
Liebe Sve, A.4 wird über die 3 mittleren Maschn in A.3 gestrickt, so machen die beiden Löcher eine gerade Linie von A.4 bis Ende. Viel Spaß beim stricken!
03.10.2018 - 07:37
![]() Behrens wrote:
Behrens wrote:
Ich verstehe im Muster A2 den Knoten nicht. Wie muss ich diesen stricken?
07.06.2018 - 23:18DROPS Design answered:
Liebe Frau Behrens, die Knoten im A.2 so stricken: über 4 M; 4 M 4 Mal zusammenstricken: einmal alle 4 M links zsstricken, einmal alle diese 4 M rechts zsstricken, einmal alle diese 4 M noch links zsstricken und endlich noch einmal alle diese 4 M noch rechts zsstricken = es sind wieder 4 M auf der rechten Nadel - es geht mit dem anderen Knoten genauso gleich: 3 M links zsstricken, diese 3 M jetzt rechts zsstricken und diese 3 M noch links zsstricken = es sind 3 M auf der rechten Nadel. Viel Spaß beim stricken!
08.06.2018 - 08:24Oksana wrote:
Me again )) so how about : Is therer exist tutorial video how to work the knot (Work these 4 stitches as follows without dropping them off left needle: Purl 4 together, knit 4 together, purl 4 together, knit 4 together, then drop stitches off left needle)? Thank you!
16.04.2018 - 15:30DROPS Design answered:
Dear Oksana, we do not have any video yet to this technique but your request has been added to our todolist. Happy knitting!
16.04.2018 - 16:16Oksana wrote:
There is no mistake? But it means that in the result you get 8 stiches in the last row of neck edge! Please check again, cause also on cardigan of the same style it is written : Then 1 knit row from right side while decreasing evenly to 136-136-140-150-154-160 stitches. I believe that in the description for jamper (and top as well) there is "TO" omitted. Excuse me and thank you for the verification!
16.04.2018 - 10:22DROPS Design answered:
Dear Oksana, oops you are right, "to" is missing and will be added as soon as possible :) thanks for your feedback! Happy knitting!
16.04.2018 - 12:12
![]() Oksana wrote:
Oksana wrote:
Is therer exist tutorial video how to work the knot (Work these 4 stitches as follows without dropping them off left needle: Purl 4 together, knit 4 together, purl 4 together, knit 4 together, then drop stitches off left needle)? Thank you!
15.04.2018 - 11:11
|
||||||||||||||||||||||||||||||||||
Miss Flora#missflorasweater |
||||||||||||||||||||||||||||||||||
|
|
||||||||||||||||||||||||||||||||||
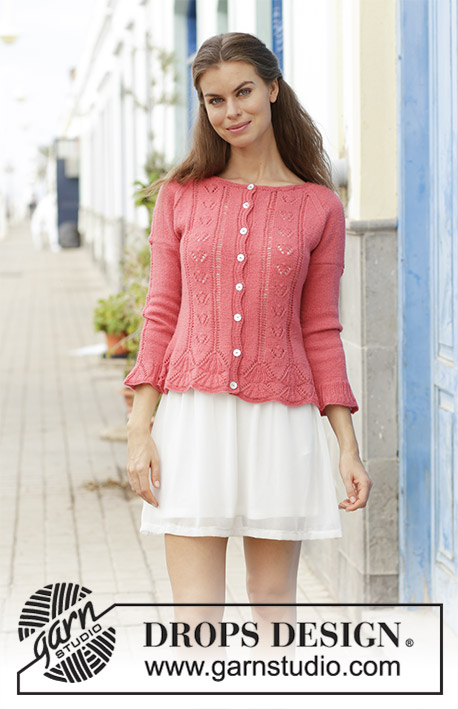
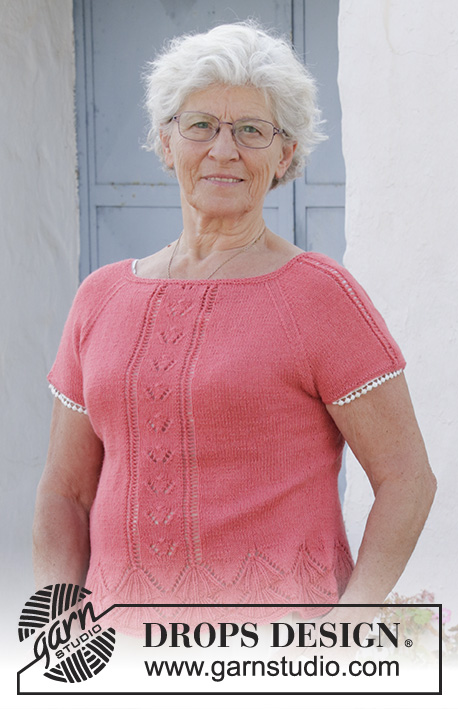
Knitted jumper with lace pattern, raglan and ¾ sleeves. Size: S - XXXL Piece is knitted in DROPS Flora.
DROPS 186-22 |
||||||||||||||||||||||||||||||||||
|
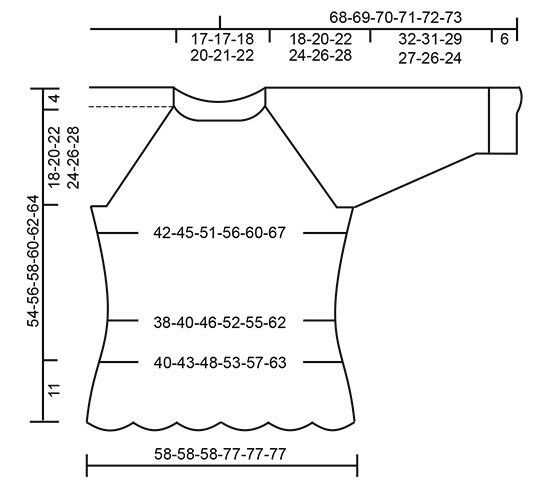
INFORMATION FOR PATTERN: GARTER STITCH (worked in the round): 1 ridge = 2 rounds. Knit 1 round and purl 1 round. PATTERN: See diagrams A.1 to A.4. Choose diagram for your size (applies to A.1, A.2 and A.3). Diagrams show all rows in pattern seen from the right side. KNITTING TIP: If you do not want lace pattern up along mid back, work in stocking stitch over the 32-34-38-32-34-38 stitches in A.2 mid back. DECREASE TIP-1 (applies to sides of body): Begin 4 stitches before marker and knit 2 together, knit 4 (marker thread is in the middle of these 4 stitches), slip 1 stitch knitwise, knit 1, pass slipped stitch over stitch worked (= 2 stitches decreased). DECREASE TIP-2 (evenly): To calculate how to decrease evenly, use the total number of stitches on row (e.g. 128 stitches) and divide stitches by number of decreases to be done (e.g. 8) = 16. In this example knit approx. every 15th and 16th stitch together. INCREASE TIP (applies to sides on body and mid under sleeves): Begin 3 stitches before marker thread, make 1 yarn over, knit 6 (marker thread is in the middle of these 6 stitches), make 1 yarn over (= 2 stitches increased). On next round knit yarn overs twisted to avoid holes. RAGLAN: Decrease for raglan on each side of the 4 marker threads in every transition between body and sleeves (= 8 stitches decreased on every decrease round). Begin 3 stitches before marker and knit 2 together, knit 2 (marker thread is in the middle of these 2 stitches), slip 1 stitch knitwise, knit 1, pass slipped stitch over stitch worked (= 2 stitches decreased). ---------------------------------------------------------- JUMPER: Body is worked in the round on circular needle, bottom up. Sleeves are worked in the round on double pointed needles/a short circular needle, bottom up. Then slip body and sleeves together and finish yoke in the round on circular needle up to neck decrease. Then work piece back and forth on circular needle up to neck edge. BODY: Cast on somewhat loosely 276-276-276-368-368-368 stitches on circular needle size 3 mm with Flora. Work 2 ridges in GARTER STITCH - see explanation above. Knit 2 rounds. Then work A.1 in the round (= 12-12-12-16-16-16 repetitions of 23 stitches). Continue pattern like this. REMEMBER THE KNITTING TENSION! When A.1 has been worked, there are 192-204-228-256-272-304 stitches on needle. Insert 1 marker thread at beginning of round and 1 marker thread after 96-102-114-128-136-152 stitches (= in the sides - move the marker threads when working). Work next round as follows: Work 32-34-38-48-51-57 stitches in stocking stitch, A.2 (= 32-34-38-32-34-38 stitches mid front), 64-68-76-96-102-114 stitches in stocking stitch, A.2 (= 32-34-38-32-34-38 stitches mid back – read KNITTING TIP) and finish with 32-34-38-48-51-57 stitches in stocking stitch. Continue pattern like this. AT THE SAME TIME when piece measures 12 cm on the shortest, decrease 1 stitch on each side of both marker threads - read DECREASE TIP-1 (= 4 stitches decreased). Decrease like this every 2-2-4-4-4-4 cm a total of 3-3-2-2-2-2 times in each side = 180-192-220-248-264-296 stitches. When piece measures 22-20-20-22-20-20 cm, increase 1 stitch on each side of both marker threads – read INCREASE TIP (= 4 stitches increased). Increase like this every 2 cm 5-6-6-5-6-6 times in total in each side = 200-216-244-268-288-320 stitches. Work until piece measures 32 cm on the shortest in all sizes. Work next round as follows: Cast off 5-5-6-6-7-8 stitches for armhole, work 90-98-110-122-130-144 stitches as before (= front piece), cast off 10-10-12-12-14-16 stitches for armhole, work 90-98-110-122-130-144 stitches as before (= back piece) and cast off the remaining 5-5-6-6-7-8 stitches for armhole. Put piece aside and work the sleeves. SLEEVE: Cast on 87-87-87-95-95-95 stitches on double pointed needles or a short circular needle size 3 mm with Flora. Work 2 ridges in GARTER STITCH in the round - see explanation above. Insert 1 marker thread at beginning of round (= mid under sleeve). Work next round as follows: * Knit 1, purl 3 *, work from *-* 8-8-8-9-9-9 times in total, work A.3 (= 23 stitches), * purl 3, knit 1 *, work from *-* 8-8-8-9-9-9 times in total. Continue with rib and pattern like this. When piece measures 2 cm on the shortest, decrease all purl 3 to purl 2 by purling 2 together in every rib section = 71-71-71-77-77-77 stitches. When A.3 has been worked, there are 65-65-65-73-73-73 stitches on needle. Then work in stocking stitch in the round, but continue A.4 over A.3 until finished measurements. AT THE SAME TIME when piece measures 8 cm on the shortest, increase 2 stitches mid under sleeve - read INCREASE TIP. Increase like this 6-10-14-13-15-18 times in total in S: On every 18th round, in M: On every 9th round, in L and XL: On every 6th round, in XXL: On every 5th round, and in XXXL: On alternately every 3rd and every 4th round = 77-85-93-99-103-109 stitches. When sleeve measures 38-37-35-33-32-30 cm (shorter measurements in the larger sizes because of longer yoke), cast off 10-10-12-12-14-16 stitches mid under sleeve (cast off 5-5-6-6-7-8 stitches on each side of marker thread) = 67-75-81-87-89-93 stitches remain on needle. Put piece aside and knit the other sleeve the same way. YOKE: Slip sleeves on to same needle as body where armholes were cast off (without working the stitches first) = 314-346-382-418-438-474 stitches on needle. Remove the marker threads in piece. Insert 1 marker thread in every transition between body and sleeves (= 4 new marker threads). Continue in the round with stocking stitch and A.2 as before, continue in addition A.4 over the middle 3 stitches on each sleeve. When 2 rounds have been worked, begin decrease for RAGLAN on next round – see explanation above. Decrease for raglan every 4th round 6-5-4-4-6-7 times in total, and then every other round 17-22-27-30-30-31 times in total. AT THE SAME TIME when piece measures 48-50-52-54-56-58 cm, slip the middle 26-26-30-36-40-50 stitches mid front on 1 stitch holder for neck. Continue back and forth as before with decrease for raglan on every row from right side. In addition cast off for neck at beginning of every row in each side as follows: Cast off 3 stitches 1 time and 2 stitches 1 time. Then cast off 1 stitch at the beginning of every row in each side until decreases for raglan are finished. After all decreases for raglan and cast offs for neck, approx. 90-90-90-96-96-106 stitches remain on needle. NECK EDGE: Pick up from right side approx. 128-128-132-144-148-168 stitches around the neck (including stitches on stitch holder at the front) on a circular needle size 2.5 mm. Purl 1 round. Then knit 1 round while decreasing evenly to 120-120-124-134-138-144 stitches – read DECREASE TIP-2. Purl 1 round, knit 1 round and purl 1 round. Cast off by knitting. Jumper measures approx. 54-56-58-60-62-64 cm from shoulder and down. ASSEMBLY: Sew the openings under the sleeves. |
||||||||||||||||||||||||||||||||||
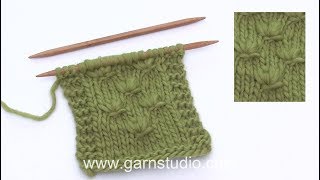
Diagram explanations |
||||||||||||||||||||||||||||||||||
|
||||||||||||||||||||||||||||||||||
 |
||||||||||||||||||||||||||||||||||
 |
||||||||||||||||||||||||||||||||||
 |
||||||||||||||||||||||||||||||||||
 |
||||||||||||||||||||||||||||||||||
 |
||||||||||||||||||||||||||||||||||
Have you finished this pattern?Tag your pictures with #dropspattern #missflorasweater or submit them to the #dropsfan gallery. Do you need help with this pattern?You'll find 38 tutorial videos, a Comments/Questions area and more by visiting the pattern on garnstudio.com. © 1982-2026 DROPS Design A/S. We reserve all rights. This document, including all its sub-sections, has copyrights. Read more about what you can do with our patterns at the bottom of each pattern on our site. |
||||||||||||||||||||||||||||||||||


With over 40 years in knitting and crochet design, DROPS Design offers one of the most extensive collections of free patterns on the internet - translated to 17 languages. As of today we count 324 catalogues and 12290 patterns translated into English (UK/cm). 12290
We work hard to bring you the best knitting and crochet have to offer, inspiration and advice as well as great quality yarns at incredible prices! Would you like to use our patterns for other than personal use? You can read what you are allowed to do in the Copyright text at the bottom of all our patterns. Happy crafting!
Post a comment to pattern DROPS 186-22
We would love to hear what you have to say about this pattern!
If you want to leave a question, please make sure you select the correct category in the form below, to speed up the answering process. Required fields are marked *.