DROPS Flora
DROPS Flora
65% Wool, 35% Alpaca
from 2.40 £ /50g
Get the yarn to make this pattern from 12.00£.

The yarn cost is calculated from the pattern’s smallest size and the yarn’s cheapest product type. Looking for an even better price? You might find it on the DROPS Deals!

DROPS SS24

Miss Flora

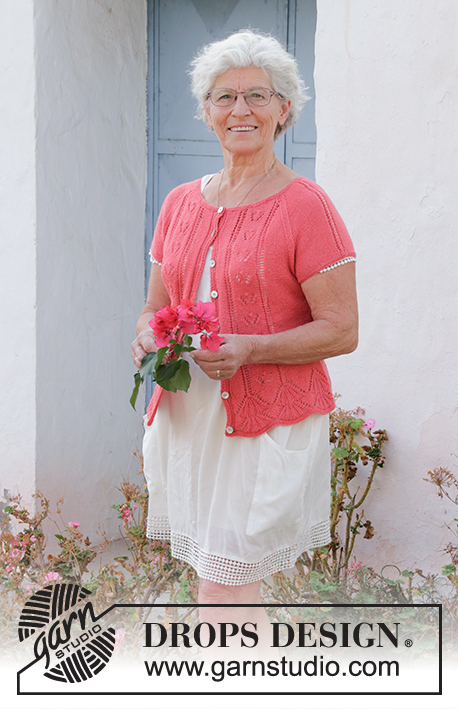
Knitted jumper with lace pattern, raglan and ¾ sleeves. Size: S - XXXL Piece is knitted in DROPS Flora.

DROPS 186-22
DROPS design: Pattern fl-026
Yarn group A
----------------------------------------------------------
Size: S - M - L - XL - XXL - XXXL
Materials:
DROPS FLORA from Garnstudio (belongs to yarn group A)
250-300-300-350-400-400 g colour 19, coral

Piece can also be knitted with yarn from:
“Alternative yarn (yarn group A)” - see link below.

DROPS DOUBLE POINTED NEEDLES AND CIRCULAR NEEDLE (40 + 60 or 80 cm) SIZE 3 mm – or size needed to get 24 stitches and 32 rows in stocking stitch = width 10 cm and 10 cm vertically.

DROPS CIRCULAR NEEDLE (40 cm) SIZE 2.5 mm – for edge in garter stitch in the neck.
----------------------------------------------------------

-------------------------------------------------------

Alternative Yarn – See how to change yarns here
Yarn Groups A to F – Use the same pattern and change the yarn here
Yarn usage using an alternative yarn – Use our yarn converter here

-------------------------------------------------------

DROPS Flora
DROPS Flora
65% Wool, 35% Alpaca
from 2.40 £ /50g
Get the yarn to make this pattern from 12.00£.

The yarn cost is calculated from the pattern’s smallest size and the yarn’s cheapest product type. Looking for an even better price? You might find it on the DROPS Deals!

Pattern instructions

NOTE: This pattern is written in British English. All measurements in charts are in cm. For conversion from cm to inches - click here. There are different terms for crocheting in British and American English. If this pattern includes crochet, click for "crochet terms" here. For this pattern in American English, please click here.
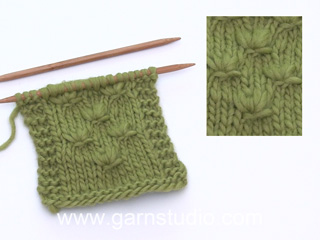
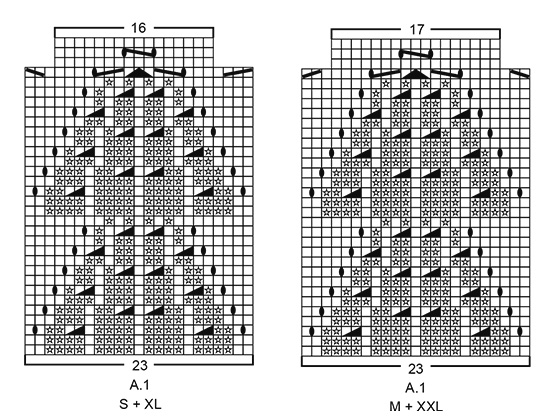
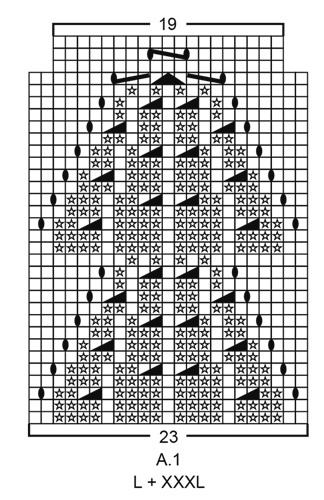
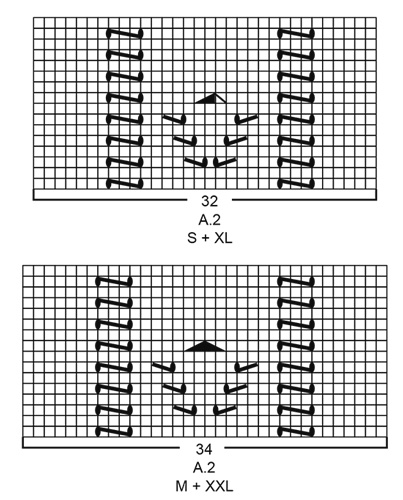
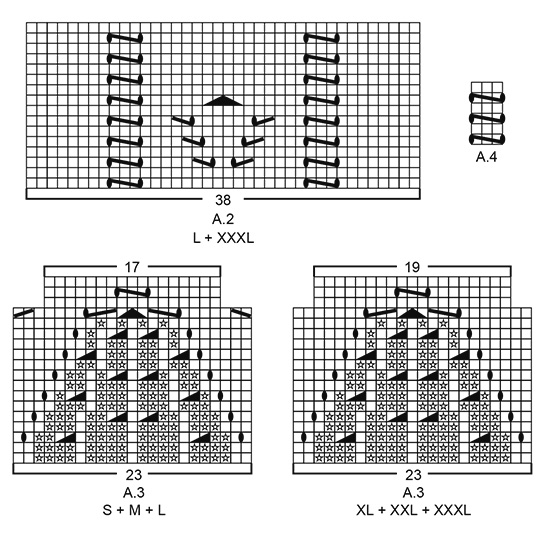
INFORMATION FOR PATTERN:

GARTER STITCH (worked in the round):
1 ridge = 2 rounds. Knit 1 round and purl 1 round.

PATTERN:
See diagrams A.1 to A.4. Choose diagram for your size (applies to A.1, A.2 and A.3).
Diagrams show all rows in pattern seen from the right side.

KNITTING TIP:
If you do not want lace pattern up along mid back, work in stocking stitch over the 32-34-38-32-34-38 stitches in A.2 mid back.

DECREASE TIP-1 (applies to sides of body):
Begin 4 stitches before marker and knit 2 together, knit 4 (marker thread is in the middle of these 4 stitches), slip 1 stitch knitwise, knit 1, pass slipped stitch over stitch worked (= 2 stitches decreased).

DECREASE TIP-2 (evenly):
To calculate how to decrease evenly, use the total number of stitches on row (e.g. 128 stitches) and divide stitches by number of decreases to be done (e.g. 8) = 16.
In this example knit approx. every 15th and 16th stitch together.

INCREASE TIP (applies to sides on body and mid under sleeves):
Begin 3 stitches before marker thread, make 1 yarn over, knit 6 (marker thread is in the middle of these 6 stitches), make 1 yarn over (= 2 stitches increased). On next round knit yarn overs twisted to avoid holes.

RAGLAN:
Decrease for raglan on each side of the 4 marker threads in every transition between body and sleeves (= 8 stitches decreased on every decrease round).
Begin 3 stitches before marker and knit 2 together, knit 2 (marker thread is in the middle of these 2 stitches), slip 1 stitch knitwise, knit 1, pass slipped stitch over stitch worked (= 2 stitches decreased).
----------------------------------------------------------

JUMPER:
Body is worked in the round on circular needle, bottom up. Sleeves are worked in the round on double pointed needles/a short circular needle, bottom up. Then slip body and sleeves together and finish yoke in the round on circular needle up to neck decrease. Then work piece back and forth on circular needle up to neck edge.

BODY:
Cast on somewhat loosely 276-276-276-368-368-368 stitches on circular needle size 3 mm with Flora. Work 2 ridges in GARTER STITCH - see explanation above. Knit 2 rounds. Then work A.1 in the round (= 12-12-12-16-16-16 repetitions of 23 stitches). Continue pattern like this. REMEMBER THE KNITTING TENSION!
When A.1 has been worked, there are 192-204-228-256-272-304 stitches on needle. Insert 1 marker thread at beginning of round and 1 marker thread after 96-102-114-128-136-152 stitches (= in the sides - move the marker threads when working).
Work next round as follows: Work 32-34-38-48-51-57 stitches in stocking stitch, A.2 (= 32-34-38-32-34-38 stitches mid front), 64-68-76-96-102-114 stitches in stocking stitch, A.2 (= 32-34-38-32-34-38 stitches mid back – read KNITTING TIP) and finish with 32-34-38-48-51-57 stitches in stocking stitch. Continue pattern like this.
AT THE SAME TIME when piece measures 12 cm on the shortest, decrease 1 stitch on each side of both marker threads - read DECREASE TIP-1 (= 4 stitches decreased). Decrease like this every 2-2-4-4-4-4 cm a total of 3-3-2-2-2-2 times in each side = 180-192-220-248-264-296 stitches.
When piece measures 22-20-20-22-20-20 cm, increase 1 stitch on each side of both marker threads – read INCREASE TIP (= 4 stitches increased). Increase like this every 2 cm 5-6-6-5-6-6 times in total in each side = 200-216-244-268-288-320 stitches.
Work until piece measures 32 cm on the shortest in all sizes.
Work next round as follows: Cast off 5-5-6-6-7-8 stitches for armhole, work 90-98-110-122-130-144 stitches as before (= front piece), cast off 10-10-12-12-14-16 stitches for armhole, work 90-98-110-122-130-144 stitches as before (= back piece) and cast off the remaining 5-5-6-6-7-8 stitches for armhole.
Put piece aside and work the sleeves.

SLEEVE:
Cast on 87-87-87-95-95-95 stitches on double pointed needles or a short circular needle size 3 mm with Flora. Work 2 ridges in GARTER STITCH in the round - see explanation above. Insert 1 marker thread at beginning of round (= mid under sleeve).
Work next round as follows: * Knit 1, purl 3 *, work from *-* 8-8-8-9-9-9 times in total, work A.3 (= 23 stitches), * purl 3, knit 1 *, work from *-* 8-8-8-9-9-9 times in total. Continue with rib and pattern like this.
When piece measures 2 cm on the shortest, decrease all purl 3 to purl 2 by purling 2 together in every rib section = 71-71-71-77-77-77 stitches. When A.3 has been worked, there are 65-65-65-73-73-73 stitches on needle. Then work in stocking stitch in the round, but continue A.4 over A.3 until finished measurements.
AT THE SAME TIME when piece measures 8 cm on the shortest, increase 2 stitches mid under sleeve - read INCREASE TIP. Increase like this 6-10-14-13-15-18 times in total in S: On every 18th round, in M: On every 9th round, in L and XL: On every 6th round, in XXL: On every 5th round, and in XXXL: On alternately every 3rd and every 4th round = 77-85-93-99-103-109 stitches.
When sleeve measures 38-37-35-33-32-30 cm (shorter measurements in the larger sizes because of longer yoke), cast off 10-10-12-12-14-16 stitches mid under sleeve (cast off 5-5-6-6-7-8 stitches on each side of marker thread) = 67-75-81-87-89-93 stitches remain on needle. Put piece aside and knit the other sleeve the same way.

YOKE:
Slip sleeves on to same needle as body where armholes were cast off (without working the stitches first) = 314-346-382-418-438-474 stitches on needle. Remove the marker threads in piece. Insert 1 marker thread in every transition between body and sleeves (= 4 new marker threads).
Continue in the round with stocking stitch and A.2 as before, continue in addition A.4 over the middle 3 stitches on each sleeve.
When 2 rounds have been worked, begin decrease for RAGLAN on next round – see explanation above.
Decrease for raglan every 4th round 6-5-4-4-6-7 times in total, and then every other round 17-22-27-30-30-31 times in total.
AT THE SAME TIME when piece measures 48-50-52-54-56-58 cm, slip the middle 26-26-30-36-40-50 stitches mid front on 1 stitch holder for neck.
Continue back and forth as before with decrease for raglan on every row from right side. In addition cast off for neck at beginning of every row in each side as follows: Cast off 3 stitches 1 time and 2 stitches 1 time. Then cast off 1 stitch at the beginning of every row in each side until decreases for raglan are finished. After all decreases for raglan and cast offs for neck, approx. 90-90-90-96-96-106 stitches remain on needle.

NECK EDGE:
Pick up from right side approx. 128-128-132-144-148-168 stitches around the neck (including stitches on stitch holder at the front) on a circular needle size 2.5 mm. Purl 1 round. Then knit 1 round while decreasing evenly to 120-120-124-134-138-144 stitches – read DECREASE TIP-2.
Purl 1 round, knit 1 round and purl 1 round. Cast off by knitting. Jumper measures approx. 54-56-58-60-62-64 cm from shoulder and down.

ASSEMBLY:
Sew the openings under the sleeves.

This pattern has been corrected.

Updated online: 20.04.2018
NECK EDGE: ...Then knit 1 round while decreasing evenly to 120-120-124-134-138-144 stitches – read DECREASE TIP-2...

Diagram

symbols = knit from the right side, purl from the wrong side
symbols = purl
symbols = between 2 stitches make 2 yarn overs, on next round/row work one yarn over in stocking stitch and drop the other yarn over off the needle
symbols = purl 2 together
symbols = knit 2 together
symbols = slip 1 stitch knitwise, knit 1, pass slipped stitch over stitch worked
symbols = slip 2 stitches knitwise, knit 1, pass the two slipped stitches over stitch worked
symbols = slip 1 stitch knitwise, knit 2 stitches together, pass slipped stitch over stitches worked together
symbols = knit 3 together
symbols = Knot: Work these 4 stitches as follows without dropping them off left needle: Purl 4 together, knit 4 together, purl 4 together, knit 4 together, then drop stitches off left needle
symbols = Knot: Work these 3 stitches as follows without dropping them off left needle: Purl 3 together, knit 3 together, purl 3 together, then drop stitches off left needle
diagram
diagram
diagram
diagram
diagram

Each of our patterns has specific tutorial videos to help you.

Do you have a question? See a list of frequently asked questions (FAQ)

Knitting tension is what determines the final measurements of your work, and is usually measured per 10 x 10 cm. It is provided like so: number of stitches in width x number of rows in height - eg: 19 stitches x 26 rows = 10 x 10 cm.

The knitting tension is very individual; some people knit/crochet loosely while others work tightly. You adjust the knitting tension with the needle size, which is why the suggested needle size is only meant as a guide! You need to adjust this (up or down) to ensure that YOUR knitting tension matches the knitting tension provided in the pattern. If you work with a different knitting tension than provided you will have a different yarn consumption, and your work will have different measurements than what the pattern suggests.

The knitting tension also determines which yarns can replace each other. As long as you achieve the same knitting tension you can replace one yarn with another.

See DROPS lesson: How to measure your tension/gauge

See DROPS video: How to make a gauge tension swatch

The required amount of yarn is provided in grams, eg: 450 g. To calculate how many balls you’ll need you first need to know how many grams are in 1 ball (25g, 50g or 100g). This information is available if you click on the individual yarn quality on our pages. Divide the amount required with the amount of each ball. For example, if each ball is 50g (the most common amount), the calculation will be as follows: 450 / 50 = 9 balls.

The important thing when changing from one yarn to another is that the knitting/crochet tension remains the same. This is so that the measurements of the finished piece will be the same as on the sketch provided. It is easier to achieve the same knitting tension using yarns from the same yarn group. It is also possible to work with multiple strands of a thinner yarn to achieve the knitting tension of a thicker one. Please try our yarn converter. We recommend you to always work a test swatch.

Please NOTE: when changing yarn the garment might have a different look and feel to the garment in the photo, due to individual properties and qualities of each yarn.

See DROPS lesson: Can I use a different yarn than the one mentioned in the pattern?

All our yarns are categorised into yarn groups (from A to F) according to thickness and knitting tension – group A contains the thinnest yarns and group F the thickest. This makes it easier for you to find alternative yarns to our patterns, should you wish to switch yarn. All yarns within the same group have a similar knitting tension and can easily replace each other. However, different yarn qualities have different structures and properties which will give the finished work a unique look and feel.

Click here for an overview of the yarns in each yarn group

At the top of all our patterns you’ll find a link to our yarn calculator, which is a helpful tool should you wish to use a different yarn than suggested. By filling in the yarn quality you wish to replace, the amount (in your size) and number of strands, the calculator will present good alternative yarns with the same knitting tension. Additionally it will tell you how much you’ll require in the new qualities and whether you’ll need to work with multiple strands. Most skeins are 50g (some are 25g or 100g).

If the pattern is worked with multiple colours, every colour will have to be calculated separately. Similarly, if the pattern is worked with several strands of different yarns (for example 1 strand Alpaca and 1 strand Kid-Silk) you will have to find alternatives for each, individually.

Click here to see our yarn calculator

Since different yarns have different qualities and textures we have chosen to keep the original yarn in our patterns. However, you can easily find options among our available qualities by using our yarn calculator, or simply pick a yarn from the same yarn group.

It is possible that some retailers still have discontinued yarns in stock, or that someone has a few skeins at home that they would like to find patterns for.

The yarn calculator will provide both alternative yarn as well as required amount in the new quality.

If you think it's hard to decide what size to make, it can be a good idea to measure a garment you own already and like the size of. Then you can pick the size by comparing those measures with the ones available in the pattern's size chart.

You'll find the size chart at the bottom of the pattern.

See DROPS lesson: How to read size chart

The needle size provided in the pattern serves only as a guide, the important thing is to follow the knitting tension. And since knitting tension is very individual, you will have to adjust the needle size to ensure that YOUR tension is the same as in the pattern – maybe you’ll have to adjust 1, or even 2 needle sizes, up or down to achieve the correct tension. For this, we recommend that you work test swatches.

Should you work with a different knitting tension than the one provided, the measurements of the finished garment might deviate from the measurement sketch.

See DROPS lesson: How to measure your tension/gauge

See DROPS video: How to make a tension/gauge swatch

Working a garment top-down provides more flexibility and room for personal adjustment. For example it is easier to try the garment on while working, as well as making adjustments to length of yoke and shoulder caps.

The instructions are carefully explaining every step, in the correct order. Diagrams are adjusted to the knitting direction and are worked as usual.

The diagram depicts all rows/rounds, and every stitch seen from the right side. It is read from bottom to top, from right to left. 1 square = 1 stitch.

When working back and forth, every other row is worked from the right side and every other row is worked from the wrong side. When working from the wrong side, the diagram will have to be worked reversed: from left to right, knit stitches are purled, purl stitches are knit etc.

When working in the round every round is worked from the right side and the diagram are worked from right to left on all rounds.

See DROPS lesson: How to read knitting diagrams

The diagram depicts all rows/rounds, and every stitch seen from the right side. It is worked from bottom to top, from right to left.

When working back and forth every other row is worked from the right side: from right to left and every other row is worked from the wrong side: from left to right.

When working in the round, every row in the diagram are worked from the right side, from right to left.

When working a circular diagram you start in the middle and work your way outwards, counter clockwise, row by row.

The rows usually start with a given number of chain stitches (equivalent to the height of the following stitch), this will either be depicted in the diagram or explained in the pattern.

See DROPS lesson: How to read crochet diagrams

Instructions for working several diagrams after each other on the same row/round, will often be written like so: “work A.1, A.2, A.3 a total of 0-0-2-3-4 times". This means you work A.1 once, then A.2 is worked once, and A.3 is repeated (in width) the number of times provided for your size – in this case like so: S = 0 times, M = 0 times, L=2 times, XL= 3 times and XXL = 4 times.

The diagrams are worked as usual: begin with the first row in A.1, then work the first row in A.2 etc.

See DROPS lesson: How to read knitting diagrams

See DROPS lesson: How to read crochet diagrams

The total width of the garment (from wrist-to-wrist) will be larger in the larger sizes, despite the actual sleeves being shorter. The larger sizes have longer sleeve caps and wider shoulders, so there will be a good fit in all sizes.

The measurement sketch/schematic drawing provides information regarding the full length of the garment. If it’s a jumper or a jacket the length is measured from the highest point on the shoulder closest to the neckline, and straight down to the bottom of the garment. It is NOT measured from the tip of shoulder. Similarly, the length of yoke is measured from the highest point on the shoulder and down to where yoke is split into body and sleeves.

On a jacket measures are never taken along bands, unless specifically stated. Always measure inside band stitches when measuring the length.

See DROPS lesson: How to read a schematic drawing

Diagrams are often repeated on the round or in height. 1 repeat is the diagram the way it appears in the pattern. If it says to work 5 repeats of A.1 in the round, then you work A.1 a total of 5 times after/next to each other in the round. If it says to work 2 repeats of A.1 vertically/in height you work the entire diagram once, then begin again at the start and work the entire diagram one more time.

Chain stitches are slightly narrower than other stitches and to avoid working the cast-on edge too tight, we simply chain more stitches to begin with. The stitch count will be adjusted on the following row to fit the pattern and measurement sketch.

The rib edge is more elastic and will contract slightly compared to, for example, stocking stitch. By increasing before the rib edge, you avoid a visible difference in width between the rib edge and the rest of the body.

It’s very easy to cast off too tightly, and by making yarn overs while casting off (and simultaneously casting these off) you avoid a too tight cast off edge.

See DROPS video: How to bind off with yarn overs (yo)

To achieve an even increase (or decrease) you can increase on, for example: every 3rd and 4th row alternately, like so: work 2 rows and increase on the 3rd row, work 3 rows and increase on the 4th. Repeat this until the increase is complete.

See DROPS lesson: Increase or decrease 1 st on every 3rd and 4th row alternately

Should you prefer to work in the round instead of back and forth, you may of course adjust the pattern. You’ll need to add steeks mid-front (usually 5 stitches), and follow the instructions. When you would normally turn and work from the wrong side, simply work across the steek and continue in the round. At the end you’ll cut the piece open, pick up stitches to work bands, and cover the cut edges.

See DROPS video: How to knit steeks and cut open

Should you prefer to work back and forth instead of in the round, you may of course adjust the pattern so you work the pieces separately and then assemble them at the end. Divide the stitches for the body in 2, add 1 edge stitch in each side (for sewing) and work the front and back pieces separately.

See DROPS lesson: Can I adapt a pattern for circular needles into straight needles?

Pattern repeats can vary slightly in the different sizes, in order to get the correct proportions. If you’re not working the exact same size as the garment in the photo, yours might deviate slightly. This has been carefully developed and adjusted so that the complete impression of the garment is the same in all sizes.

Make sure to follow instructions and diagrams for your size!

If you have found a pattern you like which is available in women’s size it’s not very difficult to convert it to men’s size. The biggest difference will be the length of sleeves and body. Start working on the women size that you think would fit across the chest. The additional length will be worked right before you cast off for the armhole/sleeve cap. If the pattern is worked top-down you can add the length right after the armhole or before the first decrease on sleeve.

Regarding additional yarn amount, this will depend on how much length you add, but it is better with a skein too many than too few.

All yarns will have excess fibres (from production) that might come off as lint or shedding. Brushed yarns (ie hairier yarns) have more of these loose, excess fibres, causing more shedding.

Shedding also depends on what is worn under or over the garment, and whether this pulls at the yarn fibres. It’s therefore not possible to guarantee that there will be no shedding

Below are some tips on how to get the best result when working with hairier yarns:

1. When the garment is finished (before you wash it) shake it vigorously so the looser hairs come off. NOTE: do NOT use a lint roller, brush or any method that pulls at the yarn.

2. Place the garment in a plastic bag and put it in your freezer - the temperature will cause the fibres to become less attached to each other, and excess fibres will come off easier.

3. Leave in the freezer for a few hours before taking it out and shaking it again.

4. Wash the garment according to the instructions on the yarn label.

Pilling is a natural process that happens to even the most exclusive of fibers. It's a natural sign of wear and tear that is hard to avoid, and that is most visible in high friction areas of your garment like a sweater's arms and cuffs.

You can make your garment look as new by removing the pilling, using a fabric comb or a pill/lint remover.

Still can't find the answer you need? Then scroll down and leave your question so one of our experts can try to help you. This will be done normally within 5 to 10 working days.
In the meantime, you can read the questions and answers that others have left to this pattern or join the DROPS Workshop on Facebook to get help from fellow knitters/crocheters!

You might also like...

Post a comment to pattern DROPS 186-22

We would love to hear what you have to say about this pattern!

If you want to leave a question, please make sure you select the correct category in the form below, to speed up the answering process. Required fields are marked *.

Comments / Questions (31)

country flag Claudia wrote:

Ein sehr schönes Modell mit zauberhaftem Blattdesign ☺️ Die richtige Größe zu ermitteln ist mir sehr schwer gefallen. Eine Orientierung an Körpermaßen (Brustumfang) wäre mir leichter gefallen. Drops-Flora und Nadelstärke 3 ergeben einen wunderbar leichten Pullover, der fast schon als Feinstrick durchgeht. Ich bin begeistert von dieser Seite, den tollen Anleitungen und der wunderbaren Wolle.

21.08.2022 - 01:47

country flag Fernanda wrote:

Estou fazendo a blusa, porém a manga não consigo... Colocar 87 pontos e fazer o ponto fantasia A3 por 8 vezes, mas o desenho necessita 23 pontos, então 23 x 8 = não enquadra a quantidade de pontos.

03.03.2021 - 16:24

DROPS Design answered:

Bom dia, Só tricota A.3 uma vez. Deve tricotar a manga da seguinte maneira: *1 malha meia, 3 malhas liga*, 8 vezes, A.3 (= 23 malhas), * 3 malhas liga, 1 malha meia* 8 vezes. O que tece 8 vezes é 1 malha meia/3 malhas liga antes e depois de A.3. Bom tricô!

04.03.2021 - 11:06

country flag Jane wrote:

Fantastiskt vacker/elegant tröja. Hoppas att denna designer kommer med fler liknande rler modeller och att hon får feedback. :) Jag har just köpt Drops Flora och börjat stick men fastnade direkt. Snälla finns det någon video som visar hur man stickar den maska som i diagrammet är representerat med en svart punkt mellan två rutor där det står att man ska göra två omslag varav ett ska släppas på nästa varv. Det ser inte rätt ut nör jag gör det,

12.01.2021 - 01:13

DROPS Design answered:

Hei Jane. Ikonet viser et dobbeltkast = større hullmønster. Ta gjerne en titt på denne videoen: mvh DROPS design

18.01.2021 - 14:02

country flag SONIA wrote:

"Lavorare il giro successivo come segue: * 1 maglia diritto, 3 maglie rovescio *, lavorare da *-* 8-8-8-9-9-9 volte in tutto, diagramma A.3 (= 23 maglie), * 3 maglie rovescio, 1 maglia diritto *, lavorare da *-* 8-8-8-9-9-9 volte in tutto. Proseguire a coste e seguendo il motivo in questo modo. Quando il lavoro misura 2 cm sul lato più corto, diminuire 1 maglia rovescio in ogni gruppo di 3 maglie rovescio (diventano gruppi di 2 maglie rovescio)" C'è un errore?

24.10.2020 - 18:19

DROPS Design answered:

Buongiorno Sonia. Se capiamo correttamente la domanda, il diagramma fa sì che il bordo non sia lineare, ma ha un effetto tipo onde. Deve misurare nel punto in cui il bordo rientra di più. Buon lavoro!

25.10.2020 - 08:50

country flag Anne Carlson wrote:

Hello, I just finished knitting this sweater, using Drops Flora yarn. When I sew in the yarn ends, it shows through on the right side of the garment as a sort of bump/line. Does anyone else have this problem? Is there a solution? I’ve tried weaving the ends on just one row, and also over two rows, like one of your videos shows how to do it, but it still shows up on the right side. Thank you!

14.06.2020 - 05:02

DROPS Design answered:

Dear Mrs Carlson, you can "untwist" the yarn and weave the different ends in many directions to make it less visible. Your DROPS store might have even more tipps for you, they'll be happy to share them with you even by mail or telephone. Happy knitting!

15.06.2020 - 09:38

country flag Sujata wrote:

Lovely pattern thanks for sharing

11.05.2020 - 11:43

country flag Lidy wrote:

Ik begin met de mouw en als ik dan de de Naalden averecht recht avererecht heb gebreid dan staat er ga verder met noordster en patroon zo!! Verder staat er niets. Bedoelen jullie zoals het telpatroon A 3. Wilt u het mij even laten weten. Bij voorbaat dank

21.04.2020 - 11:24

DROPS Design answered:

Dag Lidy,

Ja, je breit inderdaad verder op dezelfde manier, dus met boordsteek en A.3.

26.04.2020 - 20:53

country flag Jude wrote:

I am disappointed still to be waiting for an answer to my question. Do you not have a symbol explanation chart somewhere?

01.01.2020 - 10:59

DROPS Design answered:

Dear Jude, please understand that most of our staff is off for the Holidays (including the person, who can fix the symbols, which is a technical problem for the moment). We have to ask a little more patiente from you. Thank you for understanding.

01.01.2020 - 13:17

country flag Jude wrote:

I am puzzled by the last 3 lines of the chart A1 and charts A2 and A3 as the symbols show there (with the exception of the central triangle on A1) are not described in the diagram explanations. Also the last diagram explanation -describd as a 3 stitch knot, dos not appear in any of the diagrams A1, A2 or A3. I have tried to guess but this does not resut in the correxct number of stitches remaining. How do you knit these 5 symbols?

27.12.2019 - 12:29

DROPS Design answered:

Dear Jude, it looks like the 2 symbols you are missing are the decreases (see 8th and 9th symbol under diagram key): ie decrease 2 stitches and make 1 yarn over. The last symbol of diagram key appears in A.2 size S + XL so it might not apply to the size you are working. Happy knitting!

02.01.2020 - 11:33

country flag Lucia Milti wrote:

Sto facendo la fascia davanti A2 ma vi siete dimenticati di scrivere che il diagramma A2 va fatto di continuo fino al collo? grazie

10.08.2019 - 20:02

DROPS Design answered:

Buongiorno Lucia. Viene indicato di proseguire con il motivo, che comporta proseguire lavorando le maglie come sono state impostate in precedenza, quindi continuando con il diagramma. Nello sprone è indicato espressamente di proseguire con il diagramma. Buon lavoro!

10.08.2019 - 20:49