
Popular categories
Looking for a yarn?


Comments / Questions (6)
![]() Katelyn Foster wrote:
Katelyn Foster wrote:
In response to the response to my comment about the error. Under "yoke," it says to increase 0-10-22-0-14-38. Why would you increase less to end up with fewer stitches for a larger size? This leaves the XL smaller than the medium and the XXL the same size as the L.
08.01.2024 - 01:34DROPS Design answered:
Dear Mrs Foster, the pattern has been looked over and it is correct as it is. There are quite a lot of increases in the larger sizes and since each increase is quite bit it is how it is done to also get the correct size at the end of the yoke. If you prefer to have more stitches at the beginning of the yoke, you can decrease less stitches, but you will have to alter the increases further down on the yoke. Happy knitting!
05.04.2024 - 14:35
![]() Sally wrote:
Sally wrote:
I’m doing a size S, as pattern with 80 sts from the york, after doing the A1 pattern 3 times there’s 24 stitches x 3 times increased, I don’t have 224 stitches to carry on with separating the body and sleeves, can you help please?
15.12.2023 - 15:49DROPS Design answered:
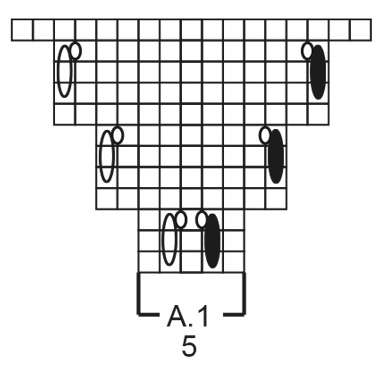
Dear Sally, you increase 12 stitches in each A.1, A.1 is worked a total of 4 times in the round (at each transition between sleeve/body), and a total of 3 times in height, this means: 80 + (12 x 4 x 3) = 224 sts. Happy knitting!
15.12.2023 - 15:58
![]() Katelyn Foster wrote:
Katelyn Foster wrote:
Ok I think I’ve figured out that this is an error. It must be. Please fix and update. I spent a lot of money on the materials for this and want to start asap.
16.11.2023 - 05:47DROPS Design answered:
Dear Mrs Foster, not sure where you found an error, could you please tell us more? About the size you are working, the place where you found this error, etc.. so that we can check further? Thanks for your comprehension.
16.11.2023 - 10:26
![]() Katelyn Foster wrote:
Katelyn Foster wrote:
I don't understand this pattern AT ALL. Starting at the Yoke. 1 edge stitch in garter stitch, knit 8-12-16-11-16-23? Do we put markers between all of these? Why not write "knit 87?" Are there markers between the front piece and the sleeves, etc?
16.11.2023 - 02:18DROPS Design answered:
Hi Katelyn, You can insert markers if you wish, to separate the sleeves from the front and back pieces but the text does include knitted stitches and pattern A.1 on both the sleeves and front/back pieces. A.1 gives you the increases you need on the yoke as well as the bobbles in the pattern. Hope this helps and happy knitting!
16.11.2023 - 06:47
![]() Mairead De Faoite wrote:
Mairead De Faoite wrote:
WORST PATTERNS EVER.
29.10.2022 - 21:26
![]() Liv wrote:
Liv wrote:
Would look great with a dress
06.08.2022 - 00:52
|
|||||||||||||
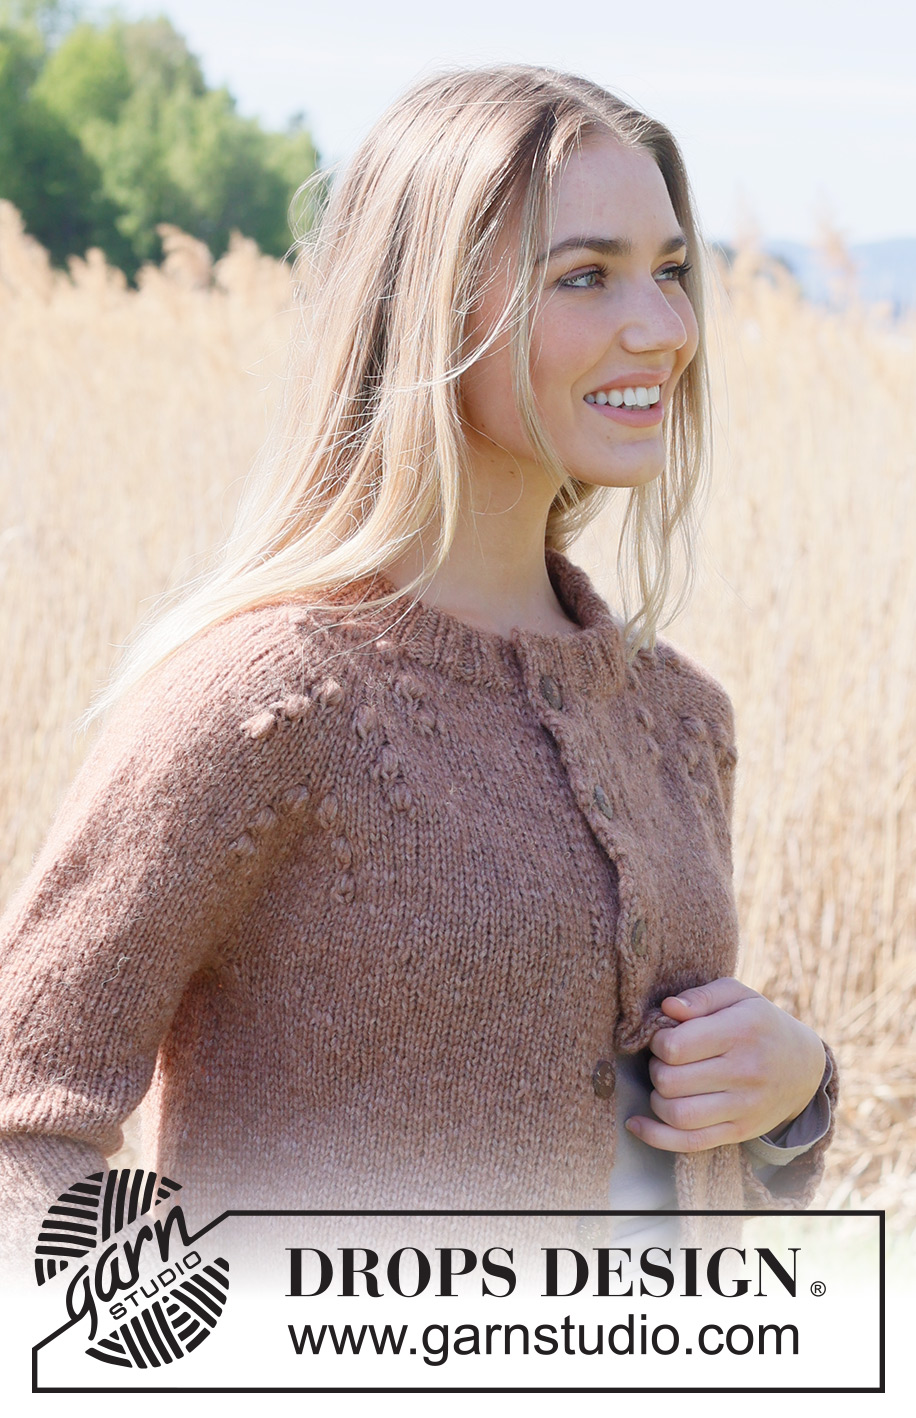
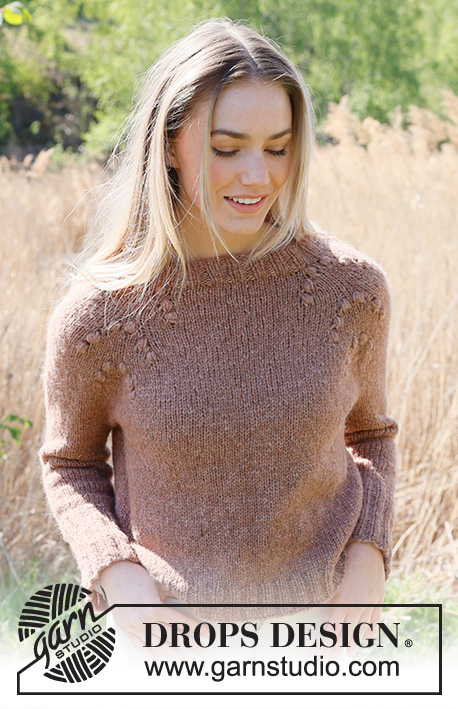
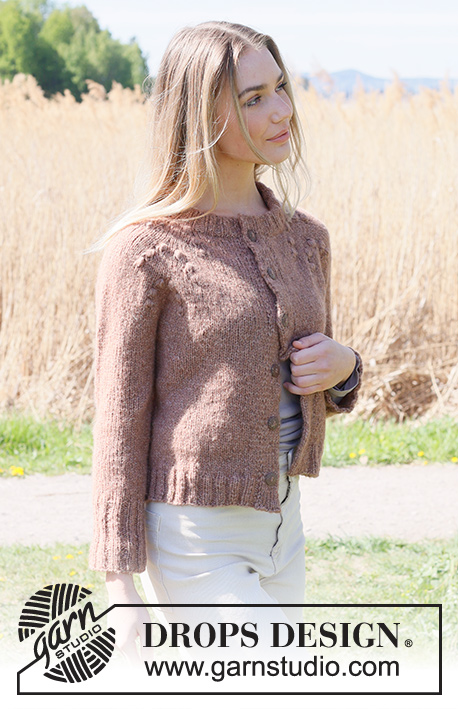
Winter Berry Cardigan#winterberrycardigan |
|||||||||||||
 |
 |
||||||||||||
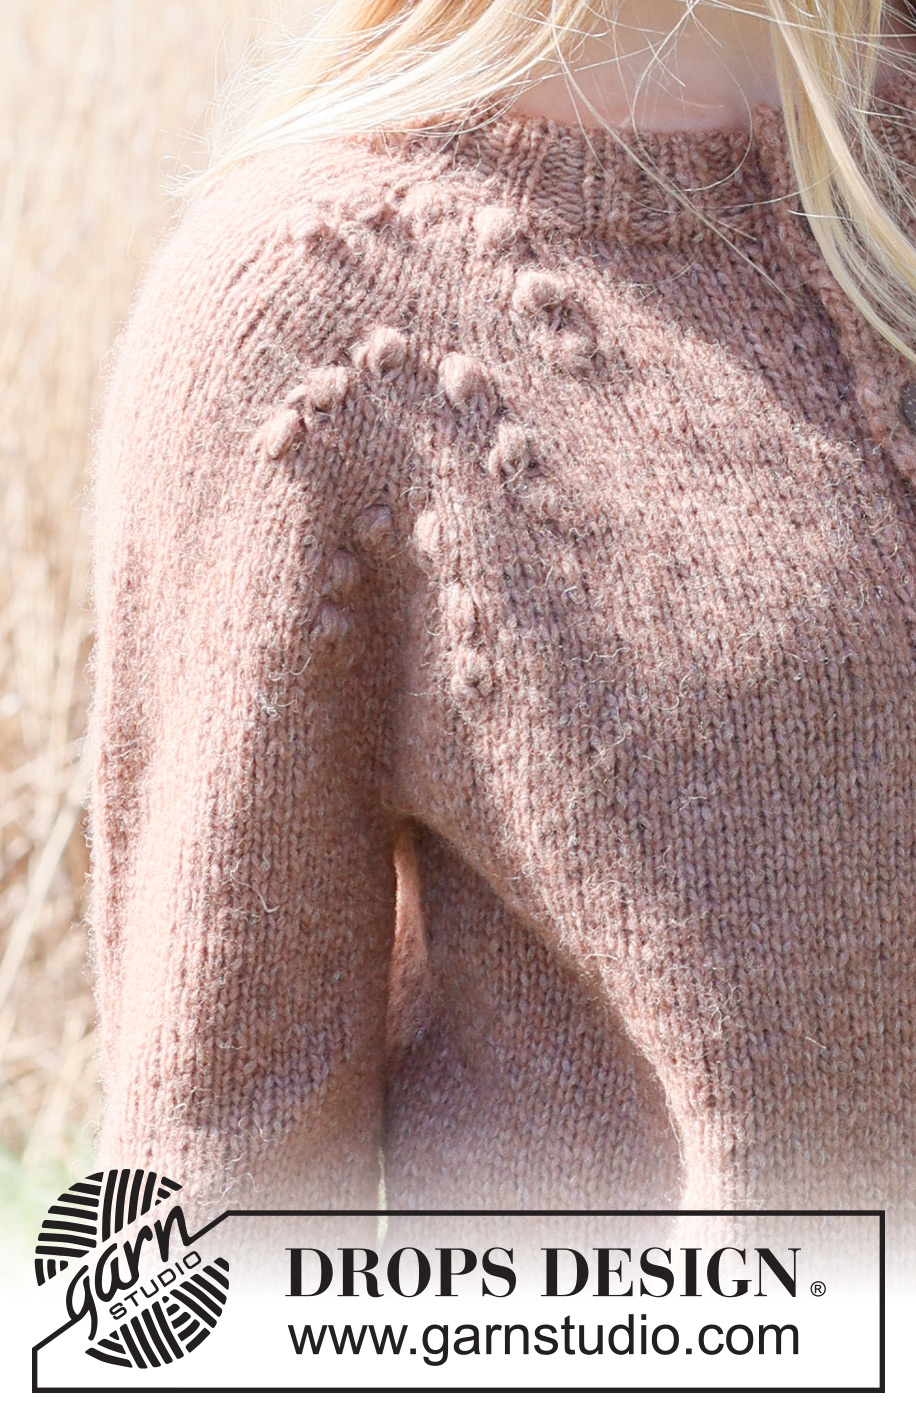
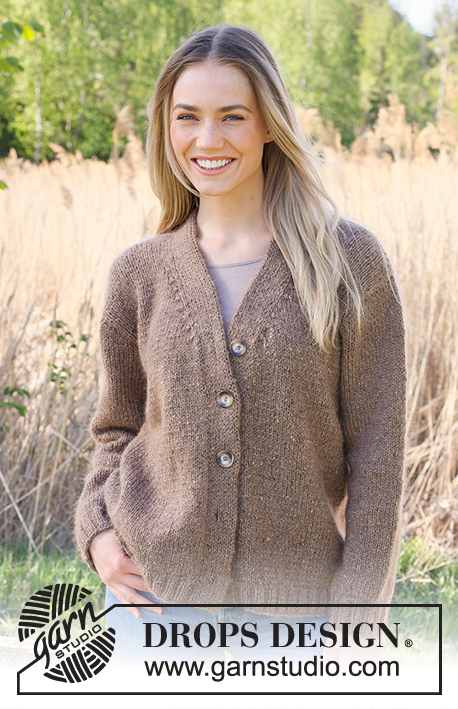
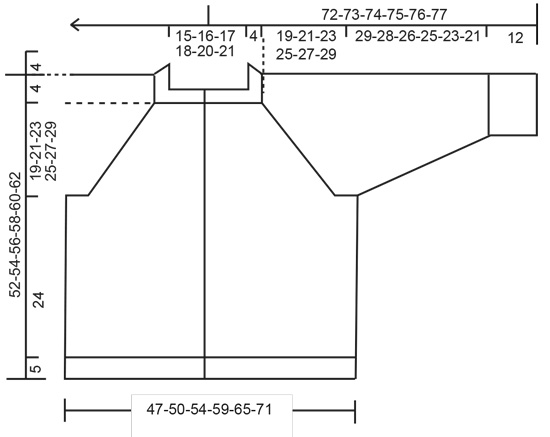
Knitted jacket in DROPS Air. The piece is worked top down with raglan, bobbles and double bands. Sizes S - XXXL.
DROPS 235-29 |
|||||||||||||
|
------------------------------------------------------- EXPLANATIONS FOR THE PATTERN: ------------------------------------------------------- PATTERN: See diagram A.1. The diagram shows all rows in the pattern from the right side. RIDGE/GARTER STITCH (worked back and forth): Knit all rows. 1 ridge = knit 2 rows. DECREASE TIP (for sleeves): Decrease 1 stitch on either side of the marker as follows: Work until there are 3 stitches left before the marker, knit 2 together, knit 2 (marker sits between these 2 stitches), slip 1 stitch as if to knit, knit 1 and pass the slipped stitch over the knitted stitch. BUTTONHOLES: Work buttonholes on the right band as follows: Work the first 6 stitches as before, turn and work back and forth over these stitches 2 more times (last row from the right side). Cut the strand. Work 4 rows as before over the remaining 6 band stitches (first row from the right side) and work the last stitch together with the next stitch on the jacket as before. On the last row from the wrong side work all the band stitches as before. Work the buttonholes when the band measures: S: 4, 13, 22, 31, 40 and 48 cm. M: 4, 14, 23, 33, 41 and 50 cm. L: 4, 14, 24, 34, 43 and 52 cm. XL: 6, 16, 26, 36, 45 and 54 cm. XXL: 4, 13, 22, 31, 40, 48 and 56 cm. XXXL: 5, 14, 23, 32, 41, 50 and 58 cm. ------------------------------------------------------- START THE PIECE HERE: ------------------------------------------------------- JACKET – SHORT OVERVIEW OF THE PIECE. The neck and yoke are worked back and forth, top down. The yoke is divided for body and sleeves and the body continued back and forth with circular needle. The sleeves are worked in the round with double pointed needles. Stitches are knitted up the front pieces and the double bands are worked to finish. DOUBLE NECK: Cast on 80-84-88-92-96-100 stitches with DROPS Air using 2 circular needles size 4mm and 5.5 mm held together. Remove the needle size 5.5 mm and continue with needle size 4 mm (this gives you an elastic cast-on edge). Purl 1 row from the wrong side. Work rib as follows from the right side: 1 edge stitch in GARTER STITCH – read description above, * purl 2, knit 2 *, work from *-* until there are 3 stitches left, purl 2 and 1 edge stitch in garter stitch. When the rib measures 9 cm, fold the neck double to the inside and knit the next row from the right side AT THE SAME TIME as every 2nd stitch is knitted together with every 2nd stitch from the cast-on edge. You now have a double neck. Change to short circular needle size 5.5 mm. Insert a marker after the edge stitch; the yoke is measured from this marker! YOKE: Purl 1 row from the wrong side and increase 0-10-22-0-14-38 stitches evenly spaced = 80-94-110-92-110-138 stitches. Work the next row from the right side as follows: 1 edge stitch in garter stitch, knit 8-12-16-11-16-23 (front piece), work A.1, knit 12 (sleeve), work A.1, knit 18-24-32-24-32-46 (back piece), work A.1, knit 12 (sleeve), work A.1, knit 8-12-16-11-16-23 and 1 edge stitch in garter stitch (front piece). Continue this pattern. REMEMBER THE KNITTING TENSION! When A.1 has been completed in height, repeat A.1 over the middle 5 stitches in previous A.1. All other stitches are worked in stocking stitch. When A.1 has been worked a total of 3-3-3-4-4-4 times in height there are 224-238-254-284-302-330 stitches. Continue with stocking stitch and 1 edge stitch in garter stitch on each side until the yoke measures 19-21-23-25-27-29 cm from the marker. Divide for the body and sleeves as follows: Work 34-37-39-43-47-52 stitches, place the next 44-46-50-56-58-62 stitches on a thread for the sleeve, cast on 8-8-10-10-12-12 stitches under the sleeve, work 68-72-76-86-92-102 stitches, place the next 44-46-50-56-58-62 stitches on a thread for the sleeve, cast on 8-8-10-10-12-12 stitches under the sleeve, work the last 34-37-39-43-47-52 stitches. BODY: = 152-162-174-192-210-230 stitches. Continue with stocking stitch and 1 edge stitch in garter stitch on each side for a further 24 cm. Increase 20-22-22-24-26-30 stitches evenly on the next row from the right side = 172-184-196-216-236-260 stitches. Change to circular needle size 4 mm and work rib from the wrong side as follows: 1 edge stitch in garter stitch, * knit 2, purl 2*, work from *-* until there are 3 stitches left, knit 2 and 1 edge stitch in garter stitch. Continue this rib for 5 cm. Cast off. SLEEVES: Place the 44-46-50-56-58-62 stitches from the thread on the one side of the piece on double pointed needles size 5.5 mm and knit up 1 stitch in each of the 8-8-10-10-12-12 stitches cast on under the sleeve = 52-54-60-66-70-74 stitches. Insert a marker in the middle of the new stitches under the sleeve. Work stocking stitch in the round for 2 cm. Now decrease 2 stitches under the sleeve – read DECREASE TIP. Decrease like this every 6-6-3½-2-2-1½ cm a total of 5-5-7-9-11-12 times = 42-44-46-48-48-50 stitches. When the sleeve measures 29-28-26-25-23-21 cm from the division, increase 6-4-6-4-4-6 stitches evenly spaced = 48-48-52-52-52-56 stitches. Change to double pointed needles size 4 mm and work rib (knit 2, purl 2) for 12 cm. Cast off. Work the other sleeve in the same way. RIGHT BAND: Start at the bottom of the right front piece, using circular needle size 5 mm and a strand-end of 90-120 cm to avoid having to cut the strand afterwards (you work the band from the ball-end), knit up 1 stitch in each knitted row along the front piece inside the 1 edge stitch. Continue working from the end of the needle with the ball = bottom of front piece. Cast on 12 stitches from the wrong side, out from the first knitted up stitch. Work the band over these 12 stitches at the same time as the band is knitted together with the front piece as follows: ROW 1 (right side): Slip 1 stitch as if to knit, keeping the strand at the front, * knit 1, slip 1 stitch as if to purl, keeping the strand at the front *, work from *-* until there is 1 of the 12 band stitches left, slip the last stitch as if to knit, keeping the strand at the back of the piece, knit the next stitch, pass the slipped stitch over the knitted stitch, turn. ROW 2 (wrong side): * Slip the first/next stitch as if to purl, keeping the strand at the front, knit 1 *, work from *-* over all 12 band-stitches, turn. Repeat rows 1 and 2. NB! If the band becomes too long for the front piece, the band stitches can be worked together with 1 extra stitch from the front piece. Then work every 10th row as follows from the right side: Work until 1 stitch remains of the 12 band stitches, slip the last stitch onto the right needle as if to knit, with the yarn behind the work, knit the next 2 stitches together, pass the slipped stitch over the stitches knitted together, turn. Work the BUTTONHOLES – read description above. When all the knitted stitches from the front piece have been worked with band stitches, knit all the band-stitches together 2 and 2. Cast off. LEFT BAND: Start at the top of the left front piece, using circular needle size 5 mm, and knit up 1 stitch in each knitted row down the front piece, inside the 1 edge stitch. Now cast on 12 stitches for the band, out from the last knitted up stitch. Work the band over these 12 stitches at the same time as the band is knitted together with the front piece as follows: ROW 1 (wrong side): Knit 1, * slip 1 stitch as if to purl, keeping the strand at the front, knit 1 *, work from *-* until there is 1 of the 12 band-stitches left, slip the next 2 stitches as if to purl together, keeping the strand at the front, turn. ROW 2 (right side): Knit 2 together, * slip 1 stitch as if to purl, keeping the strand at the front, knit 1 *, work from *-* until there is 1 stitch left, slip the last stitch as if to purl, keeping the strand at the front, turn. Repeat rows 1 and 2. NB! If the band becomes too long for the front piece, the band stitches can be worked together with 1 extra stitch from the front piece on every 9th and 10th row as follows: slip 3 stitches onto the right needle at the end of the row from the wrong side and knit 3 together from the right side. When all the knitted stitches from the front piece have been worked with band stitches, work all the band-stitches as follows: Slip 1 stitch as if to knit, knit 1 and pass the slipped stitch over the knitted stitch. Cast off. ASSEMBLY: Sew the buttons onto the left band. |
|||||||||||||
Diagram explanations |
|||||||||||||
|
|||||||||||||
 |
|||||||||||||
 |
|||||||||||||
Have you finished this pattern?Tag your pictures with #dropspattern #winterberrycardigan or submit them to the #dropsfan gallery. Do you need help with this pattern?You'll find 33 tutorial videos, a Comments/Questions area and more by visiting the pattern on garnstudio.com. © 1982-2026 DROPS Design A/S. We reserve all rights. This document, including all its sub-sections, has copyrights. Read more about what you can do with our patterns at the bottom of each pattern on our site. |
|||||||||||||


With over 40 years in knitting and crochet design, DROPS Design offers one of the most extensive collections of free patterns on the internet - translated to 17 languages. As of today we count 324 catalogues and 12290 patterns translated into English (UK/cm). 12290
We work hard to bring you the best knitting and crochet have to offer, inspiration and advice as well as great quality yarns at incredible prices! Would you like to use our patterns for other than personal use? You can read what you are allowed to do in the Copyright text at the bottom of all our patterns. Happy crafting!
Post a comment to pattern DROPS 235-29
We would love to hear what you have to say about this pattern!
If you want to leave a question, please make sure you select the correct category in the form below, to speed up the answering process. Required fields are marked *.