
Popular categories
Looking for a yarn?


Comments / Questions (5)
![]() Ann wrote:
Ann wrote:
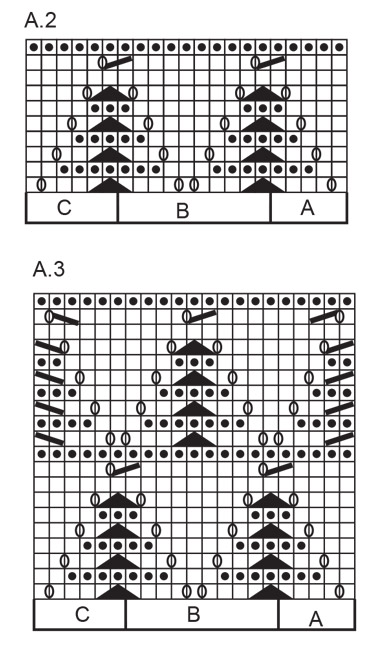
Hallo, ich verstehe die Anleitung zu dem Ärmel nicht und die Umsetzung mit dem Muster A3. Soll am Anfang immer 1× A gestrickt werden, dann n-mal B und dann C und die Maschen zwischen A und C glatt rechts? Wie wird dann mit den Abnahmen umgegangen?
30.04.2024 - 17:14DROPS Design answered:
Liebe Ann, ja genau, das Lochmuster wird mit A beginnen, mit B wiederholt und mit B enden, aber wenn man abnimmt , passt das Muster nicht mehr, so strickt man glatt rechts die restlichen Maschen, die nicht im Lochmuster gestrickt werden können, dh wenn man nicht eine Abnahme und den passenden Umschlag stricken kann, dann strickt man diese Maschen glatt rechts. Viel Spaß beim Stricken!
02.05.2024 - 07:40
![]() Katri Ekhorn wrote:
Katri Ekhorn wrote:
Hei, strikker str M. Har strikket først A. 1, også A. 2 uten raglanøkninger, men syns det ble rart og rekte opp. Og nå har strikket med raglanøkning så som i A1., men da stemmer ikke mønster A2. A eller A. 2 C.. Så vet ikke hva, er rett?
23.04.2024 - 15:28
![]() Katri Ekhorn wrote:
Katri Ekhorn wrote:
Hei, var litt vanskelig å forstå. Når man har strikket i bolen A.1 og strikker A. 2, skal man øke til raglan samtidig etter A. 1?
20.04.2024 - 08:11DROPS Design answered:
Hej Katri, hvor langt er du kommet i opskriften? Har du strikket hele A.1 med udtagninger til raglan? Skriv hvilken størrelse du strikker, hvor du er og hvor mange masker du har, så skal vi prøve at hjælpe dig :)
23.04.2024 - 13:26
![]() Dorys Jelves Ruiz wrote:
Dorys Jelves Ruiz wrote:
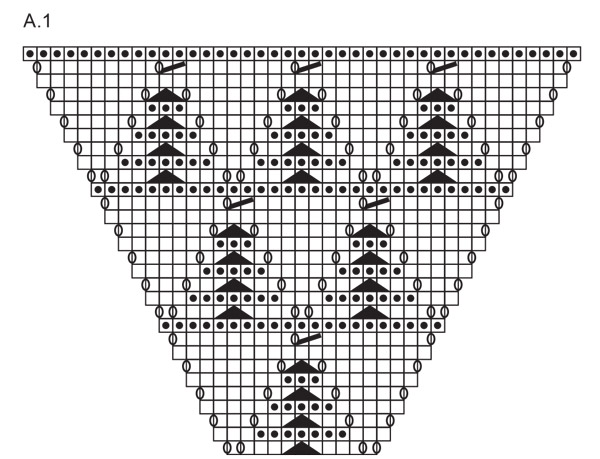
Me parece que no cuadra el gráfico A1 de la manga, ya que no se considera que se aumenta 1 punto a cada lado por cada fila de derecho
27.04.2021 - 04:40
![]() Jeanette Bratland Hjelland wrote:
Jeanette Bratland Hjelland wrote:
I mønster A3, på venstre side, går streken motsatt vei enn i starten. Det er ingen forklaring på hovrdan denne skal strikkes. Det står heller ikke noe om AB og C i mønster A3. Skal hele rapporten i A3 gjentas?
13.04.2021 - 19:39DROPS Design answered:
Hei Jeanette. Oppskriften er videre sendt til design avd. slik at de kan ta en dobbeltsjekk og evnt komme med en rettelse/kommentar. mvh DROPS design
26.04.2021 - 12:09
|
||||||||||||||||
Music of Thunder#musicofthundercardigan |
||||||||||||||||
 |
 |
|||||||||||||||
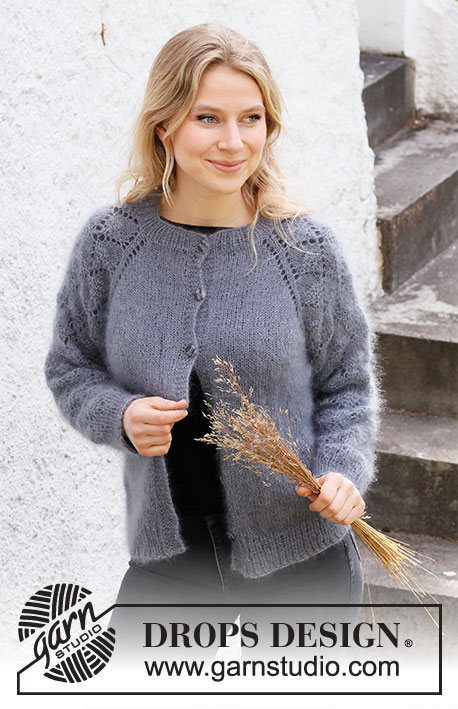
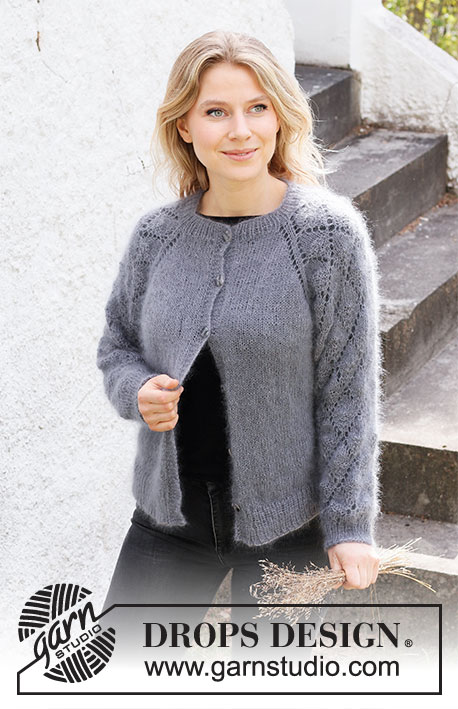
Knitted jacket in 2 strands DROPS Kid-Silk. The piece is worked top down with raglan and lace pattern. Sizes S - XXXL.
DROPS 217-36 |
||||||||||||||||
|
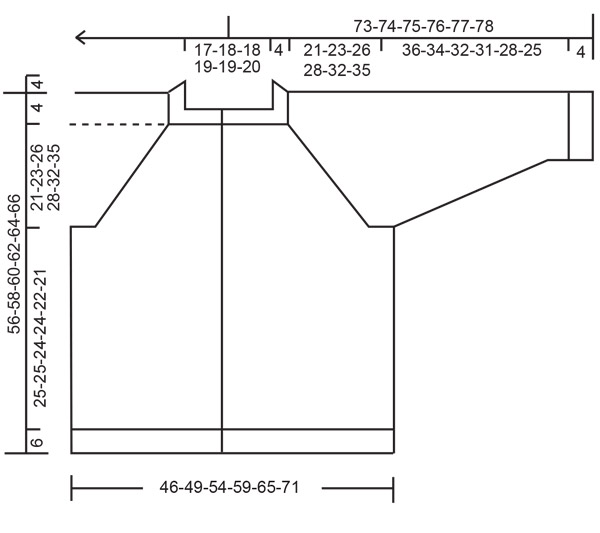
------------------------------------------------------- EXPLANATIONS FOR THE PATTERN: ------------------------------------------------------- RIDGE/GARTER STITCH (worked back and forth): Knit all rows. 1 ridge in height = Knit 2 rows. PATTERN: See diagrams A.1 to A.3 DECREASE TIP (evenly spaced): To work out how to decrease evenly, count the total number of stitches on needle (e.g. 47 stitches) and divide by number of decreases to be made (e.g. 7) = 6.7. In this example decrease by knitting together alternately each 5th and 6th stitch and each 6th and 7th stitch. DECREASE TIP-2 (for sleeves): Decrease 1 stitch on either side of the marker thread as follows: Work until there are 3 stitches left before the marker thread, knit 2 together, knit 2 (marker thread sits between these 2 stitches), slip 1 stitch as if to knit, knit 1 and pass the slipped stitch over the knitted stitch (= 2 stitches decreased). BUTTONHOLES: Work buttonholes on the right band (when the garment is worn). Work from the right side when there are 3 stitches left on the row as follows: Make 1 yarn over, knit 2 together and knit 1. On the next row knit the yarn over to leave a hole. The first buttonhole is worked when the rib on the neck measures approx. 1½-2 cm = ½"-¾". Then work the other 4-4-4-5-5-5 buttonholes with approx. 8-9 cm = 3⅛"-3½" between each one. BINDING-OFF TIP: To avoid the bind-off edge being tight you can bind off with a larger size needle. If the edge is still tight, make 1 yarn over after approx. each 4th stitch at the same time as binding off; the yarn overs are bind off as normal stitches. ------------------------------------------------------- START THE PIECE HERE: ------------------------------------------------------- JACKET – SHORT OVERVIEW OF THE PIECE: The neck and yoke are worked back and forth with circular needle from mid front and top down. The yoke is divided for body and sleeves and the body continued back and forth. The sleeves are worked in the round with short circular needle/double pointed needles, top down. The piece is worked with 2 strands Kid-Silk. NECK: Cast on 93-97-101-105-109-113 stitches (including 5 band stitches on each side) with circular needle size 4 mm = US 6 and 2 strands Kid-Silk. Purl 1 row (= wrong side). The next row is worked as follows from the right side: Work 5 stitches in GARTER STITCH - see description above, * knit 1, purl 1 *, work from *-* until there are 6 stitches left on the row, knit 1 and finish with 5 stitches in garter stitch. Remember BUTTONHOLES – read description above. Continue this rib for 4 cm = 1½". On the last row decrease 1 stitch = 92-96-100-104-108-112 stitches. Insert 1 marker after the band. The yoke will be measured from this marker. Change to circular needle size 5 mm = US 8. REMEMBER THE KNITTING GAUGE! YOKE: Insert 4 marker threads in the piece as described below (without working the stitches): Count 19-20-21-22-23-24 stitches (= left front piece), insert 1 marker thread before the next stitch, count 13 stitches (= sleeve), insert 1 marker thread before the next stitch, count 28-30-32-34-36-38 stitches (= back piece), insert 1 marker thread before the next stitch, count 13 stitches (= sleeve), insert 1 marker thread before the next stitch. There are 19-20-21-22-23-24 stitches left for the right front piece after the last marker thread. On the next row begin the pattern, working from the right side as follows: Work 5 band stitches in garter stitch, 13-14-15-16-17-18 stitches in stockinette stitch, increase 1 stitch for raglan, 2 stitches in stockinette stitch (marker thread sits between these 2 stitches), A.1 (= sleeve), work 2 stitches in stockinette stitch (marker thread sits between these 2 stitches), increase 1 stitch for raglan, work 26-28-30-32-34-36 stitches in stockinette stitch (= back piece), increase 1 stitch for raglan, 2 stitches in stockinette stitch (marker thread sits between these 2 stitches), A.1 (= sleeve), work 2 stitches in stockinette stitch (marker thread sits between these 2 stitches), increase 1 stitch for raglan, work 13-14-15-16-17-18 stitches in stockinette stitch and 5 band stitches in garter stitch. Continue this pattern; i.e. increase on the sleeves as shown in A.1. On the next row (wrong side) purl the yarn overs on the sleeves (= holes) and the increased stitches are then worked into the pattern as shown in A.1. On the front and back pieces increase with yarn overs before/after the 2 stitches in stockinette stitch (there should be 2 stitches in stockinette stitch between each raglan-increase). On the next row (wrong side) purl the yarn overs (= holes) and the increased stitches are worked in stockinette stitch. Increase like this every 2nd row (i.e. each row from the right side) = 8 stitches increased on each increase-row. REMEMBER THE KNITTING GAUGE and BUTTONHOLES on the right band – read description above. When A.1 has been worked 1 time in height continue with A.2. Work A.2A over the first 5 stitches, A.2B over the next 30 stitches and A.2C over the last 6 stitches. Each time A.2 has been worked 1 time in height there is room for 1 more repeat of A.2B in width. Continue increasing as shown in A.1. Increase to raglan a total of 23-25-28-30-34-38 times = 276-296-324-344-380-416 stitches. Continue without further increases until the piece measures 21-23-26-28-32-35 cm = 8¼"-9"-10¼"-11"-12½"-13¾" from the marker on the neck. Now divide the yoke for the body and sleeves on the next row as follows (continue the pattern as before): Work 41-44-48-51-56-61 stitches (= front piece), place the next 61-65-71-75-83-91 stitches on 1 thread for the sleeve, cast on 6-6-6-8-8-8 new stitches on the needle (= in side under the sleeve), work 72-78-86-92-102-112 stitches (= back piece), place the next 61-65-71-75-83-91 stitches on 1 thread for the sleeve, cast on 6-6-6-8-8-8 new stitches on the needle (= in side under the sleeve) and work the remaining 41-44-48-51-56-61 stitches (= front piece). Body and sleeves are finished separately. BODY: = 166-178-194-210-230-250 stitches. Continue with stockinette stitch and garter stitch as before until the piece measures 25-25-24-24-22-21 cm = 9¾"-9¾"-9½"-9½"-8¾"-8¼" from the division. Increase 1 stitch = 167-179-195-211-231-251 stitches (there is approx. 6 cm = 2⅜" left to finished length; you can try the jacket on and work to desired length). Change to circular needle size 4 mm = US 6 and work rib as follows from the right side: 5 band stitches as before, * knit 1, purl 1 *, work from *-* until there are 6 stitches left on the row, knit 1 and finish with 5 band stitches as before. Continue this rib for 6 cm = 2⅜". Bind off with garter stitch over garter stitch, knit over knit and purl over purl – read BINDING-OFF TIP! The jacket measures approx. 56-58-60-62-64-66 cm = 22"-22¾"-23⅝"-24⅜"-25¼"-26" from the shoulder down. SLEEVE: Place the 61-65-71-75-83-91 stitches from the thread on the one side of the piece on short circular needle/double pointed needles size 5 mm = US 8 and knit up 1 stitch in each of the 6-6-6-8-8-8 stitches cast on under the sleeve = 67-71-77-83-91-99 stitches. Insert a marker thread in the middle of the 6-6-6-8-8-8 stitches under the sleeve. Allow the thread to follow your work onwards; it will be used when decreasing under the sleeve. Start the round at the marker thread and continue the pattern in the round according to A.3; make sure the pattern matches A.2. The stitches under the sleeve which do not fit into the pattern are worked in stockinette stitch. When the sleeve measures 3 cm = 1⅛" from the division in all sizes, decrease 2 stitches mid under the sleeve – read DECREASE TIP-2. Decrease like this every 3½-2½-2-1½-1-1 cm = 1¼"-⅞"-¾"-½"-⅜"-⅜" a total of 10-11-13-15-18-21 times = 47-49-51-53-55-57 stitches. Continue working until the sleeve measures 36-34-32-31-28-25 cm = 14¼"-13⅜"-12½"-12¼"-11"-9¾" from the division (there is approx. 4 cm = 1½" left to finished length; you can try the jacket on and work to desired length). NOTE: Shorter measurements in larger sizes due to wider neck and longer yoke. Knit 1 round where you decrease 7 stitches evenly spaced – read DECREASE TIP-1 = 40-42-44-46-48-50 stitches. Change to double pointed needles size 4 mm = US 6 and work rib (= knit 1, purl 1) for 4 cm = 1½". Bind off with knit over knit and purl over purl – remember BINDING-OFF TIP! The sleeve measures approx. 40-38-36-35-32-29 cm = 15¾"-15"-14¼"-13¾"-12½"-11⅜" from the division. Work the other sleeve in the same way. ASSEMBLY: Sew buttons onto the left band. |
||||||||||||||||
Diagram explanations |
||||||||||||||||
|
||||||||||||||||
 |
||||||||||||||||
 |
||||||||||||||||
 |
||||||||||||||||
Have you finished this pattern?Tag your pictures with #dropspattern #musicofthundercardigan or submit them to the #dropsfan gallery. Do you need help with this pattern?You'll find 28 tutorial videos, a Comments/Questions area and more by visiting the pattern on garnstudio.com. © 1982-2026 DROPS Design A/S. We reserve all rights. This document, including all its sub-sections, has copyrights. Read more about what you can do with our patterns at the bottom of each pattern on our site. |
||||||||||||||||


With over 40 years in knitting and crochet design, DROPS Design offers one of the most extensive collections of free patterns on the internet - translated to 17 languages. As of today we count 324 catalogs and 12267 patterns - 12257 of which are translated into English (US/in).
We work hard to bring you the best knitting and crochet have to offer, inspiration and advice as well as great quality yarns at incredible prices! Would you like to use our patterns for other than personal use? You can read what you are allowed to do in the Copyright text at the bottom of all our patterns. Happy crafting!
Post a comment to pattern DROPS 217-36
We would love to hear what you have to say about this pattern!
If you want to leave a question, please make sure you select the correct category in the form below, to speed up the answering process. Required fields are marked *.