
Popular categories
Looking for a yarn?


Comments / Questions (105)
![]() Mélanie wrote:
Mélanie wrote:
Bonjour, merci pour ce joli modèle, je le réalise en taille S et je ne comprends pas les augmentations pour l'emmanchure du devant droit : "augmenter 0 fois 1 bride, augmenter ensuite 0 fois 2 mailles. A la fin du 1er rang sur l'envers , crocheter 5 ml (= on a augmenté 3 brides au total)". Dois-je utiliser le diagramme A.5 ? Et puisque j'augmente 0 fois, comment puis-je avoir augmenté 3 brides au total ? Merci de vos lumières. Cordialement.
12.06.2020 - 03:52DROPS Design answered:
Bonjour Mélanie, en taille S, vous montez souplement 5 mailles en l'air à la fin du 1er rang sur l'envers quand l'ouvrage mesure 16 cm. Au rang suivant, vous crochetez 1 bride dans la 4ème maille en l'air à partir du crochet, 1 bride dans la maille en l'air suivante = les 3 premières mailles en l'air remplacent la 1ère bride, vous avez bien augmenté 3 brides. Bon crochet!
12.06.2020 - 08:01
![]() Sofia Rossi wrote:
Sofia Rossi wrote:
The chart A4 must ne sperate di 19 times? Or for 19 rows?
05.06.2020 - 14:54DROPS Design answered:
Dear Mrs Rossi, you should increase 2 sts a total of 19 times (= 19 rows) as shown in A.4 (you will work a total of 19 row with each 2 increases). Happy crocheting!
05.06.2020 - 15:47
![]() Matilda K wrote:
Matilda K wrote:
Hej, tack för mönstret! Jag har problem med att förstå hur man ökar i halsen. Det står att man ska öka maskor som beskrivs i A4/A5?
04.06.2020 - 20:03DROPS Design answered:
Hej Matilda, ja det stemmer, du öker 2 dubbelst mot halsen på varje varv enligt diagrammerna. Lycka till :)
05.06.2020 - 14:53
![]() Erin Brown wrote:
Erin Brown wrote:
I’ve finished the neck increases and want to start the increases for the armhole, but the pattern says “once piece reaches 6 1/4 in” but at this point i’ve already done around 30 rows and the piece measures 13 in. Was i supposed to the armhole increases on the other end of the neck hole increases, or do i continue putting one dc in each dc for 6 1/4 in, or something else? A little confused. Thanks, Erin
31.05.2020 - 04:31DROPS Design answered:
Dear Mrs Brown, you incfrease for neck and armhole at the same time, ie start first increasing for neck then when piece measures 6 1/4 " start to increase for armhole (and continue to increase for neck). Happy crocheting!
02.06.2020 - 10:52
![]() Kupiec wrote:
Kupiec wrote:
Bonjour, je ne comprend pas les augmentations pour les emmanchures et je ne trouve pas dans les commentaires de réponse, merci de bien vouloir me répondre, bonne journée, Christelle
30.05.2020 - 17:22DROPS Design answered:
Bonjour Mme Kupiec, vous augmentez pour les emmanchures: d'abord 1 fois 1 bride sur le côté (devant) /des 2 côtés (dos) puis 0 à 7 fois (cf taille) 2 mailles comme le montre A.4/A.5 (= 2 augmentations = 2 brides dans 1 maille et 2 doubles brides dans 1 maille). Vous monterez ensuite des mailles en l'air sur le(s) côté(s) comme le montre cette vidéo. Bon crochet!
02.06.2020 - 09:27
![]() Sarah wrote:
Sarah wrote:
Would it be possible to make this in Baby Alpaca Silk? If so, how much yarn would be needed?
28.05.2020 - 00:00DROPS Design answered:
Dear Sarah, The DROPS Belle yarn, from which teh original modell was made belongs to the yarn goup A, while the DROPS Baby Alpaca silk is yarn group A, much thinner . Using it is not impossible, but the pattern will need recalculations of the number of stitches and rows. For the amount needed, you might use the yarn calculator, linked on the pattern's page. Happy Crafting!
28.05.2020 - 01:48
![]() Rana Totah wrote:
Rana Totah wrote:
I have a question about the neck increment is increase done each row or only at the end of every other row diagram shows that row #2 has 3 stitches but row 4 has 5
12.05.2020 - 03:05DROPS Design answered:
Dear Mrs Totah, increases for neck are done on every row, ie either at the end or at the beginning of the row as shown in A.4/A.5, row 2 in A.4/A.5 shows how to increase 1 stitch and other rows show how to increase 2 sts. Happy crocheting!
12.05.2020 - 09:44
![]() Isabel wrote:
Isabel wrote:
Ich habe ein Problem bei der Schulter. Die linke Schulter habe ich so wie in Anleitung gehäkelt (also habe ich dort zwei Reihen) Bei der rechten Schulter gibt es jetzt aber eine Unstimmigkeit: Ich habe dort in der zweiten Reihe wie beschrieben eine Masche für den Halsausschnitt zugenommen, indem ich in die erste Masche 2 Stäbchen gehäkelt habe. Dann habe ich die Reihe zu Ende gestrickt(2.Reihe). Jetzt soll ich Luftmaschen für den Halsausschnitt zunehmen, bin aber auf der Armseite.
02.04.2020 - 09:56DROPS Design answered:
Liebe Isabel, Unser Designteam wird das noch mal prüfen, ich würde selber so anpassen: linke Schulter sollte dann rechte Schulter sein, dh am Ende dieser Reihe (nach der Zunahmen) die Luftmaschenkette für den Halsausschnitt häkeln. Rechte Schulter wie zur Ende 2. Reihe häkeln und Faden abschneiden. Dann wie unter Rumpfteil weiter häkeln (mit rechter Schulter anfangen). Viel Spaß beim häkeln!
02.04.2020 - 12:54
![]() Helga wrote:
Helga wrote:
I'm sorry to say that whomever answered my question didn't addressed it correctly. I HAVE READ ALL of the "How to read a diagram", still didn't understand it!!!! My question was: Is it possible to get the instructions written instead of the diagram"?
14.03.2020 - 21:56DROPS Design answered:
Dear Helga, I am sorry, but there is no written out pattern for this cardigan. What part of the diagram causes teh problem? If nor the videos, nor the tutorial could help, you can ask for help in the store (either in person or over the phone) where you bought your DROPS yarn from.
14.03.2020 - 22:09
![]() Helga wrote:
Helga wrote:
For those of us that are not able to read a diagram, even after the training explanation, is it possible to have a written one? It's for the trim of the sleeves and the bottom edges of the top. I have finished the top and working on the sleeves but hot stuck on the trim. Can't make sense of it, even after seeing videos and reading the training on diagrams. Any help would be greatly appreciated. Thank you
12.03.2020 - 18:32DROPS Design answered:
Dear Helga, we have for you lessons that explain how to read a crochet diagram so that you can finish your work. Happy crocheting!
13.03.2020 - 08:36
|
||||||||||||||||||||||||||||||||||||||||
Beach Ballet#beachballetwrap |
||||||||||||||||||||||||||||||||||||||||
 |
 |
|||||||||||||||||||||||||||||||||||||||
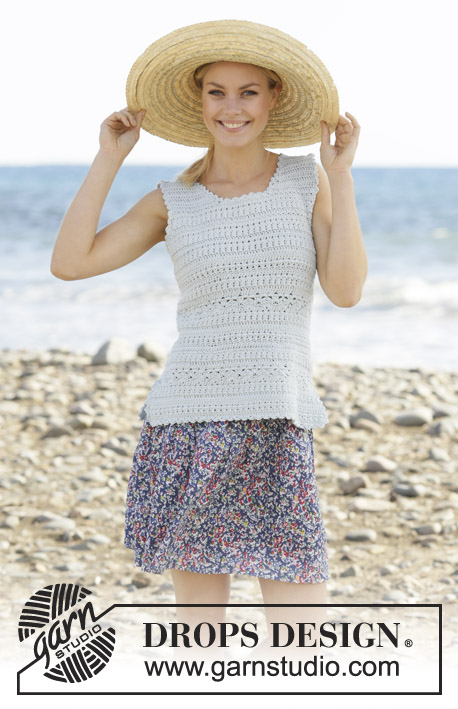
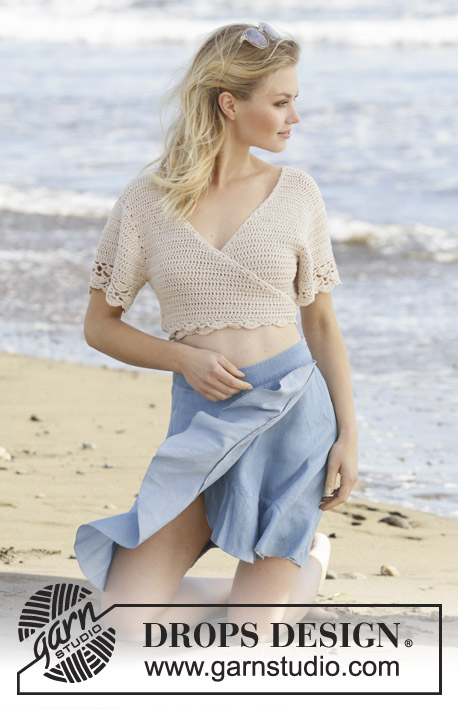
Crocheted top in DROPS Belle. The piece is worked with wrap-around style, double crochets and fans. The piece is worked top down. Sizes S - XXXL.
DROPS 199-47 |
||||||||||||||||||||||||||||||||||||||||
|
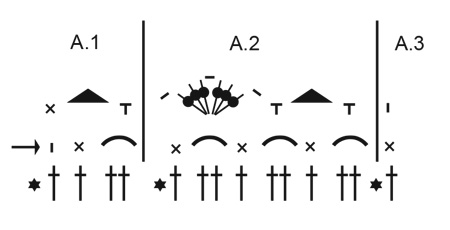
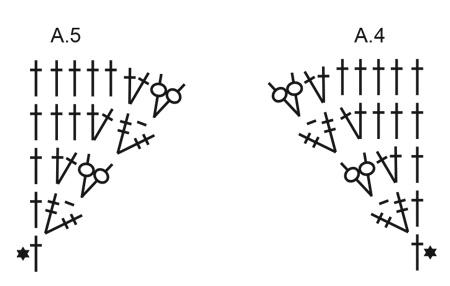
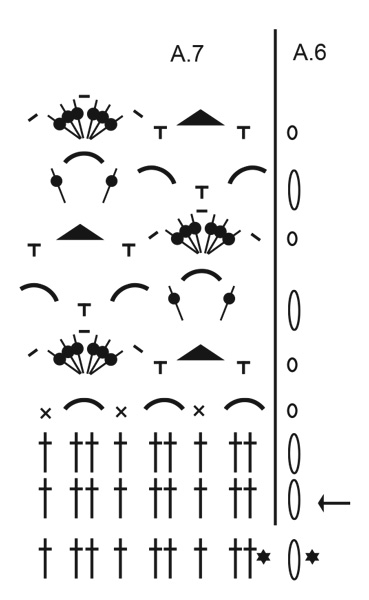
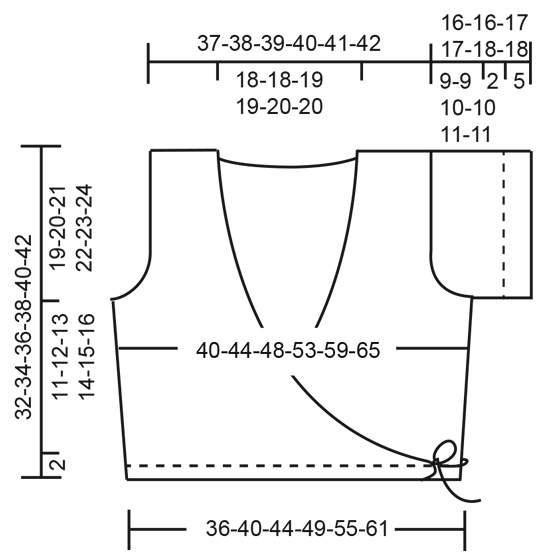
------------------------------------------------------- EXPLANATIONS FOR THE PATTERN: ------------------------------------------------------- CROCHET INFORMATION: First double crochet at the beginning of each row is replaced by 3 chain stitches. INCREASE TIP: Increase 1 double crochet by working 2 double crochets in same double crochet. Increase 2 stitches by working as shown in A.4 on right front piece and A.5 on left front piece – NOTE: First treble crochet at beginning of each row is replaced by 4 chain stitches. DECREASE TIP (for sides): Decrease 1 double crochet by working 2 double crochets together as follows: * Make 1 yarn over, insert hook through next stitch, pick up strand, 1 yarn over and pull strand through the first 2 loops on hook *, work from *-* 1 more time, make 1 yarn over and pull strand through all 3 loops on hook(= 1 double crochet decreased). PATTERN: See diagrams A.1 to A.7. (A.6 shows how rounds start and finish). INCREASE/DECREASE TIP (evenly spaced): To work out how to decrease/increase evenly, count the total number of stitches, (e.g. 68 stitches) and divide by number of decreases/increases to be made (e.g. 4) = 17. In this example, decrease by working together each 16th and 17th stitch. When increasing work 2 double crochets in each 17th double crochet. ------------------------------------------------------- START THE PIECE HERE: ------------------------------------------------------- TOP - SHORT OVERVIEW OF THE PIECE: Front and back pieces are worked back and forth separately, top down. The pieces are sewn together, and then you work fans along the bottom edge. The sleeves are worked back and forth, top down as far as the armholes, and then worked in the round. A small decorative edge is worked along the front pieces/back piece/neck. The top is wrapped around by placing the right front piece on top of the left front piece and then tying around the waist. RIGHT FRONT PIECE: Work 21-22-22-25-24-25 chain stitches with hook size 4 mm = US 6 and Belle. Turn and work 1 double crochet in the 4th chain stitch from the hook (= 2 double crochets), work 1 double crochet in each of the next 5-6-6-3-2-3 chain stitches, * skip 1 chain stitch, work 1 double crochet in each of the next 5 chain stitches *, work from *-* to end of row = 17-18-18-20-19-20 double crochets. Work a total of 6-7-8-6-7-6 rows with 1 double crochet in each double crochet – read CROCHET INFORMATION and REMEMBER THE CROCHET GAUGE! Then increase to neck and armholes at the same time as follows: NECK: On the next row (= from the right side) start to increase for neck at the end of the row – read INCREASE TIP. Increase by 1 double crochet a total of 2-3-3-0-1-1 times, then increase 2 stitches (as shown in A.4) a total of 19-19-20-26-26-29 times (= a total of 40-41-43-52-53-59 double crochets increased for neck). ARMHOLE: When the piece measures 16-16-16-17-16-14 cm = 6¼"-6¼"-6¼"-6¾"-6¼"-5 172" start to increase for armhole – read INCREASE TIP. Increase 1 double crochet 0-1-1-1-0-1 time, then increase 2 stitches 0-1-2-3-5-7 times. At the end of the first row from the wrong side work 5-5-6-7-8-8 loose chain stitches (including 3 chain stitches to turn with) for the armhole (= a total of 3-6-9-12-16-21 double crochets increased for armhole). The piece measures approx. 19-20-21-22-23-24 cm = 7½"-8"-8¼"-8¾"-9"-9½". Turn and work 1 double crochet in the 4th chain stitch from the hook (= 2 double crochets), work 1 double crochet in each of the next 1-1-2-3-4-4 chain stitches and work to end of row as before. On the next row decrease 1 double crochet in the side (i.e. towards the armhole) – read DECREASE TIP. Decrease like this every 2nd row a total of 4 times (=4 double crochets decreased), the increases for neck continue as before. When all the decreases (towards the side) and increases (for neck and armhole) are finished there are 56-61-66-80-84-96 double crochets on the last row. The piece measures approx. 30-32-34-36-38-40 cm = 11¾"-12½"-13⅜"-14¼"-15"-15¾" from the shoulder down. Cut and fasten strand. LEFT FRONT PIECE: Work 21-22-22-25-24-25 chain stitches with hook size 4 mm = US 6 and Belle. Turn and work 1 double crochet in the 4th chain stitch from the hook (= 2 double crochets), work 1 double crochet in each of the next 5-6-6-3-2-3 chain stitches, * skip 1 chain stitch, work 1 double crochet in each of the next 5 chain stitches *, work from *-* to end of row = 17-18-18-20-19-20 double crochets. Work a total of 6-7-8-6-7-6 rows with 1 double crochet in each double crochet – read CROCHET INFORMATION and REMEMBER THE CROCHET GAUGE! Then increase to neck and armholes at the same time as follows: NECK: On the next row (= from the right side) start to increase for neck at the beginning of the row – remember INCREASE TIP. Increase by 1 double crochet a total of 2-3-3-0-1-1 times, then increase 2 stitches (as shown in A.5) a total of 19-19-20-26-26-29 times (= a total of 40-41-43-52-53-59 double crochets increased for neck). ARMHOLE: When the piece measures 16-16-16-17-16-14 cm = 6¼"-6¼"-6¼"-6¾"-6¼"-5½" start to increase for the armhole – read INCREASE TIP. Increase 1 double crochet 0-1-1-1-0-1 time, then increase 2 stitches 0-1-2-3-5-7 times. At the end of the first row from the right side work 5-5-6-7-8-8 loose chain stitches (including 3 chain stitches to turn with) for the armhole (= a total of 3-6-9-12-16-21 double crochets increased for the armhole). The piece measures approx. 19-20-21-22-23-24 cm = 7½"-8"-8¼"-8¾"-9"-9½". Turn and work 1 double crochet in the 4th chain stitch from the hook (= 2 double crochets), work 1 double crochet in each of the next 1-1-2-3-4-4 chain stitches and work to end of row as before. On the next row decrease 1 treble crochet in the side (i.e. towards the armhole) – remember DECREASE TIP. Decrease like this every 2nd row a total of 4 times (=4 double crochets decreased), the increases for neck continue as before. When all the decreases (towards the side) and increases (for neck and armhole) are finished there are 56-61-66-80-84-96 double crochets on the last row. The piece measures approx. 30-32-34-36-38-40 cm = 11¾"-12½"-13⅜"-14¼"-15"-15¾" from the shoulder down. Cut and fasten strand. BACK PIECE: RIGHT SHOULDER: Work 21-22-22-25-24-25 chain stitches with hook size 4 MM = US 6 and Belle. Turn and work first row from wrong side as follwos: work 1 double crochet in 4th chain stitch from hook (= 2 double crochets), then work 1 double crochet in each of the next 5-6-6-3-2-3 chains, * skip 1 chain stitch, crochet 1 double crochet in each of the next 5 chain stitches*, repeat from *-* to end of row = 17-18-18-20-19-20 double crochets. Cut the strand and put aside LEFT SHOULDER: Work 21-22-22-25-24-25 chain stitches with hook size 4 MM = US 6 and Belle. Turn and work first row from wrong side as follows: 1 double crochet in 4th chain stitch from the hook (= 2 double crochets), work 1 double crochet in each of the next 5-6-6-3-2-3 chain stitches, * skip 1 chain stitch, work 1 double crochet in each of the next 5 chain stitches *, work from *-* to end of row = 17-18-18-20-19-20 double crochets. On the next row (from right side), crochet 1 double crochet in each double crochet until 1 double crochet remains and work 2 double crochets in the last double crochet (towards the neck = 18-19-19-21-20-21 double crochets for left shoulder. Then crochet loosely 30-30-32-32-34-34 chain stitches for neck, take right shoulder and starting from right side, crochet 1 double crochet in each of the next 16-17-17-19-18-19 double crochets (= 18-19-19-21-20-21 double crochets for right shoulder). BACK PIECE: Start on left shoulder (from wrong side) and work 1 double crochet in each of the first 18-19-19-21-20-21 double crochets, work 1 double crochet in each of the 30-30-32-32-34-34 chain stitches in the neck and 1 double crochet in each of the 18-19-19-21-20-21 double crochets on right shoulder = 66-68-70-72-74-76 double crochets. Work 1 double crochet in each double crochet until the piece measures 16-16-16-17-16-14 cm = 6¼"-6¼"-6¼"-6¾"-6¼"-5½". Now start to increase for the armholes on each side of the piece as follows: Increase 1 double crochet 0-1-1-1-0-1 times, then 2 double crochets 0-1-2-3-5-7 times = 66-74-80-86-94-106 double crochets. Cut the strand. Work the next row as follows: Work 3-3-4-5-6-6 loose chain stitches for the armhole, 1 double crochet in each double crochet and finish with 5-5-6-7-8-8 loose chain stitches (including 3 chain stitches to turn with) for the armhole = 72-80-88-96-106-118 stitches. Turn and work 1 double crochet in 4th chain stitch from hook (= 2 double crochets), work 1 double crochet in each of the next 1-1-2-3-4-4 chain stitches, 1 double crochet in each double crochet and 1 double crochet in each of the 3-3-4-5-6-6 last chain stitches = 72-80-88-96-106-118 double crochets. On the next row decrease 1 double crochet on each side of the piece – remember DECREASE TIP. Decrease like this every 2nd row a total of 4 times = 64-72-80-88-98-110 double crochets. Continue working until you have the same number of rows as on the front pieces, i.e. the piece measures approx. 30-32-34-36-38-40 cm = 11¾"-12½"-13⅜"-14¼"-15"-15¾" from the shoulder down. Cut and fasten strand. ASSEMBLY: Sew shoulder seams and side seams - sew in outermost loop of outermost stitch so the seam is flat. FAN-EDGE (bottom edge): = 176-194-212-248-266-302 double crochets on last row (both front and back pieces). Start on right front piece from the wrong side and work as follows: Work A.1 over the first 4 double crochets, A.2 until there is 1 double crochet left (= 19-21-23-27-29-33 repeats of 9 double crochets) and finish with A.3 over the last double crochet. When A.1 to A.3 have been completed, cut and fasten the strand. DECORATIVE EDGE (along front pieces and back piece/neck): Start at bottom of tip on right front piece from the right side and fasten the strand with 1 slip stitch in the first stitch. Work 1 single crochet around the first row, * 3 chain stitches, 1 single crochet around next row *, work from *-* along the whole front piece, neck and down the left front piece, finishing at the tip. Cut and fasten the strand. SLEEVE: The sleeve is worked top down, starting with the sleeve cap. Work 42-48-44-45-42-46 chain stitches (including 3 chain stitches to turn with) with hook size 4 mm = US 6 and Belle. Turn and work 1 double crochet in 4th chain stitch from the hook (= 2 double crochets), work 1 double crochet in each of the next 2-1-4-5-2-6 chain stitches, * skip 1 chain stitch, work 1 double crochet in each of the next 5 chain stitches *, work from *-* to end of row = 34-39-36-37-34-38 double crochets. On the next row increase 2 double crochets on each side of the piece (increase 2 double crochets by working 3 double crochets in same double crochet). Increase like this a total of 7-7-8-8-9-9 times on each side = 62-67-68-69-70-74 double crochets. Cut the strand. Work 3-3-4-5-6-6 loose chain stitches for armhole, work 1 double crochet in each of the 62-67-68-69-70-74 double crochets and finish with 3-3-4-5-6-6 loose chain stitches for armhole. Then join the piece with 1 slip stitch in the first chain stitch = 68-73-76-79-82-86 stitches. Now work in the round as follows: Work A.6 (shows how rounds start and finish), repeat A.7 to end of round (= 7-8-8-9-9-10 repeats of 9 double crochets) – AT THE SAME TIME on the first round adjust the number of stitches by increasing/decreasing to 64-73-73-82-82-91 double crochets – read INCREASE/DECREASE TIP. Continue until A.6 and A.7 have been completed. Cut and fasten strand. Work the other sleeve in the same way. ASSEMBLY: Sew in sleeves - sew in outermost loop of outermost stitch so the seam is flat. TWISTED CORD: Cut 2 strands measuring 6 metres = 240" of Belle. Twist them together until they begin to resist, fold double and they will continue to twist. Tie a knot in each end. Tie one end to the tip of the right front piece. Make 1 more cord in the same way and tie to the tip of the left piece. |
||||||||||||||||||||||||||||||||||||||||
Diagram explanations |
||||||||||||||||||||||||||||||||||||||||
|
||||||||||||||||||||||||||||||||||||||||
 |
||||||||||||||||||||||||||||||||||||||||
 |
||||||||||||||||||||||||||||||||||||||||
 |
||||||||||||||||||||||||||||||||||||||||
 |
||||||||||||||||||||||||||||||||||||||||
Have you finished this pattern?Tag your pictures with #dropspattern #beachballetwrap or submit them to the #dropsfan gallery. Do you need help with this pattern?You'll find 12 tutorial videos, a Comments/Questions area and more by visiting the pattern on garnstudio.com. © 1982-2026 DROPS Design A/S. We reserve all rights. This document, including all its sub-sections, has copyrights. Read more about what you can do with our patterns at the bottom of each pattern on our site. |
||||||||||||||||||||||||||||||||||||||||


With over 40 years in knitting and crochet design, DROPS Design offers one of the most extensive collections of free patterns on the internet - translated to 17 languages. As of today we count 324 catalogs and 12260 patterns - 12250 of which are translated into English (US/in).
We work hard to bring you the best knitting and crochet have to offer, inspiration and advice as well as great quality yarns at incredible prices! Would you like to use our patterns for other than personal use? You can read what you are allowed to do in the Copyright text at the bottom of all our patterns. Happy crafting!
Post a comment to pattern DROPS 199-47
We would love to hear what you have to say about this pattern!
If you want to leave a question, please make sure you select the correct category in the form below, to speed up the answering process. Required fields are marked *.