
Popular categories
Looking for a yarn?


Comments / Questions (37)
![]() Lara wrote:
Lara wrote:
Complimenti per il bellissimo poncho! Purtroppo dalle indicazioni non mi è chiaro se è il risultato di due rettangoli di uguale lunghezza, 64 cm. Così nelle indicazioni delle due sezioni, mentre dal grafico finale una sezione appare più piccola. Potreste aiutarmi? Arrivata alla seconda sezione non so quanto farla grande. Grazie!
07.10.2019 - 06:57DROPS Design answered:
Buongiorno Lara. Il poncho è lavorato in due rettangoli uguali. Per unirli dovrà appoggiare uno dei lati corti di un rettangolo su un lato lungo dell’altro, seguendo le indicazioni della confezione. Buon lavoro!
07.10.2019 - 07:50
![]() Corine wrote:
Corine wrote:
Dank voor dit prachtige patroon; ik ven enorm blij met het eindresultaat!
07.09.2019 - 16:38
![]() Corine wrote:
Corine wrote:
De tekening met de omtrek van deel A en B is niet meer zichtbaar. Daardoor weet ik niet hoe lang en breed deel A dient te zijn. Kunt u mij dit vertellen of de tekening terugplaatsen?\\\\r\\\\nDank!!!?
17.08.2019 - 18:24
![]() Corine Steijger wrote:
Corine Steijger wrote:
Wat een leuk patroon. Ik begrijp het deel dat aan dat zijkant gehaakt moet worden echter niet. Als ik de eerste toer heb gehaakt zoals u hebt omschreven, moet ik dan verder met de toeren 3 t/m 6? Groet Corine
13.08.2019 - 22:24DROPS Design answered:
Dag Corine,
Als je TOER 1 hebt gehaakt dan ga je daarna verder met TOER 2 zoals beschreven in het patroon. Daarna ga je pas verder met TOER 3 tm 6, dus gewoon op chronologische volgorde. Bij elke toer staat aangegeven welk telpatroon het is. De telpatronen zijn dus de uitgetekende toeren.
01.09.2019 - 14:23
![]() Jaulin wrote:
Jaulin wrote:
Bonjour, je suis en train de faire ce poncho mais je bloque un peu sur 2 choses la 1ère lorsque je fais A.2 5 fois faut-il tourné l'ouvrage à chaque fois. Ensuite la partie A est plus petite combien faut il faire de rang ou combien doit mesurer cette partie. Merci par avance. Nadia
26.06.2019 - 15:38DROPS Design answered:
Bonjour Mme Jaulin, à chaque rang, vous devez crocheter: en lisant les diagrammes de gauche à droite: 1 x A.1, 5 x A.2 (reprenez au début de A.2 à chaque nouveau motif) et 1 x A.3, tournez et crochetez 1 x A.3, 5 x A.2 et 1 x A.1 (en lisant le diagramme de droite à gauche, répétez A.2 à chaque fois en le reprenant au début). Les 2 pièces sont identiques, mais sur le schéma, on ne voit qu'une petite partie de A - cette vidéo montre l'assemblage d'un poncho au tricot réalisé de la même façon, avec 2 rectangles identiques, l'assemblage sera naturellement également différent ici. Bon crochet!
27.06.2019 - 08:26
![]() Inéz Miller wrote:
Inéz Miller wrote:
Hi, I've started the pattern but have a question. Where is section B? Is the pattern only for section A (A1, A2, A3...) ? After after row 6 it just say that I should repeat 3-6 until the desired lenght. Do I make a second piece in the same pattern with different measurements to create B? It's a lovely pattern and I would really like to finish it but am stuck. Please help. Regards Inéz
12.06.2019 - 16:56DROPS Design answered:
Dear Mrs Miller, you crochet a total of 2 identical pieces that you will sew together A to B (see ASSEMBLY) - when working pattern after row 6 have been worked the first time, repeat row 3 to 6 until the desired length. Happy crocheting!
13.06.2019 - 08:55
![]() Marit Strindlund wrote:
Marit Strindlund wrote:
Hej! Jag har svårt att förstå hur ni menar på varv 3....får inte ihop det alls😢 med beskrivningen eller diagrammet.... så snälla hjälp mig gärna med närbild
03.06.2019 - 21:02
![]() Maria Teresa wrote:
Maria Teresa wrote:
Ich finde diesen Poncho wunderschön. Habe mir Wolle und Anleitung besorgt, aber ab reihe 3 verzweifle ich und komme nicht weiter -
26.05.2019 - 13:54DROPS Design answered:
Liebe Maria Teresa, folgen Sie Masche nach Masche die schriffliche Anleitung, dh bei der 3. Reihe häkeln Sie jetzt die Hälfte einer neuen Reihe mit Blumen (= die untere Seite der nächsten Reihe: A.1 x 1, dann A.2 wiederholen und mit A.3 enden (die Kettmasche un den nächsten (= letzten) Luftmaschenbogen = schwarzer Punkt an der Rechten Seite in A.3. Viel Spaß beim häkeln!
27.05.2019 - 10:56
![]() Ruth Mwewa wrote:
Ruth Mwewa wrote:
This is lovely
21.05.2019 - 21:32
![]() Daniela Giammatteo wrote:
Daniela Giammatteo wrote:
Semplicemente meraviglioso
21.02.2019 - 11:58
|
||||||||||||||||||||||||||||
Sweet Jasmine#sweetjasmineponcho |
||||||||||||||||||||||||||||
 |
 |
|||||||||||||||||||||||||||
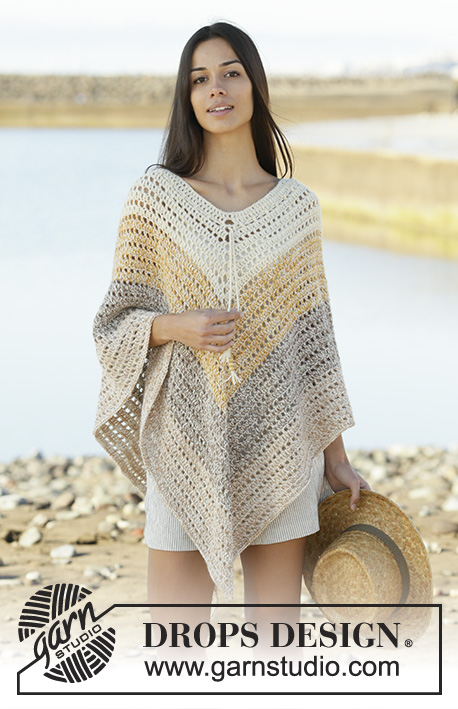
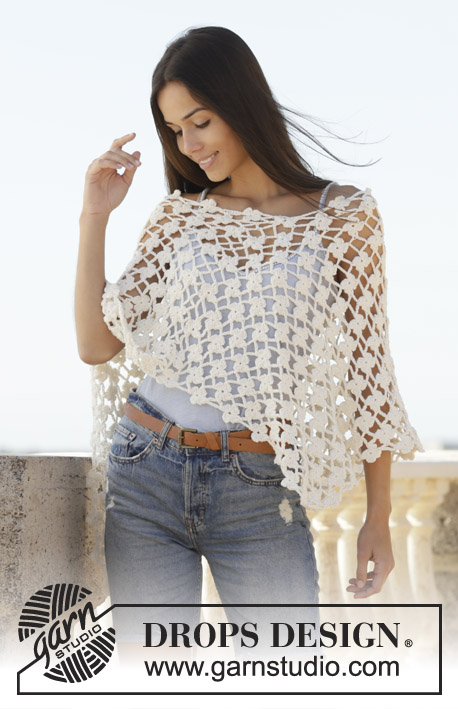
Crocheted poncho in DROPS Merino Extra Fine. The piece is worked with flower pattern. Sizes S - XXXL.
DROPS 200-38 |
||||||||||||||||||||||||||||
|
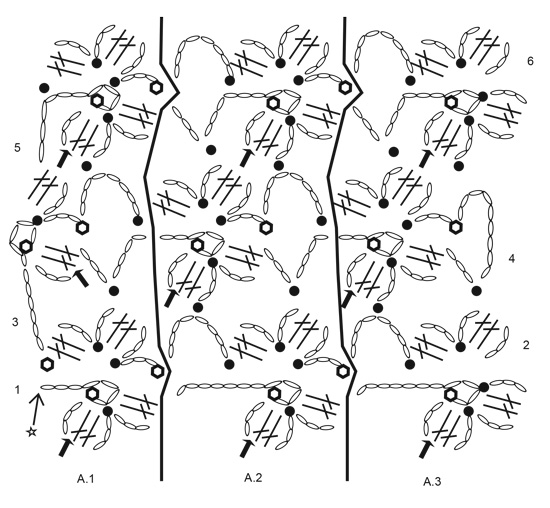
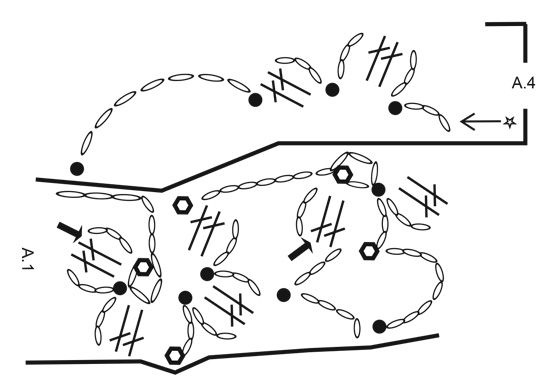
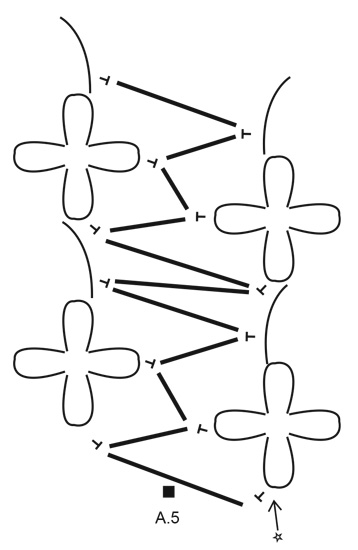
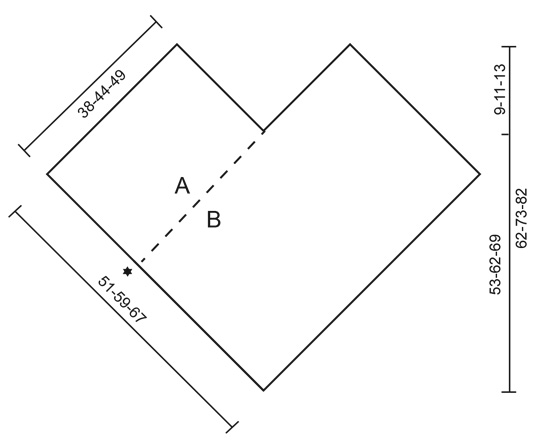
------------------------------------------------------- EXPLANATIONS FOR THE PATTERN: ------------------------------------------------------- PATTERN: See diagrams A.1 to A.5 (A.5 shows how to crochet the 2 sections together). ------------------------------------------------------- START THE PIECE HERE: ------------------------------------------------------- PONCHO - SHORT OVERVIEW OF THE PIECE: The piece is worked back and forth in 2 sections which are worked together to finish. There are 2 different patterns for the poncho: One with diagrams and one with further explanation to the diagrams. PONCHO (pattern with diagrams): Start with hook size 4.5 mm = US 7 and Merino Extra Fine and work pattern as follows: Work A.1, A.2 a total of 5-6-7 times, A.3. Continue back and forth like this. REMEMBER THE CROCHET GAUGE! When A.1 to A.3 have been completed in height, repeat rows 3 to 6 until the piece measures approx. 64-74-84 cm = 25¼"-29⅛"-33" – adjust so you finish after row 4. Do not cut the strand! Continue from EDGE ALONG SIDE (further down the pattern)! PONCHO (pattern with explanations to the diagrams): Start with hook size 4.5 mm = US 7 and Merino Extra Fine and work pattern as follows: ROW 1: Work A.1 as follows: 7 chain stitches, 1 slip stitch in 4th chain stitch from hook (= chain-stitch ring), 3 chain stitches, turn the piece. Around the chain-stitch ring work (2 double crochets, 3 chain stitches, 1 slip stitch, 3 chain stitches, 2 double crochets). Work A.2 as follows: * 11 chain stitches, 1 slip stitch in 4th chain stitch from hook (=chain-stitch ring), 3 chain stitches, turn the piece. Around chain-stitch ring work (2 double crochets, 3 chain stitches, 1 slip stitch, 3 chain stitches, 2 double crochets) *, work from *-* a total of 5-6-7 times. Work A.3 as follows: 11 chain stitches, 1 slip stitch in 4th chain stitch from hook (=chain-stitch ring), 3 chain stitches, turn the piece. Around the chain-stitch ring work (2 double crochets, 3 chain stitches, 1 slip stitch, 3 chain stitches, 2 double crochets, 3 chain stitches, 1 slip stitch). REMEMBER THE CROCHET GAUGE! ROW 2: Work A.3 as follows: 3 chain stitches, around first chain-stitch ring work (2 double crochets, 3 chain stitches, 1 slip stitch, 3 chain stitches, 2 double crochets). Work 1 slip stitch around first chain-space in A.3 on row below, 8 chain stitches. Work A.2 as follows: * 1 slip stitch in last chain stitch on same chain-space, 3 chain stitches. Around next chain-stitch ring work (1 slip stitch, 3 chain stitches, 2 double crochets, 3 chain stitches, 1 slip stitch, 3 chain stitches, 2 double crochets). Work 1 slip stitch around next chain-space on row below, 8 chain stitches *, work from *-* a total of 5-6-7 times. Work A.1 as follows: 1 slip stitch in last chain stitch on same chain-space, 3 chain stitches. Around next chain-stitch ring work (1 slip stitch, 3 chain stitches, 2 double crochets, 3 chain stitches, 1 slip stitch, 3 chain stitches, 2 double crochets). Work 1 slip stitch in last chain stitch on row below. ROW 3: Work A.1 as follows: 11 chain stitches, 1 slip stitch in 4th chain stitch from hook (=chain-stitch ring), 3 chain stitches, turn the piece. Around the chain-stitch ring work 2 double crochets. Work 3 chain stitches, skip 1 chain-space on row below, 1 slip stitch around next chain-space, 4 chain stitches. Work A.2 as follows: * 6 chain stitches, 1 slip stitch in 4th chain stitch from hook (= chain-stitch ring), 3 chain stitches, turn the piece. Around the chain-stitch ring work 2 double crochets, skip 2 chain-spaces on row below, 1 slip stitch around next chain-space, 3 chain stitches. Around the same chain-stitch ring work (1 slip stitch, 3 chain stitches, 2 double crochets). Work 3 chain stitches, skip 1 chain-space on row below, 1 slip stitch around the same chain-space, 4 chain stitches *, work from *-* a total of 5-6-7 times. Work A.3 as follows: 6 chain stitches, 1 slip stitch in 4th chain stitch from hook (= chain-stitch ring), 3 chain stitches, turn the piece. Around the chain-stitch ring work 2 double crochets, skip 2 chain-spaces on row below, 1 slip stitch around the next chain-space, 3 chain stitches. Around the same chain-stitch ring work (1 slip stitch, 3 chain stitches, 2 double crochets, 3 chain stitches). Skip 1 chain-space on the row below, 1 slip stitch around the next chain-space. ROW 4: Work A.3 as follows: 9 chain stitches, skip 2 chain stitches on row below, 1 slip stitch in next chain stitch, 3 chain stitches. Around first chain-stitch ring work (1 slip stitch, 3 chain stitches, 2 double crochets, 3 chain stitches, 1 slip stitch, 3 chain stitches, 2 double crochets). Work A.2 as follows: * 1 slip stitch around next chain-space on row below, 8 chain stitches, skip 1 slip stitch + 2 chain stitches on row below, 1 slip stitch in next chain stitch, 3 chain stitches. Around next chain-stitch ring work (1 slip stitch, 3 chain stitches, 2 double crochets, 3 chain stitches, 1 slip stitch, 3 chain stitches, 2 double crochets) *, work from *-* a total of 5-6-7 times. Work A.1 as follows: 1 slip stitch around next chain-space on row below, 8 chain stitches, skip 1 slip stitch + 2 chain stitches on row below, 1 slip stitch in next chain stitch, 3 chain stitches. Around the last chain-stitch ring work (1 slip stitch, 3 chain stitches, 2 double crochets). ROW 5: Work A.1 as follows: 10 chain stitches, 1 slip stitch in 4th chain stitch from hook (=chain-stitch ring), 3 chain stitches, turn the piece. Around the chain-stitch ring work 2 double crochets, skip 2 chain-spaces on row below, 1 slip stitch around next chain-space, 3 chain stitches. Around the same chain-stitch ring work (1 slip stitch, 3 chain stitches, 2 double crochets). Work A.2 as follows: * 3 chain stitches, skip 1 chain-space from row below, 1 slip stitch around next chain-space, 10 chain stitches, 1 slip stitch in 4th chain stitch from hook (=chain-stitch ring), 3 chain stitches, turn the piece. Around the chain-stitch ring work 2 double crochets, skip 2 chain-spaces on row below, 1 slip stitch around next chain-space, 3 chain stitches. Around the same chain-stitch ring work (1 slip stitch, 3 chain stitches, 2 double crochets) *, work from *-* a total of 5-6-7 times. Work A.3 as follows: 3 chain stitches, skip 1 chain-space on row below, 1 slip stitch around next chain-space, 10 chain stitches, 1 slip stitch in 4th chain stitch from the hook (=chain-stitch ring), 3 chain stitches, turn the piece. Around the chain-stitch ring work 2 double crochets, skip 2 chain-spaces on row below, 1 slip stitch around next chain-space, 3 chain stitches. Around the same chain-stitch ring work (1 slip stitch, 3 chain stitches, 2 double crochets, 3 chain stitches, 1 slip stitch). ROW 6: Work A.3 as follows: 3 chain stitches, around the first chain-stitch ring work (2 double crochets, 3 chain stitches, 1 slip stitch, 3 chain stitches, 2 double crochets). Work 1 slip stitch around the next chain-space on row below, 8 chain stitches. Work A.2 as follows: * skip 1 slip stitch + 2 chain stitches on row below, 1 slip stitch in next chain stitch, 3 chain stitches. Around the next chain-stitch ring work (1 slip stitch, 3 chain stitches, 2 double crochets, 3 chain stitches, 1 slip stitch, 3 chain stitches, 2 double crochets). Work 1 slip stitch around the next chain-space on row below, 8 chain stitches *, work from *-* a total of 5-6-7 times. Work A.1 as follows: Skip 1 slip stitch + 2 chain stitches on row below, 1 slip stitch in next chain stitch, 3 chain stitches. Around the last chain-stitch ring work (1 slip stitch, 3 chain stitches, 2 double crochets, 3 chain stitches, 1 slip stitch, 3 chain stitches, 2 double crochets), 1 slip stitch around the next chain-space. Repeat rows 3 to 6 until the piece measures approx. 64-74-84 cm = 25¼"-29⅛"-33" – adjust so that you finish after row 4. Do not cut the strand! Continue with EDGE ALONG SIDE – read description below! EDGE ALONG SIDE: From here you continue working along the one side of the piece so there is a complete flower along the side with A.1. Work pattern according to diagram A.4 as follows: * Work 3 chain stitches. Around the chain-stitch ring work (1 slip stitch, 3 chain stitches, 2 double crochets, 3 chain stitches, 1 slip stitch, 3 chain stitches, 2 double crochets), 1 slip stitch around the next chain-space, 7 chain stitches, skip 1 slip stitch, work 1 slip stitch around the next chain-space *, work from *-* down the side. Finish with 1 slip stitch in first stitch worked on piece (= first chain stitch in A.1). Cut and fasten the strand. Work the second section in the same way. ASSEMBLY: Lay the short side (A) on the one section towards the bottom of the other section (B) - see illustration with black star – lay the sides so the flowers on the one section lie between the flowers on the other section. Work the 2 sections together as shown in A.5 and described below: NOTE: When working slip stitches in the petals, work in the spaces between 2 double crochets. Fasten the strand with 1 slip stitch in the first petal on section B, * work 3 chain stitches, 1 slip stitch in the next petal on section A, work 3 chain stitches, 1 slip stitch in the next petal on section B, 3 chain stitches, 1 slip stitch in the next petal on section A, 3 chain stitches, 1 slip stitch around the next chain-space in section B, 3 chain stitches, 1 slip stitch around the chain-space in section A, 3 chain stitches, 1 slip stitch in next petal on section B *, work from *-* along the whole side. Cut and fasten strand. Repeat on back of poncho so the front and back are the same. |
||||||||||||||||||||||||||||
Diagram explanations |
||||||||||||||||||||||||||||
|
||||||||||||||||||||||||||||
 |
||||||||||||||||||||||||||||
 |
||||||||||||||||||||||||||||
 |
||||||||||||||||||||||||||||
 |
||||||||||||||||||||||||||||
Have you finished this pattern?Tag your pictures with #dropspattern #sweetjasmineponcho or submit them to the #dropsfan gallery. Do you need help with this pattern?You'll find 6 tutorial videos, a Comments/Questions area and more by visiting the pattern on garnstudio.com. © 1982-2026 DROPS Design A/S. We reserve all rights. This document, including all its sub-sections, has copyrights. Read more about what you can do with our patterns at the bottom of each pattern on our site. |
||||||||||||||||||||||||||||


With over 40 years in knitting and crochet design, DROPS Design offers one of the most extensive collections of free patterns on the internet - translated to 17 languages. As of today we count 324 catalogs and 12291 patterns - 12281 of which are translated into English (US/in).
We work hard to bring you the best knitting and crochet have to offer, inspiration and advice as well as great quality yarns at incredible prices! Would you like to use our patterns for other than personal use? You can read what you are allowed to do in the Copyright text at the bottom of all our patterns. Happy crafting!
Post a comment to pattern DROPS 200-38
We would love to hear what you have to say about this pattern!
If you want to leave a question, please make sure you select the correct category in the form below, to speed up the answering process. Required fields are marked *.