
Looking for a yarn?


Comments / Questions (63)
![]() Carina Steens wrote:
Carina Steens wrote:
Zeer mooiv
16.01.2025 - 20:24
![]() Mia wrote:
Mia wrote:
Jeg har svært ved at få diagrammerne til at gå op.. når jeg hækler runden over stjernen, slutter jeg A1 med en stangmaske og ikke en luftmaske, hvis jeg skal stoppe to stangmasker før luftmaskebuen hvor jeg skal lave A3 første gang. Hvad gør jeg forkert?
21.08.2024 - 21:41DROPS Design answered:
Hej Mia, hvis du tænker at hver 2. række altid består af skiftevis 1 stangmaske og 1 luftmaske og at du altid i hvert hjørne hækler 2 st 4lm 2 st i samme luftmaskebue, så tror vi at du løser det :)
22.08.2024 - 11:59
![]() Elín wrote:
Elín wrote:
Það vantar seinni hluta málsgreinarinnar þar sem aukið er út fyrir axlirnar í íslensku þýðingunni. Restin af textanum er í ensku útgáfunni.
01.07.2024 - 19:01DROPS Design answered:
Blessuð Elín. Takk fyrir ábendinguna. Þetta hefur verið leiðrétt.
02.07.2024 - 14:03
![]() Sam wrote:
Sam wrote:
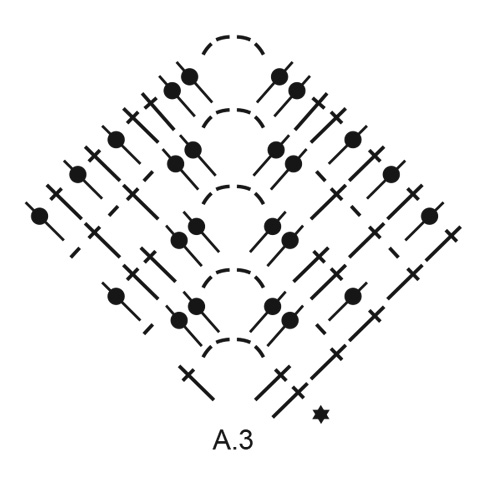
Are the first two stitches shown in the diagram the last two before chain space? So are we then starting from two stitches in with regard to the diagram? For example, A.2 row 2 shows dc, ch st, dc dc; do we start at the dc around ch st since the first 2 are a continuation of A.1?? Thanks!!!
27.06.2024 - 15:32DROPS Design answered:
Dear Sam, correct, so you will start A.2 when 2 sts remain before chain space and work (1 dc in next dc, 1 ch, around the next ch-space work: 2 dc + 4 ch + 2 dc, then work 1 chain, skip next dc*), then continue with A.1 = *1 dc in next dc, 1 chain, skip 1 dc*, repeat from *-* for A.1. Happy crocheting!
27.06.2024 - 16:08
![]() Sam wrote:
Sam wrote:
When the pattern reads “2 dc before chain space”, the A.1/2/3 is to be followed from the first symbol in the appropriate diagram’s row? As one gets further in the diagram, it becomes very difficult to fit those sts in the chain space… am I missing something? Also, is A.2 only worked in full once? Thanks!
27.06.2024 - 04:53DROPS Design answered:
Dear Sam, you first work and repeat A.1 until 2 sts remain before the chain space, then work as shown in A.2 (these 2 sts are drawn on first row in diagram = row with a black star), then continue with A.1 - you can add markers at the beg of A.2/A.3 to help you to check diagrams. read more about diagrams here under Several different diagrams worked consecutively on the row/round:. Happy crocheting!
27.06.2024 - 08:52
![]() Elisabeth Olsen wrote:
Elisabeth Olsen wrote:
Hei! I oppskrifta står det farge gulstøvete nr 2110, lys beige nr 618 og camel nr 73. Gulstøvete finner jeg ikke i sortimentet deres. Er den utgått? Lys beige heter nougat og Camel hadde et annet nummer. Hva betyr dette? Mvh Elisabeth Olsen
21.06.2024 - 15:42DROPS Design answered:
Hej Elisabeth, det betyder at nogle af farverne er skiftet ud siden vi lavede ponchoen, det gør vi regelmæssigt for at holde farvekortet opdateret. Du kan bruge DROPS Alpaca 2923 istedet for 2110 :)
25.06.2024 - 13:34
![]() Steph wrote:
Steph wrote:
Should the edges be curly at only 4-5 rows in?
20.06.2024 - 22:04DROPS Design answered:
Dear Steph, no, the edges should not be curly. Edges only do that if the starting chain is much thighter than it should be. Happy Stitching!
20.06.2024 - 23:48
![]() Steph wrote:
Steph wrote:
I’m new to crochet diagrams. I understand I read right to left and bottom to top, but do I complete the entire four rows of diagram per completion of vertical row? Do I continue this with each color? When do I switch? Also, can you delete my last question as it contains my entire name? Thanks
19.06.2024 - 04:52DROPS Design answered:
Dear Steph, you have to follow each row each diagram, ie work first row 1 all diagrams as explained and join in the round, then work 2nd row all diagrams as explained and join in the round and so on - see this lesson under Several different diagrams worked consecutively on the row/round: . Happy crocheting!
19.06.2024 - 08:19
![]() Stephanie Anne Thorpe wrote:
Stephanie Anne Thorpe wrote:
Can you write out directions for beach paradise poncho? I’mhaving trouble reading diagrams despite google and YouTube searches…
19.06.2024 - 03:38DROPS Design answered:
Dear Stephanie Anne, please undertsand, that with many thousand patterns available for free on our site, we cannot modify our patterns. HERE we have a lesson on how to read crochet patterns and you can always ask for help (either in person or over the phone, in the store where you bought your DROPS yarn from. Happy Crafting!
19.06.2024 - 04:02
![]() Ines Glock wrote:
Ines Glock wrote:
Leider habe ich auch das Problem mit der ungeraden Maschenanzahl. Wenn vor dem Luftmaschenbogen jeweils eine Luftmasche kommt, dann ist es immer ungerade. Bitte mal eine verständliche Lösung formulieren.
07.01.2024 - 13:12DROPS Design answered:
Liebe Frau Glock, vielleicht können Sie uns sagen, welche Größe Sie häkeln, so kann man versuchen, Ihnen anders zu erklären. Danke im voraus für Ihr Verständnis.
08.01.2024 - 10:28
|
|||||||||||||
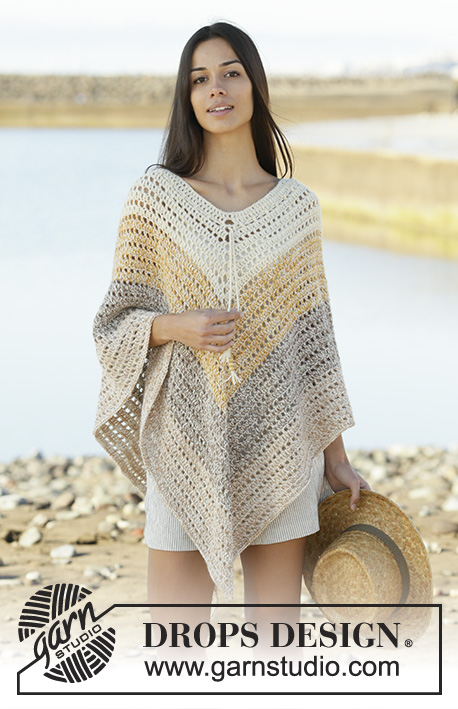
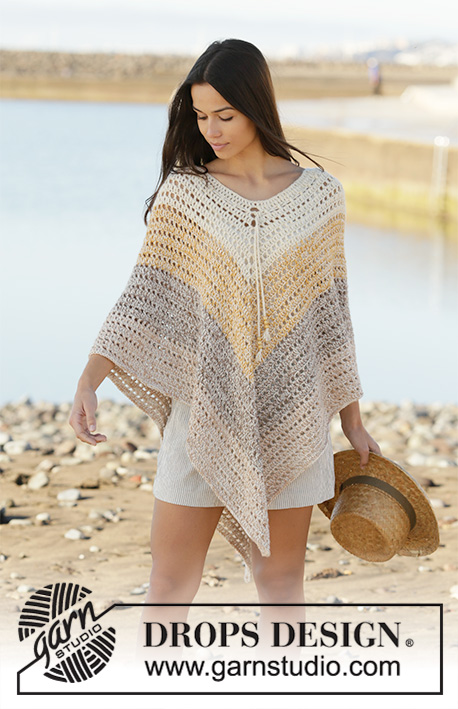
Beach Paradise#beachparadiseponcho |
|||||||||||||
 |
 |
||||||||||||
Crochet poncho with stripes in DROPS Alpaca. Piece is crocheted top down with 2 strands Alpaca. Size: S - XXXL
DROPS 200-32 |
|||||||||||||
|
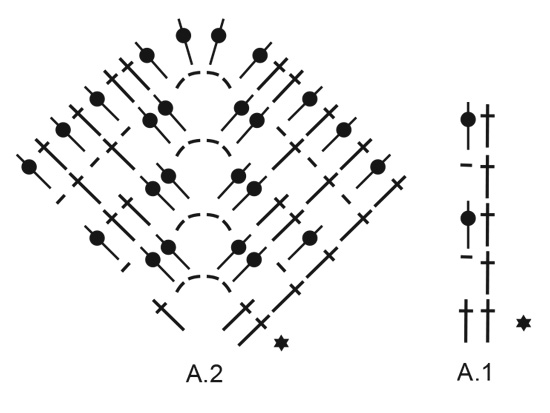
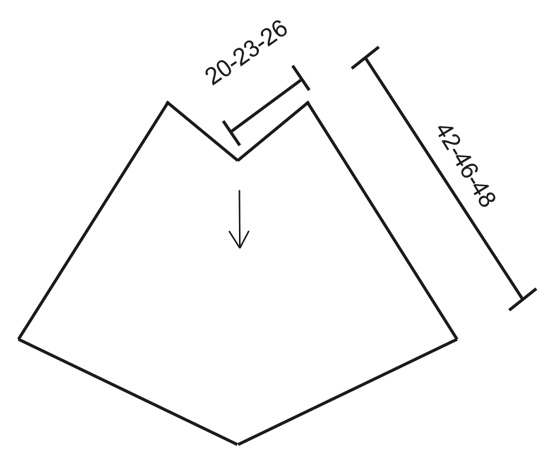
---------------------------------------------------------- EXPLANATION FOR THE PATTERN: ---------------------------------------------------------- CROCHET TIP: Replace first double crochet on round with 3 chain stitches. Finish round with 1 slip stitch in 3rd chain stitch. PATTERN: See diagrams A.1, A.2 and A.3. STRIPES: Work 4 stripes, work every stripe with 2 strands. STRIPE 1: Work 10½-11½-12 cm = 4⅛"-4½"-4¾" with off white and wheat. STRIPE 2: Work 10½-11½-12 cm = 4⅛"-4½"-4¾" with off white and goldenrod. STRIPE 3: Work 10½-11½-12 cm = 4⅛"-4½"-4¾" with off white and light beige. STRIPE 4: Work 10½-11½-12 cm = 4⅛"-4½"-4¾" with off white and camel beige. ---------------------------------------------------------- START THE PIECE HERE: ---------------------------------------------------------- PONCHO - SHORT OVERVIEW OF THE PIECE: Worked in the round, top down. Work entire piece in 2 strands Alpaca with STRIPES - see explanation above. PONCHO: Work 128-144-162 chain stitches with hook size 5 mm = US H/8 and 1 strand off white and 1 strand wheat. Form a ring by working 1 slip stitch in first chain stitch. ROUND 1: Work 1 double crochet – READ CROCHET TIP in explanation above, work 1 double crochet in each of the first 6-7-7 chain stitches, skip 1 chain stitch, * work 1 double crochet in each of the next 7-8-8 chain stitches, skip 1 chain stitch *, work from *-* the entire round and finish with 1 slip stitch in first double crochet = 112-128-144 double crochets. ROUND 2: Work 1 double crochet, work 1 double crochet in each of the next 27-31-35 double crochets, * work 4 chain stitches, work 1 double crochet in each of the next 28-32-36 double crochets *, work from *-* 3 times in total and finish with 4 chain stitches and 1 slip stitch in first double crochet. There are now 4 chain spaces on round with 28-32-36 double crochets between each of the chain spaces. REMEMBER THE CROCHET GAUGE! Now work according to diagrams A.1-A.3 as follows: NOTE: Round with star has already been worked, begin on next round Work A.1 until 2 double crochets remain before the first chain space, work A.2 one time (= first shoulder), work A.1 until 2 double crochets remain before next chain space, work A.3 one time (= mid front, insert a marker here), work A.1 until 2 double crochets remain before next chain space, work A.2 one time (= other shoulder), work A.1 until 2 double crochets remain before the last chain space, work A.3 one time (= mid back, insert a marker here) and finish round with 1 slip stitch in first stitch. When diagrams have been worked 1 time vertically, there are 176-192-208 stitches on round. Now the increase at the shoulders is done. Only increase mid front and mid back onwards. Work according to diagrams A.1 and A.3 as follows: Work A.1 until 2 double crochets remain before the first chain space with marker (= mid front), work A.3 one time, work A.1 until 2 double crochets remain before the next chain space with marker (= mid back), work A.3 one time and finish with 1 slip stitch in first stitch. Continue to work like this until all stripes are done, piece measures approx. 42-46-48 cm = 16½"-18"-19" from neck to bottom, along the shortest side, adjust so that last round is a round with double crochets (2nd or 4th round in A.1/A.3). Fasten off. TWINED STRING: Cut 4 lengths off white and 4 lengths wheat of 5 metres = 200" each. Twine the strands tog until they resist, fold the strands double so that they twine. Fasten 3 beads at each end of string. Tie a knot at the ends so that the strings is twined and the beads stay on. Cut the end of string on the underside of knot so that the end fringes. Pull the string up and down in 3rd round around the neck - start and finish mid front. |
|||||||||||||
Diagram explanations |
|||||||||||||
|
|||||||||||||
|
|||||||||||||
|
|||||||||||||
|
|||||||||||||
Have you finished this pattern?Tag your pictures with #dropspattern #beachparadiseponcho or submit them to the #dropsfan gallery. Do you need help with this pattern?You'll find 9 tutorial videos, a Comments/Questions area and more by visiting the pattern on garnstudio.com. © 1982-2025 DROPS Design A/S. We reserve all rights. This document, including all its sub-sections, has copyrights. Read more about what you can do with our patterns at the bottom of each pattern on our site. |
|||||||||||||


With over 40 years in knitting and crochet design, DROPS Design offers one of the most extensive collections of free patterns on the internet - translated to 17 languages. As of today we count 314 catalogs and 11821 patterns - 11811 of which are translated into English (US/in).
We work hard to bring you the best knitting and crochet have to offer, inspiration and advice as well as great quality yarns at incredible prices! Would you like to use our patterns for other than personal use? You can read what you are allowed to do in the Copyright text at the bottom of all our patterns. Happy crafting!
Post a comment to pattern DROPS 200-32
We would love to hear what you have to say about this pattern!
If you want to leave a question, please make sure you select the correct category in the form below, to speed up the answering process. Required fields are marked *.