Comments / Questions (196)
![]() Helga wrote:
Helga wrote:
Hei! Jeg har akkurat startet å strikkesirkelen på diagram a1. Når jeg er ferdig med diagrammet har jeg 24 og ikke 48 masker. Hva gjør jeg feil? Hvordan får jeg økt 8 og ikke 4 på omgangen?
21.01.2026 - 15:00DROPS Design answered:
Hei Helga. Har du strikket diagram A.1 8 ganger? Du legger opp 8 masker, setter 2 masker på hver pinne (på 4 strikkepinner), og så strikker du diagram A.1 2 ganger på hver pinne. Når diagram A.1 er strikket 1 gang i høyden skal du ha 12 masker på hver pinne (x 4 = 48 masker). Om du bare har strikket diagrammet 4 ganger vil du få 24 masker når diagrammet er strikket 1 gang i høyden. mvh DROPS Design
21.01.2026 - 15:24
![]() Liisi wrote:
Liisi wrote:
Please help, Im very confused how to continue after completing the circle To do the sides and back I understand that its knitted back and forth but is it knitted from one side to an other
10.01.2026 - 18:34DROPS Design answered:
Dear Liisi, after the circle you have 2 markers, 1 at the beginning of the round and another one at some point, depending on the size. Now work back and forth over the stitches not in between these markers (39-49 stitches) but over all other stitches and simply turn and work back before reaching the marker, as explained in the pattern. Happy knitting!
11.01.2026 - 23:12
![]() Blanchet wrote:
Blanchet wrote:
Ce modèle est magnifique ainsi que tous les modèles que vous proposez Les explications sont claires et faciles à comprendre Merci
24.12.2025 - 09:00
![]() Katinka wrote:
Katinka wrote:
Hei! Voiko Brushed Alpaca Silkin korvata suoraan Kid-Silkillä tässä mallissa?
11.09.2025 - 18:14DROPS Design answered:
Hei, voit korvata Brushed Alpaca Silk -langan 2-kertaisella Kid-Silk -langalla.
11.09.2025 - 18:41
![]() Edwige wrote:
Edwige wrote:
Bonjour, Je suis au fil marqueur à placer dans la torsade A4 au milieu du dos de la veste. Est-ce normal de ne pas avoir le même nombre de maille à gauche et à droite ? Je dois avoir le même nombre à partir de le 3eme mailles de la torsade ? De plus on ne coupe pas le fil, on continue avec celui-ci ou doit-on reprendre une pelote ? Merciii
22.08.2025 - 22:50DROPS Design answered:
Bonjour Edwige, quand vous avez terminé les rangs raccourcis des devants et du dos, ne coupez pas le fil, placez votre marqueur en bas et tricotez le devant gauche avec le fil de pelote. Vous tricotez des rangs raccourcis comme avant mais cette fois juste sur les mailles du devant gauche, continuez à augmenter après chaque torsade comme avant. Bon tricot!
25.08.2025 - 09:22
![]() Magdalena wrote:
Magdalena wrote:
Beste als men de linker en de rechterkant onderaan apart breit waarom is er dan geen split in het midden?
11.06.2025 - 15:06DROPS Design answered:
Dag Magdalena,
Deze worden niet apart gebreid maar aan een stuk.
08.07.2025 - 21:32
![]() Johanna wrote:
Johanna wrote:
Hei! Takakappaleen kavennukset on kirjoitettu hyvin epäselvästi. KUINKA MONTA silmukkaa jätetään neulomatta 4. krs jälkeen? 3? Vai n+3? Ei ole kovin kiva neuloa yritys-erehdys -tyylillä.
18.05.2025 - 20:16DROPS Design answered:
Hei, 5. ja 6. kerroksella neulotaan, kunnes merkkilankaa edeltää 9 silmukkaa, 7. ja 8. kerroksella neulotaan, kunnes merkkilankaa edeltää 12 silmukkaa, jne.
19.05.2025 - 16:41
![]() Edwige wrote:
Edwige wrote:
Bonjour, je suis perdu !! Les rangs raccourcis se font sur les 210 mailles ? (Taille M) Merciii
08.04.2025 - 19:32DROPS Design answered:
Bonjour Edwige, tout à fait, les rangs raccourcis se tricotent sur les 210 mailles des devants et du bas du dos, toutefois, votre nombre de mailles va changer car, si vous tricotez moins de mailles (en laissant des mailles non tricotées en fin de rang), vous allez augmenter en même temps après les torsades/A.4 (rang 3) tous les 4 rangs. Bon tricot!
09.04.2025 - 08:25
![]() Edwige wrote:
Edwige wrote:
Bonjour, auriez-vous une vidéo pour le diagramme A2 en taille M. Je ne comprends pas (piquer l’aiguille droite au milieu des 3 mailles....) Merciii
17.02.2025 - 19:45DROPS Design answered:
Bonjour Edwige, tout à fait, retrouvez-la ici. Bon tricot!
18.02.2025 - 09:16
![]() Helena Witte wrote:
Helena Witte wrote:
Et spørgsmål mere. Jeg vender så 3 m før mærketråd, men er det kun de 4 rækker med snoning, eller skal jeg også vende 3 før på de 2 rækker inden snoninger, for mønster er ko på 6 rækker i alt?
12.02.2025 - 11:51DROPS Design answered:
Hej Helena, du vender ifølge de 4 pinde som er beskrevet og så fortsætter du til du har strikket 7 rapporter A.4 i højden (= 42 pinde) :)
18.02.2025 - 09:14
Empress#empressjacket |
|||||||||||||||||||||||||||||||
 |
 |
||||||||||||||||||||||||||||||
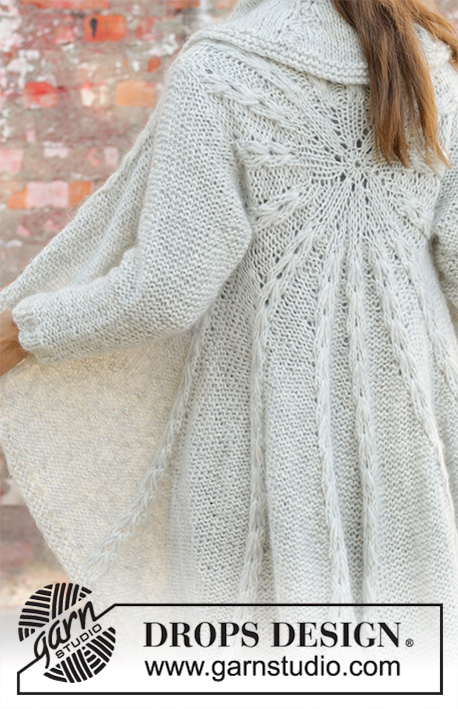
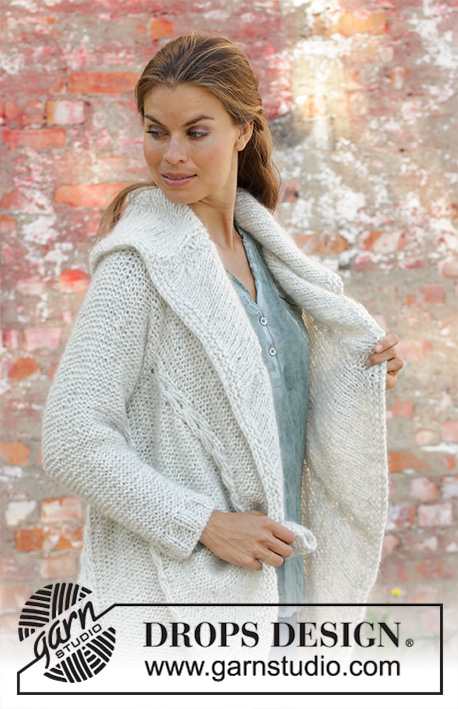
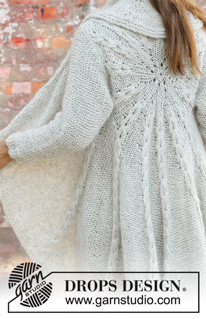
Knitted long circle jacket in 1 strand DROPS Air and 1 strand DROPS Brushed Alpaca Silk. The piece is worked in the round in a circle with texture. Sizes S - XXXL.
DROPS 194-17 |
|||||||||||||||||||||||||||||||
|
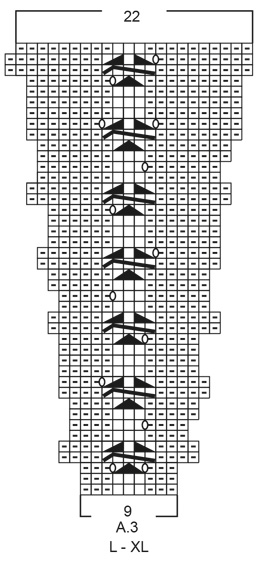
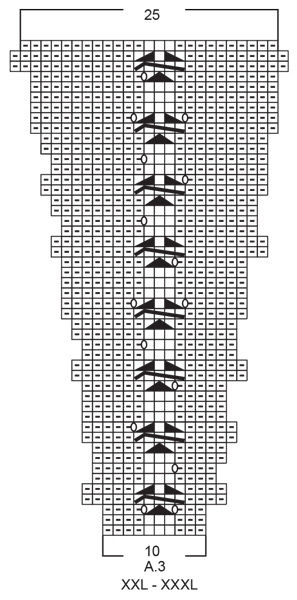
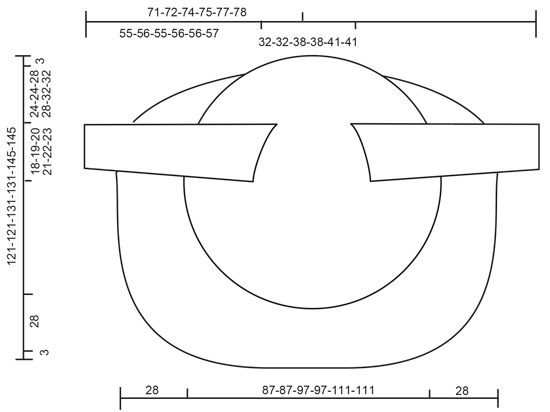
------------------------------------------------------- EXPLANATIONS FOR THE PATTERN: ------------------------------------------------------- RIDGE/GARTER STITCH (worked in the round): 1 ridge = 2 rounds. Knit 1 round and purl 1 round. RIDGE/GARTER STITCH (worked back and forth): 1 ridge = knit 2 rows. PATTERN: See diagrams A.1 to A.4. Choose diagram for your size. The diagrams show all the rows in the pattern seen from the right side! DECREASE TIP (for sleeves): All decreases are made from the side in purl! Decrease 1 stitch by purling 2 stitches together ------------------------------------------------------- START THE PIECE HERE: ------------------------------------------------------- CIRCLE JACKET - SHORT OVERVIEW OF THE PIECE: The piece is worked in the round in a circle from the middle of the back outwards. Change to circular needle(s) when necessary. Then work back and forth with short rows for the front pieces and down the back. The sleeves are worked top down in stockinette stitch with the wrong side out. Because of the weight of the yarn, the garment will stretch somewhat after use. CIRCLE JACKET: CIRCLE: Cast on 8 stitches with double pointed needles size 8 mm = US 11 and 1 strand Air and 1 strand Brushed Alpaca Silk (= 2 strands). Divide the stitches between 4 needles so that there are 2 stitches on each. Insert a marker thread at the beginning of the round. Allow the marker thread to follow your work onwards. Work pattern in the round according to A.1 – choose diagram for your size, a total of 8 times on the round. REMEMBER THE KNITTING GAUGE! When A.1 is finished, there are 48 stitches on the round. Now work pattern as follows: Work A.2 – choose diagram for your size, a total of 16 times on the round. After the next-to-last round in A.2 there are 128-128-144-144-160-160 stitches on the round. The last round in A.2 is worked as follows: Work the first 39-39-45-45-49-49 stitches (there is now 1-1-0-0-1-1 stitch left in the last repeat of A.2 worked), insert a new marker thread here (follows your work onwards and is later used when you work short rows from the front pieces and down the body on the back piece), bind off the next 20-21-22-23-24-25 stitches (= armhole), work the next 49-47-55-53-63-61 stitches, bind off the last 20-21-22-23-24-25 stitches (= armhole). The piece measures approx. 39-39-41-41-47-47 cm = 15¼"-15¼"-16⅛"-16⅛"-18½"-18½" in diameter. The next round is worked as follows: Work A.3 – choose diagram for your size (= 8-8-9-9-10-10 stitches on the first round in the diagram) a total of 16 times on the round and at the same time cast on 20-21-22-23-24-25 new stitches on the needle where the stitches were bind off for the armholes = 128-128-144-144-160-160 stitches. Continue in the round with A.3 until the whole diagram has been completed in height. There are now 304-304-352-352-400-400 stitches on the round. The piece measures approx. 87-87-97-97-111-111 cm = 34¼"-34¼"-38¼"-38¼"-43¾"-43¾" in diameter. Cut the strand. Place the first 94-94-110-110-124-124 stitches on the round (= stitches between the 2 marker threads) on a thread. FRONT PIECES AND DOWN THE BODY: There are now 210-210-242-242-276-276 stitches for the front pieces and down the body on the back piece. Start from the right side after the second marker thread and work short rows back and forth for the front pieces and down the body on the back piece as follows: ROW 1 (right side): Purl over purl and work A.4 (= 3 stitches) over each cable until there are 3 stitches left before the next marker thread (i.e. start of round), turn. ROW 2 (wrong side): Work back until there are 3 stitches left before the marker thread, turn. ROW 3: Purl over purl and work A.4 over each of the cables until there are 6 stitches left before the marker thread, AT THE SAME TIME increase 1 purled stitch after each cable/A.4, turn. ROW 4: Work back until there are 6 stitches left before the marker thread, turn. Continue back and forth like this by working 3 fewer stitches than the previous row and increase 1 stitch after each cable/A.4 every 4th row until you have worked 7 repeats of A.4 in height (= 42 rows). The piece measures approx. 72-72-77-77-84-84 cm = 28⅜"-28⅜"-30⅜"-30⅜"-33"-33" from the middle of the circle and down mid back. The last row is worked from the wrong side. Do not cut the strand. Insert a marker thread in the middle cable/A.4 mid back of jacket. Continue back and forth with pattern as before over the bottom of the left front piece as follows: ROW 1 (right side): Work until there are 4 stitches left before the cable/A.4 with the marker thread mid back, turn. ROW 2 (wrong side): Work until there are 3 more stitches left before the marker thread than the previous row (start of round), AT THE SAME TIME increase 1 purled stitch after each cable/A.4, turn. ROW 3 (right side): Work until there are 4 more stitches than last time left before the cable/A.4 with the marker thread mid back, turn. ROW 4 (wrong side): Work until there are 3 more stitches before the marker thread than the previous row, turn. Continue back and forth with pattern and increase after each cable/A.4 every 4th row until you have worked 3 repeats of A.4 in height (= 18 rows). Cut the strand. Start from the right side and after A.4/mid back and work short rows back and forth over the bottom of the right front piece in the same way, but reversed, i.e. each row from the wrong side is turned when there are 4 more stitches before the cable/A.4 with the marker thread mid back than the previous time and on each row from the right side is turned when there are 3 more stitches left than the previous time. EDGE: Place all stitches on the circle back on circular needle and work 2 RIDGES – read description above, around the whole circle. Bind off, but to avoid the bind-off edge being tight you can make 1 yarn over after approx. each 5th stitch - the yarn overs are bind off as normal stitches. SLEEVE: The sleeve is worked in stockinette stitch with the wrong side out (reversed stockinette stitch). Cast on 11-11-12-12-14-14 stitches with circular needle size 8 mm = US 11 and 1 strand Air and 1 strand Brushed Alpaca Silk (= 2 strands). Work stockinette stitch back and forth, AT THE SAME TIME cast on new stitches at the end of each row in each side as follows: Cast on 2 stitches 2 times, 1 stitch 3-4-5-6-6-7 times, 2 stitches 1 time and 4 stitches 1 time = 37-39-42-44-46-48 stitches. THE PIECE IS NOW MEASURED FROM HERE. Continue back and forth with stockinette stitch and 1 edge stitch in GARTER STITCH – read description above, in each side. When the piece measures 4 cm decrease 1 stitch inside the 1 edge stitch in garter stitch in each side – read DECREASE TIP. Decrease like this every 7-6-6-5-5-4 cm = 2¾"-2⅜"-2⅜"-2"-2"-1½" a total of 6-7-7-8-8-9 times = 25-25-28-28-30-30 stitches. When the piece measures 42-42-40-40-39-39 cm = 16½"-16½"-15¾"-15¾"-15¼"-15¼" increase 7-7-4-9-7-7 stitches evenly on row = 32-32-32-37-37-37 stitches. Change to circular needle size 7 mm = US 10,75. Work rib, starting from the side with purl (reversed stockinette stitch/the wrong side out) as follows: 1 edge stitch in garter stitch (knit 2, purl 3) until there is 1 stitch left, 1 edge stitch in garter stitch. When the rib measures 5 cm = 2" bind off with knit over knit and purl over purl. The sleeve measures approx. 55-56-55-56-56-57 cm = 21⅝"-22"-21⅝"-22"-22"-22½" from the sleeve cap down. Work the other sleeve in the same way. ASSEMBLY: Sew sleeves to body inside the bind-off/cast-on edge. Sew sleeve seams. Make sure that the seam is not tight. |
|||||||||||||||||||||||||||||||
Diagram explanations |
|||||||||||||||||||||||||||||||
|
|||||||||||||||||||||||||||||||
 |
|||||||||||||||||||||||||||||||
 |
|||||||||||||||||||||||||||||||
 |
|||||||||||||||||||||||||||||||
 |
|||||||||||||||||||||||||||||||
 |
|||||||||||||||||||||||||||||||
Have you finished this pattern?Tag your pictures with #dropspattern #empressjacket or submit them to the #dropsfan gallery. Do you need help with this pattern?You'll find 30 tutorial videos, a Comments/Questions area and more by visiting the pattern on garnstudio.com. © 1982-2026 DROPS Design A/S. We reserve all rights. This document, including all its sub-sections, has copyrights. Read more about what you can do with our patterns at the bottom of each pattern on our site. |
|||||||||||||||||||||||||||||||






Post a comment to pattern DROPS 194-17
We would love to hear what you have to say about this pattern!
If you want to leave a question, please make sure you select the correct category in the form below, to speed up the answering process. Required fields are marked *.