
Popular categories
Looking for a yarn?


Comments / Questions (3)
![]() Christine wrote:
Christine wrote:
Bonjour, Je suis au tout début du patron et avant d’entamer A.1 quand on demande de tricoter 4 rangs endroit, je tricote recto verso en endroit (point mousse) ou je donne un fini jersey et donc j’alterne endroit et envers? J’ai tricoté 4 rangs endroit, mais après ca ne semble pas être une base valable pour bâtir la suite du motif avec A.1 …
08.08.2023 - 09:04DROPS Design answered:
Bonjour Christine, pour le bandeaux, vous commencez par 4 rangs endroit, autrement dit 2 côtes mousse. Vous tricotez ensuite A.1 (n'oubliez pas d'augmenter au 3ème rang endroit), puis vous répétez A.2 jusqu'à la hauteur indiquée, terminez ensuite par 4 rangs endroit (en diminuant) et rabattez. vous aurez ainsi 4 côtes mousse au milieu dos du bandeau (partie derrière la nuque). Bon tricot!
08.08.2023 - 09:26
![]() Lilou wrote:
Lilou wrote:
Bonjour trop de modèles sur aiguilles doubles pointes!!.... dommage
24.09.2020 - 09:23DROPS Design answered:
Bonjour Lilou, vous trouverez ici comment adapter un modèle sur aiguilles droites. Nombreuses sont celles qui ont finalement adopté le tricot en rond, n'hésitez pas à essayer. Nos vidéos sont là pour vous aider. Bon tricot!
24.09.2020 - 09:57
![]() Jeannette Katzen wrote:
Jeannette Katzen wrote:
I love this ear warmer/head band so much, but i can't follow the pattern because i knit with written words and NOT the charts that were provided. I have never learned how to do that and i don't think this pattern is the way to start. It looks SO confusing right now. I am 72 years old and have had a little trouble trying to learn easier charts. Is there anyway to get this pattern with written words? I have 4 granddaughters to do this for. Thanking you so much, Jeannette
19.03.2020 - 17:02DROPS Design answered:
Dear Jeanette, we are sorry, but we cannot adapt our patterns to each request. However we think that it is well worth to try and make sense of the diagrams, as they not only show the very next step (like the written out patterns), but you can see the stiches and rows in relations to each other. HERE you can find a lesson on our site about how to read knitting diagrams, and also, you can always ask for help in person or over the phone, in the store where you bought your DROPS yarn from. Happy Knitting!
19.03.2020 - 21:57
|
||||||||||||||||||||||||||||||||||||||||
Snødrive#snoedriveset |
||||||||||||||||||||||||||||||||||||||||
 |
 |
|||||||||||||||||||||||||||||||||||||||
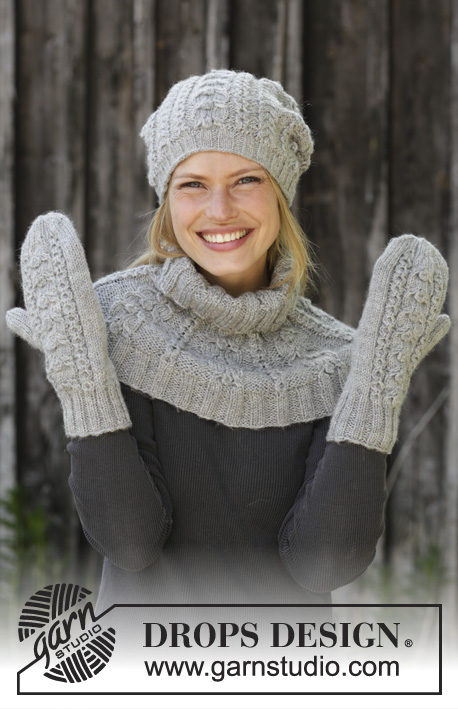
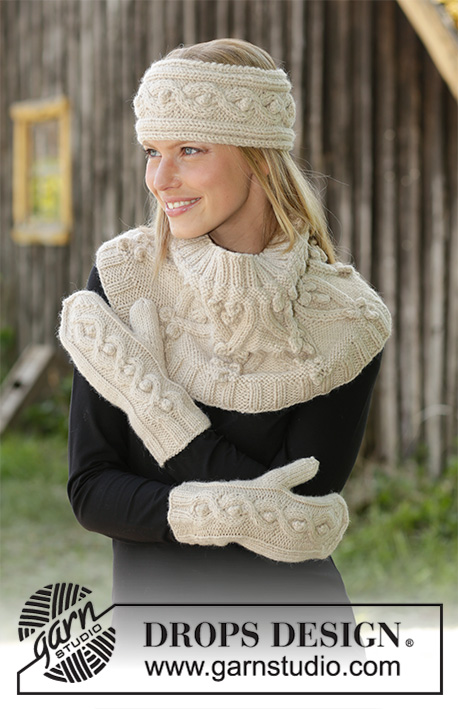
Knitted head band in DROPS Nepal. The piece is worked sideways with cables and bobbles. Knitted neck warmer in DROPS Nepal. The piece is worked with cables and bobbles. Knitted mittens in DROPS Nepal. The piece is worked with cables and bobbles.
DROPS 192-56 |
||||||||||||||||||||||||||||||||||||||||
|
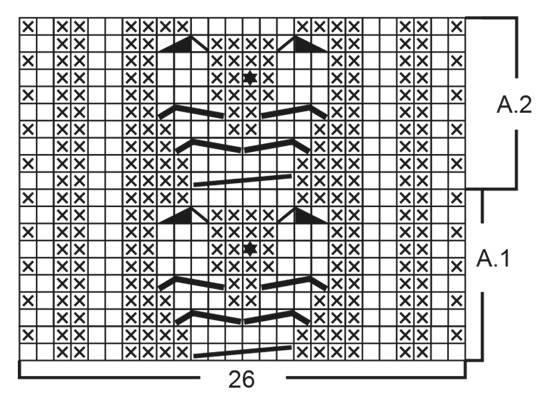
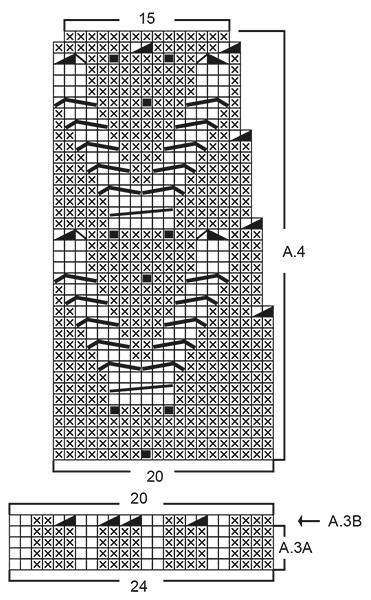
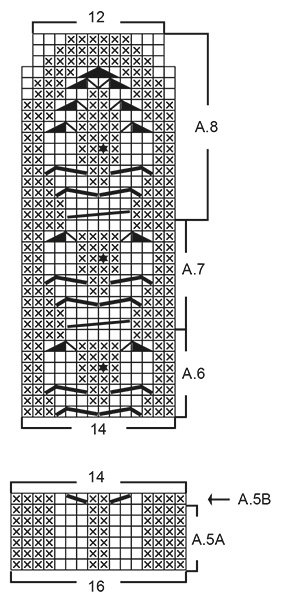
------------------------------------------------------- EXPLANATIONS FOR THE PATTERN: ------------------------------------------------------- PATTERN: Head band: See diagrams A.1 and A.2. Neck warmer: See diagrams A.3 and A.4. Mittens: See diagrams A.5 to A.8. The diagrams show all the rows in the pattern seen from the right side. DECREASE TIP-1 (for neck warmer, evenly spaced): To work out how to decrease evenly, count the total number of stitches on the needle (e.g. 120 stitches) and divide by the number of decreases to be made (e.g. 16) = 7.5. In this example, decrease by knitting together alternately each 6th and 7th stitch and each 7th and 8th stitch. INCREASE TIP (for mittens; thumb gusset): Work as far as the stitch with the marker, make 1 yarn over, knit 1 (= stitch with marker), make 1 yarn over (= 2 stitches increased). On the next round knit the yarn overs twisted to avoid holes. The next increase is worked as follows: Work until there is 1 stitch left before the stitch with marker, make 1 yarn over, knit 3, 1 yarn over (= 2 stitches increased). Continue to increase like this every 2nd round; i.e. you always increase on outside of increased stitches. DECREASE TIP-2 (for top of mitten): Start 3 stitches before the marker thread, knit 2 together, knit 2 (marker thread sits between these 2 stitches), slip 1 stitch as if to knit, knit 1 and pass the slipped stitch over the knitted stitch (= 2 stitches decreased). ------------------------------------------------------- START TO WORK HERE: ------------------------------------------------------- HEAD BAND - SHORT OVERVIEW OF THE PIECE: The piece is worked back and forth on needle and sewn together mid back to finish. HEAD BAND: Cast on 22-22 stitches with needle size 4.5 mm / US 7 and Nepal. Knit 4 rows and increase at the same time 4 stitches evenly on the 3rd row = 26-26 stitches. Work A.1 (= 26 stitches). When A.1 has been completed repeat A.2 to finished length. REMEMBER THE GAUGE! Work until the piece measures approx. 47-51 cm / 18 ½"-20", but it is neatest, if possible, to finish after row 2 in A.2. Knit 4 rows and decrease at the same time 4 stitches evenly on first row = 22-22 stitches. After the 4 knitted rows, bind off with knit from the right side. ASSEMBLY: Sew the head band together mid back inside the cast-on and bind-off edges. ------------------------------------------------------- NECK WARMER - SHORT OVERVIEW OF THE PIECE: The piece is worked in the round with circular needle, bottom up. NECK WARMER: Cast on 192-216 stitches with circular needle size 5 mm / US 8 and Nepal. Knit 1 round. Then work A.3A in the round (= 8-9 repeats of 24 stitches). When the piece measures 4 cm / 1½" work A.3B in the round = 160-180 stitches on needle. Change to circular needle size 6 mm / US 10 and work A.4 in the round (= 8-9 repeats of 20 stitches). REMEMBER THE GAUGE! When A.4 has been completed there are 120-135 stitches on the needle. Continue working stockinette stitch with the wrong side out. When the piece measures 24-24 cm / 9⅜"-9⅜" knit 1 round where you decrease 16-19 stitches evenly on round – read DECREASE TIP-1 = 104-116 stitches. Change to circular needle size 5 mm / US 8 and work rib in the round (= knit 2 / purl 2) for 4 cm / 1½". Then bind off with knit over knit and purl over purl. The neck warmer measures approx. 28-28 cm / 11"-11" from the top down. ------------------------------------------------------- MITTENS - SHORT OVERVIEW OF THE PIECE: The piece is worked in the round with double pointed needles, bottom up. RIGHT MITTEN: Cast on 38-38 stitches with double pointed needles size 3 mm / US 2.5 and Nepal. Knit 1 round. Work rib as follows: * purl 2, knit 2 *, work from *-* a total of 5 times, work A.5A (= 16 stitches) and finish with knit 2 stitches. Continue this rib for 4-5 cm / 1 ½"-1⅞". The next round is worked as follows: Knit 8 stitches, knit 2 together, knit 8, knit 2 together, work A.5b (= 16 stitches which decrease to 14 stitches) and finish with knit 2 stitches = 34-34 stitches on needle. Change to double pointed needles size 4 mm / US 6 and work the next round as follows: Work 18 stitches in stockinette stitch (= inside of hand), A.6 (= 14 stitches) and finish with 2 stitches in stockinette stitch. Continue this pattern, but when A.6 has been completed repeat A.7 onwards. REMEMBER THE GAUGE! AT THE SAME TIME when the piece measures 11-12 cm / 4 ¼"-4⅝" insert 1 marker in the first stitch on the round. The marker marks where you will increase for the thumb gusset. On the next round increase on each side of the stitch with the marker – read INCREASE TIP. Increase like this on each side of the increased stitches every 2nd round a total of 5-6 times = 44-46 stitches. After the last increase, place the 11-13 thumb-stitches on 1 thread. Continue in the round as before and cast on 1 new stitch over the thumb opening on the first round = 34-34 stitches. When A.7 has been worked a total of 3 times in height, work A.8 = 32-32 stitches. Then continue in the round with stockinette stitch over all stitches. Work until the piece measures 24½-26½ cm (there is now approx. 3½ cm to finished length – you can try the mitten on and work to desired length if necessary). Insert 1 marker thread at the beginning of the round and 1 marker thread after the next 16 stitches on the round. There are 16 stitches between the last and first marker thread. The marker threads are used when decreasing on each side of the mitten. I.e. If A.8 has been completed, continue with stockinette stitch in the round over all stitches. AT THE SAME TIME decrease 1 stitch on each side of both marker threads – read DECREASE TIP-2 = 4 stitches decreased. Decrease like this every 2nd round a total of 3 times and then every round a total of 3 times = 8 stitches left on needles. Cut the strand, pull it through the remaining stitches, pull tight and fasten well. The mitten measures approx. 28-30 cm / 11"-11 ¾" from the top down. THUMB: Place the 11-13 thumb-stitches from the thread back on double pointed needles size 4 mm / US 6 and knit up 4-3 stitches behind the thumb = 15-16 stitches. Work stockinette stitch in the round until the thumb measures approx. 4½-5 cm (there is now approx. ½ cm left to finished length – you can try the mitten on and work to desired length if necessary). Knit 2 rounds where all stitches are knitted together 2 and 2 on both rounds = 4-4 stitches left on needles. Cut the strand, pull it through the remaining stitches, pull tight and fasten well. LEFT MITTEN: Cast on 38-38 stitches with double pointed needles size 3 mm / US 2.5 and Nepal. Knit 1 round. Work rib as follows: Knit 2, A.5A (= 16 stitches), * knit 2, purl 2 *, work from *-* a total of 5 times. Continue this rib for 4-5 cm / 1 ½"-1⅞". The next round is worked as follows: Knit 2 stitches, work A.5B (= 16 stitches which decrease to 14 stitches) knit 2 together, knit 8, knit 2 together and finish with knit 8 = 34-34 stitches on needle. Change to double pointed needles size 4 mm / US 6 and work the next round as follows: Work 2 stitches in stockinette stitch A.6 (= 14 stitches) and finish with 18 stitches in stockinette stitch(= inside of hand),. Continue this pattern, but when A.6 has been completed repeat A.7 onwards. REMEMBER THE GAUGE! AT THE SAME TIME when the piece measures 11-12 cm / 4 ¼"-4⅝" insert 1 marker in the last stitch on the round. The marker marks where you will increase for the thumb gusset. On the next round increase on each side of the stitch with the marker – remember INCREASE TIP. Increase like this on each side of the increased stitches every 2nd round a total of 5-6 times = 44-46 stitches. After the last increase place the 11-13 thumb-stitches on 1 thread. Continue in the round as before and cast on 1 new stitch over the thumb opening on the first round = 34-34 stitches. When A.7 has been worked a total of 3 times in height, work A.8 = 32-32 stitches. Then continue in the round with stockinette stitch over all stitches. Work until the piece measures 24½-26½ cm (there is now approx. 3½ cm to finished length – you can try the mitten on and work to desired length if necessary). Insert 1 marker thread at the beginning of the round and 1 marker thread after the next 16 stitches on the round. There are 16 stitches between the last and first marker thread. The marker threads are used when decreasing on each side of the mitten. If A.8 has been completed, continue with stockinette stitch in the round over all stitches. AT THE SAME TIME decrease 1 stitch on each side of both marker threads – remember DECREASE TIP-2 = 4 stitches decreased. Decrease like this every 2nd round a total of 3 times and then every round a total of 3 times = 8 stitches left on needles. Cut the strand, pull it through the remaining stitches, pull tight and fasten well. The mitten measures approx. 28-30 cm / 11"-11 ¾" from the top down. Work thumb in the same way as on right mitten. |
||||||||||||||||||||||||||||||||||||||||
Diagram explanations |
||||||||||||||||||||||||||||||||||||||||
|
||||||||||||||||||||||||||||||||||||||||
 |
||||||||||||||||||||||||||||||||||||||||
 |
||||||||||||||||||||||||||||||||||||||||
 |
||||||||||||||||||||||||||||||||||||||||
Have you finished this pattern?Tag your pictures with #dropspattern #snoedriveset or submit them to the #dropsfan gallery. Do you need help with this pattern?You'll find 30 tutorial videos, a Comments/Questions area and more by visiting the pattern on garnstudio.com. © 1982-2026 DROPS Design A/S. We reserve all rights. This document, including all its sub-sections, has copyrights. Read more about what you can do with our patterns at the bottom of each pattern on our site. |
||||||||||||||||||||||||||||||||||||||||


With over 40 years in knitting and crochet design, DROPS Design offers one of the most extensive collections of free patterns on the internet - translated to 17 languages. As of today we count 324 catalogs and 12290 patterns - 12280 of which are translated into English (US/in).
We work hard to bring you the best knitting and crochet have to offer, inspiration and advice as well as great quality yarns at incredible prices! Would you like to use our patterns for other than personal use? You can read what you are allowed to do in the Copyright text at the bottom of all our patterns. Happy crafting!
Post a comment to pattern DROPS 192-56
We would love to hear what you have to say about this pattern!
If you want to leave a question, please make sure you select the correct category in the form below, to speed up the answering process. Required fields are marked *.