
Popular categories
Looking for a yarn?


Comments / Questions (196)
![]() Brigitte wrote:
Brigitte wrote:
Guten Abend, ich habe den Pullover nach der Anleitung gestrickt. In der Länge arbeitet ich die Größe XL , in der Breite die Größe L. Nun habe ich beim Zusammennähe das Problem, dass ich am Rücken zu viel Gestricktes habe und eine Beule rechts und links ist. Was kann ich dagegen tun. Danke
18.11.2024 - 19:00DROPS Design answered:
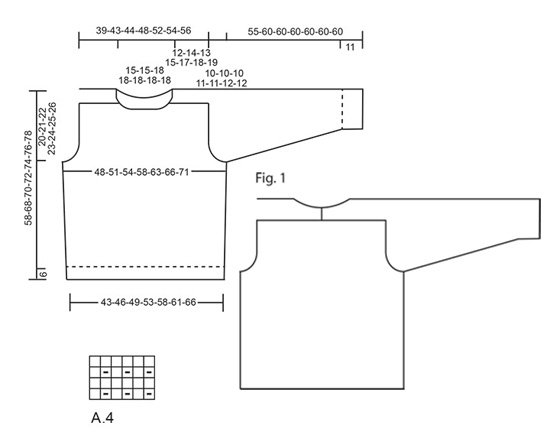
Liebe Brigitte, sind die Ärmel etwas zu kurz? Am Ende sollen die beiden Ärmel sich in der Mitte vom Rückenteil "treffen" - siehe Fig. 1, so sind es vielleicht hier zu kurz, das könnte diese Beule erklären (aber nur eine Idée, ohne das Strickstück zu sehen); am besten zeigen Sie Ihr Wollladen Ihr Strickstück (auch ein Foto per Mail senden), so können sie Ihnen besser helfen. Viel Spaß beim Stricken!
19.11.2024 - 07:49
![]() Mylène wrote:
Mylène wrote:
Merci beaucoup pour votre réponse. J'ai déjà demandé au magasin où je commande mes laines drops, mais ils ne m'ont jamais répondu. Pour la tension, je sais que je n'aurai pas le même échantillon. Je voulais simplement garder du modèle la grille du motif. J'ai déjà la mérinos. Je voulais simplement l'associer à une autre. Encore merci pour votre réponse.
30.10.2024 - 16:57DROPS Design answered:
Bonjour Mylène, en fonction de l'effet souhaité dans les couleurs, plusieurs choix sont à votre disposition, si vous voulez un ton sur ton ou pas. Essayez de téléphoner à votre magasin (ou à un autre), ce sera beaucoup plus simple pour eux de vous faire les propositions correspondants à vos envies et aux couleurs/bains qu'ils ont en stock..Merci pour votre compréhension. Bon tricot!
31.10.2024 - 08:59
![]() Mylène wrote:
Mylène wrote:
Bonjour, je voudrais faire ce modèle en l'associant avec de la Kid silk. Ma couleur merino ultra fine est le n°3. J'avais pensé l'associer avec la kid silk n°44 Difficile de savoir par internet. Pouvez-vous m'aider ? Merci beaucoup.
30.10.2024 - 14:51DROPS Design answered:
Bonjour Mylène, n'hésitez pas à demander conseil à votre magasin qui vous proposera la couleur la plus appropriée; en revanche, notez que si vous tricotez Merino Extra Fine et Kid-Silk, votre tension sera différente et même, si vous avez la même tension de 21 m x 28 rangs jersey = 10 x 10 cm, la texture sera différente de celle du modèle présenté. Bon tricot!
30.10.2024 - 16:25
![]() Christiane Ide wrote:
Christiane Ide wrote:
Mouwen Bij de laatste afkanting van 1 keer 19 steken terwijl er tegelijkertijd 8 van deze 19 steken 2 aan 2 samen breit voordat ze worden afgekant, 1 keer 3 steken, 1 keer 2steken. Deze mindering begrijp ik niet 41 st - 19 st = 22 steken 22st - 1 steek = 21 steken In de beschrijving staat dat er 16 steken overblijven ? Graag een snel antwoord’, ben reeds begonnen met breien Dank u
29.10.2024 - 19:51DROPS Design answered:
Dag Christiane,
Je kant eest 19 steken af, dan kant je 3 steken af, dan kant je 2 steken af en tot slot, even later, nog 1 steek. Dus 19+3+2+1=24 steken. 41-24= 16 steken over.
31.10.2024 - 20:05
![]() Siri Karlsen wrote:
Siri Karlsen wrote:
Hei. Jeg har strikket Sibiria genser i strl M. Har strikket mye i min tid, men nå står jeg bom fast når jeg skal montere denne. Tror ikke jeg har vært borti denne fasongen tidligere. Har gått gjennom oppskriften og mener at den er strikket korrekt. Om derre har noe bilde om hvordan genseren ser ut bak, hadde det kanskje hjulpet. En flott genser og min mann venter spent Med vennlig hilsen Siri Karlsen
08.02.2024 - 17:09DROPS Design answered:
Hei Siri. Veldig flott genser din mann får :) Denne genseren har sadelskulder, der ermene strikkes nedenifra og opp (som et "normal" erme), men så fortsetter man å strikke oppå skulderen og langs med nakken øverst på ryggen. Halsmaskene øverst på ermet felles mot forstykket og en liten del av ermet strikkes videre øverst på bakstykket som syes sammen midt bak, slik at halsdybden blir høyere på bakstykket enn på forstykket. Vi har dessverre ikke bilde bak på denne genseren, men ta en titt på målskissen nederst på oppskriften. Håper det kan hjelpe. Har dessverre ingen video på dette enda. mvh DROPS Design
09.02.2024 - 09:03
![]() Siri Karlsen wrote:
Siri Karlsen wrote:
Hei. Er det noe sted en kan finne målene på en str M for herre. Skal strikke Siberia genser, .
09.01.2024 - 15:52DROPS Design answered:
Hei Siri, Det er en målskisse på bunnen av oppskriften med mål til alle størrelsene. God fornøyelse!
10.01.2024 - 06:43
![]() Gill Roberts wrote:
Gill Roberts wrote:
Hi. I too am having trouble with attaching the sleeves. I did the decreases only on one side for right and other side for left sleeve so I have a straight edge and a sloped edge. When I try to attach the sleeve to the back I see to have to take the straight edge round a 90° turn along the cast off stitches of the back. It doesn't lie well. Is this correct. Is there any way to see a photo of the back of the finished garment? Or can I send you a photo of my jumper. It's difficult to explain.
01.12.2023 - 16:11DROPS Design answered:
Dear Gill, unfortunately, you can't add photos in this messages. You can see how the sleeve will look like in the measurements schematic and Fig.1. The upper part of the back piece (shown in Fig.1) is actually the sleeves, so the sleeves will end up over the back piece. Happy knitting!
04.12.2023 - 00:39
![]() Adad Susane wrote:
Adad Susane wrote:
Bonjour, je n arrive pas à comprendre les diagrammes du pull Siberia sur les rangs envers et encore moins les torsades, et donc impossible de le continuer en allers et retours. Pouvez vous me transmettre les grilles sur l ’envers ou un patron de ce pull à tricoter tout en circulaire? Je vous remercie. Cordialement.
21.11.2023 - 22:58DROPS Design answered:
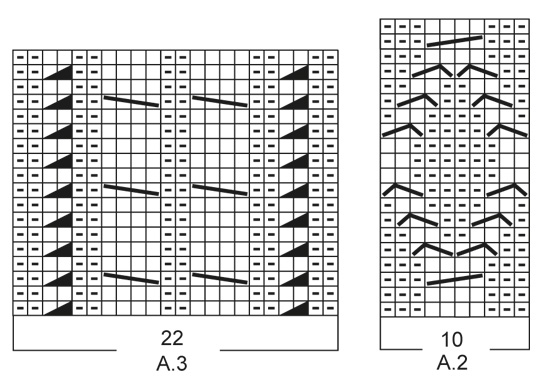
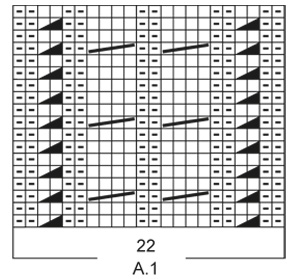
Bonjour Mme Adad, les diagrammes montrent tous les rangs des points fantaisie, vus sur l'endroit, autrement dit, 1 case blanche se tricote à l'endroit sur l'endroit et à l'envers sur l'envers; 1 tiret va se tricoter à l'envers sur l'endroit et à l'endroit sur l'envers; lisez les diagrammes en rond et sur l'endroit de droite à gauche et sur l'envers de gauche à droite. Lorsque vous divisez l'ouvrage après les emmanchures, veillez à ce que les torsades soient toujours sur l'endroit après la division. Bon tricot!
22.11.2023 - 09:09
![]() Simon wrote:
Simon wrote:
Hi there, I can’t find any tension guide on the pattern or measurements for each of the sizes? Thanks
11.11.2023 - 07:02DROPS Design answered:
Dear Simon, the measurements are in the size chart, before the knitting charts and after the written instructions. You can see how to read this here: https://www.garnstudio.com/lesson.php?id=24&cid=19. The gauge for both needles is indicated in the materials section at the top of the page: 21 stitches and 28 rows stocking stitch on 10 cm in width and 10 cm in height for the main needles and 22 stitches and 30 rows stocking stitch on 10 cm in width and 10 cm in height for the rib. Happy knitting!
12.11.2023 - 22:49
![]() Nancy wrote:
Nancy wrote:
Bonjour Faut il rabattre toutes les mailles du dos à 61 cm pour le modèle siberia ? Aucune maille en attente pour l’encolure?
09.10.2023 - 15:05DROPS Design answered:
Bonjour Nancy, tout à fait, si vous regardez le schéma Fig.1 en bas de page, vous pouvez voir que le haut du dos s'arrête avant l'encolure; ce sont les manches qui seront cousues le long du haut du dos, et on va rabattre les mailles de l'encolure à la fin des manches. Bon tricot!
09.10.2023 - 16:26
|
||||||||||||||||||||||
Siberia#siberiasweater |
||||||||||||||||||||||
 |
 |
|||||||||||||||||||||
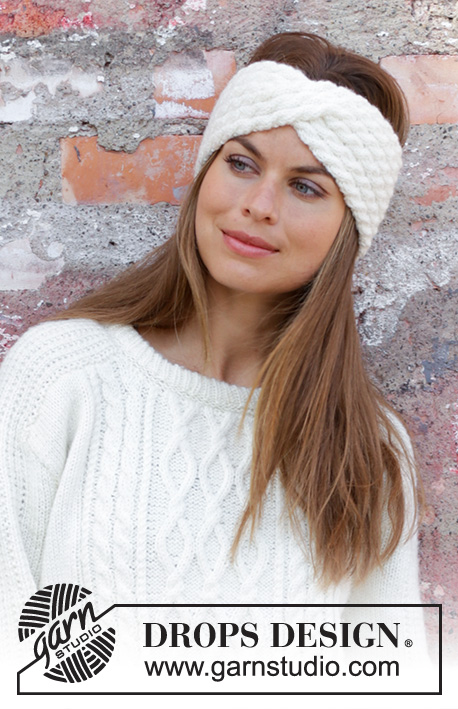
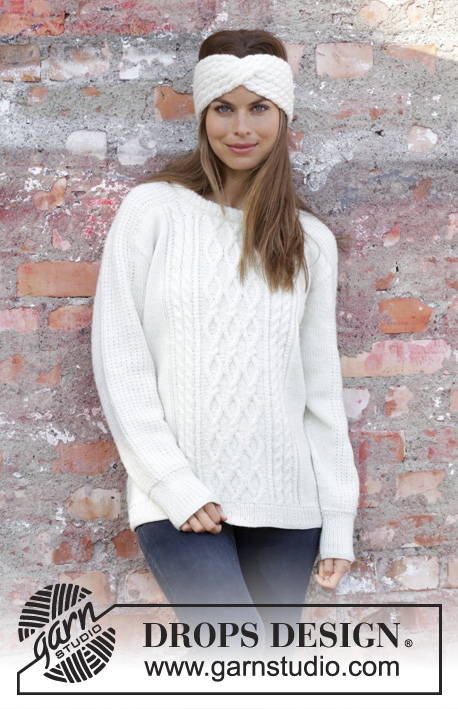
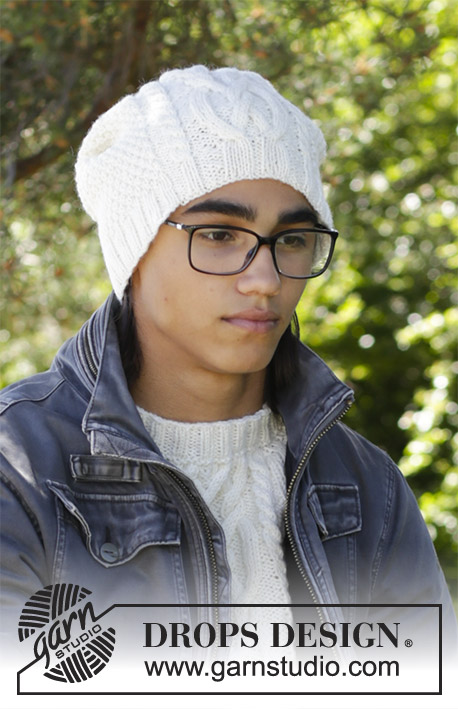
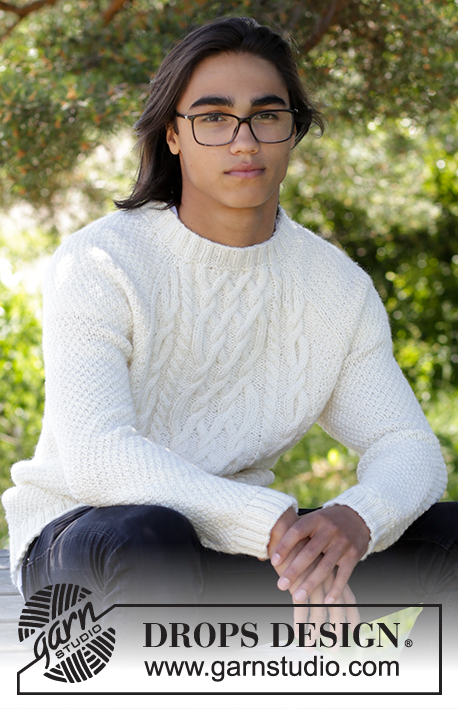
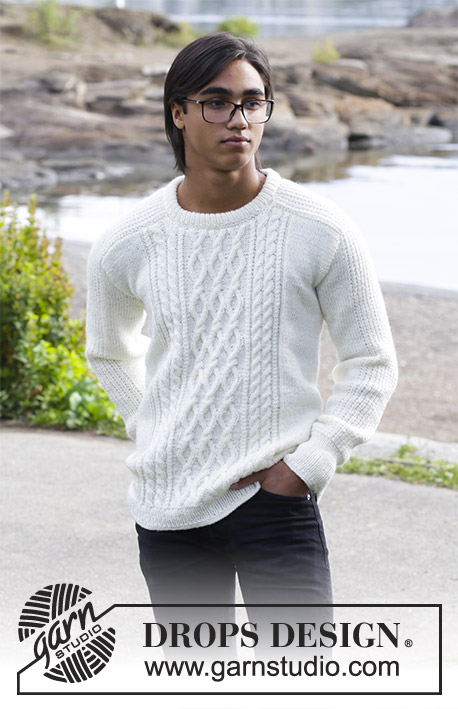
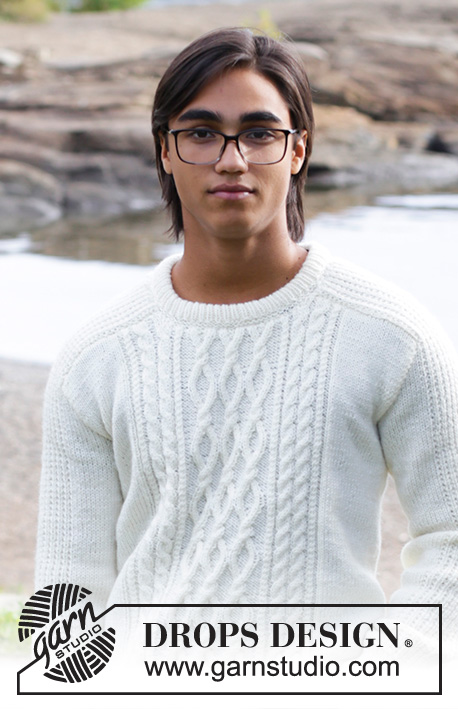
Men’s knitted sweater with cables. Sizes 13/14 years – XXXL. The piece is worked in DROPS Merino Extra Fine.
DROPS 185-2 |
||||||||||||||||||||||
|
INFORMATION FOR THE PATTERN: SWEATER– SHORT OVERVIEW OF THE PIECE: The sleeve is worked upwards, continued onto the shoulder and along the neck, top back. The neck-stitches at the top of the sleeve are decreased towards the front piece and a small section of the sleeve is continued along the top of the back piece and later sewn together mid-back, so the neck is higher at the back than at the front – see Fig.1. RIDGE/GARTER STITCH (worked in the round): 1 ridge = 2 rounds. Knit 1 round and purl 1 round. PATTERN: See diagrams A.1 to A.4. The diagrams show all the rows in the pattern seen from the right side. INCREASE/DECREASE TIP (evenly spaced): To work out how to increase/decrease evenly, count the total number of stitches on the needle (e.g. 218 stitches) and divide by the number of increases/decreases to be made (e.g. 10) = 21.8. In this example, increase alternately after approx. every 21st and 22nd stitch by making 1 yarn over. On the next round, work the yarn overs twisted to avoid holes. If you are decreasing (in this example) knit together alternately approx. every 20th and 21st stitch and every 21st and 22nd stitch. INCREASE TIP (for sides in body and sleeves): Start 1 stitch before the marker, make 1 yarn over, knit 2 (the marker sits in the middle of these two stitches), make 1 yarn over. On the next round knit the yarn overs twisted to avoid holes. The new stitches are subsequently worked in stockinette stitch. BINDING OFF TIP: Decrease 1 stitch at the same time as binding off as follows: Knit 2 stitches together, knit 1 stitch, pass over (bind off) (= 1 extra stitch decreased). ---------------------------------------------------------- SWEATER: The piece is worked in the round with circular needle as far as the armholes, then the front and back pieces are worked back and forth separately. The sleeves are worked in the round with double pointed needles as far as the armholes, then the sleeves are worked back and forth. To finish, the sleeves are sewn into the armhole and shoulders on front and back pieces. BODY: Cast on 218-230-246-264-280-298-314 stitches with circular needle size 3.5 mm / US 4 and Merino Extra Fine. Work 2 RIDGES – see description above! Then work rib (knit 1 /purl 1). When the piece measures 5 cm / 2" work 1 ridge, AT THE SAME TIME as you increase 10-10-10-12-12-14-14 stitches evenly on the first round – read INCREASE/DECREASE TIP= 228-240-256-276-292-312-328 stitches. Insert 2 markers in the piece, one at the beginning of the round and one after 114-120-128-138-146-156-164 stitches (= in each side). Change to circular needle size 4 mm / US 6 and work PATTERN as follows – see description above: * Work 20-23-27-27-31-31-35 stitches stockinette stitch, A.1 (= 22 stitches), A.2 (= 10 stitches) over the next 30-30-30-40-40-50-50 stitches (= 3-3-3-4-4-5-5 repeats in width), A.3 (= 22 stitches), 20-23-27-27-31-31-35 stitches stockinette stitch, the marker sits here *, work from *-* 1 more time. REMEMBER THE GAUGE! Continue the pattern in this way. When the piece measures 9 cm / 3½" increase 1 stitch on both sides of the markers in each side – read INCREASE TIP (= 4 stitches increased). Increase in this way every 6-8-8-9-9-9-10 cm / 4" a total of 5 times = 248-260-276-296-312-332-348 stitches. When the piece measures 38-47-48-49-50-51-52 cm / 18½"-19"-19¼"-19¾"-20"-20½" bind off 6 stitches for the armhole in each side (bind off 3 stitches on both side of the markers in each side) and continue each piece separately. BACK PIECE: = 118-124-132-142-150-160-168 stitches. The piece is worked back and forth with circular needle. Continue with pattern, stockinette stitch and 1 edge stitch in garter stitch in each side, AT THE SAME TIME continue to bind off for armhole at the beginning of each row in each side as follows: 2 stitches 3-3-4-4-4-4-5 times and 1 stitch 1-0-1-1-2-2-2 times = 104-112-114-124-130-140-144 stitches. When the piece measures 49-59-61-63-65-67-69 cm / 23¼"-24"-24¾"-25½"-26⅜"-27⅛" bind off, AT THE SAME TIME as you decrease 20-20-20-22-18-24-24 stitches evenly over the stitches in diagrams A.1, A.2 and A.3 – read BINDING OFF TIP. FRONT PIECE: = 118-124-132-142-150-160-168 stitches. Continue with pattern, stockinette stitch and 1 edge stitch in garter stitch, AT THE SAME TIME as bind off for armhole as for back piece = 104-112-114-124-130-140-144 stitches. When the piece measures 46-56-58-60-62-64-66 cm / 22"-22¾"-23⅝"-24⅜"-25¼"-26" decrease 10-10-10-12-12-12 stitches evenly over the middle 40-40-40-48-48-48-48 stitches before these stitches are placed on a thread for the neck (= 30-30-30-36-36-36-36 stitches on thread). The shoulders are now finished separately. On the next row from the neck bind off 2 stitches = 30-34-35-36-39-44-46 stitches. When the piece measures 49-59-61-63-65-67-69 cm / 23¼"-24"-24¾"-25½"-26⅜"-27⅛" (adjust to match the back piece) bind off, AT THE SAME TIME as you decrease 5-5-4-5-3-6-6 stitches evenly over the 15-15-15-16-16-21-21 stitches towards the neck – remember BINDING OFF TIP. Work the other shoulder in the same way. RIGHT SLEEVE: The piece is worked in the round with double pointed needles. Cast on 56-58-60-62-64-66-68 stitches with double pointed needles size 3.5 mm / US 4 and Merino Extra Fine. Work 2 ridges. Then work rib (= knit 1 /purl 1) until the piece measures 10 cm / 4". Work 1 ridge, AT THE SAME TIME as you decrease 5 stitches evenly on row = 51-53-55-57-59-61-63 stitches. Insert 1 marker at the beginning of the round. Change to double pointed needles size 4 mm / US 6 and work pattern on the next round as follows: Stockinette stitch over the first 4-5-6-7-8-9-10 stitches, work A.4 over the next 42 stitches, work the first stitch in A.4, 4-5-6-7-8-9-10 stitches stockinette stitch. Continue this pattern upwards. AT THE SAME TIME when the piece measures 13-12-13-12-12-14-13 cm / 5"-4¾"-5"-4¾"-4¾"-5½"-5" increase 1 stitch on each side of the marker – remember INCREASE TIP! Increase in this way every 2-2½-2-2-2-1½-1½ cm / ¾"-⅞"-¾"-¾"-¾"-½"-½" a total of 14-15-16-17-18-19-20 times = 79-83-87-91-95-99-103 stitches. When the piece measures 45-50-50-49-49-48-48 cm / 19¾"-19¾"-19¼"-19¼"-19"-19" bind off 6 stitches mid under the sleeve (bind off 3 stitches on each side of the marker). Then work back and forth on the needle AT THE SAME TIME as you bind off for sleeve cap at the beginning of each row in each side as follows: 2 stitches 2-4-6-7-9-10-12 times and 1 stitch 12-10-8-8-6-6-4 times = 41 stitches left in all sizes. The piece measures 55-60-60-60-60-60-60 cm / 21½"-23½"-23½"-23½"-23½"-23½". NOW YOU MEASURE THE PIECE FROM HERE! Continue with pattern over the remaining stitches until the piece measures 12-14-13-15-17-18-19 cm / 4¾"-5½"-5"-6"-6⅔"-7"-7½". Then you bind off at the beginning of each row from the right side as follows: 19 stitches 1 time AT THE SAME TIME as 8 of these 19 stitches are knitted together 2 and 2 before they are bind off, 3 stitches 1 time, 2 stitches 1 time. Work 3 rows without decreases. Bind off 1 stitch on the next row = 16 stitches left in all sizes. Continue working until the piece measures 19-21-22-24-26-27-28 cm / 7½"-8¼"-8¾"-9½"-10¼"-10½"-11". The whole sleeve measures approx. 74-81-82-84-86-87-88 cm / 29"-32"-32¼"-33"-34"-34¼"-34½". LEFT SLEEVE: Worked as for right sleeve, but decreases at top are worked in opposite side, i.e. at the beginning of every row from the wrong side. ASSEMBLY: Sew the sleeves together mid back inside the bind off edge of each sleeve. Sew the sleeves to front and back piece on body in the outermost stitch as follows: Sew from the armhole and up along shoulder on back piece to mid back. Repeat on the other side. Sew in that same way from armhole and up along shoulder to the neck on the front piece. Repeat on the other side. NECKLINE: Knit up 94-94-108-108-108-108-108 stitches around the neck (including the stitches from the thread) with short circular needle size 3.5 mm / US 4 and Merino Extra Fine. Work 2 ridges, AT THE SAME TIME as you increase on the last round 22-22-26-26-26-26-26 stitches evenly = 116-116-134-134-134-134-134 stitches. Then work rib (= knit 1 /purl 1). When the rib measures 8 cm / 3⅛" work 1 ridge. Bind off. Fold the neck double and fasten on the inside, ridge to ridge. |
||||||||||||||||||||||
Diagram explanations |
||||||||||||||||||||||
|
||||||||||||||||||||||
 |
||||||||||||||||||||||
 |
||||||||||||||||||||||
 |
||||||||||||||||||||||
Have you finished this pattern?Tag your pictures with #dropspattern #siberiasweater or submit them to the #dropsfan gallery. Do you need help with this pattern?You'll find 29 tutorial videos, a Comments/Questions area and more by visiting the pattern on garnstudio.com. © 1982-2026 DROPS Design A/S. We reserve all rights. This document, including all its sub-sections, has copyrights. Read more about what you can do with our patterns at the bottom of each pattern on our site. |
||||||||||||||||||||||


With over 40 years in knitting and crochet design, DROPS Design offers one of the most extensive collections of free patterns on the internet - translated to 17 languages. As of today we count 324 catalogs and 12290 patterns - 12280 of which are translated into English (US/in).
We work hard to bring you the best knitting and crochet have to offer, inspiration and advice as well as great quality yarns at incredible prices! Would you like to use our patterns for other than personal use? You can read what you are allowed to do in the Copyright text at the bottom of all our patterns. Happy crafting!
Post a comment to pattern DROPS 185-2
We would love to hear what you have to say about this pattern!
If you want to leave a question, please make sure you select the correct category in the form below, to speed up the answering process. Required fields are marked *.