
Popular categories
Looking for a yarn?


Comments / Questions (71)
![]() Van Durpe Hilde wrote:
Van Durpe Hilde wrote:
Heeft er al iemand deze jas gemaakt in aparte stukken ipv met rondbreinaalden
04.12.2018 - 12:14DROPS Design answered:
Dag Hilde,
Voor het aanpassen van patronen om met rechte naalden te breien kun je deze link raadplegen.
04.12.2018 - 13:28
![]() Fanny wrote:
Fanny wrote:
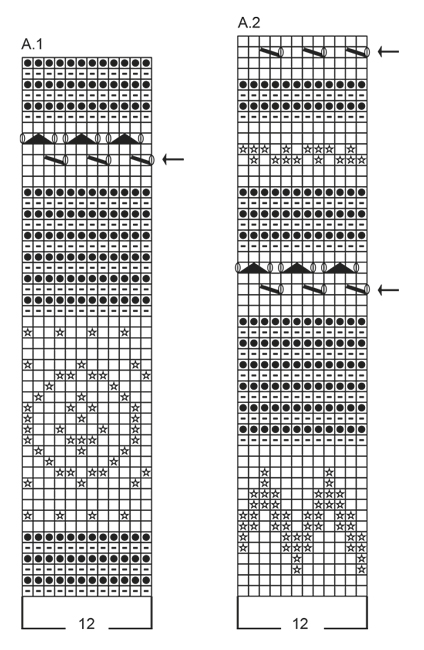
Bonjour, Je ne comprend pas bien la légende de la flèche sur les diagrammes A1et A2. Comment commence-on le rang? Une maille lisière puis le jeté? Ou la maille lisière, ne pas faire le jeté et faire le glissé endroit directement ? Merci d'avance
17.11.2018 - 11:55DROPS Design answered:
Bonjour Fanny, aux autres rangs on répète A.1/A.2 en largeur en terminant (sur l'endroit) par la 1ère m de A.1/A.2 avant la m lisière. Sur ces rangs, vous terminerez par les 2 premières m de A.1.A.2 (= 1 jeté, 2 m ens à l'end) avant la m lisière. Bon tricot!
19.11.2018 - 08:08
![]() Rosa wrote:
Rosa wrote:
Hola, error en diagrama en el símbolo estrella, debería ser: Estrella=derecho por el lado derecho, revés por el lado revés en color neblina.
10.07.2018 - 22:20
![]() Ulrike wrote:
Ulrike wrote:
Wie viel Gramm Wolle benötigt man, wenn man die Jacke in einer Farbe ohne Muster stricken möchte?
20.05.2018 - 13:29DROPS Design answered:
Liebe Ulrike, die Garnmenge in jeder Farbe für Ihre Größe können Sie zusammenrechnen, sicher brauchen Sie etwas weniger, Ihr DROPS Laden wird Ihnen damit gerne helfen. Viel Spaß beim stricken!
22.05.2018 - 08:42Claudia wrote:
Hola estoy confundida, me pueden explicar es que no entendí cómo se trabajan las filas con la flecha? A qué se refieren con tejer los primer dos puntos con A1/A2 y además el punto de orillo. De antemano gracias por su respuesta. Saludos cordiales
19.03.2018 - 05:08DROPS Design answered:
Hola Claudia, debido a que en las filas marcadas con las flechas los primeros 2 puntos se trabajan de la siguiente manera: lazada, deslizar 1 punto como de derecho, 1 derecho, pasar el punto deslizado sobre el punto trabajado; y para que el patrón quede simétrico, los últimos 2 puntos se trabajan igual: 1 lazada, deslizar 1 punto como de derecho, 1 derecho, pasar el punto deslizado sobre el punto trabajado.
08.04.2018 - 18:39
![]() Donatella wrote:
Donatella wrote:
Buongiorno, non riesco ad interpretare il significato del simbolo con la freccia nei diagrammi A1 e A2 relativamente alle righe 41, 29, 51.Cosa significa lavorare le prime due maglie al posto della prima maglia? Le righe alle quali si riferisce la freccia iniziano con un gettato! Grazie e cordiali saluti
14.03.2018 - 16:24DROPS Design answered:
Buongiorno Donatella. Deve lavorare le prime due maglie a diritto; quindi non lavora la prima maglia gettata e non deve passare 1 maglia a diritto e poi accavallarla. Buon lavoro!
15.03.2018 - 08:23
![]() Nancy wrote:
Nancy wrote:
Moet je na de meerderingen in de sjaalkraag toch doorbreien in boordsteek ( 3 rechts - 3 averechts) Dan loopt het patroon toch niet meer door?
08.02.2018 - 07:42DROPS Design answered:
Hoi Nancy, In de sjaalkraag meerder je in de averechte delen en de gemeerderde steken brei je dan averecht, zodat het boordsteekpatroon in tact blijft. Dat betekent dus dat je over een deel van de sjaalkraag 3 recht, 4 averecht breit.
11.02.2018 - 21:31
![]() Nancy wrote:
Nancy wrote:
Minder je voor het achterpand aan het begin en einde van dezelfde naald of alleen aan het begin van iedere naald?
23.01.2018 - 16:40DROPS Design answered:
Hoi Nancy, Je mindert voor de armsgaten alleen aan het begin van elke naald aan elke kant, dus niet aan het begin en het einde.
26.01.2018 - 19:15
![]() Marie Boyte wrote:
Marie Boyte wrote:
Bonjour,J'aimerais faire la veste 181/17 .La laine proposée est Drops Air de la catégorie C.J'aimerais faire ce modèle mais avec la laine A+A comme proposé en alternative.Mais je ne sais pas comment calculer la quantité à acheter.Pouvez vous m'aider svp? Merci beaucoup pour votre MERVEILLEUX site,je l'adore Marie
15.01.2018 - 00:17DROPS Design answered:
Bonjour Mme Boyte et merci. Vous trouverez ici comment calculer la quantité nécessaires dans les laines alternatives choisies. Bon tricot!
15.01.2018 - 10:10Margo wrote:
When knitting the increases in the collar do I just increase the amount of stitches in each rib section?
04.12.2017 - 23:01DROPS Design answered:
Dear Margo, you increase for right band collar in the 6-6-6-7-7-8 P sections, then in the k sections after marker, continue rib as before before marker (over the 38-38-38-44-44-50 sts before marker). Happy knitting!
05.12.2017 - 08:39
|
|||||||||||||||||||||||||
Svalbard#svalbardjacket |
|||||||||||||||||||||||||
 |
 |
||||||||||||||||||||||||
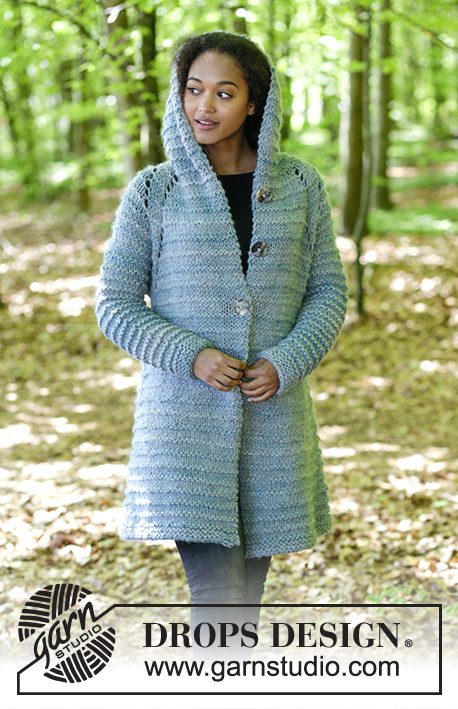
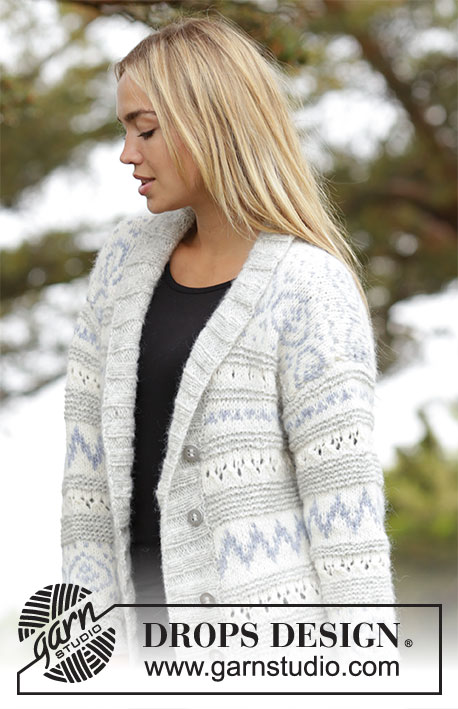
Knitted jacket with multi-colored Norwegian pattern, garter stitch and band collar in rib. Sizes S - XXXL. The piece is worked in DROPS Air.
DROPS 181-17 |
|||||||||||||||||||||||||
|
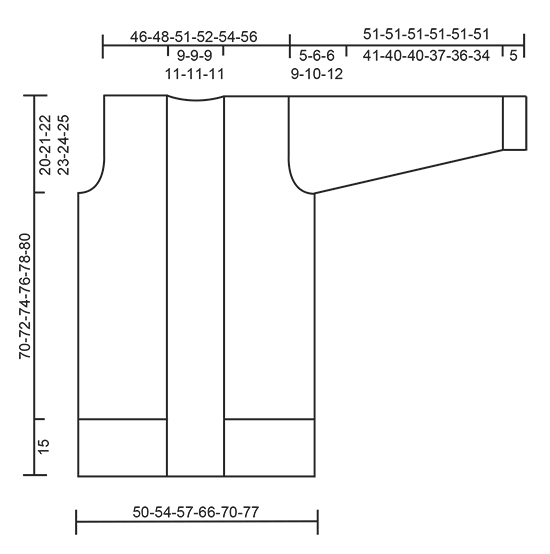
INFORMATION FOR THE PATTERN: RIDGE/GARTER STITCH (worked back and forth): 1 ridge = Knit 2 rows. PATTERN: See diagrams A.1 and A.2. The diagrams show all the rows in the pattern seen from the right side. * Work A.1 once in height, then A.2 once in height *, work from *-* to finished length. A.1 + A.2 together measure approx. 43 cm / 17" in height. DECREASE TIP (for mid front): All decreases are worked from the right side! Decrease on the inside of 1 edge stitch in garter stitch. Decrease as follows after the 1 edge stitch: Slip 1 stitch as if to knit, knit 1, pass the slipped stitch over. Decrease as follows before the 1 edge stitch: Start 2 stitches before the edge stitch and knit 2 together. DECREASE TIP/INCREASE TIP (evenly on row): To work out how to decrease/increase evenly on row, count the total number of stitches on the row (e.g. 185 stitches) and divide by the number of decrease/increases to be made (e.g. 38) = 4.9. In other words, in this example you decrease by knitting together approx. every 4th and 5th stitch. If you are increasing, do this after approx. every 5th stitch. Increase 1 stitch by making 1 yarn over, on the next row, work the yarn overs twisted to prevent holes. INCREASE TIP (for the band): Increase 1 stitch at the end of every purl section (seen from the right side) by picking up the loop between 2 stitches in the transition between purl and knit. Purl the loop twisted to prevent holes. The next time you increase will be at the end of each knit section and the loop is knitted twisted. BUTTONHOLE: Decrease for the buttonhole on the right band collar (when the garment is worn). Decrease from the right side in a purl section. 1 BUTTONHOLE = purl 2 together and make 1 yarn over. On the next row (= wrong side) knit the yarn over so that there is a hole. The top buttonhole should be approx. 18-19-20-21-22-23 cm / 7"-7½"-8"-8¼"-8 ¾"-9" from the shoulder and down, the 3 next in every other purl section (count out from the top buttonhole where the bottom buttonhole should be made). ---------------------------------------------------------- BODY: The piece is worked back and forth with circular needle from mid front. The band collar is worked at the end by knitting up stitches mid front. Cast on 185-197-215-245-257-287 stitches with circular needle size 5 mm / US 8 and pearl gray. Purl 1 row from the wrong side. The next row is worked as follows from the right side: 1 edge stitch in GARTER STITCH – see description above, * knit 3, purl 3 *, work from *-* until there are 4 stitches left on the row, finish with knit 3 and 1 edge stitch in garter stitch. Continue rib in this way, but after every 5th row, purl 1 row from the wrong side with 1 edge stitch in garter stitch in each side (this is done to prevent the rib being tight). When the rib measures 15 cm / 6", knit 1 row from the right side where you decrease 38-38-44-50-50-56 stitches evenly on row – read DECREASE TIP/INCREASE TIP (evenly spaced) = 147-159-171-195-207-231 stitches. Change to circular needle SIZE 5.5 mm/US 9 / US 9. Purl 1 row from the wrong side with 1 edge stitch in garter stitch in each side. The next row is worked as follows from the right side: 1 edge stitch in garter stitch, work PATTERN according to diagram A.1 – see description above, until there are 2 stitches left on the row, work the first stitch in A.1 and finish with 1 edge stitch in garter stitch. Continue the pattern in this way until the piece measures 50-51-52-53-54-55 cm / 19¾"-20"-20½"-21"-21¼"-21⅝" (after A.1 continue with A.2 in the same way). REMEMBER THE GAUGE! The next row is worked as follows: Work 32-35-37-42-44-50 stitches (= front piece), bind off 4-4-6-6-8-8 stitches for armhole, work 75-81-85-99-103-115 stitches (= back piece), bind off 4-4-6-6-8-8 stitches for armhole and work the last 32-35-37-42-44-50 stitches (= front piece). The front and back pieces are now finished separately. BACK PIECE: = 75-81-85-99-103-115 stitches. Continue the pattern back and forth as before and bind off for the armhole at the beginning of each row in each side as follows: bind off 2 stitches 0-0-0-2-2-4 times and 1 stitch 1-2-2-4-4-5 times = 73-77-81-83-87-89 stitches. Continue the pattern with1 edge stitch in garter stitch in each side. When the piece measures 68-70-72-74-76-78 cm / 26¾"-27½"-28⅜"-29⅛"-30"-30¾" bind off the middle 13-13-13-15-15-15 stitches for the neck and each shoulder is finished separately. Continue the pattern and bind off 1 stitch on the next row from the neck = 29-31-33-33-35-36 stitches left on the shoulder. Continue working until the piece measures 70-72-74-76-78-80 cm / 27½"-28⅜"-29⅛"-30"-30¾"-31½. Bind off. Repeat on the other shoulder. RIGHT FRONT PIECE: = 32-35-37-42-44-50 stitches. Continue the pattern and bind off for the armhole at the beginning of each row from the side as for the back piece. AT THE SAME TIME when the piece measures 52-53-54-55-56-57 cm / 20½"-21"-21¼"-21⅝"-22"-22½" decrease 1 stitch for the neck towards mid front – read DECREASE TIP. Repeat the decrease in sizes S + M + L when the piece measures 62-63-64 cm / 24½"-24¾"-25¼" (do not work anymore decreases in the other sizes). After all the decreases for armhole and neck, there are 29-31-33-33-35-36 stitches on the row for the shoulder. Continue working until the piece measures 70-72-74-76-78-80 cm / 27½"-28⅜"-29⅛"-30"-30¾"-31½. Bind off. LEFT FRONT PIECE: Work as for the right but reversed. SLEEVE: The piece is worked in the round with double pointed needles. Change to short circular needle when you have enough stitches. Cast on 36-36-36-48-48-48 stitches with double pointed needles size 5 mm / US 8 and pearl gray. Knit 1 round. Then work rib (= knit 3 / purl 3) for 5 cm / 2". Insert 1 marker thread at the beginning of the round (= mid under the sleeve) and allow the marker thread to follow your work upwards. Change to double pointed needles SIZE 5.5 mm/US 9 / US 9 and work PATTERN in the round according to diagram A.1 – see description above. When the piece measures 6-6-6-8-8-9 cm / 2⅜"-2⅜"-2⅜"-3"-3"-3½" increase 2 stitches mid under the sleeve (increase by working 2 stitches in the first and the last stitch on the round – NOTE: The increased stitches are worked into the pattern as you go). Increase in this way every 3½-3-2½-3-2½-2 cm / 1¼"-1⅛"-⅞"-1⅛"-⅞"-¾" a total of 12-13-15-11-13-14 times = 60-62-66-70-74-76 stitches. When the piece measures 46-45-45-42-41-39 cm / 18"-17¾"-17¾"-16½"-16"-15¼" (NOTE: Shorter measurements in larger sizes because of longer sleeve cap and wider shoulders) bind off the middle 4-4-6-6-8-8 stitches under the sleeve (i.e. Bind off 2-2-3-3-4-4 stitches on each side of the marker thread). Continue by working the sleeve cap back and forth with circular needle. Continue the pattern and bind off for the sleeve cap at the beginning of each row in each side as follows: bind off 3 stitches 1-1-2-2-2-2 times, 2 stitches 1 time and 1 stitch 1-1-1-3-3-6 times. Continue by binding off 2 stitches at the beginning of each row in each side until the piece measures 50 cm / 19¾" in all sizes. Bind off 3 stitches at the beginning of the next 2 rows and then LOOSELY bind off the remaining stitches. Work another sleeve in the same way. ASSEMBLY: Sew the shoulder seams. RIGHT BAND COLLAR: Start from the right side at the bottom of the right front piece and knit up approx. 122 to 140 stitches along the front piece to mid back of the neck with circular needle size 5 mm / US 8 and pearl gray (knit up inside the 1 edge stitch in garter stitch). Knit 1 row from the wrong side where you increase evenly along the row to 149-155-161-167-173-179 stitches. Knit 1 row from the right side. The next row is worked as follows from the wrong side (starting mid back of neck): 2 edge stitches in garter stitch, * knit 3, purl 3 *, work from *-* until there are 3 stitches left on the row and finish with 3 edge stitches in garter stitch (from the right side, this will be 3 stitches garter stitch and knit 3 at the bottom of the front piece and purl 3 and 2 edge stitches in garter stitch mid back of neck). When the band collar measures 2 cm / ¾" insert 1 marker after 38-38-38-44-44-50 stitches counted from mid back of neck and down. On the next row from the right side increase 1 stitch in each purl section over these 38-38-38-44-44-50 stitches (= 6-6-6-7-7-8 stitches increased) - read INCREASE TIP (this is done so that the collar will lie neatly when folded over). When the band collar measures 4 cm / 1½" increase in the same way in each knit section (= 6-6-6-7-7-8 stitches increased). Repeat the increases in each purl section when the band collar measure 6-6-6-7-7-7 cm / 2⅜"-2⅜"-2⅜"-2¾"-2¾"-2¾" and in each knit section when the band collar measures 8-8-8-9-9-9 cm / 3"-3"-3"-3½"-3½"-3½". AT THE SAME TIME when the band collar measures 7-7-7-9-9-9 cm / 2¾"-2¾"-2¾"-3½"-3½"-3½" decrease for 4 BUTTONHOLES – see description above. After all the increases, there are 173-179-185-195-201-211 stitches on the row. When the band collar measures 9-9-9-11-11-11 cm / 3½"-3½"-3½"-4½"-4½"-4½" bind off with garter stitch over garter stitch, knit over knit and purl over purl. LEFT BAND COLLAR: Start from the right side mid back of neck and knit up stitches in the same way as for the right band collar. Work as for the right band collar, but in reverse, i.e. the first row of rib is worked from the wrong side as follows (= from the bottom of the front piece): 3 edge stitches in garter stitch, * purl 3, knit 3 *, work from *-* until there are 2 stitches left and finish with 2 edge stitches in garter stitch. Do not decrease for buttonholes on the left band collar. ASSEBLY: Sew in the sleeves. Sew the collar together mid back – sew in the outermost loop of the outermost stitch. When the collar is turned down, there will be 4 stitches garter stitch mid back with knit 3 on each side of these stitches. Lay the right band over the left band and mark the position of the buttons. Sew the buttons onto the left band. |
|||||||||||||||||||||||||
Diagram explanations |
|||||||||||||||||||||||||
|
|||||||||||||||||||||||||
 |
|||||||||||||||||||||||||
 |
|||||||||||||||||||||||||
Have you finished this pattern?Tag your pictures with #dropspattern #svalbardjacket or submit them to the #dropsfan gallery. Do you need help with this pattern?You'll find 33 tutorial videos, a Comments/Questions area and more by visiting the pattern on garnstudio.com. © 1982-2026 DROPS Design A/S. We reserve all rights. This document, including all its sub-sections, has copyrights. Read more about what you can do with our patterns at the bottom of each pattern on our site. |
|||||||||||||||||||||||||


With over 40 years in knitting and crochet design, DROPS Design offers one of the most extensive collections of free patterns on the internet - translated to 17 languages. As of today we count 324 catalogs and 12290 patterns - 12280 of which are translated into English (US/in).
We work hard to bring you the best knitting and crochet have to offer, inspiration and advice as well as great quality yarns at incredible prices! Would you like to use our patterns for other than personal use? You can read what you are allowed to do in the Copyright text at the bottom of all our patterns. Happy crafting!
Post a comment to pattern DROPS 181-17
We would love to hear what you have to say about this pattern!
If you want to leave a question, please make sure you select the correct category in the form below, to speed up the answering process. Required fields are marked *.