
Popular categories
Looking for a yarn?


Comments / Questions (47)
![]() Adélie wrote:
Adélie wrote:
Bonjour je ne comprends pas comment enfiler les liens et l'incorporer à l'ouvrage. Merci beaucoup.
09.04.2018 - 15:42DROPS Design answered:
Bonjour Adélie, enfilez une des extrémités du lien dans le devant et l'autre extrémité dans le dos, serrez et nouez au niveau de l'épaule à la hauteur souhaitée. Bon assemblage!
09.04.2018 - 16:09
![]() Fanny wrote:
Fanny wrote:
Buenas tardes... no entiendo los puntos de aumento... Talla L. 44 cad. que se convierten en 35. ok. Empiezo con los aumentos del esquema (4 vueltas x 2 aum. a cada lado) 35 + 16=51p.altos. Hasta ahí perfecto. Despúes 13 vueltas con 3 aumentos en cada vuelta (13x3=39) 51+39=90 ???? según las instrucciones debería tener 74 puntos !!!! Necesito ayuda. Gracias por vuestra página
04.04.2018 - 16:40DROPS Design answered:
Hola Fanny. En cada fila aumentamos 3 puntos altos. Los 5 puntos de cadeneta no cuentan como puntos altos (lee INFORMACIÓN PARA LA REALIZACIÓN DEL TRABAJO). Hay que trabajar un TOTAL de 13 filas con aumentos , no las filas del diagrama + 13, es decir 13x3 = 39 puntos aumentados + 35 puntos de la primera fila = 74 puntos
04.04.2018 - 23:14Robyn Ratcliffe wrote:
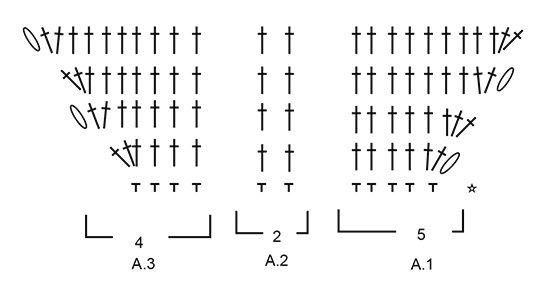
Hi, I'm new to crocheting. I don't understand the graph. In A1 it's for 5 single/double crochet but there are more that 5 symbols in some if the ries
20.09.2017 - 11:30DROPS Design answered:
Dear Mrs Ratcliffe, in 1st row in A.1 work 3rd symbol (= 5 chains), then continue with 2 dc in 1st sc, then 1 dc in each of the next 4 sts. Happy crocheting!
20.09.2017 - 14:02
![]() Karen Mackin wrote:
Karen Mackin wrote:
How do I find what size I need??? normally theres a bust measurement or something
27.07.2017 - 20:11DROPS Design answered:
Dear Karin, for sizing please refer to the measuremets given on the shematics at the bottom of the pattern.The measurements are given in cm. I hope this helps. Happy Knitting!
27.07.2017 - 23:15
![]() Audrey wrote:
Audrey wrote:
Bonsoir! Je suis presque à la fin de mon ouvrage mais je ne sis pas satisfaite de mon travail. En effet à partir du diagramme A4/A5 mon ouvrage gondole .. comme si j'avais trop de brides! Pourtant j'ai bel et bien 187 brides (taille M) au départ! Que faire? ! Merci de votre aide!
30.06.2017 - 23:42DROPS Design answered:
Bonjour Audrey, pensez à toujours bien conserver la même tension en brides et en point fantaisie pour conserver la bonne largeur. Essayez avec un crochet plus petit si votre point fantaisie est trop large. Bon crochet!
03.07.2017 - 09:01
![]() Michi wrote:
Michi wrote:
Ich stehe gerade total auf dem Schlauch. Das Vorderteil wird von oben nach unten gehäkelt. Bei Größe S soll ich 42 Maschen anschlagen laut schriftlicher Anleitung. Wenn ich mir die Skizze ansehe, steht da am Anfang 18. Sind das dann die cm? Hilfe, verstehe ich nicht 😞
20.06.2017 - 21:11DROPS Design answered:
Liebe Michi, es wird mit 42 Lm angefangen aber dann bei der 1. Reihe werden Lm überspringen = 35 fM am Ende der 1. Reihe = ca 19 cm in der Breite wenn Ihre Maschenprobe stimmt. Viel Spaß beim häkeln!
21.06.2017 - 10:10
![]() M. ANGELES wrote:
M. ANGELES wrote:
No consigo entender como hacer la primera vuelta de unión de las dos partes. Hago los puntos altos de la espalda y los puntos de cadeneta para la sisa, pero no sé cómo hacer el comienzo de los puntos altos del delantero ya que hay un desnivel, las cadenetas de la espalda quedan en la parte alta del punto alto y hay que unir al delantero pero no sé como hacerlo. Creo que no está bien explicado. Se necesita un video ya que entiendo que es dificil hacerlo en palabras.
04.06.2017 - 19:36DROPS Design answered:
Hola M.Ángeles, después de las cadenetas, se trabaja 1 p.a. en el primer p.a. del delantero. Si tienes dificultad para trabajarlo, acércate a la tienda más cercana de DROPS, donde te podrán ayudar personalmente. Todos los videos que puedan servir de ayuda para realizar el patrón se pueden encontrar bajo el patrón.
17.06.2017 - 18:57Lucille wrote:
I dont understand the bottom part when i have worked 66 dc in both front and back then they ask to chain 6 in both and then i dont understand the rest. Could you kindly explain to me. Where do i slip stitch in 3rd chain? Is it in the front or back?
29.05.2017 - 09:50DROPS Design answered:
Dear Lucille, work 1 dc in each of the 66 dc on back piece (starting with 3 ch to replace 1 st dc), then 6 ch for armhole, 1 dc in each of the 66 dc on front piece, then 6 ch for armhole, join now in the first dc at the beginning on back piece (= the first of the 66 dc of the back piece = the 3 ch at beg of row worked on back piece). You are working body in the round from now. Happy crocheting!
29.05.2017 - 10:30
![]() Christine wrote:
Christine wrote:
Please help me with is pattern. Im stuck in the body where they ask us to "work 6-12-12-16-24-30 chain stitches and finish with 1 slip stitch in 3rd chain stitch at beginning of round" but i dont understand it. Where do i insert tge slip stitch and does the back and front portion come together?
29.05.2017 - 09:49DROPS Design answered:
Dear Christine, you will join with a sl st in the 1st st at beg of back piece (= 1st tr = 3 ch, work the sl st in the 3rd ch at beg of the last row worked on back piece). You will now have the 6-30 ch (see size) under each arm and continue in the round to the bottom end. Happy crocheting!
29.05.2017 - 10:28
![]() Christine wrote:
Christine wrote:
Please help me with is pattern. Im stuck in the body where they ask us to "work 6-12-12-16-24-30 chain stitches and finish with 1 slip stitch in 3rd chain stitch at beginning of round" but i dont understand it. Where do i insert tge slip stitch and does the back and front portion come together?
29.05.2017 - 09:48DROPS Design answered:
Dear Christine, When you put the front and the back pieces together, the chanstiches will from the armholes, therefore you should put the slip stitch into the first stitch on the back, thus clising the circle. From this point you work in the round, as in you close the circle at the end of each round, but turn the piece and continue to crochet from the other side, in order to have the pattern the same in the whole piece. I hope this helped. Happy Cricheting!
21.06.2017 - 16:34
|
|||||||||||||||||||||||||
Hawaiian Breeze#hawaiianbreezetop |
|||||||||||||||||||||||||
|
|
|||||||||||||||||||||||||
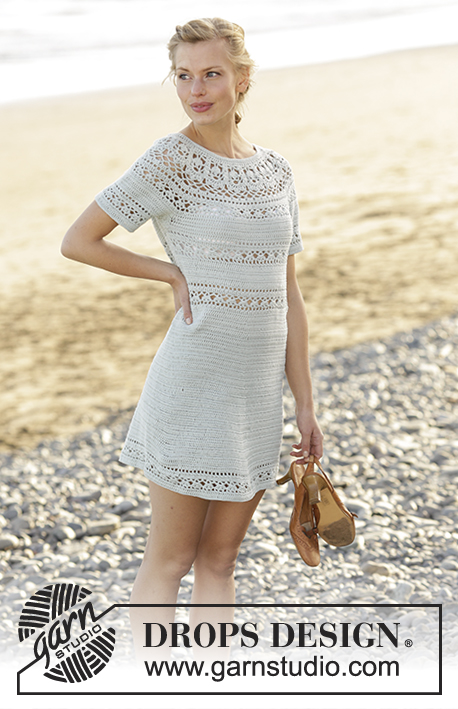
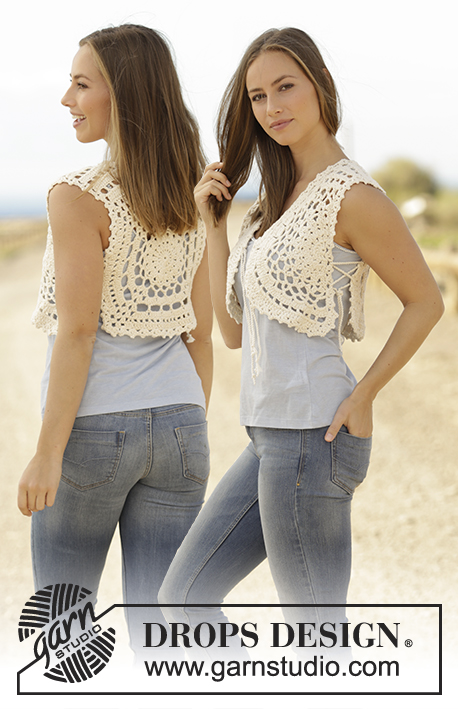
Crochet top with lace pattern and fringes in DROPS Muskat. Size: S - XXXL
DROPS 175-27 |
|||||||||||||||||||||||||
|
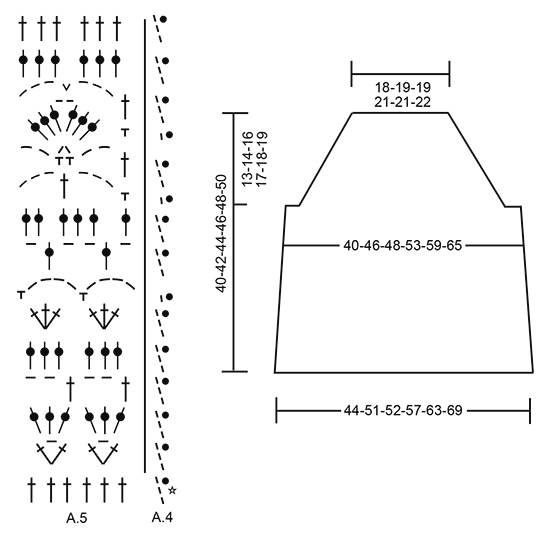
CROCHET INFO: At beginning of every row with double crochets in A.1 and A.3 work 5 chain stitches to turn with. These 5 chain stitches do not replace first double crochet. When working in the round, replace the first double crochet with 3 chain stitches, finish round with 1 slip stitch in 3rd chain stitch at beginning of round. PATTERN: See diagrams A.1 to A.5. INCREASE TIP: Increase by working 2 double crochets in 1 double crochet. ---------------------------------------------------------- TOP: Top is worked top down. First work front piece and back piece back and forth separately, then work in the round over both parts. FRONT PIECE: Work 42-44-44-47-47-49 loose chain stitches on hook size 4 mm / G/6 with Muskat. Turn and work as follows: Work 1 single crochet in second chain stitch from hook (= 1 single crochet + 1 chain stitch to turn with), work 1 single crochet in each of the next 0-2-2-0-0-2 chain stitches, * skip 1 chain stitch, work 1 single crochet in each of the next 4 chain stitches *, repeat from *-* 7-7-7-8-8-8 more times = 33-35-35-37-37-39 single crochets. Turn and work pattern as follows: Begin on 2nd row. Work A.1 over the first 5 single crochet, A.2 over the next 24-26-26-28-28-30 single crochets, A.3 over the remaining 4 single crochet - READ CROCHET INFO. REMEMBER THE CROCHET GAUGE! When diagram A.1 to A.3 have been done vertically, continue with double crochets and increases the same way until 11-12-13-14-15-16 rows with increases have been worked in total (increase 3 double crochets on every row). There are now 66-71-74-79-82-87 double crochets on row. Put piece aside. BACK PIECE: Work the same way as on front piece. BODY: Now work the two parts together as follows: Turn and work 1 double crochet in each of the 66-71-74-79-82-87 double crochets from back piece, work 6-12-12-16-24-30 chain stitches, work 1 double crochet in each of the 66-71-74-79-82-87 double crochets from front piece, work 6-12-12-16-24-30 chain stitches and finish with 1 slip stitch in 3rd chain stitch at beginning of round. Then work piece in the round, continue with 1 double crochet in every double crochet/chain stitch = 144-166-172-190-212-234 double crochets. When working in the round, turn after every round to work alternately from right side and wrong side. This is so that the texture is the same on the entire top. Insert 1 marker thread in each side, in the middle of the 6-12-12-16-24-30 chain stitches. NOW MEASURE THE PIECE FROM HERE. When piece measures 4 cm / 1½", increase 1 double crochet on each side of each marker thread - READ INCREASE TIP. Increase every 3-3-3-3-4-4 cm / 1"-1"-1"-1"-1½"-1½" 4 times in total = 160-182-188-206-228-250 double crochets. Piece now measures 14-15-15-16-17-18 cm / 5½"-6"-6"-6¼"-6¾-7" work 1 round while increasing 3-5-5-5-1-3 double crochets evenly = 163-187-193-211-229-253 double crochets, then work as follows: Work A.4 over the first double crochet on round, then repeat A.5 over the remaining double crochets. A.4 shows beginning and end of round. Do not turn, work all rounds from right side. Fasten off when A.4 and A.5 have been worked 1 time vertically. Piece measures approx. 40-42-44-46-48-50 cm / 15¾"-16½"-17¼"-18"-19"-19¾" in total. TIE: Work 2 loose ties as follows: Work chain stitches with Muskat on hook size 4 mm / G/6 until the tie measures 100 cm / 39½", turn and work 1 slip stitch in every chain stitch but make sure that the slipped stitches are not worked tighter than chain stitches. Fasten off. Work another tie the same way. Baste tie through one side on front piece, between second and third double crochet from edge in the first row with double crochets. Baste tie through one side on back piece the same way and tie a knot on shoulder. Repeat on the other side of top. FRINGES: Cut 4 lengths of yarn of 20 cm / 8". Place them double, thread loop from right side between 2 double crochets at the bottom of body. Then pull yarn ends through loops and tighten. Fasten fringes approx. 2 cm / ¾" apart at the bottom of top. |
|||||||||||||||||||||||||
Diagram explanations |
|||||||||||||||||||||||||
|
|||||||||||||||||||||||||
 |
|||||||||||||||||||||||||
 |
|||||||||||||||||||||||||
Have you finished this pattern?Tag your pictures with #dropspattern #hawaiianbreezetop or submit them to the #dropsfan gallery. Do you need help with this pattern?You'll find 9 tutorial videos, a Comments/Questions area and more by visiting the pattern on garnstudio.com. © 1982-2026 DROPS Design A/S. We reserve all rights. This document, including all its sub-sections, has copyrights. Read more about what you can do with our patterns at the bottom of each pattern on our site. |
|||||||||||||||||||||||||


With over 40 years in knitting and crochet design, DROPS Design offers one of the most extensive collections of free patterns on the internet - translated to 17 languages. As of today we count 325 catalogs and 12298 patterns - 12288 of which are translated into English (US/in).
We work hard to bring you the best knitting and crochet have to offer, inspiration and advice as well as great quality yarns at incredible prices! Would you like to use our patterns for other than personal use? You can read what you are allowed to do in the Copyright text at the bottom of all our patterns. Happy crafting!
Post a comment to pattern DROPS 175-27
We would love to hear what you have to say about this pattern!
If you want to leave a question, please make sure you select the correct category in the form below, to speed up the answering process. Required fields are marked *.