
Popular categories
Looking for a yarn?


Comments / Questions (26)
![]() Xisela wrote:
Xisela wrote:
Muchas gracias, ya me ha salido. Al final se trata de hacer exactamente lo que pone el diagrama, y confiar en que va a funcionar. Y así fue, quedó muy bonito. Gracias!
12.12.2024 - 10:01
![]() Xisela wrote:
Xisela wrote:
No consigo entender que estoy haciendo mal con el diagrama. Si tejo primero A1A, luego A1b, el punto central, a continuación A2A y termino con A2B antes de los dos puntos de punto musgo, obtengo los aumentos de forma irregular: en la primera mitad del tejido, antes del punto central, me queda un aumento, y en la segunda mitad, después del punto central, tengo tres aumentos. Llevo tres días intentando entender qué pasa.
28.11.2024 - 22:30DROPS Design answered:
Hola Xisela, A.1a y A.2b son 3 puntos cada uno y tienes 2 puntos en punto musgo a cada lado. Te quedan 56 puntos y 1 punto central, que son 28 puntos a cada lado del punto central que se trabajan como 7 repeticiones de A.1b en un lado y 7 repeticiones de A.2a en el otro lado. Como los diagramas son iguales (solo la orientación es diferente, el número de puntos es igual) el número de puntos debería ser igual en total, incluyendo el número de aumentos.
07.12.2024 - 19:33
![]() Bekah wrote:
Bekah wrote:
I am confused on how to read the pattern before the diagrams come in. What am I repeating for the rows?
10.09.2022 - 02:03DROPS Design answered:
Dear Bekah, work the diagrams starting at the bottom corner on the right side and towards the left from RS and read WS rows from the left towards the right (= here you just have to purl all stitches in the diagrams from WS); when diagrams are done in height, start again from first row starting with A.1A then repeat A.1B to the middle stitch, and work A.2A and repeat A.2B to the edge sts.. Happy knitting!
12.09.2022 - 09:22
![]() TERESA wrote:
TERESA wrote:
No entiendo que hay que hacer con estas instrucciones del patrón: = 2 pjd = ? = desl 1 pt como de derecho, 1 d. pasar el pt desl por encima.= ? ¿Podrían enviarme la frase entera, sin abreviaturas? Gracias
30.09.2021 - 09:00DROPS Design answered:
Hola Teresa, 2 pjd no existe en el patron. Segunda pregunta: deslizar 1 punto como de derecho, trabajar 1 derecho y pasar el punto deslizado sobre el punto trabajado. Buen trabajo!
01.10.2021 - 09:25
![]() Greg wrote:
Greg wrote:
Buonasera, non comprendo bene la fase finale. Dopo che il lavoro misura 73 cm bisogna procedere lavorando 2 coste su tutte le maglie ma cosa si intende esattamente? Forse avanti e indietro 2 volte per un totale di 4 ferri sempre a diritto? Grazie
14.03.2021 - 23:53DROPS Design answered:
Buonasera Greg, la spiegazione delle coste si trova sotto il paragrafo M LEGACCIO. In ogni caso deve lavorare 4 ferri diritto su tutte le maglie. Buon lavoro!
15.03.2021 - 23:15
![]() Gregorio Callegari wrote:
Gregorio Callegari wrote:
Buongiorno, Quando nei diagrammi A1 A e A2 B devo eseguire 2 gettati consecutivi devo separarli con 1 maglia a diritto? Ovvero io capisco che la sequenza è, nel caso di A1A, 2 gettati 1 diritto 2 gettati e poi inizia A1B. E'corretta la mia interpretazione? Grazie
04.03.2021 - 22:39DROPS Design answered:
Buonasera Gregorio, si, è corretto, deve lavorare 2 gettati, 1 diritto e 2 gettati. Buon lavoro!
04.03.2021 - 23:53
![]() Christine wrote:
Christine wrote:
J ai réussi à obtenir le diagramme qui correspond au châle. Merci de bien vouloir ignorer ma question du 04/01/21. Je pense qu une erreur s est glissée au niveau de A1B. Voilà ce que j'ai fait après les 67 m. : 2 m.PM + A1A (2jetés, 2m.ens. à l end.., 2jetés, 1m.end., 2jetés) +A1B (2m.ens. à l end., 2jetés). Répétez A1B jusqu à la m. centrale. Tricotez A2A : (2jetés, 2m.ens. à l end.). Répétez A2A jusqu\'à ce qu il reste 5 m. Tricotez A2B comme A1A et finir avec 2mPM
06.01.2021 - 13:19
![]() Christine wrote:
Christine wrote:
Après les 67 m. Pouvez-vs me confirmer le rg à tricoter en suivant le diagramme :2 m. PM , 2 jetés, 1 m.end, 2 jetés, glisser 1 m. à l'end, 1 m.end, passez la m. (A1A) ; 2 jetés, glisser 1 m à l'end, 1 m end, passez la m., 2 jetés, glisser 1 m à l'end, 1 m end, passez la m, 2 jetés (A1B). répétez A1B jusqu'à la m cent; m cent en jers.; 2 jetés, 2 m ens à l'end, 2 jetés, 2 m ens à l'end (A2A). Répétez A2A > 5 m. ; 2 jetés, 2 m ens, 2 jetés, 1 m end, 2 jetés
04.01.2021 - 11:53
![]() Cristina wrote:
Cristina wrote:
Me puede decir por qué se deja caer la segunda lazada en la vuelta del revés
18.02.2020 - 23:07DROPS Design answered:
Hola Cristina. Trabajamos doble lazada para que el agujero en el punto calado quede más visible y en la fila de revés trabajamos una y dejamos caer la otra lazada.
23.02.2020 - 23:09
![]() Cristina Torro wrote:
Cristina Torro wrote:
Efectivamente, me ha quedado genial. Muchas gracias!!! Tengo una enorme curiosidad: a un lado se hacen dos puntos juntos para el calado y al otro se hace slip-psso? Se puede hacer e los dos lados igual?
14.02.2020 - 20:06DROPS Design answered:
Hola Cristina. Sí, se pueden trabajar los dos lados igual, pero en ese caso el dibujo no quedaría simétrico.
16.02.2020 - 21:28
|
|||||||||||||
Autumn Fire#autumnfirescarf |
|||||||||||||
|
|
|||||||||||||
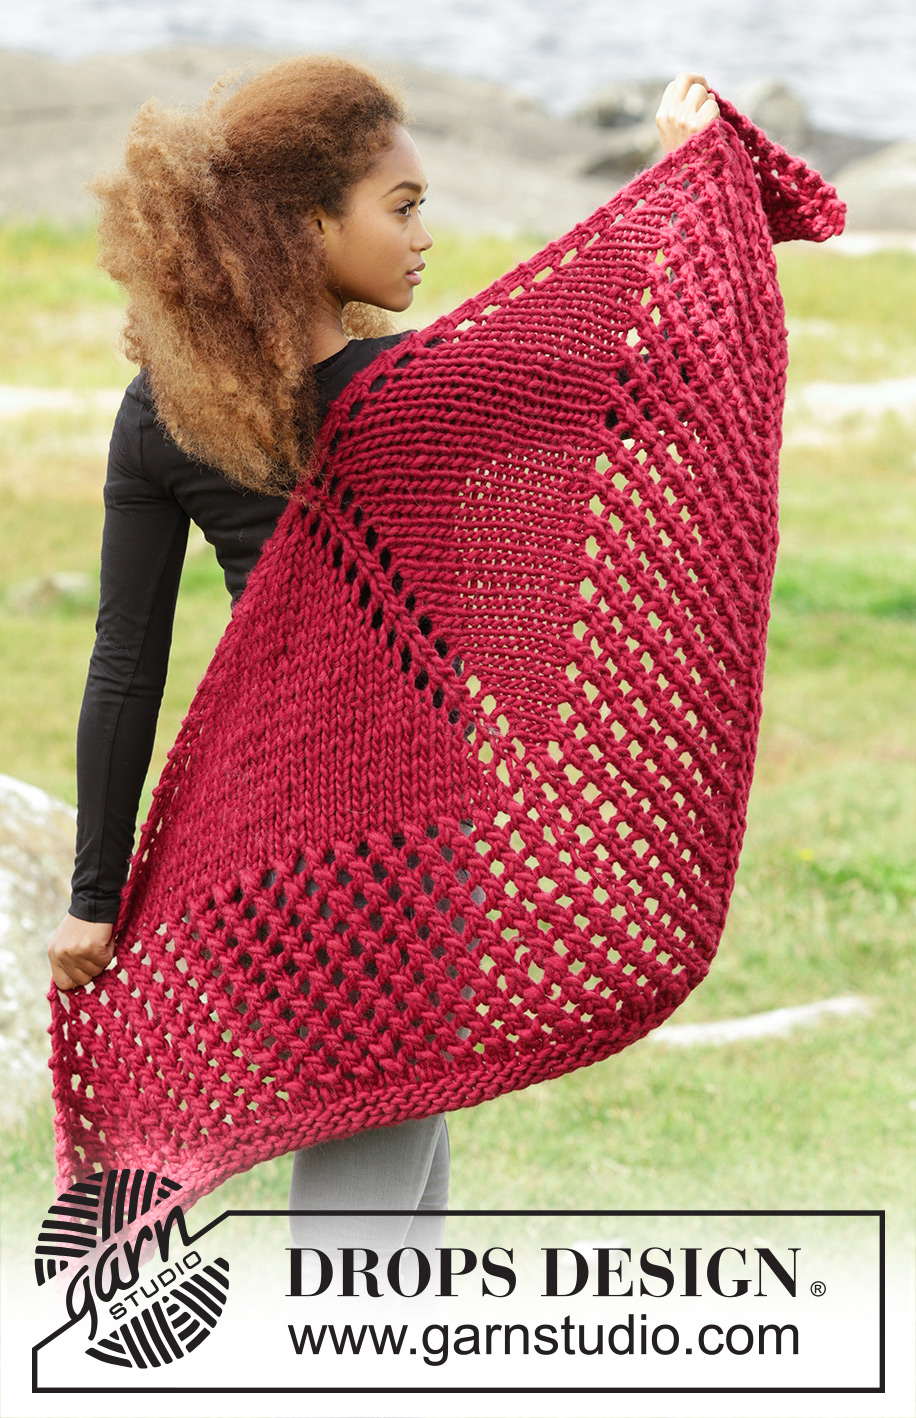
Knitted DROPS shawl with lace pattern in "Polaris".
DROPS 172-37 |
|||||||||||||
|
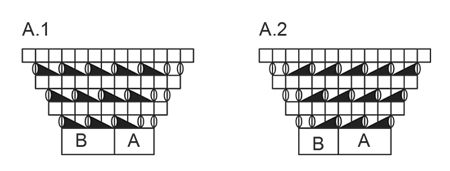
GARTER ST (back and forth on needle): K all rows. 1 ridge = K2 rows. PATTERN: See diagrams A.1 and A.2. The diagrams show all rows in pattern seen from RS. ---------------------------------------------------------- SHAWL: Worked back and forth on circular needle to make room for all the sts. The piece is worked top down. Cast on 5 sts on circular needle size 15 mm / US 19 with Polaris. Insert 1 marker in the 3rd st (mid st - marks mid back of shawl). Work 1st row as follows (= RS): K 2, 1 YO, K 1, 1 YO, K 2 = 7 sts. Continue in stockinette st with 2 sts in GARTER ST - see explanation above, in each side while AT THE SAME TIME inc 4 sts on every row from RS as follows: Make 1 YO inside 2 sts in garter st in each side and make a YO on each side of st with marker. Inc 15 times in total = 67 sts. Work next row as follows from RS: 2 sts in garter st, work A.1 A, repeat A.1 B until mid st (work in stockinette st), repeat from A.2 A until 5 sts remain, work A.2 B and finish with 2 sts in garter st. REMEMBER THE KNITTING GAUGE Continue like this with pattern and inc (inc are shown in pattern, inc 4 sts on every row from RS). When piece measures 73 cm / 28 3/4'' (or desired length), work 2 ridges over all sts before binding off. |
|||||||||||||
Diagram explanations |
|||||||||||||
|
|||||||||||||
 |
|||||||||||||
Have you finished this pattern?Tag your pictures with #dropspattern #autumnfirescarf or submit them to the #dropsfan gallery. Do you need help with this pattern?You'll find 16 tutorial videos, a Comments/Questions area and more by visiting the pattern on garnstudio.com. © 1982-2026 DROPS Design A/S. We reserve all rights. This document, including all its sub-sections, has copyrights. Read more about what you can do with our patterns at the bottom of each pattern on our site. |
|||||||||||||


With over 40 years in knitting and crochet design, DROPS Design offers one of the most extensive collections of free patterns on the internet - translated to 17 languages. As of today we count 324 catalogs and 12278 patterns - 12268 of which are translated into English (US/in).
We work hard to bring you the best knitting and crochet have to offer, inspiration and advice as well as great quality yarns at incredible prices! Would you like to use our patterns for other than personal use? You can read what you are allowed to do in the Copyright text at the bottom of all our patterns. Happy crafting!
Post a comment to pattern DROPS 172-37
We would love to hear what you have to say about this pattern!
If you want to leave a question, please make sure you select the correct category in the form below, to speed up the answering process. Required fields are marked *.