
Popular categories
Looking for a yarn?


Comments / Questions (7)
![]() Barbara wrote:
Barbara wrote:
Salve!Sto facendo la fascia ma non so come proseguire quando al diagramma 15 al momento in cui metto le 7 maglie in sospeso e devo procedere con 1 m al dritto e 1 al rovescio....non combacia il punto maglia coste 1/1. Grazie.Barbara
17.12.2021 - 17:01DROPS Design answered:
Buongiorno Barbara, l'intreccio dovrebbe essere sul diritto del lavoro, per cui lavora 1 maglia diritto, mette in sospeso 7 maglie e poi procede come indicato. Buon lavoro!
20.12.2021 - 16:08
![]() Claudine Charette wrote:
Claudine Charette wrote:
J'ai commencé le bandeau et au 7e rang quand nous devons faire une torsade il est indiqué après avoir mis nos 7 mailles en attente de tricoter les 6 suivantes: 1m end, 1m env. Donc si je comprends bien nous devons contrarier les 6 mailles qui seront cachées par la torsade?
05.12.2021 - 18:25DROPS Design answered:
Bonjour Mme Charette, effectivement, tricotez bien les 6 mailles comme indiqué et non comme elles se présentent, ainsi, les mailles de la torsade seront toujours en côtes 1 m end/1 m env, vu sur l'endroit. Bon tricot!
06.12.2021 - 08:50
![]() Ahmet Hakan wrote:
Ahmet Hakan wrote:
Who is she mannequin in the picture? please help me i need to her name
30.01.2021 - 22:01
![]() Joan wrote:
Joan wrote:
I don't see any place where I can print out this pattern or any others that I like. Thank you.
13.01.2019 - 18:08DROPS Design answered:
Dear Joan, y ou will find the icon for print the pattern just below the links to order the yarns and needle. Happy knitting!
14.01.2019 - 11:57
![]() Mirella wrote:
Mirella wrote:
Scaldacollo diagramma A.2 è spiegato che 6 maglie devono essere mantenute in sospeso sul dietro del lavoro. Poi lavorare le restanti 5 maglie dir, rov, dir, rov, dir. lavorare le 6 maglie in sospeso dir e rov e poi per altre 2 volte. Risultano 2 maglie dir vicine e l'ultima maglia della treccia risulta a rovescio. Dopo la spiegazione vuole che sulla treccia risulti dir e rov alternato. Non sarebbe meglio lavorare le 6 maglie rov e dir e poi per altre 2 volte?
22.12.2017 - 14:25DROPS Design answered:
Buongiorno Mirella. Abbiamo corretto la descrizione del penultimo simbolo del diagramma. Buon lavoro!
23.12.2017 - 07:31
![]() Marie wrote:
Marie wrote:
Sieht toll aus und ist schnell gestrickt. Danke für das schöne Muster!
18.11.2017 - 19:02
![]() Esther Rudin wrote:
Esther Rudin wrote:
Ich verstehe die Reihenfolge zu diesem sehr schönen Kragenschal 0-1172 nicht ganz. Weis nicht wie ich die Einteilung beginnen soll. Ist mir unklar. Könnt ihr mir bitte HELFEN ??? Ganz lieben Dank Esther
23.07.2016 - 15:34DROPS Design answered:
Liebe Esther, geht es um die Mustereinteilung im oberen Teil oder ist nicht klar, wie Vorder- und Rückteil getrennt werden?
25.07.2016 - 06:28
|
|||||||||||||||||||
DROPS Extra 0-1172 |
|||||||||||||||||||
|
|
|||||||||||||||||||
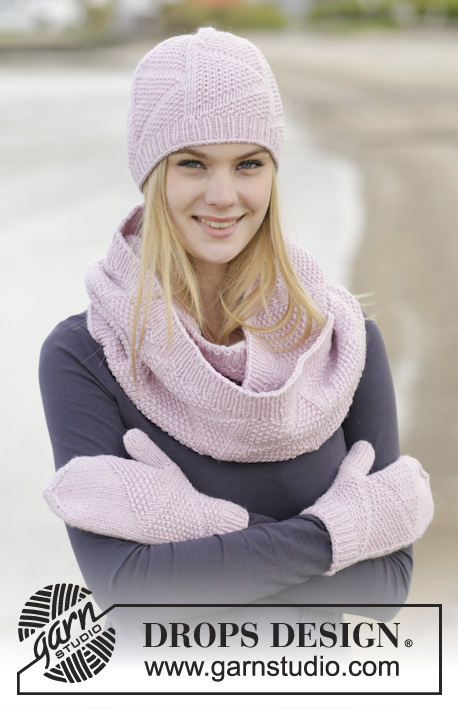
Set consists of: Knitted DROPS head band and neck warmer with cables in “Brushed Alpaca Silk” and “Alpaca”.
DROPS Extra 0-1172 |
|||||||||||||||||||
|
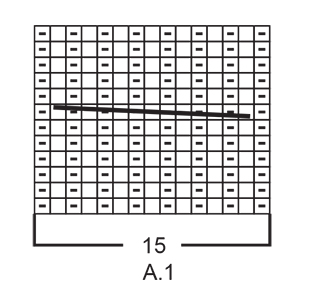
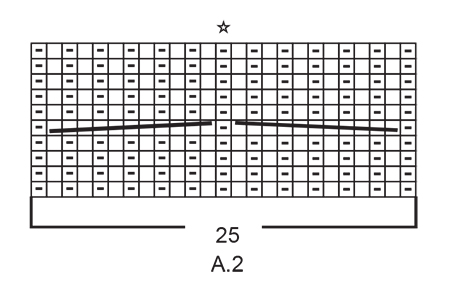
GARTER ST (back and forth): K all rows. 1 ridge = K2 rows. GARTER ST (worked in the round): * K 1 round and P 1 round *, repeat from *-*. 1 ridge = 2 rounds. PATTERN: See diagrams A.1 and A.2. The diagrams show all rows in pattern seen from RS. INCREASE TIP: Inc 1 st by making 1 YO, on next row/round work YO twisted (i.e. work in back loop of st instead front) to avoid holes. DECREASE TIP: Dec 1 st by K 2 sts tog. ---------------------------------------------------------- HEAD BAND: Worked back and forth on needle and sew tog mid back. Cast on 16 sts on needle size 6 mm / US 10 with 1 strand Brushed Alpaca Silk and 1 strand Alpaca (= 2 strands). Work 1 ridge in GARTER ST - see explanation above, AT THE SAME TIME on first row inc 5 sts evenly - READ INCREASE TIP = 21 sts. On next row work pattern as follows: 3 sts in garter st, A.1 (= 15 sts) and 3 sts in garter st. REMEMBER THE KNITTING GAUGE Continue like this until A.1 has been worked 6 times vertically, or to desired measurements. Now work 1 ridge over all sts AT THE SAME TIME dec 5 sts evenly - READ DECREASE TIP = 16 sts. Loosely bind off. ASSEMBLY: Fold cast-on edge and bind-off edge towards each other and sew neatly tog st by st with grafting/kitchener stitches. Make sure that to avoid a tight seam. Fasten off. ---------------------------------------------------------- NECK WARMER: Work in the round on circular needle, top down to vent, then work front and back piece back and forth separately. Cast on 78 sts on circular needle size 7 mm / US 10.75 with 1 strand Brushed Alpaca Silk and 1 strand Alpaca (= 2 strands). Work 2 ridges in GARTER ST in the round - see explanation above - AT THE SAME TIME on last row from RS inc 2 sts evenly = 80 sts. Switch to circular needle size 8 mm / US 11 and work pattern as follows: Work the last 13 sts in A.2 (= 25 sts), AT THE SAME TIME insert a marker in first st worked (= side), continue with 15 sts in stockinette st, A.2, insert a marker in the middle st in A.2 (= side), 15 sts in stockinette st, work the first 12 sts in A.2. REMEMBER THE KNITTING GAUGE When A.2 has been worked 1 time vertically, continue with A.2 one more time vertically, AT THE SAME TIME the last time the cable is worked (i.e. on 5th round) inc 1 st before every st with marker by making a YO = 82 sts. On next round P the YO twisted to avoid holes. Then P the new st in each side. When A.2 has been worked 2 times in total vertically, piece measures approx. 16 cm / 6 1/4''. Continue to work back and forth. Slip the first 41 sts on round on a stitch holder. FRONT PIECE: Continue with pattern over the remaining 41 sts, AT THE SAME TIME at the end of the next 2 rows cast on 4 new sts in each side = 49 sts. Work the new sts in GARTER ST - see explanation above, until finished measurements (i.e. now work 4 sts in garter st in each side). When A.2 has been worked 1 time vertically and piece measures 23 cm / 9'', switch to circular needle size 7 mm / US 10.75 and work 2 ridges over all sts. Bind off. BACK PIECE: Slip sts from stitch holder back on needle. Work as front piece. ASSEMBLY: Sew the 4 sts (garter st) that was cast on in each side, tog st by st. |
|||||||||||||||||||
Diagram explanations |
|||||||||||||||||||
|
|||||||||||||||||||
 |
|||||||||||||||||||
 |
|||||||||||||||||||
Have you finished this pattern?Tag your pictures with #dropspattern or submit them to the #dropsfan gallery. Do you need help with this pattern?You'll find 18 tutorial videos, a Comments/Questions area and more by visiting the pattern on garnstudio.com. © 1982-2026 DROPS Design A/S. We reserve all rights. This document, including all its sub-sections, has copyrights. Read more about what you can do with our patterns at the bottom of each pattern on our site. |
|||||||||||||||||||


With over 40 years in knitting and crochet design, DROPS Design offers one of the most extensive collections of free patterns on the internet - translated to 17 languages. As of today we count 324 catalogs and 12252 patterns - 12242 of which are translated into English (US/in).
We work hard to bring you the best knitting and crochet have to offer, inspiration and advice as well as great quality yarns at incredible prices! Would you like to use our patterns for other than personal use? You can read what you are allowed to do in the Copyright text at the bottom of all our patterns. Happy crafting!
Post a comment to pattern DROPS Extra 0-1172
We would love to hear what you have to say about this pattern!
If you want to leave a question, please make sure you select the correct category in the form below, to speed up the answering process. Required fields are marked *.