
Popular categories
Looking for a yarn?


Comments / Questions (31)
![]() Lucia wrote:
Lucia wrote:
Grazie. Ma non riesco a lavorare il collo cominciando Dal Fondo Della V, e finendo nuovamente new fondodella V. Il ferry non ci arriva.
08.12.2017 - 15:06DROPS Design answered:
Buongiorno Lucia. Deve riprendere le maglie solo intorno al collo, non anche ai lati della V. Ai lati della V ha lavorato una maglia vivagno come bordo. Buon lavoro!
08.12.2017 - 15:35
![]() Lucia wrote:
Lucia wrote:
Buongiorno, ho un’altra domanda. Bisogna attaccare Le maniche prima di cucire I lati/fianchi Del maglione o dopo? E Le maniche bisogna prima chiuderle E poi attaccarle al maglione o viceversa? Grazie
08.12.2017 - 13:32DROPS Design answered:
Buongiorno Lucia. Di solito si cuciono le maniche agli scalfi del davanti / dietro (quindi cuce la parte in alto della manica al davanti/dietro), poi unisce i lati delle maniche e del davanti e dietro. Buon lavoro!
08.12.2017 - 14:32
![]() Lucia wrote:
Lucia wrote:
Buongiorno, ho append fatto il collo di questo maglione, ma nella V non ho fatto I 4 giri a m. Legaccio, quindi la V sembra non rifinita. Guardando la foto non sembra abbiate fatto 4 ferri a m. Legaccio, ma sembra Abbia una rifinitura molto bassa, quasi come un giro o 2 a uncinetto di m. bassissima o bassa. Potete chiarificare, per favore? Grazie
08.12.2017 - 13:27DROPS Design answered:
Buongiorno Lucia. Quando riprende le maglie intorno al collo, vengono lavorati 4 ferri a legaccio. Si vede meglio se riesce ad ingrandire la fotografia. Buon lavoro!
08.12.2017 - 14:30
![]() Véronique wrote:
Véronique wrote:
Bonjour. Lorsque je fais le point fantaisie 2. À la fin des 2 rangs Je me retrouve toujours avec 92 mailles au lieu de 90 . Cela vient des mailles de lisières qui sont tricotées avec 2 fils , lorsque je fais le deuxième rang dois-je tricoter les 2 fils de la maille de lisière ensemble ou séparément ? Sinon d'où vient mon erreur ? Merci
15.10.2017 - 08:44DROPS Design answered:
Bonjour Véronique, sur 90 m, tricotez 1 m lis au point mousse, puis *2 m env, passez la 1ère m env par-dessus la 2ème*, répétez de *-* et terminez par 1 m lis (pour que le nombre de mailles tombe juste). Au 2ème rang, tricotez 1 m lis, tricotez 2 fois chaque maille du rang précédent et terminez par 1 m lis = vous aurez ainsi 90 m de nouveau. Bon tricot!
16.10.2017 - 09:38
![]() Isabelle R. wrote:
Isabelle R. wrote:
Bonjour, diagramme M1 est à renouveler toutes les 8 mailles, le diagramme se rétréci au 9eme rang , est ce une erreur de schéma? Merci de votre réponse, cordialement
21.08.2017 - 17:22DROPS Design answered:
Bonjour Isabelle. Le diagramme est correct. Après avoir tricoté le diagramme , vous aurez le nombre correct de mailles pour les manches. Bon tricot!
22.08.2017 - 12:30
![]() Lucia Mameli wrote:
Lucia Mameli wrote:
Grazie. L'avevo già fatto così ma Pensavo fosse sbagliato. Grazie Dell'aiuto!
16.12.2016 - 14:06
![]() Daniel wrote:
Daniel wrote:
Ich habe eine frage bezüglich der Annahmen bzw dem Abketten wenn ich mit den Ärmeln anfangen soll. Wie Kette ich symmetrisch ab? Wenn ich in der selben Reihe links und rechts abkette, sind die Abnahmen zwar symmetrisch, aber die letzte masche dieser Reihe passt dann nicht zur ersten masche der nächsten reihe. Wenn ich aber anfangs einer neuen reihe die Maschen auf jeder Seite abkette, laufen die Abnahmen versetzt. Entgeht mir etwas? Wie soll ich es machen? Vielen Dank und viele Grüsse
27.06.2015 - 14:16DROPS Design answered:
Man macht das Abketten für die Ärmel üblicherweise immer am Anfang der R, also an der rechten Seite der Arbeit am Anfang jeder Hin-R und an der linken Seite der Arbeit am Anfang jeder Rück-R. Dass hier ein kleiner Versatz passiert, ist nicht schlimm und fällt hinterher nicht auf. Weiterhin viel Spaß beim Stricken!
28.06.2015 - 19:18
![]() Planche wrote:
Planche wrote:
Bonjour, Merci beaucoup pour votre réponse.
15.04.2015 - 18:54
![]() PLANCHE wrote:
PLANCHE wrote:
Bonjour, Je suis entrain de réaliser ce modèle. Je souhaiterai savoir si le dos se fait entièrement avec le colori turquoise clair uniquement ou pas. Merci de votre aide
13.04.2015 - 14:23DROPS Design answered:
Bonjour Mme Planche, le dos se tricote comme le devant sauf pour l'encolure - le motif au crochet est ensuite cousu sur le devant (pas de motif dans le dos). Bon tricot!
13.04.2015 - 15:19
![]() Janny Drenthe wrote:
Janny Drenthe wrote:
Ik heb een vraag over het volgende patroon Drops 69-12: Ik begrijp het Motief niet. Kan dit uitgelegd worden.
14.03.2014 - 09:45DROPS Design answered:
Het motief staat bovenaan in het patroon uitgelegd. Als u hier niet uitkomt, graag aangeven wat u niet snapt zodat we het uit kunnen leggen.
08.04.2014 - 20:55
|
||||||||||
Sun Pearl |
||||||||||
 |
 |
|||||||||
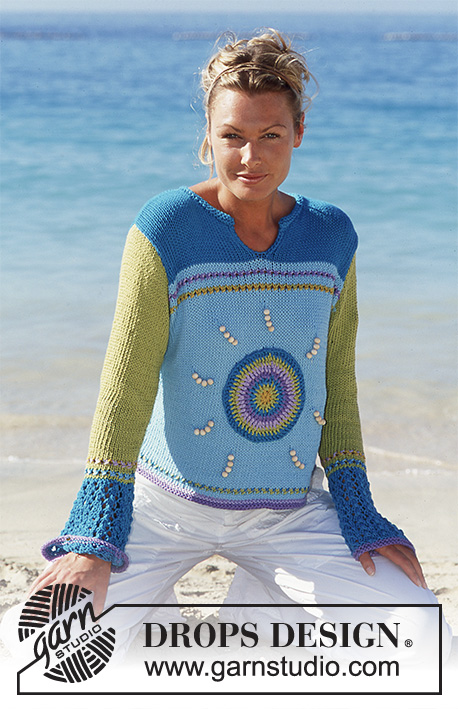
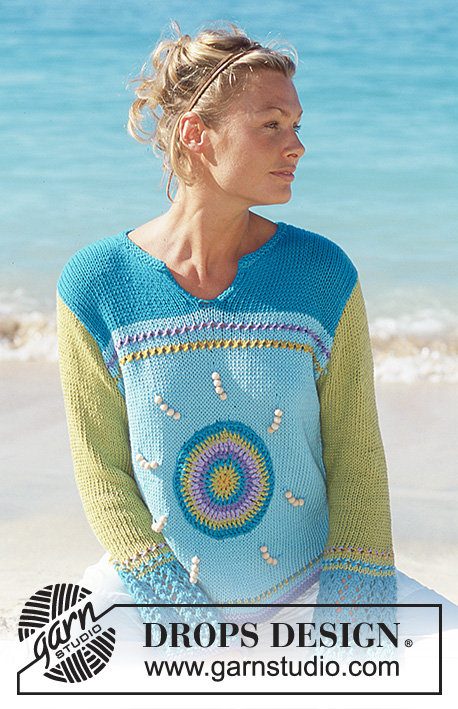
DROPS Pullover in Paris
DROPS 69-12 |
||||||||||
|
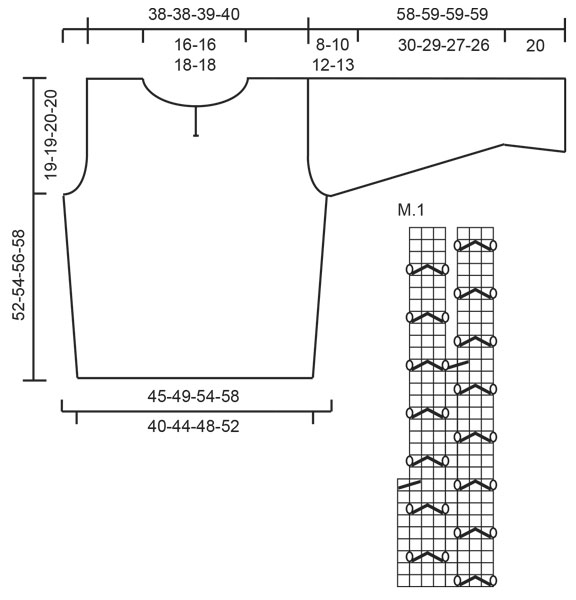
Gauge: 17 sts x 22 rows = 10 x 10 cm [4" x 4"] on larger needles in stockinette st. Garter st, when knitting flat: Knit all sts, all rows. Pattern 1: See chart. The pattern is seen from the right side. Pattern 2: Row 1 (wrong side): with 2 strands of yarn, knit as follows: K 1 (edge st knit in garter st throughout), * P 2, pass the 1st st over the 2nd st *, repeat from * - * to last st, K 1. Now all sts except first and last edge st are K2 tog with 2 strands of the yarn. Row 2 (right side) with 1 strand of yarn: change back to the color used before row 1 in Pattern, Now all sts should be divided and each of the strands in the st (except 1 edge st each side) are knitted separately as 1 st. Make sure it's the same color strand that are knitted first in each st. Front: Cast on 70-76-84-90 sts on smaller needles with purple. Knit 2 rows garter st, change to lilac and knit 2 rows garter st. Change to larger needles and light turquoise and knit stockinette st. After 3 rows change to 1 strand dark turquoise + 1 strand pistachio. Knit Pattern 2 - see instructions above. Then continue with stockinette st and 1 strand light turquoise. When the piece measures 7 cm [2.75"] inc 1 st at each side on every 5-5-5-5 cm [2"] a total of 4-5-5-5 times = 78-86-94-100 sts. Read the entire next section before knitting. Armhole: When the piece measures 33-35-36-38 cm [13"-13.75"-14⅛"-14⅞"] bind off for armhole at each side every other row: 3 sts 1-1-1-1 time, 2 sts 1-2-3-4 times and 1 st 2-4-5-5 times = 64-64-66-68 sts. At the same time when the piece measures 34-36-37-39 cm [13⅜"-14⅛"-14.5"-15.25"] change to 1 strand mustard and 1 strand pistachio. Knit Pattern 2, then knit 2 rows with light turquoise, change to 1 strand lilac + 1 strand purple and knit Pattern 2. After the pattern knit 2 rows with light turquoise. Change to dark turquoise and knit stockinette st to finished dimensions. Neck: At the same time when the piece measures 39-41-42-44 cm [15.25"-16⅛"-16.5"-17.25"] P (on right side row) the center 2 sts. On the next row divide at center front and knit each piece separately. Knit stockinette st keeping 1 st at neck edge in garter st. When the piece measures 46-48-49-51 cm [18⅛"-18⅞"-19.25"-20"] bind off 6 sts for the neck. Then bind off at neck edge every other row: 2 sts 2-2-2-2 times and 1 st 4-4-5-5 times. Bind off the remaining 18-18-18-19 sts on shoulder when the piece measures 52-54-56-58 cm [20.5"-21.25"-22"-22⅞"]. Back: Cast on and knit the same as the front. Bind off for armhole as on front and continue in stockinette st until the piece measures 50-52-54-56 cm [19.75"-20.5"-21.25"-22"]. Bind off the center 26-26-28-28 sts for the neck. On the next row dec 1 st at each neck edge = 18-18-18-19 sts remain on each shoulder. Bind off when the piece measures 52-54-56-58 cm [20.5"-21.25"-22"-22⅞"]. Sleeve: Cast on 58-58-66-66 sts on smaller needles with purple. Knit 2 rows garter st, change to larger needles and dark turquoise and knit Pattern 1. After Pattern 1 the piece measures approx. 18 cm [7"] and there are 44-44-50-50 sts. Change to pistachio and knit 2 rows stockinette st. Change to 1 strand light turquoise + 1 strand dark turquoise and knit Pattern 2, then knit 2 rows stockinette st in pistachio. Change to 1 strand mustard + 1 strand light lilac, knit Pattern 2, then continue with pistachio in stockinette st to finished dimensions. The piece measures approx. 22 cm [8⅝"] after Pattern 2 rows -- now inc 1 st at each side 8-8-7-7 times every 3.5 cm [1⅜"] = 60-60-64-64 sts. When sleeve measures 50-49-47-46 cm [19.75"-19.25"-18.5"-18⅛"] bind off for sleeve cap at each side every other row: 3 sts 1-1-1-1 time, 2 sts 4-3-3-2 times, 1 st 1-3-6-8 times, then bind off 2 sts at each side until the piece measures 58-59-59-59 cm [22⅞"-23.25"-23.25"-23.25"]. Bind off the remaining sts. Assembly: Sew shoulder seams. Pick up approx. 68 to 78 sts around the neck on smaller needles with dark turquoise. Knit 4 rows garter st, bind off. Sew in sleeves. Sew sleeve and side seams using edge sts as a seam allowance. Crocheted sun: Ch 5 with mustard and join into a ring with 1 sl st. Ch 2 to turn every row and work as follows: Row 1: 9 dc in the ring. Row 2: Change to pistachio and work 2 dc in each dc from previous row = 18 dc Row 3: Change to dark turquoise and crochet as follows: * 1 dc in first dc, 2 dc in next dc *, repeat from * - * = 27 dc Row 4: Change to purple and crochet as follows: * 1 dc, 2 dc in next dc, 1 dc *, repeat from * - * = 36 dc Row 5: Change to lilac and crochet as follows: * 1 dc, 2 dc in next dc, 2 dc *, repeat from * - * = 45 dc Row 6: Change to pistachio and crochet as follows: * 1 dc, 2 dc in next dc, 3 dc *, repeat from * - * = 54 dc Row 7: Change to dark turquoise and crochet as follows: * 1 dc, 2 dc in next dc, 4 dc *, repeat from * - * = 63 dc. The sun now has a diameter of approx. 16 cm [6.25"]. Stitch down to the center of the light turquoise part of front. Sunbeams: For each beam: thread 4 beads on a strand of light turquoise. Fasten beams on the pullover by threading the 2 ends of yarn through front and tying together on wrong side. Fasten 8 beams around sun. |
||||||||||
Diagram explanations |
||||||||||
|
||||||||||
 |
||||||||||
Have you finished this pattern?Tag your pictures with #dropspattern or submit them to the #dropsfan gallery. Do you need help with this pattern?You'll find 28 tutorial videos, a Comments/Questions area and more by visiting the pattern on garnstudio.com. © 1982-2026 DROPS Design A/S. We reserve all rights. This document, including all its sub-sections, has copyrights. Read more about what you can do with our patterns at the bottom of each pattern on our site. |
||||||||||


With over 40 years in knitting and crochet design, DROPS Design offers one of the most extensive collections of free patterns on the internet - translated to 17 languages. As of today we count 325 catalogs and 12298 patterns - 12288 of which are translated into English (US/in).
We work hard to bring you the best knitting and crochet have to offer, inspiration and advice as well as great quality yarns at incredible prices! Would you like to use our patterns for other than personal use? You can read what you are allowed to do in the Copyright text at the bottom of all our patterns. Happy crafting!
Post a comment to pattern DROPS 69-12
We would love to hear what you have to say about this pattern!
If you want to leave a question, please make sure you select the correct category in the form below, to speed up the answering process. Required fields are marked *.