
Popular categories
Looking for a yarn?


Comments / Questions (186)
![]() Michaela Schmidt wrote:
Michaela Schmidt wrote:
Hallo liebes Team, Ich häkel den Pulli in Gr. M und habe wie beschrieben nach der ersten Reihe 86 Maschen auf der Nadel. Die zweite Reihe beginne ich wie folgt: 3 Lm, ein Stäbchen überspringen, 2 Stäbchen 2 Lm, dann weiter wie Häkelschrift (4 Stb, 2 Lm), ende ich zum Schluß nicht mit einem Stäbchen in die letzte Masche sondern es verbleiben 2 Maschen auf der Nadel. Somit geht das Muster ja dann in der zweiten Musterreihe nicht auf. Was mache ich falsch?
27.11.2015 - 19:54DROPS Design answered:
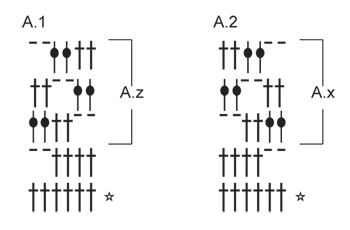
Sie häkeln, nachdem Sie mit den 3 Lm 1 Stb übersprungen haben, ja direkt im Muster, das aus 6 M besteht: 3 Lm, 1 Stb überspringen, Diagramm A.1 (= 6 M) insgesamt 14 x in der Breite, enden mit 1 Stb in das letzte Stb. D.h. 6 M x 14 = 84 M, bleibt noch je 1 M für den Anfang und das Ende der R übrig.
05.12.2015 - 17:29
![]() Alexia wrote:
Alexia wrote:
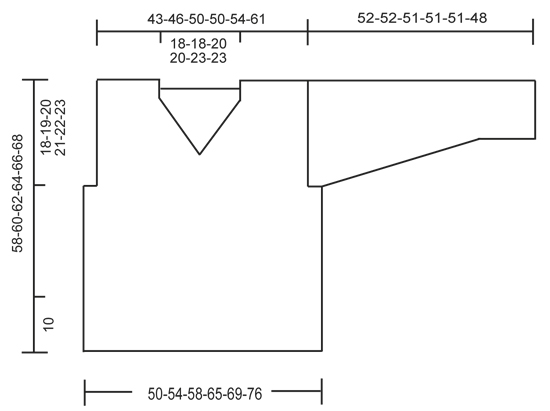
Hola de nuevo. Aún no he terminado el jersey...voy y vengo :). Mi duda es que para la espalda habla de trabajar el patrón como antes sobre los 74 pts centrales, es decir que dejo en cada lado 6 ptos sin trabajar para la sisa pero en la parte delantera no dice nada de dejar para la sisa. Mi parte delantera es un rectángulo de 60 X 54cm sin espacio para sisas. Es eso así?? Gracias de nuevo por su paciencia
25.11.2015 - 11:39DROPS Design answered:
Hola Alexia. En las explicaciones del patrón pone : "Trabajar como la espalda, pero..", es decir, tienes que hacer todas las dism y aum (si hay) como en la espalda a la misma altura y los mismos puntos. En el apartado DELANTERO solo te explican por lo demás las diferencias con la espalda: el escote...
26.11.2015 - 10:46Alexia wrote:
Hola de nuevo. Tengo problemas para empezar el escote. No se como hacerlo. Tgo talla M y dice trabajar sobre los primeros 34 p.a. Se refiere a p.a o cadenas?? Es que si cuento 34p.a no es la mitad de la labor. No deberia de quedar en el centro? Por favor ayudarme. Seria posible un diagrama de las disminuciones para hacer hombros/ escote? Gracias
11.10.2015 - 23:54DROPS Design answered:
Hola Alexia. En el patrón para la forma del escote trabajamos 34 pts + 3 p.a. juntos = 37 p.a., es decir justo la mitad de los pts (74 p.a. entre 2 = 37 p.a.) El espacio de la web es limitado y no se pueden añadir más diagramas.
21.10.2015 - 10:43Alexia wrote:
Hola, estoy tejiendo la espalda y no entiendo como empezar la primera fila de A.Z: en el diagrama pone 2 cadenas pero seria 3 cadenas (sustitucion del primer punto alto) + las 2 cadenas??gracias :)
13.09.2015 - 23:06DROPS Design answered:
Hola Alexia. La fila se empieza con 3 p.de cad. y finaliza con 1 p.a.. Entre ellos trabajamos las repeticiones de A.1 o A.z. Si la fila en el diagrama comienza con 2 p.de cad. hay que trabajar 3 p.de cad. del inicio + 2 p.de cad. del diagrama = 5 p.de cad.
14.09.2015 - 13:00
![]() Ann-louise wrote:
Ann-louise wrote:
Hej med jer tak for jeres svar. Det prøver jeg og ser om det går op. :-) hilsen Ann-louise
12.09.2015 - 10:40
![]() Ann-Louise wrote:
Ann-Louise wrote:
Hej med jer når man nu skal tage ind til ærmegabet, står der (hækler str S) nu hækles der videre i mønster over de midterste 68 m (=6 m i hver side til ærmegab) men hvor skal man sætte det nye garn til? er det i luftmasken og så hækle 2 stangmasker om buen og 2 m i næste masker? det prøvede jeg og endte med 2 stangmasker om den sidste luftmaskebue, men kunne ikke få det til at passe, da jeg vendte og maskeantallet passer med venlig hilsen Alo
01.09.2015 - 09:20DROPS Design answered:
Hej Ann-Louise. Du skal skal starte i den 7 maske og saa haekle mönster over de naeste 68 m saa du ogsaa har 6 m over paa den anden side = aermegabet
02.09.2015 - 16:58
![]() Kitty wrote:
Kitty wrote:
Bij het voorpand wil ik aan de toeren beginnen voor de hals. En er staat dat ik in de eerste 37 moet beginnen maar dan kom ik niet in het midden uit. Moet ik eerst 7 staat overslaan om te beginnen zoals de achterkant voor de arms gaten? Ik snap dat stukje niet.
28.08.2015 - 16:52DROPS Design answered:
Hoi Kitty. Als ik het goed begrijp dan haak je dan maat XL. Je hebt voor de armsgaten geminderd op 43 cm (12 stk aan elke kant) 80 stk op de toer. Je haakt dan over de eerste 37 stk, en vervolgens 3 stk samen haken = over 40 stk gehaakt = midden. Keer en haak terug en minder verder zoals beschreven zodat je eindigt met 24 stk voor de schouder. Herhaal aan de andere kant.
02.09.2015 - 16:28
![]() Manuela wrote:
Manuela wrote:
Hallo, ich muss leider dumm fragen, da ich nichts finden kann diesbezüglich, gibt es bei den Mustern auch irgendwo ungefähre Mengenangaben an Garn, die man benötigt?
10.08.2015 - 14:24DROPS Design answered:
Die Mengenangaben finden Sie immer oben im Kopf nebem dem Foto unter Material. Dort stehen die Grammangaben für die verschiedenen Größen, durch Gedankenstriche getrennt.
11.08.2015 - 11:23
![]() Raquel wrote:
Raquel wrote:
Hello! Trying to make this but not sure what is the weight of the yarn? Is it medium worsted? Fine? Super fine? Please help as I would like to use other yarn. Thank you!
05.08.2015 - 02:02DROPS Design answered:
Dear Raquel, Cotton Light is a DK yarn - more informations about the yarn there. Happy crocheting!
05.08.2015 - 09:31
![]() Bernadette wrote:
Bernadette wrote:
Hallo, ich komme mit dem Anfang und dem Beenden der Reihen vom Rückenteil nicht klar: die zweite Reihe beginnt mit 3 Luftmaschen (als Ersatz für das erste Stb) + 3 Stb = 4 Stb, und dann 2 Lm, usw - ist das korrekt? Und am Ende der 2. R dann 2 Lm, und dann? Die 2 Lm hängen ja dann frei. Falls man als letzte Masche doch ein Stb häkeln muss (was das Diagramm aber nicht zeigt), wie mache ich dann in der 3. R weiter? Vielen Dank für eure Antwort im voraus!
03.08.2015 - 18:50DROPS Design answered:
Sie müssen zusätzlich zum Diagramm die Anleitung beachten, dort steht, dass Sie nach A.1 am Ende der R in das letzte Stb 1 Stb häkeln: "Diagramm A.1 (= 6 M) insgesamt 13-14-15-17-18-20 x in der Breite, enden mit 1 Stb in das letzte Stb." Die 2.R von A.1 beginnt mit 4 Stb, 2 Lm (die R nur mit Stäbchen, die mit einem Stern markiert ist, zählt nicht, ist die 1. R und ist in der Anleitung erklärt). Am Ende der 2.R haben Sie also die 2 Lm von A.1 und dann 1 Stb in das letzte Stb. Die nächste R entsprechend: 3 Lm (= 1 Stb) in das 1. Stb, dann kommt die nächste R von A.1: 2 Stb um den Lm-Bogen, 2 Stb, 2 Lm usw.
07.08.2015 - 09:00
|
|||||||||||||
Just Me#justmesweater |
|||||||||||||
 |
 |
||||||||||||
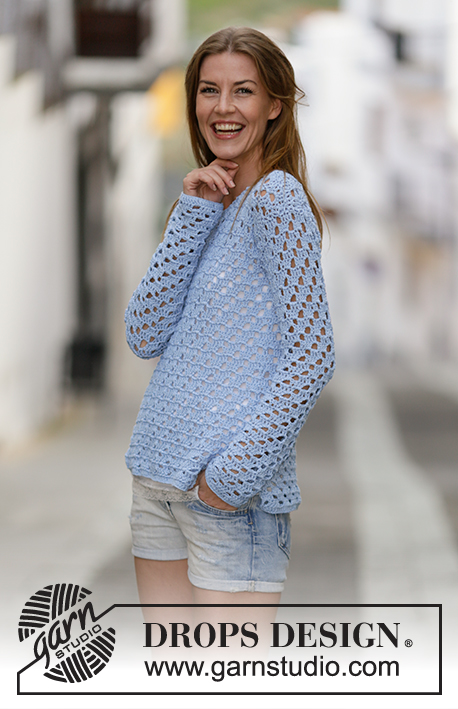
Crochet DROPS jumper with lace pattern in ”Cotton Light”. Size: S - XXXL.
DROPS 162-3 |
|||||||||||||
|
PATTERN: See diagrams A.1-A.2. CROCHET INFO: Replace first dc at beg of every dc row with 3 ch. 3 DC TOG: Work 3 dc into 1 dc as follows: * Work 1 dc but wait with last pull through (= 2 strands on hook) *, repeat from *-* 1 more time, then work next dc but on last pull through, pull yarn through all sts on hook. ---------------------------------------------------------- BACK PIECE: Work back and forth. Work 94-101-108-122-129-143 ch on hook size 4.5 mm/US 7 with Cotton Light. Work 1 dc in 4th ch from hook (= 2 dc), 1 dc in each of the next ch 5, * 1 dc in each of the next ch 6, skip 1 ch *, repeat from *-* until 1 ch remains, 1 dc in last ch = 80-86-92-104-110-122 dc. Then work as follows: 3 ch - READ CROCHET INFO, skip 1 dc (replaced by the 3 ch), A.1 (= 6 sts) 13-14-15-17-18-20 times in total, finish with 1 dc in last dc. Continue pattern like this. Eyelet holes in A.1 goes diagonally towards the left 2 sts on every row (seen from RS) until hole meets the one dc in left side of piece. REMEMBER THE CROCHET GAUGE! When A.1 has been worked 1 time vertically, repeat A.z until finished measurements. Fasten off when piece measures 40-41-42-43-44-45 cm / 15¾"-16⅛"-16½"-17"-17¼"-17¾". Now work pattern as before over the middle 68-74-80-80-86-98 sts (= 6-6-6-12-12-12 sts in each side for armhole). When piece measures 54-56-58-60-62-64 cm / 21¼"-22"-22¾"-23⅝"-24⅜"-25¼", adjust so that next row is from RS. Work over the first 20-23-24-24-24-31 sts (= shoulder) as follows: Work 1 dc in every dc and 2 dc in every ch-space = 20-23-24-24-24-31 dc. Work 2 rows with 1 dc in every dc. Fasten off. Do the same on the other shoulder FRONT PIECE: Work as back piece but work A.2 instead of A.1, i.e. eyelet holes goes diagonally towards the right (seen from RS). Repeat A.x until finished measurements. When piece measures 45-47-48-50-51-53 cm / 17¾"-18½"-19"-19¾"-20"-21", adjust after a whole repetition of A.x dec for neck (next row is from WS) as follows: Work as before over the first 31-34-37-37-40-46 dc, work 3 dc TOG - see explanation above. Turn piece. Repeat this dec on every row toward mid-front 7-7-8-8-9-9 times in total = 20-23-24-24-25-31 sts remain for shoulder. Then work 1 row with 1 dc in every dc and 2 dc in every ch-space. Work 2 rows with 1 dc in every dc. Fasten off. Do the same on the other shoulder SLEEVE: Work back and forth. Work 45-45-49-49-52-52 ch on hook size 4.5 mm/US 7 with Cotton Light. Work 1 dc in 4th ch from hook (= 2 dc), 1 dc in each of the next 5-5-7-7-5-5 ch, * 1 dc in each of the next ch 6, skip 1 ch *, repeat from *-* until 1-1-3-3-1-1 ch remains, 1 dc in the last 1-1-3-3-1-1 ch = 38-38-42-42-44-44 dc. Work 1 dc in each of the first 1-1-3-3-1-1 dc, A.2 until 1-1-3-3-1-1 dc remain, (= 6-6-6-6-7-7 times in width), 1 dc in each of the last 1-1-3-3-1-1 dc. When A.2 has been worked 1 time vertically, repeat A.x until finished measurements. When piece measures 8-8-8-10-10-10 cm / 4", inc 1 dc by working 2 dc in first and last dc on row (= 2 dc inc). Repeat inc every 4½-4-4-3-3-2½ cm / 1¾"-1½"-1½"-1"-1"-⅞" 9-10-10-12-12-14 more times = 58-60-64-68-70-74 sts. Work the inc sts in pattern. NOTE: There is always 1 dc (or 3 ch = 1 dc) in each side of piece. Fasten off when piece measures 52-52-51-51-51-48 cm / 20½"-20½"-20"-20"-20"-19" (shorter measurements in the larger sizes because of wider shoulders). Work another sleeve the same way. ASSEMBLY: Work the shoulder seams tog from WS as follows through both layers: 1 sc in first dc, * ch 1, skip 1 dc, 1 sc in next dc *, repeat from *-*. Sew in sleeves. Work the under arm seams and side seams tog from WS as follows through both layers: * 1 sc in outer loop, ch 3, skip 1 row *, repeat from *-* until approx. 10 cm / 4" remain on body for vent in each side. Fasten off. NECK EDGE: Work an edge around the neck as follows from mid on top of shoulder: 1 sc, * ch 3, skip approx. 1 cm / ½", 1 sc *, repeat from *-* around the entire neck and finish with 1 sl st in first sc on round. Fasten off. |
|||||||||||||
Diagram explanations |
|||||||||||||
|
|||||||||||||
 |
|||||||||||||
 |
|||||||||||||
Have you finished this pattern?Tag your pictures with #dropspattern #justmesweater or submit them to the #dropsfan gallery. Do you need help with this pattern?You'll find 5 tutorial videos, a Comments/Questions area and more by visiting the pattern on garnstudio.com. © 1982-2026 DROPS Design A/S. We reserve all rights. This document, including all its sub-sections, has copyrights. Read more about what you can do with our patterns at the bottom of each pattern on our site. |
|||||||||||||


With over 40 years in knitting and crochet design, DROPS Design offers one of the most extensive collections of free patterns on the internet - translated to 17 languages. As of today we count 325 catalogs and 12298 patterns - 12288 of which are translated into English (US/in).
We work hard to bring you the best knitting and crochet have to offer, inspiration and advice as well as great quality yarns at incredible prices! Would you like to use our patterns for other than personal use? You can read what you are allowed to do in the Copyright text at the bottom of all our patterns. Happy crafting!
Post a comment to pattern DROPS 162-3
We would love to hear what you have to say about this pattern!
If you want to leave a question, please make sure you select the correct category in the form below, to speed up the answering process. Required fields are marked *.