
Popular categories
Looking for a yarn?


Comments / Questions (186)
![]() Catherine wrote:
Catherine wrote:
Thank you for the clear explanation. Kind regards, Catherine
27.03.2017 - 18:46
![]() Cath wrote:
Cath wrote:
Thank you. Do you also chain 3 immediately before the 3TR TOG on turning or just 3TR TOG without initial 3 chain. Thanks.
27.03.2017 - 15:55DROPS Design answered:
Dear Cat, you need the 3 ch to turn with and to replace 1st tr, but the 3 ch will count as the first of the 3 tr to work tog. Happy crocheting!
27.03.2017 - 17:48
![]() Cath wrote:
Cath wrote:
I'm doing front neck shaping decreases XXL size. Do I do the 2nd row 3TR TOG immediately after turning work without a 3 chain start? Also does this part of the pattern comprise 10 rows in total to get to the 25 stitches remaining for the shoulder or are the decreases to be done on alternate WS rows? Thank you.
26.03.2017 - 13:23DROPS Design answered:
Dear Cath, at the beg of row, replace 1st tr with 3 ch as before, dec for neck are done every row ie both from RS and from WS. Happy crocheting!
27.03.2017 - 09:24
![]() Mc wrote:
Mc wrote:
Merci
21.03.2017 - 10:26
![]() Mc wrote:
Mc wrote:
Merci pour la rapidité de votre réponse. Oui, je vais refaire un échantillon avec un crochet plus petit. Ceci dit, pourquoi monter autant de mailles au départ, pour les diminuer le rang suivant ? Cela ne risque t il pas de faire gondoler la bordure ?
21.03.2017 - 09:25DROPS Design answered:
Bonjour Mc, souvent la chaînette de base est trop serrée, et pour conserver la bonne largeur sans que la base ne soit trop serrée, on monte plus de mailles en l'air que l'on a besoin de mailles, puis au 1er rang, on saute régulièrement des ml pour avoir le bon nombre de mailles = la largeur souhaitée en conservant l'élasticité voulue. Bon crochet!
21.03.2017 - 09:46
![]() Mc wrote:
Mc wrote:
Bonjour, J'ai fait mon échantillon, petit probléme, il fait 10cm sur la hauteur , mais 13cm sur la largeur ! En général je tricote un modéle taille Xl , j'ai l'impression qu'il faut que je réalise un modele de la taille L Qu'en pensez vous ?
20.03.2017 - 21:27DROPS Design answered:
Bonjour Mc, essayez un nouvel échantillon avec un crochet plus petit, et essayez de tirer un peu plus vos brides en hauteur pour bien conserver la bonne hauteur si vous avez la bonne largeur mais pas encore la bonne hauteur. Bon crochet!
21.03.2017 - 09:02
![]() Mc wrote:
Mc wrote:
Merci beaucoup
17.03.2017 - 13:13
![]() Mc wrote:
Mc wrote:
Je regarde les vidéos sur lesquelles sont expliquées la réalisation de A1 et A2, pouvez vous me dire le nombre de brides faites au premier tour, car lorsque je fais le point sur 16 brides (échantillon de 10 cmx10cm), je n'arrive pas à terminer le point comme sur la vidéo Merci
17.03.2017 - 11:13DROPS Design answered:
Bonjour Mc, le nombre de mailles de A.1 doit être multiple de 6 + 1 B (= 3 ml) + 1 B à la fin. Pour votre échantillon, il vous faudra au moins 3 motifs x 6 m = 18 + 2 B = 20 B. Bon crochet!
17.03.2017 - 11:48
![]() Charo wrote:
Charo wrote:
Hola! ¿Podrían indicarme, por favor, si en las disminuciones del escote, después de girar la labor, se comienza la siguiente fila, en la línea del escote, con tres puntos de cadeneta? Muchas gracias.
20.10.2016 - 19:42DROPS Design answered:
Hola Charo. En la fila con p.a. siempre comenzamos con 3 p.de cad. sustituyendo el 1er p.a. En este modelo, las dism se trabajan con 3 p.a. juntos y el primer p.a. trabajamos como 3 p.de cad.
30.10.2016 - 12:16
![]() Valeria wrote:
Valeria wrote:
Buongiorno... Temo di aver mal interpretato lo schema ed ora ho un dubbio... Nella parte superiore del dietro ho effettuato una diminuzione in corrispondenza della maniche per intenderci, in modo che venisse una sorta di gradino. Nella parte davanti, questo non avviene o sono io che sto capendo male il lavoro? Grazie
11.09.2016 - 07:32DROPS Design answered:
Buongiorno Valeria. Gli scalfi sono lavorati in modo uguale sul davanti e sul dietro. Quindi quando il lavoro misura 40-41-42-43-44-45 cm a seconda della taglia non lavora le prime e le ultime m della riga, formando così lo scalino. Buon lavoro!
11.09.2016 - 07:40
|
|||||||||||||
Just Me#justmesweater |
|||||||||||||
 |
 |
||||||||||||
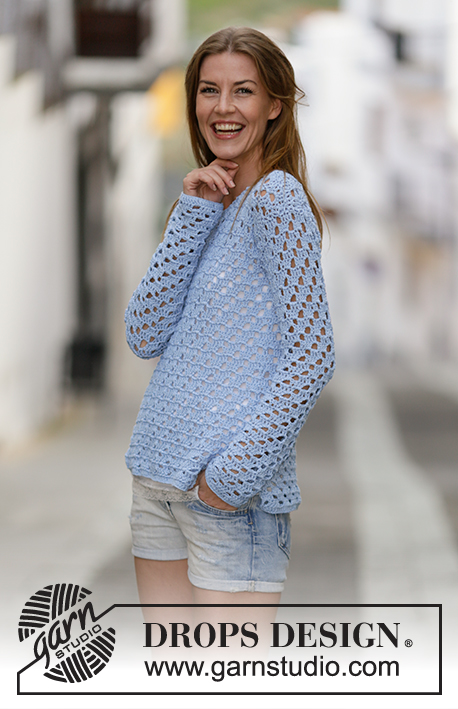
Crochet DROPS jumper with lace pattern in ”Cotton Light”. Size: S - XXXL.
DROPS 162-3 |
|||||||||||||
|
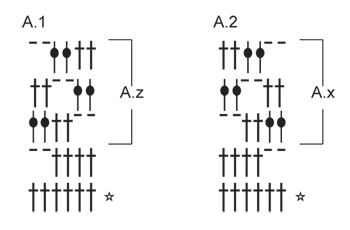
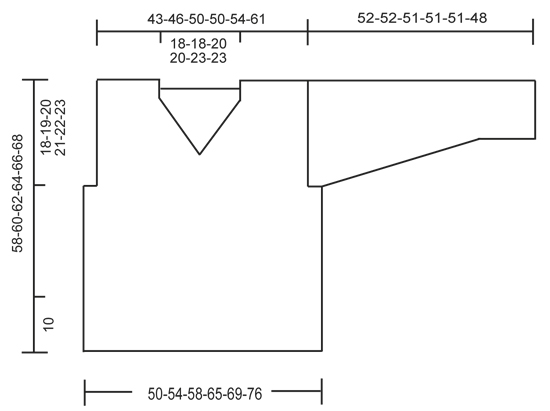
PATTERN: See diagrams A.1-A.2. CROCHET INFO: Replace first dc at beg of every dc row with 3 ch. 3 DC TOG: Work 3 dc into 1 dc as follows: * Work 1 dc but wait with last pull through (= 2 strands on hook) *, repeat from *-* 1 more time, then work next dc but on last pull through, pull yarn through all sts on hook. ---------------------------------------------------------- BACK PIECE: Work back and forth. Work 94-101-108-122-129-143 ch on hook size 4.5 mm/US 7 with Cotton Light. Work 1 dc in 4th ch from hook (= 2 dc), 1 dc in each of the next ch 5, * 1 dc in each of the next ch 6, skip 1 ch *, repeat from *-* until 1 ch remains, 1 dc in last ch = 80-86-92-104-110-122 dc. Then work as follows: 3 ch - READ CROCHET INFO, skip 1 dc (replaced by the 3 ch), A.1 (= 6 sts) 13-14-15-17-18-20 times in total, finish with 1 dc in last dc. Continue pattern like this. Eyelet holes in A.1 goes diagonally towards the left 2 sts on every row (seen from RS) until hole meets the one dc in left side of piece. REMEMBER THE CROCHET GAUGE! When A.1 has been worked 1 time vertically, repeat A.z until finished measurements. Fasten off when piece measures 40-41-42-43-44-45 cm / 15¾"-16⅛"-16½"-17"-17¼"-17¾". Now work pattern as before over the middle 68-74-80-80-86-98 sts (= 6-6-6-12-12-12 sts in each side for armhole). When piece measures 54-56-58-60-62-64 cm / 21¼"-22"-22¾"-23⅝"-24⅜"-25¼", adjust so that next row is from RS. Work over the first 20-23-24-24-24-31 sts (= shoulder) as follows: Work 1 dc in every dc and 2 dc in every ch-space = 20-23-24-24-24-31 dc. Work 2 rows with 1 dc in every dc. Fasten off. Do the same on the other shoulder FRONT PIECE: Work as back piece but work A.2 instead of A.1, i.e. eyelet holes goes diagonally towards the right (seen from RS). Repeat A.x until finished measurements. When piece measures 45-47-48-50-51-53 cm / 17¾"-18½"-19"-19¾"-20"-21", adjust after a whole repetition of A.x dec for neck (next row is from WS) as follows: Work as before over the first 31-34-37-37-40-46 dc, work 3 dc TOG - see explanation above. Turn piece. Repeat this dec on every row toward mid-front 7-7-8-8-9-9 times in total = 20-23-24-24-25-31 sts remain for shoulder. Then work 1 row with 1 dc in every dc and 2 dc in every ch-space. Work 2 rows with 1 dc in every dc. Fasten off. Do the same on the other shoulder SLEEVE: Work back and forth. Work 45-45-49-49-52-52 ch on hook size 4.5 mm/US 7 with Cotton Light. Work 1 dc in 4th ch from hook (= 2 dc), 1 dc in each of the next 5-5-7-7-5-5 ch, * 1 dc in each of the next ch 6, skip 1 ch *, repeat from *-* until 1-1-3-3-1-1 ch remains, 1 dc in the last 1-1-3-3-1-1 ch = 38-38-42-42-44-44 dc. Work 1 dc in each of the first 1-1-3-3-1-1 dc, A.2 until 1-1-3-3-1-1 dc remain, (= 6-6-6-6-7-7 times in width), 1 dc in each of the last 1-1-3-3-1-1 dc. When A.2 has been worked 1 time vertically, repeat A.x until finished measurements. When piece measures 8-8-8-10-10-10 cm / 4", inc 1 dc by working 2 dc in first and last dc on row (= 2 dc inc). Repeat inc every 4½-4-4-3-3-2½ cm / 1¾"-1½"-1½"-1"-1"-⅞" 9-10-10-12-12-14 more times = 58-60-64-68-70-74 sts. Work the inc sts in pattern. NOTE: There is always 1 dc (or 3 ch = 1 dc) in each side of piece. Fasten off when piece measures 52-52-51-51-51-48 cm / 20½"-20½"-20"-20"-20"-19" (shorter measurements in the larger sizes because of wider shoulders). Work another sleeve the same way. ASSEMBLY: Work the shoulder seams tog from WS as follows through both layers: 1 sc in first dc, * ch 1, skip 1 dc, 1 sc in next dc *, repeat from *-*. Sew in sleeves. Work the under arm seams and side seams tog from WS as follows through both layers: * 1 sc in outer loop, ch 3, skip 1 row *, repeat from *-* until approx. 10 cm / 4" remain on body for vent in each side. Fasten off. NECK EDGE: Work an edge around the neck as follows from mid on top of shoulder: 1 sc, * ch 3, skip approx. 1 cm / ½", 1 sc *, repeat from *-* around the entire neck and finish with 1 sl st in first sc on round. Fasten off. |
|||||||||||||
Diagram explanations |
|||||||||||||
|
|||||||||||||
 |
|||||||||||||
 |
|||||||||||||
Have you finished this pattern?Tag your pictures with #dropspattern #justmesweater or submit them to the #dropsfan gallery. Do you need help with this pattern?You'll find 5 tutorial videos, a Comments/Questions area and more by visiting the pattern on garnstudio.com. © 1982-2026 DROPS Design A/S. We reserve all rights. This document, including all its sub-sections, has copyrights. Read more about what you can do with our patterns at the bottom of each pattern on our site. |
|||||||||||||


With over 40 years in knitting and crochet design, DROPS Design offers one of the most extensive collections of free patterns on the internet - translated to 17 languages. As of today we count 325 catalogs and 12298 patterns - 12288 of which are translated into English (US/in).
We work hard to bring you the best knitting and crochet have to offer, inspiration and advice as well as great quality yarns at incredible prices! Would you like to use our patterns for other than personal use? You can read what you are allowed to do in the Copyright text at the bottom of all our patterns. Happy crafting!
Post a comment to pattern DROPS 162-3
We would love to hear what you have to say about this pattern!
If you want to leave a question, please make sure you select the correct category in the form below, to speed up the answering process. Required fields are marked *.