
Popular categories
Looking for a yarn?


Comments / Questions (44)
![]() Marie Laure KAMINSKI wrote:
Marie Laure KAMINSKI wrote:
Bonjour Je ne comrends pas le raglan: il ne peut pas se faire sur 7 rangs, mais sur beaucoup plus de rangs. Merci d'avance pour vos explications.
17.09.2017 - 20:15DROPS Design answered:
Bonjour Mme Kaminski, les 7 premiers rangs décrivent comment tricoter les augmentations du raglan et comment augmenter en même temps pour l'encolure devant. Continuez ensuite en rond en augmentant tous les 2 tours, puis éventuellement tous les 4 tours comme indiqué pour votre taille. Bon tricot!
18.09.2017 - 09:21Fran Hoffman wrote:
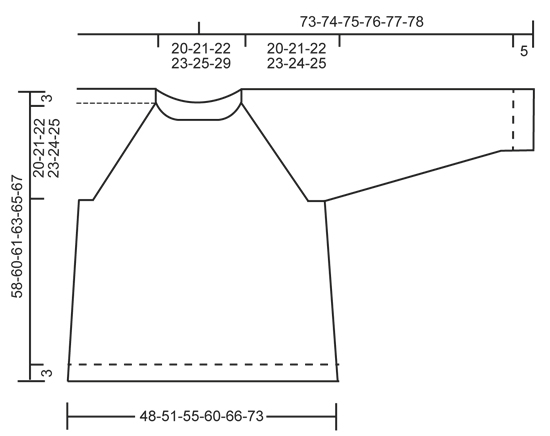
I have studied the schematic for this sweater and cannot determine the bust size. You referred another questioner to the schematic. Can you just tell me what are the bust sizes?
17.09.2016 - 17:13DROPS Design answered:
Dear Mrs Hoffman, the measurement chart at the bottom of the page does not have a bust measure for this model, but you can find the bottom measures (hip measure) in cm: use this to find the right size. Happy knitting!
18.09.2016 - 23:28
![]() Emmanuelle wrote:
Emmanuelle wrote:
Donc on ferme en rond après le 8 eme rang et non le 7eme rang comme il est indique dans les explications ?
13.06.2016 - 11:34DROPS Design answered:
Bonjour Emmanuelle, on continue en rond à partir du rang suivant, pas à la fin du dernier rang sur l'envers, ainsi, l'ouvrage se continue sur l'endroit. Bon tricot!
13.06.2016 - 11:58
![]() Emmanuelle wrote:
Emmanuelle wrote:
C'est encore moi ... Lorsque j' ai fini de tricoter en aller-retour a l' envers le 7eme rang , je dois alors tricoter en rond . Mais je me retrouve alors a tricoter a l' endroit sur l' envers du tricot et j' obtiens alors du point mousse sur l' endroit du tricot . J' ai deja tricote sans problèmes du jersey en rond sur des aiguilles circulaires mais j' avoue que cette fois ci quelquechose m' echappe ....Merci par avance pour votre réponse !!
11.06.2016 - 22:41DROPS Design answered:
Bonjour Emmanuelle, après le rang 7, tournez pour tricoter sur l'endroit et à la fin de ce rang, fermez l'ouvrage en rond (placez un marqueur pour repérer le début du tour et continuez en rond). Bon tricot!
13.06.2016 - 09:16
![]() Emmanuelle wrote:
Emmanuelle wrote:
Bonsoir , je ne comprends pas a quel endroit placer les marqueurs au 1er rang . Je me réjouissais de tricoter un pull , mais je bloque des le depart !!! Merci pour votre réponse et bonne semaine .
05.06.2016 - 21:17DROPS Design answered:
Bonjour Emmanuelle, au 1er rang sur l'envers, placez 1 marqueur à 8-6 m des bords de chaque côté: vous avez ainsi: 8-6 m pour la manche, marqueur, 32-46 m pour le dos, marqueur et 8-6 m pour la 2ème manche. Bon tricot!
06.06.2016 - 09:56
![]() Anette Gersbo wrote:
Anette Gersbo wrote:
Jeg har været ved at strikke denne model, men ærmegabet bliver iflg opskriften ikke ret langt. Hvad gør jeg forkert?
02.02.2016 - 17:43
![]() Iris Ytre- Hauge wrote:
Iris Ytre- Hauge wrote:
Hei. Hvordan finner jeg ut hva overvidden er på genseren?
28.12.2015 - 21:34DROPS Design answered:
Hej Iris. Se maalskitsen nederst paa mönstret.
04.01.2016 - 14:27
![]() Bettina Wiemer wrote:
Bettina Wiemer wrote:
Ich komme mit den Zunahmen in Reihe 2 nicht klar. Da ich nur 2 Markierter habe, wess ich nicht wie die Reihe zu Ende gestrickt werden soll.
02.12.2015 - 19:09DROPS Design answered:
Es sind ja in der 2. R auch nur 2 Markierer genannt. Sie nehmen am Anfang der R (nach den ersten 2 M) 1 M zu, dann stricken Sie bis noch 2 M vor dem ersten Markierer übrig sind, dann 1 Zunahme, dann kommen 4 M re mit dem ersten Markierer dazwischen und dann nehmen Sie wieder 1 M zu. Dann stricken Sie bis 2 M vor den zweiten Markierer und nehmen 1 M zu, dann kommen wieder 4 M re mit dem Markierer dazwischen und danach wieder 1 Zunahme. Dann wird der Rest der R re zu Ende gestr, am Ende der R erfolgt vor den letzten 2 M 1 Zunahme.
05.12.2015 - 18:50Pretty Odds wrote:
My Nepal Orange Crush is a Nepal Grey-Purple Crush. I used Drops pattern as a base for some of my own ideas (I added some pockets in cablestich, made a wide turtleneck). It became a nice, warm jumper. It was so easy to handle! I m quite sure it will become my favourite pattern. Happy knitting :D
01.12.2015 - 15:08
![]() Elisabeth wrote:
Elisabeth wrote:
Kan det passe at jeg kun skal bruge 5 nøgler Brushed Alpaca silk eller 6 nøgler air til denne model? Kan ikke helt forstå det, da jeg så vidt jeg kan regne ud skal bruge 7 nøgler air eller Brushed Alpaca Silk til model 164-20, som er næsten den samme. Modellerne strikkes på næsten samme pinde..
09.11.2015 - 00:49DROPS Design answered:
Hej Elisabeth. Ja, ved den mindste str? 450 gr Nepal er 675 m garn, saa divideret med Air (130 m) har du 6 nögler og Brushed (140 m) 5. Du kan altid köbe et ekstra nögle hvis du tvivler.
09.11.2015 - 12:42
|
|
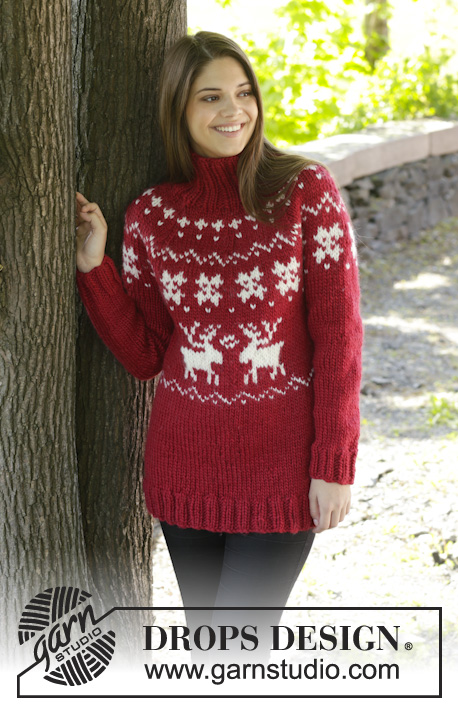
Orange Crush#orangecrushsweater |
|
|
|
|
Knitted DROPS jumper with rib and raglan, worked top down in ”Nepal”. Size: S - XXXL.
DROPS 158-18 |
|
|
INCREASE TIP: Back and forth on needle: Inc 1 st from RS by making 1 YO, on next row P YO twisted. In the round on needle: Inc 1 st by making 1 YO, on next round K YO twisted. DECREASE TIP: Dec 1 st before marker as follows: Work until 2 sts remain before marker, slip 1 st as if to K, K 1, psso. Dec 1 st after marker as follows: K 2 tog. ---------------------------------------------------------- JUMPER: Worked top down in the round on circular needle/double pointed needles. First work back and forth until sts have been cast on for front piece, then work in the round. Pick up a neck edge at the end. RAGLAN: Cast on 48-50-52-52-52-58 sts on circular needle size 5.5 mm / US 9 with Nepal. ROW 1 (= WS): P all sts. Insert 1 marker 8-8-8-8-6-6 sts in from each side (= 8-8-8-8-6-6 sts on sleeve in each side, 32-34-36-36-40-46 sts on back piece between markers). Move the markers upwards when working. ROW 2 (= RS): K 2, * inc 1 st - READ INCREASE TIP, K until 2 sts remain before next marker, inc 1 st, K 4 (marker is in the middle of these sts), inc 1 st, K until 2 sts remain before next marker, inc 1 st, K 4 (marker is in the middle of these sts), inc 1 st *, K until 2 sts remain on needle, inc 1 st, K 2 = 6 inc sts. Now cast on 4 sts on needle for front piece = 58-60-62-62-62-68 sts. (NOTE: Repeat *-* in 4th and 6th row as explained below). ROW 3: P all sts, at the end of row cast on 4 sts = 62-64-66-66-66-72 sts. Insert 1 new marker 4 sts in from each side (= 4 sts on front piece in each side, 4 markers in total in piece). ROW 4: K 6, (1st marker is after the first 4 sts), repeat from *-* from 2nd row, K until 2 sts remain before last marker, inc 1 st, K 6 (last marker is before the last 4 sts) = 6 inc sts. Cast on 4 sts = 72-74-76-76-76-82 sts. ROW 5: P all sts, at the end of row cast on 4 sts = 76-78-80-80-80-86 sts (= 8 sts on front piece in each side). ROW 6: K 10, (1st marker is after the first 8 sts), repeat from *-* from 2nd row, K until 2 sts remain before last marker, inc 1 st, K 10 = 6 inc sts (last marker is before the last 8 sts). Cast on 11-12-13-13-15-18 sts = 93-96-99-99-101-110 sts. ROW 7: P, at the end of row, cast on 11-12-13-13-15-18 sts = 104-108-112-112-116-128 sts on needle (= 19-20-21-21-23-26 sts on front piece in each side, 38-40-42-42-46-52 sts on back piece and 14-14-14-14-12-12 sts on each sleeve). REMEMBER THE GAUGE! Then work piece in the round as follows: ROUND 1: * K until 2 sts remain before next marker, inc 1 st, K 4 (marker is between these sts), inc 1 st *, repeat from *-* 3 more times (= 4 times in total), K the remaining sts (= 8 inc sts) = 112-116-120-120-124-136 sts. ROUND 2: K all sts. Then inc 8 sts on round the same way - i.e. inc 1 st on each side of every marker - every other round 10-11-12-17-20-21 more times (11-12-13-18-21-22 inc in total on front piece), then every 4th round 3-3-3-1-0-0 time = 216-228-240-264-284-304 sts (= 66-70-74-80-88-96 sts on front piece and back piece, 42-44-46-52-54-56 sts on each sleeve). NOTE! Insert 1 marker in the middle on front piece (marks front piece which has shorter raglan). Work next round as follows: Work 66-70-74-80-88-96 sts on front piece, * slip the next 42-44-46-52-54-56 sts (= sleeve) on 1 stitch holder, cast on 6-8-10-12-14-16 sts for armhole, insert a marker in the middle of these new sts *, work the next 66-70-74-80-88-96 sts on back piece, repeat from *-* 1 more time = 144-156-168-184-204-224 sts for body. BODY: Then work in stockinette st. When piece measures 10 cm / 4" from new sts under sleeve, inc 1 st on each side of markers in the side as follows: Work until 1 st before first marker, 1 YO, 2 sts in stockinette st, 1 YO, repeat inc in the other side (= 4 sts inc) = 148-160-172-188-208-228 sts. Repeat inc when piece measures 20-22-24-26-28-30 cm / 8"-8¾"-9½"-10¼"-11"-11¾" = 152-164-176-192-212-232 sts. When piece measures 55-57-59-61-63-65 cm / 21⅝"-22½"-23¼"-24"-24¾"-25½" in total vertically (measured at the back), inc 8 sts evenly on round = 160-172-184-200-220-240 sts. On next round switch to circular needle size 5 mm / US 8. Continue to work rib as follows: * K 2, P 2 *, repeat from *-* the entire round until rib has been worked for 3 cm / 1". Bind off with K over K and P over P. SLEEVE: Slip the 42-44-46-52-54-56 sts from stitch holder back on double pointed needles size 5.5 mm / US 9. Cast on 6-8-10-12-14-16 sts at the end of row = 48-52-56-64-68-72 sts. Insert a marker in the middle of the new sts under the sleeve. NOW MEASURE THE PIECE FROM HERE. Continue to work in stockinette st in the round for 3 cm / 1". On next round dec 1 st - READ DECREASE TIP - on each side of marker. Repeat dec every 5-4-3½-2½-2-2 cm / 2"-1½"-1¼"-⅞"-¾"-¾" 6-7-8-12-13-14 more times = 34-36-38-38-40-42 sts. Continue in stockinette st until piece measures 38-37-37-36-35-33 cm / 15"-14½"-14½"-14¼"-13¾"-13". On next round switch to double pointed needles size 5 mm / US 8. Work in stockinette st AT THE SAME TIME inc 6-4-6-6-8-6 sts evenly = 40-40-44-44-48-48 sts. Continue to work rib as follows: * K 2, P 2 *, repeat from *-* the entire round. When rib measures 5 cm / 2", loosely bind off all sts with K over K and P over P, sleeve measures approx. 43-42-42-41-40-38 cm / 17"-16½"-16½"-16"-15¾"-15" (shorter measurements in the larger sizes because of wider shoulders). ASSEMBLY: Sew tog hole under the sleeves. NECK EDGE: Beg mid back and pick up 88-92-96-96-100-112 sts on circular needle size 5 mm / US 8 around the neck. Then work rib as follows: K 1, * P 2, K 2 *, repeat from *-* until 3 sts remain, P 2, K 1. Continue like this until rib has been worked for 5 cm / 2". Bind off with K over K and P over P. |
|
 |
|
Have you finished this pattern?Tag your pictures with #dropspattern #orangecrushsweater or submit them to the #dropsfan gallery. Do you need help with this pattern?You'll find 24 tutorial videos, a Comments/Questions area and more by visiting the pattern on garnstudio.com. © 1982-2026 DROPS Design A/S. We reserve all rights. This document, including all its sub-sections, has copyrights. Read more about what you can do with our patterns at the bottom of each pattern on our site. |


With over 40 years in knitting and crochet design, DROPS Design offers one of the most extensive collections of free patterns on the internet - translated to 17 languages. As of today we count 325 catalogs and 12298 patterns - 12288 of which are translated into English (US/in).
We work hard to bring you the best knitting and crochet have to offer, inspiration and advice as well as great quality yarns at incredible prices! Would you like to use our patterns for other than personal use? You can read what you are allowed to do in the Copyright text at the bottom of all our patterns. Happy crafting!
Post a comment to pattern DROPS 158-18
We would love to hear what you have to say about this pattern!
If you want to leave a question, please make sure you select the correct category in the form below, to speed up the answering process. Required fields are marked *.