
Popular categories
Looking for a yarn?


Comments / Questions (170)
![]() Riet wrote:
Riet wrote:
Hoi, na de ribbels, brei je 2 naalden met meerdering van 8 st. = 16. Klopt het dat deze 2 naalden niet meetellen in het patroon? Het patroon begint dan in de derde heengaande naald? ik heb deze 2 raglanbeginnaalden wel meegenomen in het patroon, maar nu kom ik aan bij de eerste kabel, (de 15e naald vh patroon) op het achterpand met 180 st. dit moeten er 196 zijn. Dat heb ik zo uitgeteld. Wil je even feedback geven? dankjewel, Riet
18.08.2016 - 18:37DROPS Design answered:
Hoi Riet. Ik kan niet helemaal volgen waar je bent in het patroon. Gaat het om de meerderingen voor raglan? Je meerdert 8 st per keer en de nieuwe st moet je av op de mouw en de overige st brei je volgens het patroon zoals beschreven in PATROON
26.10.2016 - 16:18
![]() Riet wrote:
Riet wrote:
Bij de beschrijving voor de raglan algemeen staat tussen haakjes (A1/A2, markeerder A2/A1, aan elke kant een omslag. In de patroonbeschrijving staat: A1-markeerderA2. de markeerders staan tussen de kabels, waardoor (bij mij) verwarring ontstaat, omdat ik meende te lezen dat je aan beide zijden van de markeerder moest meerderen. Er moet gemeerderd worden vóór en na de A1/A2? Ik hoor graag,Vriendelijk dank!
15.08.2016 - 17:13DROPS Design answered:
U meerdert op vier punten met 2 omslagen, dus bij elke raglan. Dit doet u aan de buitenkant van de raglansteken die gevormd worden door herhalingen van A.1, A.2 en een markeerder bij elke raglan.
15.08.2016 - 22:40
![]() Riet wrote:
Riet wrote:
Dankjewel! Tuurlijk verwacht ik niet dat je in het weekend antwoord... Ik ga nogmaals aan de slag!
15.08.2016 - 09:40DROPS Design answered:
Succes ermee! Het is een mooi vest, een echte blikvanger.
15.08.2016 - 11:36
![]() Riet Schut wrote:
Riet Schut wrote:
Beste Dropsmensen, dit patroon is geen reclame voor Drops, jammer. Ik ben al de hele dag aan het puzzelen, ik kan de kabel op de midden van de mouw niet terugvinden. De hoeveelste steek is het midden van de mouw(en) en hoe krijg ik dit in patroon? De aantallen steken kloppen, maar het ontbreekt aan een duidelijk begin van de werkbeschrijving. Ik kan geen patroonvolgorde vinden.... Wanneer begint bijvoorbeeld het lijf? ik hoop op een spoedig antwoord.....groeten!
14.08.2016 - 18:36DROPS Design answered:
Beste mevrouw Schut, dit is een patroon met complexe kabels dat van boven naar beneden wordt gebreid - het vraagt goed lezen, maar het klopt wel. De kabels op de mouw lopen door vanaf de pas, u kunt gewoon breien zoals de steken zich voordoen en het patroon vervolgen. Het lijf begint als de st voor de mouwen op hulpdraden worden gezet, dat is na deze zin: Het werk meet nu 27-28-29-30-31 cm vanaf schouder... U breit van boven naar beneden: eerst de pas, dan het lijf en tot slot één voor één de mouwen. Wij streven ernaar vragen binnen 3 werkdagen te beantwoorden, normaal dus niet in het weekend.
14.08.2016 - 21:38
![]() Corinne wrote:
Corinne wrote:
Bonjour. En dessous des emmanchures, taille L, je dois suivre les diagrammes A5 et A4. A4 continue les torsades indiquées A2 (tourne vers la gauche). Mais j'ai 2 torsades qui suivaient A1(tourne vers la droite) : dois-je modifier A4 juste pour ces 2 torsades (juste avant le marqueur bleu) pour poursuivre leur façon de tourner jusqu'en bas? Ou alors, les transformer pour qu'elles suivent A2? Je ne sais pas si je suis claire... D'avance merci pour votre réponse :)
29.07.2016 - 16:13
![]() CHRISTIANE EVRA wrote:
CHRISTIANE EVRA wrote:
Bonjour, Je suis arrivée au DOS et DEVANT, et au moment de placer le point fantaisie, (5 pt mousse, 1m.env, 2 m endr,) je me suis rendue compte qu'il n'y avait pas les torsades A1 et A2 de faites au dos et devants qui partaient des torsades de l’emmanchure comme sur le modéle. J'aurais dû les inclure probablement plus haut mais à quel moment ? Est ce au moment des augmentations du raglan ? Et combien de mailles envers entre chaque A1 ? Merci pour votre réponse
04.07.2016 - 00:45DROPS Design answered:
Bonjour Mme Evra, lorsque l'on augmente pour le raglan des devants et du dos, on tricote les 6 premières augmentations en A.2 puis les 7-9 m suivantes (cf taille) à l'env, les 6 augm. suivante en A.2 et les 7-9 suivantes à l'env. Voir paragraphe "POINT FANTAISIE" juste après le raglan. Bon tricot!
04.07.2016 - 10:47
![]() Corinne wrote:
Corinne wrote:
Bonjour,J'en suis au moment où on laisse les mailles des manches en attente. Pour la taille L, vous dites : "Continuez ensuite en point fantaisie sur l'endroit : 5 m point mousse, 1 m env, ..., 1 fois A2 en largeur, ...". Est-ce que cela signifie que l'on tricote 6 mailles de A2 en faisant la torsade, ou alors que l'on tricote les 6 mailles sans former la torsade, en jersey tout simple? Sur les photos, il me semble que ce n'est pas torsadé juste sous la manche. Merci.
22.05.2016 - 17:34DROPS Design answered:
Bonjour Corinne, tricotez 1 fois A.2 en largeur, soit 1 m env, 4 m end et 1 m env, on va faire la torsade à ce niveau également. Bon tricot!
23.05.2016 - 09:49
![]() Irena Skiba Bieler wrote:
Irena Skiba Bieler wrote:
Hei, jeg har problem med raglan økning. Jeg forstår det slik at økning til reglane starter rund merker. Jeg øker da 1 maske før merke og 1 maske etter merke. Så står det under mønster at "de første 6m som økes strikkes i A2, neste 8 økte strikkes vr...." Betyr det at det dannes A2 mønster rund merke 1 og 3?
08.04.2016 - 15:07DROPS Design answered:
Hej, Ja hvis du ser på billedet så er det den flette som er på hvert forstykke som starter næsten øverst i halsen ud fra de to fletter som er i hver raglanovergang. God fornøjelse!
11.04.2016 - 15:10Nadine wrote:
This is the most frustrating and confusing pattern. I am an experienced knitter and can not even figure out the raglan increases. How do you yo increase on both sides of the marker? My head is hurting trying to figure this pattern out. Somebody really needs to revise it and print it more clearly.
13.02.2016 - 07:34DROPS Design answered:
Dear Nadine, inc for raglan are explained at the beg of pattern(see "raglan") - for any individual assistance, you are please contact your DROPS store. Happy knitting!
15.02.2016 - 12:09
![]() Jenny Katoele wrote:
Jenny Katoele wrote:
Lijf: A.2 0-1 keer in de breedte, 7-7 enz. Wat betekend in de breedte.
25.11.2015 - 15:19DROPS Design answered:
Hoi Jenny. Je herhaalt A.1 0 of 1 keer in de breedte = 1 keer is over 6 st
25.11.2015 - 17:28
|
||||||||||||||||||||||||||||
Alana Cardigan#alanacardigan |
||||||||||||||||||||||||||||
 |
 |
|||||||||||||||||||||||||||
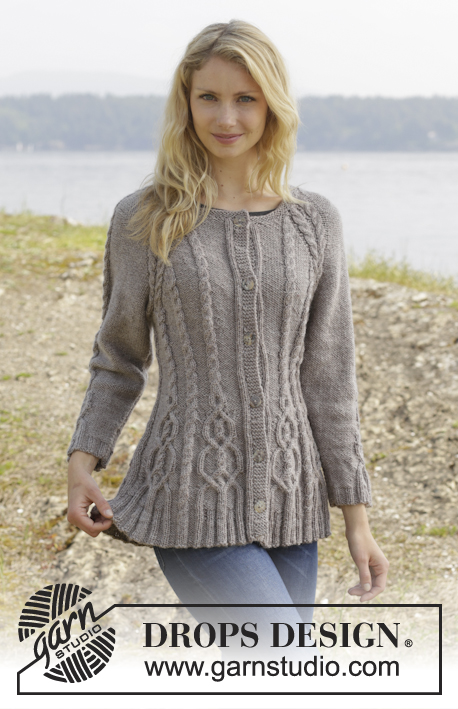
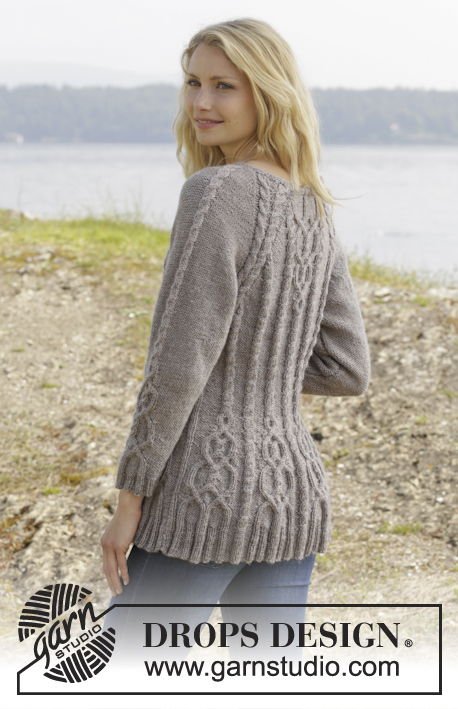
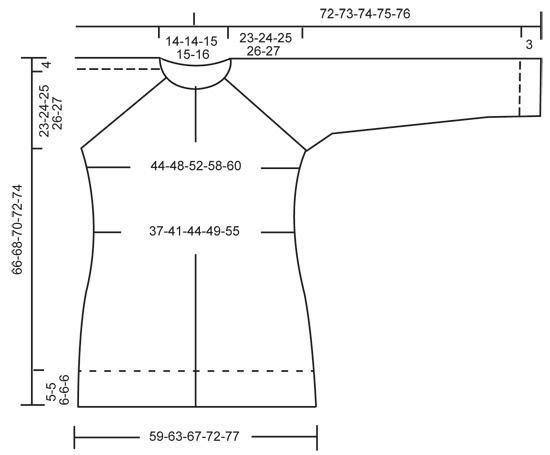
Knitted DROPS jacket with cables and raglan, worked top down in ”Karisma”. Size S-XXL
DROPS 156-4 |
||||||||||||||||||||||||||||
|
GARTER ST (back and forth on needle): K all rows. 1 ridge = K2 rows. PATTERN: See diagrams A.1 - A.5. The diagrams show all rows in pattern seen from RS. RAGLAN: Inc on each side of raglan sts (A.1/A.2, marker, A.2/A.1) by making 1 YO = 8 inc on row. On next row work YOs twisted to avoid holes. Then work the new sts P on sleeves (seen from RS), and on front and back piece work the new sts in to pattern as explained below. DECREASE TIP (applies to sleeves): Dec on each side of marker as follows: Work until 3 sts remain before marker, P 2 tog, P 2, P 2 tog = 2 sts dec. INCREASE TIP: All inc are done from RS. Inc 1 st by making a YO. On next row K YOs twisted, i.e. work in the back loop of st instead of front to avoid holes. P the new sts (seen from RS). KNITTING TIP: For every 10th row work short rows over the 5 sts in garter st in bands as follows (beg from RS): K 5 band sts, turn piece, tighten yarn and K back, turn piece and work as before over all sts, turn piece, K 5 band sts in garter st, turn piece, tighten yarn and K back. That way the ridges in band will not contract as much. BUTTONHOLES: Dec for buttonholes on right band. 1 buttonhole = K tog third and fourth st from edge and make 1 YO. Dec for buttonholes when piece measures: SIZE S: 2, 12, 22, 32, 42 and 52 cm / ¾",4 ¾",8 ¾",12½",16½",20½" SIZE M: 2, 12, 22, 32, 42 and 52 cm / ¾",4 ¾",8 ¾",12½",16½",20½" SIZE L: 2, 11, 20, 29, 38, 47 and 56 cm / ¾",4½",8",11½",15",18½",22" SIZE XL: 2, 11, 20, 29, 38, 47 and 56 cm / ¾",4½",8",11½",15",18½",22" SIZE XXL: 2, 11, 20, 29, 38, 47, 56 and 65 cm / ¾",4½",8",11½",15",18½",22",25½ ---------------------------------------------------------- JACKET: Worked back and forth, top down on circular needle to make room for all the sts. YOKE: Cast on 108-108-113-113-117 sts on circular needle size 4 mm / US 6 with Karisma. Work 3 ridges in GARTER ST - see explanation above. K next row AT THE SAME TIME inc 24-24-23-23-27 sts evenly = 132-132-136-136-144 sts. Remember BUTTONHOLES - see explanation above. Now work as follows from RS: 5 sts in garter st, P 1, K 2 (= band), P 12-12-13-13-15, A.1, insert 1st marker, A.2, P 2, A.2, P 2, A.1, insert 2nd marker, A.2, P 0-0-1-1-3, A.3, P 0-0-1-1-3, A.1, insert 3rd marker, A.2, P 2, A.2, P 2, A.1, insert 4th marker, A.2, P 12-12-13-13-15, K 2, P 1, 5 sts in garter st (= band) – READ KNITTING TIP! READ ALL OF THE FOLLOWING SECTION BEFORE CONTINUING! REMEMBER THE GAUGE! On next row from RS beg inc for RAGLAN – see explanation above, AT THE SAME TIME work pattern as follows: RAGLAN: Repeat inc every row 0-2-10-20-20 times in total. Then inc on every other row (i.e. on every row from RS) 23-32-30-26-27 times and in every 3rd row 6-0-0-0-0 times = 364-404-456-504-520 sts. PATTERN: Work pattern on body as follows (P the inc sts on sleeves): Work the first 6 sts inc in A.2, then P next 8-9-7-8-8 inc sts, work the next 6 inc sts in A.2, P the next 8-9-7-8-8 inc sts. NOTE: (Size M-L-XL-XXL): When A.3 has been worked 1 time vertically, continue with A.2 over cable and P (seen from RS) the remaining sts from A.3 until start of body. S/M: Then inc as before on sleeve and inc inside A.1/A.2 (i.e. between A.1 and A.2, towards marker for raglan) on front and back piece 1-4 more times. P the new sts. L/XL/XXL: Continue with A.2 over the next 6 inc sts, P the next 7-8-8 inc sts, then inc as before on sleeve and inc inside A.1/A.2 (i.e. between A.1 and A.2, towards marker for raglan) on front and back piece 1-4-5 more times. P the last 1-4-5 inc sts. Piece now measures 27-28-29-30-31 cm / 10½"-11"-11½"-11¾"-12¼" from shoulder. Now work as follows from WS: Work 55-60-67-73-76 sts (= right front piece), slip the next 80-90-102-114-116 sts on a stitch holder for sleeve, cast on 12 new sts under sleeve, insert a blue marker in the middle of these new sts (= side), work the next 94-104-118-130-136 m (= back piece), slip the next 80-90-102-114-116 sts on a stitch holder for sleeve, cast on 12 new sts under sleeve, insert a blue marker in the middle of these new sts (= side), work the remaining 55-60-67-73-76 sts (= left front piece). There are now 228-248-276-300-312 sts on needle. NOW MEASURE THE PIECE FROM HERE. BODY: There are now 106-116-130-142-148 sts for back piece and 61-66-73-79-82 sts for each front piece. Then continue pattern as follows from RS: S/M: 5 sts in garter st, P 1, K 2 (= band), P 12-12, A.2, insert a marker, P 8-9, A.2, insert a marker, P 8-9, A.1, P 7-7, A.2 0-1 time in width, P 7-7, A.2, P 8-9, insert a marker, A.2, P 8-9, insert a marker, A.2, P 9-9, A.2, P 9-9, A.2, insert a marker, P 8-9, A.2, insert a marker, P 8-9, A.1, P 7-7, A.2 0-1 time in width, P 7-7, A.2, P 8-9, insert a marker, A.2, P 8-9, insert a marker, A.2, P 12-12, K 2, P 1, 5 sts in garter st. L/XL/XXL: 5 sts in garter st, P 1, K 2 (= band), P 13-14-15, A.2, insert a marker, P 7-8-8, A.2, insert a marker, P 7-8-8, A.2, insert a marker, P 7-8-8, A.1, P 4-6-5, A.2 1-1-2 times in width, P 4-6-5, A.2, P 7-8-8, insert a marker, A.2, P 7-8-8, insert a marker, A.2, P 7-8-8, insert a marker, A.2, P 10-11-12, A.2, P 10-11-12, A.2, insert a marker, P 7-8-8, A.2, insert a marker, P 7-8-8, A.2, insert a marker, P 7-8-8, A.1, P 4-6-5, A.2 1-1-2 times in width, P 4-6-5, A.2, P 7-8-8, insert a marker, A.2, P 7-8-8, insert a marker, A.2, P 7-8-8, insert a marker, A.2, P 13-14-15, K 2, P 1, 5 sts in garter st. READ THE NEXT 2 SECTIONS BEFORE CONTINUING! Now dec and inc at the same time as follows: DECREASE: Dec differently as follows: Dec 1 st by P 2 tog towards the bands mid front, repeat dec every 1½-1½-1½-2-2 cm / ½"-½"-½"-¾"-¾" 5-5-4-4-5 more times. AT THE SAME TIME dec 1 st on each side of the middle cable on back piece. Repeat dec every 2-2-1½-1½-1½ cm / ¾"-¾"-½"-½"-½" 3-3-4-4-6 more times. AT THE SAME TIME dec 1 st towards cable in every P section with marker in (= 8-8-12-12-12 markers). Repeat dec every 3-2½-5-4-4 cm / 1⅛"-⅞"-2"-1½"-1½" 2-3-1-2-2 more times. INCREASE (towards the sides): When piece measures 3 cm / 1", inc along the cable towards the sleeve (i.e. cable from raglan) in P section towards the sides – READ INCREASE TIP! Inc 4 sts on row. Repeat inc every 1½-1½-2½-1½-1 cm / ½"-½"-⅞"-½"-⅜" 3-4-2-4-10 more times. When all dec and inc are done, 200-216-244-264-294 sts remain. When piece measures 11-12-12-13-14 cm / 4½"-4¾"-4¾"-5"-5½", work pattern as follows: 5 sts in garter st, P 1, K 2 (= band), P 2-2-4-4-5, A.5, A.4, A.5, A.4 0-0-1-1-1 time, P 7-8-6-11-15, A.2 0-1-1-1-2 times in width, P 7-8-6-11-15, A.4 0-0-1-1-1 time in width, * A.5, A.4 *, repeat from *-* 2-2-3-3-3 more times in width, A.5 1-1-0-0-0 times in width, P 7-8-6-11-15, A.2 0-1-1-1-2 times in width, P 7-8-6-11-15, A.4 0-0-1-1-1 time in width, A.5, A.4, A.5, P 2-2-4-4-5, K 2, P 1, 5 sts in garter st (= band). NOTE: Adjust the first cable in A.4 and A.5 to get a nice transition between diagrams. Continue with pattern and inc according to diagram. When A.4 and A.5 have been worked vertically and piece measures approx. 33-34-34-35-35 cm / 13"-13½"-13½"-13¾"-13¾", there are 316-332-376-396-426 sts on needle. Insert a marker here. NOW MEASURE THE PIECE FROM HERE. Now work rib inside 8 band sts in each side of piece as follows: S/M: * Work K over K and P over P until 7-11 sts remain before the blue marker in the side, P 2, K 2, P 3-4 *, repeat from *-* 1 more time and continue with K over K and P over P until band sts. L/XL/XXL: * Work K over K and P over P until 8-14-21 sts remain before the blue marker in the side, K 2-2-2, P 3-4-3, K 0-2-2, P 0-3-3, K 0-0-2, P 0-0-3 *, repeat from *-* 1 more time and continue with K over K and P over P until band sts. When rib has been worked for 2 cm / ¾" from marker, inc by making 1 YO before first P st in every P section. READ INCREASE TIP! When rib has been worked for 5-5-6-6-6 cm / 2"-2"-2½"-2½"-2½", bind off with K over K and P over P. SLEEVES: Slip the 80-90-102-114-116 sts from stitch holder back on circular needle. Work 1 row over all sts and cast on 12 new sts at the end of row = 92-102-114-126-128 sts. Insert a marker in the middle of the new sts (i.e. 6 sts on each side of marker). NOW MEASURE THE PIECE FROM HERE. Then work sleeve in the round on circular needle/double pointed needles. Continue the middle cable on sleeve as before but work P over cables in raglan. On 2nd round beg dec on each side of marker - READ DECREASE TIP. Repeat dec every other round 6 more times = 78-88-100-112-114 sts. Then dec 1 st on each side of marker every 2-1½-1-1-1 cm / ¾"-½"-⅜"-⅜"-⅜" 13-17-22-27-27 times = 52-54-56-58-60 sts. AT THE SAME TIME when piece measures 15 cm / 6", work A.5 over cable in the middle of sleeve - adjust the first cable in A.5 to get a nice transition between diagrams. NOTE: Do not inc in A.5 on sleeve, i.e. do not work YOs in diagram. When A.5 is finished and sleeve measures 37 cm / 14½", work rib as follows from marker at beg of round: P 0-0-1-2-3, K 1-2-2-2-2, P 3, K 2. P 3, K 2, P 2, continue rib as on last row in A.5 (= 26 sts), P 2, K 2, P 3, K 2, P 3, K 1-2-2-2-2, P 0-0-1-2-3. Continue like this for 3 cm / 1", bind off with K over K and P over P. ASSEMBLY: Sew the holes under the sleeves. Sew the buttons on to left band. |
||||||||||||||||||||||||||||
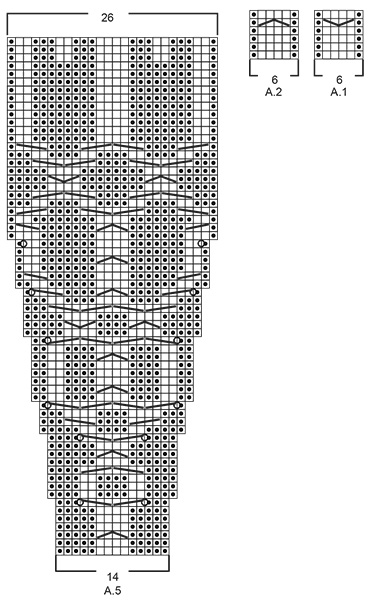
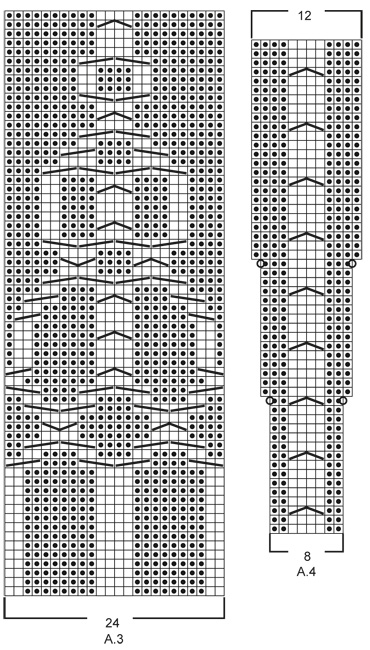
Diagram explanations |
||||||||||||||||||||||||||||
|
||||||||||||||||||||||||||||
 |
||||||||||||||||||||||||||||
 |
||||||||||||||||||||||||||||
 |
||||||||||||||||||||||||||||
Have you finished this pattern?Tag your pictures with #dropspattern #alanacardigan or submit them to the #dropsfan gallery. Do you need help with this pattern?You'll find 25 tutorial videos, a Comments/Questions area and more by visiting the pattern on garnstudio.com. © 1982-2026 DROPS Design A/S. We reserve all rights. This document, including all its sub-sections, has copyrights. Read more about what you can do with our patterns at the bottom of each pattern on our site. |
||||||||||||||||||||||||||||


With over 40 years in knitting and crochet design, DROPS Design offers one of the most extensive collections of free patterns on the internet - translated to 17 languages. As of today we count 324 catalogs and 12290 patterns - 12280 of which are translated into English (US/in).
We work hard to bring you the best knitting and crochet have to offer, inspiration and advice as well as great quality yarns at incredible prices! Would you like to use our patterns for other than personal use? You can read what you are allowed to do in the Copyright text at the bottom of all our patterns. Happy crafting!
Post a comment to pattern DROPS 156-4
We would love to hear what you have to say about this pattern!
If you want to leave a question, please make sure you select the correct category in the form below, to speed up the answering process. Required fields are marked *.