
Popular categories
Looking for a yarn?


Comments / Questions (170)
![]() Christina wrote:
Christina wrote:
Hej igen! Angående markörerna: om de fyra markörerna är till raglan, då stämmer inte deras placering enligt beskrivningen. Tittar man på bilderna så ser det inte ut som när man sätter markörerna efter beskrivningen. Hur menar ni att markörerna då skall sitta?
13.01.2017 - 15:12DROPS Design answered:
Hej Christina. Beskrivelsen med markörerne er korrekt, vi kan ikke se det er fejl.
08.03.2017 - 13:52
![]() Christina wrote:
Christina wrote:
Detta mönster är det mest snurriga jag varit med om, och jag har stickat mycket! Det talas om att sätta ut markörer (4 st) i början, men dessa markörer verkar inte vara desamma som de som märker ut var raglanökningen ska börja! Eller?
11.01.2017 - 17:39DROPS Design answered:
Hej Christina. De 4 markörer er til raglan
12.01.2017 - 14:56
![]() Christina wrote:
Christina wrote:
Mönsterdiagrammen visas ju uppifrån och ner, som man läser en text, men på bilderna av koftan är det tvärt om. Skall alltså diagrammen läsas nerifrån och upp? Detta är mycket förvirrande!
02.01.2017 - 10:40DROPS Design answered:
Hej. Diagram läses alltid nedifrån och upp. Lycka till! Mvh DROPS Design
02.01.2017 - 13:50
![]() Jennifer wrote:
Jennifer wrote:
I think there is an error in the M instructions for the Body, when you finish the first row in which your put the sleeve stitches on the holders you have 248 stitches. but if you follow the instructions for the body it doesn't line up with the cables & if you tally up the stitches. it comes to 256. where are these extra stitches supposed to come from?
17.09.2016 - 04:54DROPS Design answered:
Dear Jennifer, you should have 248 sts after 1st row putting sts on a st holder. There were 404 sts and you put 2 x 90 sts (sleeves) on a st holder + cast on 2 x 12 sts for armhole = 404 - 180 + 24 = 248 sts. You maybe should check how you worked the inc sts for raglan. Remember you'll get furhter personnal assistance from the store where you bought your yarn. Happy knitting!
19.09.2016 - 10:42
![]() Repnik Daniela wrote:
Repnik Daniela wrote:
Aber 13cm mehr kommt mir schon sehr viel mehr vor ich werde das versuchen dann nach messen im schlimmsten Fall ribbeln
12.09.2016 - 09:55DROPS Design answered:
Liebe Frau Repnik, stimmt Ihre Maschenprobe glatt gestrickt? Wenn ja, dann genauso stricken wie bei der Maschenprobe, so bekommen Sie dieselben Massnahamen wie im Diagram.
12.09.2016 - 09:58
![]() Repnik Daniela wrote:
Repnik Daniela wrote:
Weiters habe ich entdeckt und eigentlich bin ich eine geübte strickerin das sich in der Legende ein kleiner aber verherender Fehler eingeschlichen hat laut den Angaben wären nur hi-nreihen im schema gezeichnet da man rechte maschen in der hin Reihe rechts und in der Rückreihe links stricken soll das war selbst nach 20 Jahren strick anleitungen lesen für mich verwirrend ein kleiner Satz es ist hin und Rückreihen gezeichnet würde diesen Fehler vermeiden
12.09.2016 - 09:28DROPS Design answered:
Liebe Frau Repnik, wie in der schriftlichen Anleitung erklärt, zeigen die Diagramme all Hin- und Rück-R - siehe mal auch hier.
12.09.2016 - 09:52
![]() Repnik Daniela wrote:
Repnik Daniela wrote:
Hallo Kann es sein das die angegebene maschenprobe überhauptnicht zu der jacke paßt ich bin jetzt noch nicht ganz fertig mit dem raglan aber wenn ich das anhand der angegeben maschenprobe 21m/28 r nachrechnen stimmt das überhauptnicht in Größe L hat man 276 maschen auf der nadel nachdem die ärmel stillgelegt werden Und das würde einer weite von 65 cm entsprechen angegeben sind da aber 52 cm so viel weite können die zöpfe nicht schlucken? Oder?
12.09.2016 - 09:26DROPS Design answered:
Liebe Frau Repnik, die Maschenprobe gilt glatt gestrickt, die Jacke ist mit Zöpfe, li. und re. Maschen gestrickt, dh man braucht hier mehr M. in der Breite als wenn mann glatt stricken sollten.
12.09.2016 - 09:50
![]() Repnik Daniela wrote:
Repnik Daniela wrote:
Leider ist es laut Legende nicht ersichtlich das hun und Rückreinen im Schema gezeichnet sind da gleich am Anfang steht re in der hinreihe links in der Rückreihe nimmt man an das nur hinreißen gezeichnet sind ausserdem hab ich entdeckt das die maschenprobe nicht zu den Angaben passen kann da die weste sonst nicht 52 cm breit wäre sondern 65 ausser ich hab ned Knopf in meinem kopf für gr.l 267 maschen :2 =138 maschen 52 cm wären aber beider maschenprobe nur 109 maschen
11.09.2016 - 13:35
![]() Repnik Daniela wrote:
Repnik Daniela wrote:
Leider ist es laut Legende nicht ersichtlich das hun und Rückreinen im Schema gezeichnet sind da gleich am Anfang steht re in der hinreihe links in der Rückreihe nimmt man an das nur hinreißen gezeichnet sind ausserdem hab ich entdeckt das die maschenprobe nicht zu den Angaben passen kann da die weste sonst nicht 52 cm breit wäre sondern 65 ausser ich hab ned Knopf in meinem kopf für gr.l 267 maschen :2 =138 maschen 52 cm wären aber beider maschenprobe nur 109 maschen
11.09.2016 - 12:19
![]() Corinne wrote:
Corinne wrote:
Bonjour. Pour la reprise des manches, vous dites : "tricotez 1 rang endroit sur toutes les mailles". Même sur celles de la torsade? N'y aura-t'il pas de démarcation à cet endroit?
04.09.2016 - 10:16DROPS Design answered:
Bonjour Corinne, quand on reprend les mailles de la manche, on tricote 1 rang sur toutes les mailles (= pas un rang end (correction à venir) c'est-à-dire tricotez les mailles comme elles se présentent, et faites la torsade du dessus de la manche si besoin) - Bon tricot!
05.09.2016 - 09:30
|
||||||||||||||||||||||||||||
Alana Cardigan#alanacardigan |
||||||||||||||||||||||||||||
 |
 |
|||||||||||||||||||||||||||
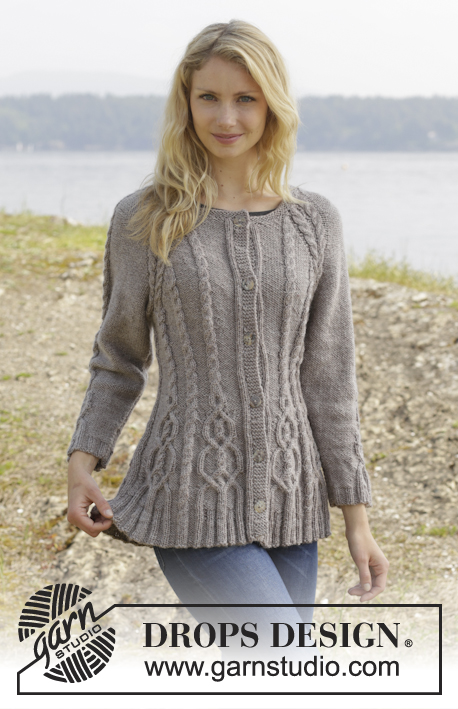
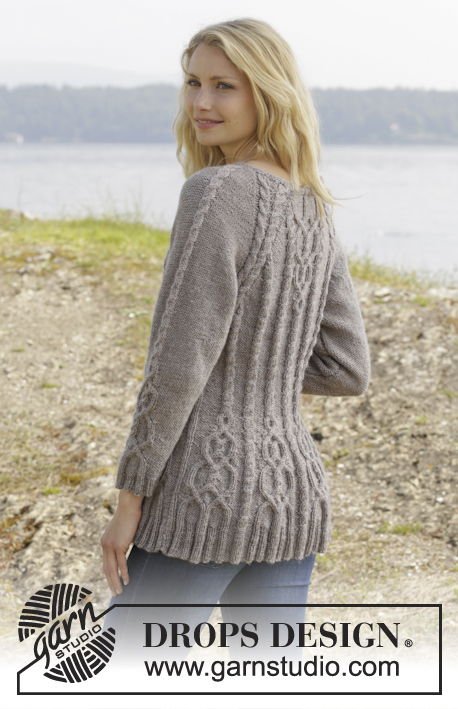
Knitted DROPS jacket with cables and raglan, worked top down in ”Karisma”. Size S-XXL
DROPS 156-4 |
||||||||||||||||||||||||||||
|
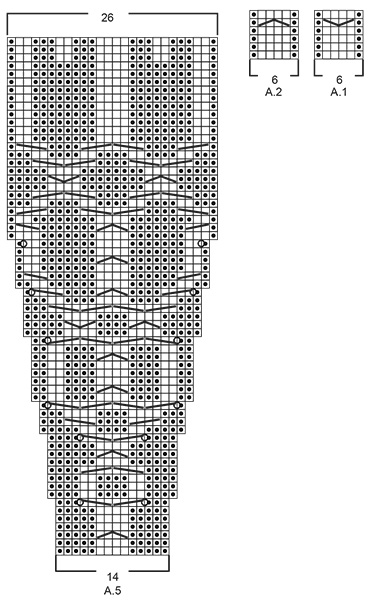
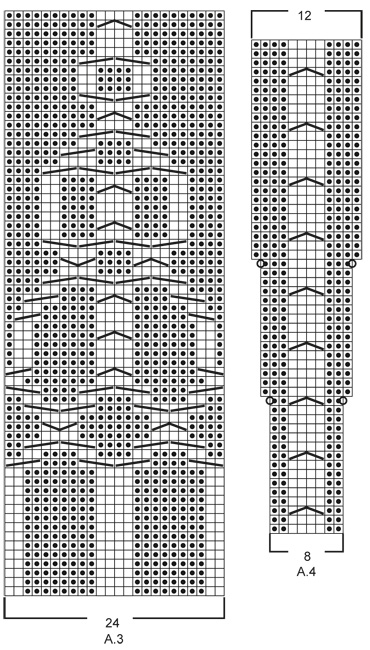
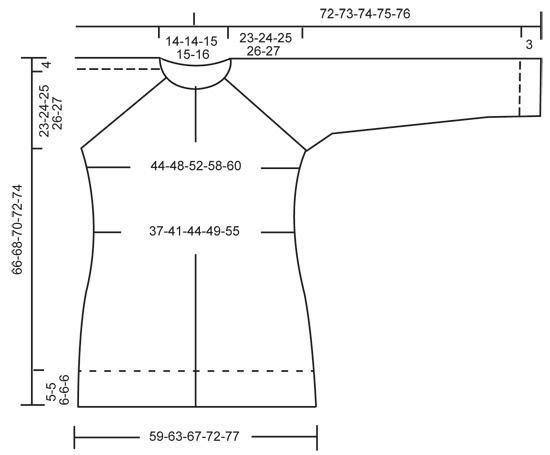
GARTER ST (back and forth on needle): K all rows. 1 ridge = K2 rows. PATTERN: See diagrams A.1 - A.5. The diagrams show all rows in pattern seen from RS. RAGLAN: Inc on each side of raglan sts (A.1/A.2, marker, A.2/A.1) by making 1 YO = 8 inc on row. On next row work YOs twisted to avoid holes. Then work the new sts P on sleeves (seen from RS), and on front and back piece work the new sts in to pattern as explained below. DECREASE TIP (applies to sleeves): Dec on each side of marker as follows: Work until 3 sts remain before marker, P 2 tog, P 2, P 2 tog = 2 sts dec. INCREASE TIP: All inc are done from RS. Inc 1 st by making a YO. On next row K YOs twisted, i.e. work in the back loop of st instead of front to avoid holes. P the new sts (seen from RS). KNITTING TIP: For every 10th row work short rows over the 5 sts in garter st in bands as follows (beg from RS): K 5 band sts, turn piece, tighten yarn and K back, turn piece and work as before over all sts, turn piece, K 5 band sts in garter st, turn piece, tighten yarn and K back. That way the ridges in band will not contract as much. BUTTONHOLES: Dec for buttonholes on right band. 1 buttonhole = K tog third and fourth st from edge and make 1 YO. Dec for buttonholes when piece measures: SIZE S: 2, 12, 22, 32, 42 and 52 cm / ¾",4 ¾",8 ¾",12½",16½",20½" SIZE M: 2, 12, 22, 32, 42 and 52 cm / ¾",4 ¾",8 ¾",12½",16½",20½" SIZE L: 2, 11, 20, 29, 38, 47 and 56 cm / ¾",4½",8",11½",15",18½",22" SIZE XL: 2, 11, 20, 29, 38, 47 and 56 cm / ¾",4½",8",11½",15",18½",22" SIZE XXL: 2, 11, 20, 29, 38, 47, 56 and 65 cm / ¾",4½",8",11½",15",18½",22",25½ ---------------------------------------------------------- JACKET: Worked back and forth, top down on circular needle to make room for all the sts. YOKE: Cast on 108-108-113-113-117 sts on circular needle size 4 mm / US 6 with Karisma. Work 3 ridges in GARTER ST - see explanation above. K next row AT THE SAME TIME inc 24-24-23-23-27 sts evenly = 132-132-136-136-144 sts. Remember BUTTONHOLES - see explanation above. Now work as follows from RS: 5 sts in garter st, P 1, K 2 (= band), P 12-12-13-13-15, A.1, insert 1st marker, A.2, P 2, A.2, P 2, A.1, insert 2nd marker, A.2, P 0-0-1-1-3, A.3, P 0-0-1-1-3, A.1, insert 3rd marker, A.2, P 2, A.2, P 2, A.1, insert 4th marker, A.2, P 12-12-13-13-15, K 2, P 1, 5 sts in garter st (= band) – READ KNITTING TIP! READ ALL OF THE FOLLOWING SECTION BEFORE CONTINUING! REMEMBER THE GAUGE! On next row from RS beg inc for RAGLAN – see explanation above, AT THE SAME TIME work pattern as follows: RAGLAN: Repeat inc every row 0-2-10-20-20 times in total. Then inc on every other row (i.e. on every row from RS) 23-32-30-26-27 times and in every 3rd row 6-0-0-0-0 times = 364-404-456-504-520 sts. PATTERN: Work pattern on body as follows (P the inc sts on sleeves): Work the first 6 sts inc in A.2, then P next 8-9-7-8-8 inc sts, work the next 6 inc sts in A.2, P the next 8-9-7-8-8 inc sts. NOTE: (Size M-L-XL-XXL): When A.3 has been worked 1 time vertically, continue with A.2 over cable and P (seen from RS) the remaining sts from A.3 until start of body. S/M: Then inc as before on sleeve and inc inside A.1/A.2 (i.e. between A.1 and A.2, towards marker for raglan) on front and back piece 1-4 more times. P the new sts. L/XL/XXL: Continue with A.2 over the next 6 inc sts, P the next 7-8-8 inc sts, then inc as before on sleeve and inc inside A.1/A.2 (i.e. between A.1 and A.2, towards marker for raglan) on front and back piece 1-4-5 more times. P the last 1-4-5 inc sts. Piece now measures 27-28-29-30-31 cm / 10½"-11"-11½"-11¾"-12¼" from shoulder. Now work as follows from WS: Work 55-60-67-73-76 sts (= right front piece), slip the next 80-90-102-114-116 sts on a stitch holder for sleeve, cast on 12 new sts under sleeve, insert a blue marker in the middle of these new sts (= side), work the next 94-104-118-130-136 m (= back piece), slip the next 80-90-102-114-116 sts on a stitch holder for sleeve, cast on 12 new sts under sleeve, insert a blue marker in the middle of these new sts (= side), work the remaining 55-60-67-73-76 sts (= left front piece). There are now 228-248-276-300-312 sts on needle. NOW MEASURE THE PIECE FROM HERE. BODY: There are now 106-116-130-142-148 sts for back piece and 61-66-73-79-82 sts for each front piece. Then continue pattern as follows from RS: S/M: 5 sts in garter st, P 1, K 2 (= band), P 12-12, A.2, insert a marker, P 8-9, A.2, insert a marker, P 8-9, A.1, P 7-7, A.2 0-1 time in width, P 7-7, A.2, P 8-9, insert a marker, A.2, P 8-9, insert a marker, A.2, P 9-9, A.2, P 9-9, A.2, insert a marker, P 8-9, A.2, insert a marker, P 8-9, A.1, P 7-7, A.2 0-1 time in width, P 7-7, A.2, P 8-9, insert a marker, A.2, P 8-9, insert a marker, A.2, P 12-12, K 2, P 1, 5 sts in garter st. L/XL/XXL: 5 sts in garter st, P 1, K 2 (= band), P 13-14-15, A.2, insert a marker, P 7-8-8, A.2, insert a marker, P 7-8-8, A.2, insert a marker, P 7-8-8, A.1, P 4-6-5, A.2 1-1-2 times in width, P 4-6-5, A.2, P 7-8-8, insert a marker, A.2, P 7-8-8, insert a marker, A.2, P 7-8-8, insert a marker, A.2, P 10-11-12, A.2, P 10-11-12, A.2, insert a marker, P 7-8-8, A.2, insert a marker, P 7-8-8, A.2, insert a marker, P 7-8-8, A.1, P 4-6-5, A.2 1-1-2 times in width, P 4-6-5, A.2, P 7-8-8, insert a marker, A.2, P 7-8-8, insert a marker, A.2, P 7-8-8, insert a marker, A.2, P 13-14-15, K 2, P 1, 5 sts in garter st. READ THE NEXT 2 SECTIONS BEFORE CONTINUING! Now dec and inc at the same time as follows: DECREASE: Dec differently as follows: Dec 1 st by P 2 tog towards the bands mid front, repeat dec every 1½-1½-1½-2-2 cm / ½"-½"-½"-¾"-¾" 5-5-4-4-5 more times. AT THE SAME TIME dec 1 st on each side of the middle cable on back piece. Repeat dec every 2-2-1½-1½-1½ cm / ¾"-¾"-½"-½"-½" 3-3-4-4-6 more times. AT THE SAME TIME dec 1 st towards cable in every P section with marker in (= 8-8-12-12-12 markers). Repeat dec every 3-2½-5-4-4 cm / 1⅛"-⅞"-2"-1½"-1½" 2-3-1-2-2 more times. INCREASE (towards the sides): When piece measures 3 cm / 1", inc along the cable towards the sleeve (i.e. cable from raglan) in P section towards the sides – READ INCREASE TIP! Inc 4 sts on row. Repeat inc every 1½-1½-2½-1½-1 cm / ½"-½"-⅞"-½"-⅜" 3-4-2-4-10 more times. When all dec and inc are done, 200-216-244-264-294 sts remain. When piece measures 11-12-12-13-14 cm / 4½"-4¾"-4¾"-5"-5½", work pattern as follows: 5 sts in garter st, P 1, K 2 (= band), P 2-2-4-4-5, A.5, A.4, A.5, A.4 0-0-1-1-1 time, P 7-8-6-11-15, A.2 0-1-1-1-2 times in width, P 7-8-6-11-15, A.4 0-0-1-1-1 time in width, * A.5, A.4 *, repeat from *-* 2-2-3-3-3 more times in width, A.5 1-1-0-0-0 times in width, P 7-8-6-11-15, A.2 0-1-1-1-2 times in width, P 7-8-6-11-15, A.4 0-0-1-1-1 time in width, A.5, A.4, A.5, P 2-2-4-4-5, K 2, P 1, 5 sts in garter st (= band). NOTE: Adjust the first cable in A.4 and A.5 to get a nice transition between diagrams. Continue with pattern and inc according to diagram. When A.4 and A.5 have been worked vertically and piece measures approx. 33-34-34-35-35 cm / 13"-13½"-13½"-13¾"-13¾", there are 316-332-376-396-426 sts on needle. Insert a marker here. NOW MEASURE THE PIECE FROM HERE. Now work rib inside 8 band sts in each side of piece as follows: S/M: * Work K over K and P over P until 7-11 sts remain before the blue marker in the side, P 2, K 2, P 3-4 *, repeat from *-* 1 more time and continue with K over K and P over P until band sts. L/XL/XXL: * Work K over K and P over P until 8-14-21 sts remain before the blue marker in the side, K 2-2-2, P 3-4-3, K 0-2-2, P 0-3-3, K 0-0-2, P 0-0-3 *, repeat from *-* 1 more time and continue with K over K and P over P until band sts. When rib has been worked for 2 cm / ¾" from marker, inc by making 1 YO before first P st in every P section. READ INCREASE TIP! When rib has been worked for 5-5-6-6-6 cm / 2"-2"-2½"-2½"-2½", bind off with K over K and P over P. SLEEVES: Slip the 80-90-102-114-116 sts from stitch holder back on circular needle. Work 1 row over all sts and cast on 12 new sts at the end of row = 92-102-114-126-128 sts. Insert a marker in the middle of the new sts (i.e. 6 sts on each side of marker). NOW MEASURE THE PIECE FROM HERE. Then work sleeve in the round on circular needle/double pointed needles. Continue the middle cable on sleeve as before but work P over cables in raglan. On 2nd round beg dec on each side of marker - READ DECREASE TIP. Repeat dec every other round 6 more times = 78-88-100-112-114 sts. Then dec 1 st on each side of marker every 2-1½-1-1-1 cm / ¾"-½"-⅜"-⅜"-⅜" 13-17-22-27-27 times = 52-54-56-58-60 sts. AT THE SAME TIME when piece measures 15 cm / 6", work A.5 over cable in the middle of sleeve - adjust the first cable in A.5 to get a nice transition between diagrams. NOTE: Do not inc in A.5 on sleeve, i.e. do not work YOs in diagram. When A.5 is finished and sleeve measures 37 cm / 14½", work rib as follows from marker at beg of round: P 0-0-1-2-3, K 1-2-2-2-2, P 3, K 2. P 3, K 2, P 2, continue rib as on last row in A.5 (= 26 sts), P 2, K 2, P 3, K 2, P 3, K 1-2-2-2-2, P 0-0-1-2-3. Continue like this for 3 cm / 1", bind off with K over K and P over P. ASSEMBLY: Sew the holes under the sleeves. Sew the buttons on to left band. |
||||||||||||||||||||||||||||
Diagram explanations |
||||||||||||||||||||||||||||
|
||||||||||||||||||||||||||||
 |
||||||||||||||||||||||||||||
 |
||||||||||||||||||||||||||||
 |
||||||||||||||||||||||||||||
Have you finished this pattern?Tag your pictures with #dropspattern #alanacardigan or submit them to the #dropsfan gallery. Do you need help with this pattern?You'll find 25 tutorial videos, a Comments/Questions area and more by visiting the pattern on garnstudio.com. © 1982-2026 DROPS Design A/S. We reserve all rights. This document, including all its sub-sections, has copyrights. Read more about what you can do with our patterns at the bottom of each pattern on our site. |
||||||||||||||||||||||||||||


With over 40 years in knitting and crochet design, DROPS Design offers one of the most extensive collections of free patterns on the internet - translated to 17 languages. As of today we count 324 catalogs and 12290 patterns - 12280 of which are translated into English (US/in).
We work hard to bring you the best knitting and crochet have to offer, inspiration and advice as well as great quality yarns at incredible prices! Would you like to use our patterns for other than personal use? You can read what you are allowed to do in the Copyright text at the bottom of all our patterns. Happy crafting!
Post a comment to pattern DROPS 156-4
We would love to hear what you have to say about this pattern!
If you want to leave a question, please make sure you select the correct category in the form below, to speed up the answering process. Required fields are marked *.