
Popular categories
Looking for a yarn?


Comments / Questions (170)
![]() JANOWSKI Maryline wrote:
JANOWSKI Maryline wrote:
Bonjour je ne comprends : "Ensuite, augmenter comme avant aux manches et augmenter avant/après A.1/A.2 (c'est-à-dire entre A.1 et A.2, côté marqueur pour le raglan) aux devants et au dos encore 1-4 fois. Tricoter les augmentations à l'env.Cela veut il dire qu\'il faut continuer les mêmes augmentations pour le raglan ? merci beaucoup
26.03.2018 - 20:07DROPS Design answered:
Bonjour Mme Janowski, quand les premières augmentations ont été tricotées comme indiqué (A.2 et 8-9 m env - cf taille), les augmentations suivantes vont se tricoter comme pour les manches soit à l'envers. En taille S-M, on va répéter ces augmentations encore 1-4 fois sur les devants et le dos. Bon tricot!
28.03.2018 - 14:53
![]() JANOWSKI Maryline wrote:
JANOWSKI Maryline wrote:
Bonjour, quand vous dites "monter 12 m sous la manche\", en fait, je ne vois pas je dois mettre ces mailles. Merci beaucoup
26.03.2018 - 20:06DROPS Design answered:
Bonjour Mme Janowski, cette vidéo montre comment mettre les mailles des manches en attente et comment monter les mailles sous la manche pour un pull (à partir du time code 6:56 environ) - le principe sera le même pour un gilet ou une veste. Bon tricot!
28.03.2018 - 14:50
![]() JANOWSKI wrote:
JANOWSKI wrote:
Bonjour je ne comprends : "Ensuite, augmenter comme avant aux manches et augmenter avant/après A.1/A.2 (c'est-à-dire entre A.1 et A.2, côté marqueur pour le raglan) aux devants et au dos encore 1-4 fois. Tricoter les augmentations à l'env.Cela veut il dire qu\'il faut continuer les mêmes augmentations pour le raglan ? merci beaucoup
26.03.2018 - 20:05Teresa Young wrote:
THANK YOU SO VERY MUCH LOVE THE STYLE AND KNITTING PATTERN JUST LOVE IT.
07.03.2018 - 11:12Wendy wrote:
Thank you for offering 156-4 for free. I'd love to knit this, but can't figure out how to start. Do I start with A.1/A.2 by casting on 12 sts, add a marker, then another 12 sts? Is my 1st row: Inc. 1, P1, K4, P1, inc 2, P1, K4, P1, inc 2, etc? Should I use circular needles? Does A.1/A.2 turn into one of the other A's? or are all the A's separate pieces? I'm REALLY lost with the way the pattern is presented. Thank you!
13.01.2018 - 16:38DROPS Design answered:
Dear Wendy, the jacket is started by casting on 108-108-113-113-117 stitches, and knitting 3 ridges (= 6 rows) with garter stitch, then increading stitches in the next row. Then you knit a row where you set up the pattern alternating pattern A.1 and A.2 and purl stitches acording to the pattern and placing markers to help you with the raglan increases. Don't forget, you can always ask for help in person, in the store you bought your DROPS yarn from. Happy Knitting!
13.01.2018 - 21:42
![]() Christina wrote:
Christina wrote:
Detta mönster är det mest opedagogiska och virriga mönster jag nånsin träffat på! Jag har stickat mycket i mitt liv, men aldrig någonsin varit med om liknande. Jag har också lämnat över min stickning till en kvinna som stickat ännu mer och efter riktigt komplicerade mönstebeskrivningar, men även hon går bet på detta virrvarr som inte stämmer. Detta betyder att jag fått överge sitt stickarbete och har kastat bort pengar på garn helt i onödan! Fy vad dåligt!
05.10.2017 - 15:51
![]() Haley wrote:
Haley wrote:
Hi, yes in that area you have A.2 (6st), 11st, and then A.2 (6 st), but A.4 is 8st wide, so there's only 10st between the last stitch of A.4 and the first st of A.2, so when we work A.4 over where A.2 previously was, we have one less stitch to work with, we don't still have 11.
20.09.2017 - 19:46
![]() Haley wrote:
Haley wrote:
Hi, again. I'm having a similar problem as before. I'm about to start working a.4 and a.5, but it says to P11 before doing a.2 at the sides, but if you P11 right after a.4 there, the 11th P puts you at the second stitch of A.2 Not the first. And I re-checked to make sure I increased enough.
20.09.2017 - 02:22DROPS Design answered:
Dear Mrs Haley, there were P6 on each side of A.2 there and you increased a total of 5 times (ie inc 1st time when piece measures 3 cm then repeat inc 4 more times) = P6 + 5 inc = P11. Happy knitting!
20.09.2017 - 09:16
![]() Haley wrote:
Haley wrote:
I slipped the sleeves onto the markers and to continue the pattern it says to P14 before A.2. [SIZE XL]. But if you P14, it would throw the whole pattern off since you P13 before A.2 historically. Is this a pattern issue? I read the pattern in French to see if it was different, but it's not.
13.09.2017 - 03:52DROPS Design answered:
Dear Mrs Haley, it looks like you are right, P 13 sts as before, there will be a correction asap. Thank you. Happy knitting!
13.09.2017 - 09:01Patricia wrote:
La figura A.5 tiene algunos errores en su diagrama, pues aparecen algunos aumentos y cruces para formar torsadas en las filas pares, esto es, por el revés. No es pòsible hacer una torsada por el revés y siempre los aumentos van por el derecho. Los errores están desde la fila 39 hacia arriba. Yo corregí cambiando el número de las filas
18.08.2017 - 17:41
|
||||||||||||||||||||||||||||
Alana Cardigan#alanacardigan |
||||||||||||||||||||||||||||
 |
 |
|||||||||||||||||||||||||||
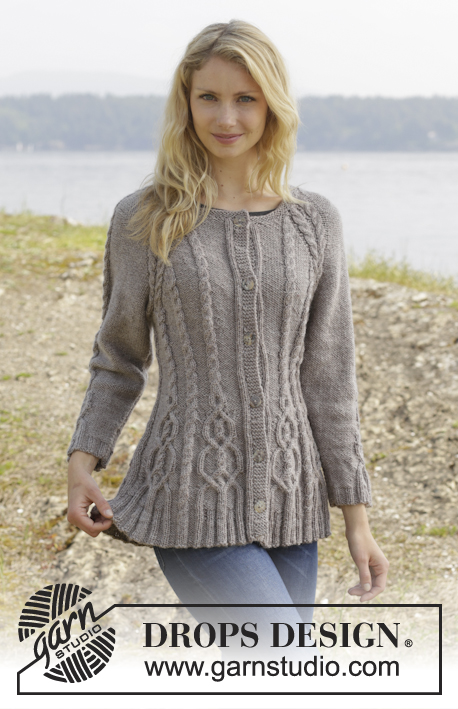
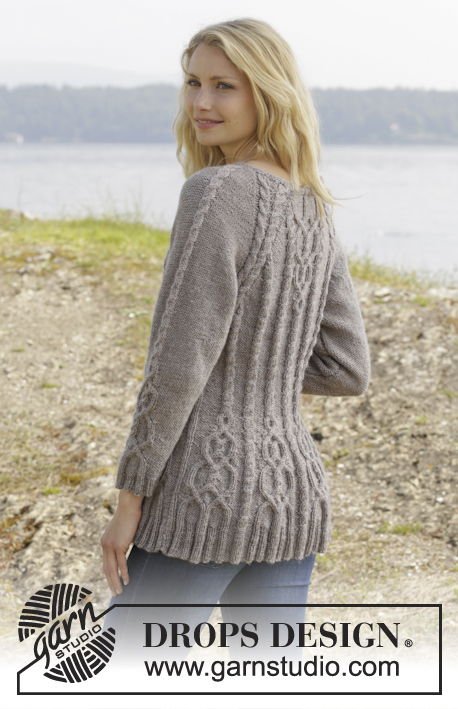
Knitted DROPS jacket with cables and raglan, worked top down in ”Karisma”. Size S-XXL
DROPS 156-4 |
||||||||||||||||||||||||||||
|
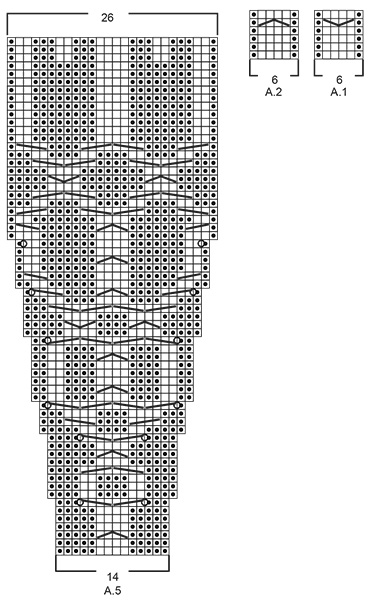
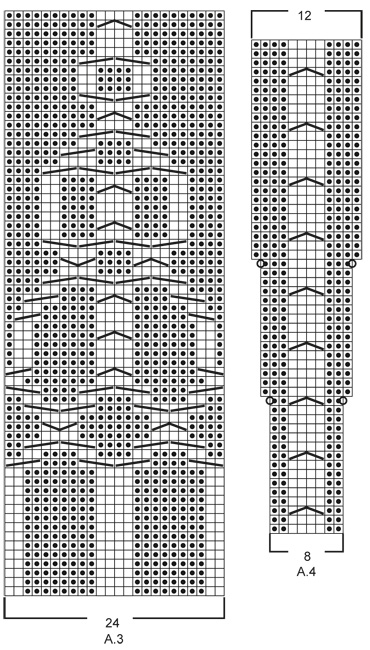
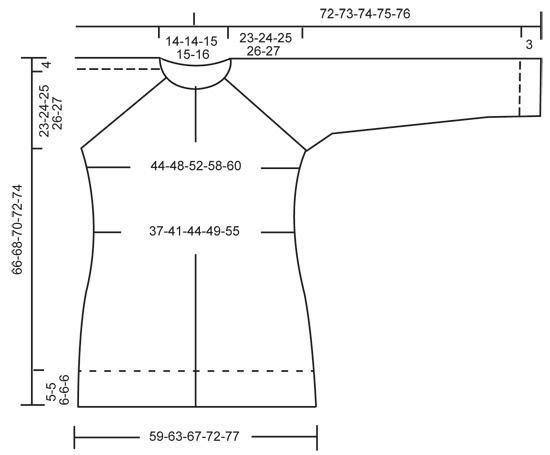
GARTER ST (back and forth on needle): K all rows. 1 ridge = K2 rows. PATTERN: See diagrams A.1 - A.5. The diagrams show all rows in pattern seen from RS. RAGLAN: Inc on each side of raglan sts (A.1/A.2, marker, A.2/A.1) by making 1 YO = 8 inc on row. On next row work YOs twisted to avoid holes. Then work the new sts P on sleeves (seen from RS), and on front and back piece work the new sts in to pattern as explained below. DECREASE TIP (applies to sleeves): Dec on each side of marker as follows: Work until 3 sts remain before marker, P 2 tog, P 2, P 2 tog = 2 sts dec. INCREASE TIP: All inc are done from RS. Inc 1 st by making a YO. On next row K YOs twisted, i.e. work in the back loop of st instead of front to avoid holes. P the new sts (seen from RS). KNITTING TIP: For every 10th row work short rows over the 5 sts in garter st in bands as follows (beg from RS): K 5 band sts, turn piece, tighten yarn and K back, turn piece and work as before over all sts, turn piece, K 5 band sts in garter st, turn piece, tighten yarn and K back. That way the ridges in band will not contract as much. BUTTONHOLES: Dec for buttonholes on right band. 1 buttonhole = K tog third and fourth st from edge and make 1 YO. Dec for buttonholes when piece measures: SIZE S: 2, 12, 22, 32, 42 and 52 cm / ¾",4 ¾",8 ¾",12½",16½",20½" SIZE M: 2, 12, 22, 32, 42 and 52 cm / ¾",4 ¾",8 ¾",12½",16½",20½" SIZE L: 2, 11, 20, 29, 38, 47 and 56 cm / ¾",4½",8",11½",15",18½",22" SIZE XL: 2, 11, 20, 29, 38, 47 and 56 cm / ¾",4½",8",11½",15",18½",22" SIZE XXL: 2, 11, 20, 29, 38, 47, 56 and 65 cm / ¾",4½",8",11½",15",18½",22",25½ ---------------------------------------------------------- JACKET: Worked back and forth, top down on circular needle to make room for all the sts. YOKE: Cast on 108-108-113-113-117 sts on circular needle size 4 mm / US 6 with Karisma. Work 3 ridges in GARTER ST - see explanation above. K next row AT THE SAME TIME inc 24-24-23-23-27 sts evenly = 132-132-136-136-144 sts. Remember BUTTONHOLES - see explanation above. Now work as follows from RS: 5 sts in garter st, P 1, K 2 (= band), P 12-12-13-13-15, A.1, insert 1st marker, A.2, P 2, A.2, P 2, A.1, insert 2nd marker, A.2, P 0-0-1-1-3, A.3, P 0-0-1-1-3, A.1, insert 3rd marker, A.2, P 2, A.2, P 2, A.1, insert 4th marker, A.2, P 12-12-13-13-15, K 2, P 1, 5 sts in garter st (= band) – READ KNITTING TIP! READ ALL OF THE FOLLOWING SECTION BEFORE CONTINUING! REMEMBER THE GAUGE! On next row from RS beg inc for RAGLAN – see explanation above, AT THE SAME TIME work pattern as follows: RAGLAN: Repeat inc every row 0-2-10-20-20 times in total. Then inc on every other row (i.e. on every row from RS) 23-32-30-26-27 times and in every 3rd row 6-0-0-0-0 times = 364-404-456-504-520 sts. PATTERN: Work pattern on body as follows (P the inc sts on sleeves): Work the first 6 sts inc in A.2, then P next 8-9-7-8-8 inc sts, work the next 6 inc sts in A.2, P the next 8-9-7-8-8 inc sts. NOTE: (Size M-L-XL-XXL): When A.3 has been worked 1 time vertically, continue with A.2 over cable and P (seen from RS) the remaining sts from A.3 until start of body. S/M: Then inc as before on sleeve and inc inside A.1/A.2 (i.e. between A.1 and A.2, towards marker for raglan) on front and back piece 1-4 more times. P the new sts. L/XL/XXL: Continue with A.2 over the next 6 inc sts, P the next 7-8-8 inc sts, then inc as before on sleeve and inc inside A.1/A.2 (i.e. between A.1 and A.2, towards marker for raglan) on front and back piece 1-4-5 more times. P the last 1-4-5 inc sts. Piece now measures 27-28-29-30-31 cm / 10½"-11"-11½"-11¾"-12¼" from shoulder. Now work as follows from WS: Work 55-60-67-73-76 sts (= right front piece), slip the next 80-90-102-114-116 sts on a stitch holder for sleeve, cast on 12 new sts under sleeve, insert a blue marker in the middle of these new sts (= side), work the next 94-104-118-130-136 m (= back piece), slip the next 80-90-102-114-116 sts on a stitch holder for sleeve, cast on 12 new sts under sleeve, insert a blue marker in the middle of these new sts (= side), work the remaining 55-60-67-73-76 sts (= left front piece). There are now 228-248-276-300-312 sts on needle. NOW MEASURE THE PIECE FROM HERE. BODY: There are now 106-116-130-142-148 sts for back piece and 61-66-73-79-82 sts for each front piece. Then continue pattern as follows from RS: S/M: 5 sts in garter st, P 1, K 2 (= band), P 12-12, A.2, insert a marker, P 8-9, A.2, insert a marker, P 8-9, A.1, P 7-7, A.2 0-1 time in width, P 7-7, A.2, P 8-9, insert a marker, A.2, P 8-9, insert a marker, A.2, P 9-9, A.2, P 9-9, A.2, insert a marker, P 8-9, A.2, insert a marker, P 8-9, A.1, P 7-7, A.2 0-1 time in width, P 7-7, A.2, P 8-9, insert a marker, A.2, P 8-9, insert a marker, A.2, P 12-12, K 2, P 1, 5 sts in garter st. L/XL/XXL: 5 sts in garter st, P 1, K 2 (= band), P 13-14-15, A.2, insert a marker, P 7-8-8, A.2, insert a marker, P 7-8-8, A.2, insert a marker, P 7-8-8, A.1, P 4-6-5, A.2 1-1-2 times in width, P 4-6-5, A.2, P 7-8-8, insert a marker, A.2, P 7-8-8, insert a marker, A.2, P 7-8-8, insert a marker, A.2, P 10-11-12, A.2, P 10-11-12, A.2, insert a marker, P 7-8-8, A.2, insert a marker, P 7-8-8, A.2, insert a marker, P 7-8-8, A.1, P 4-6-5, A.2 1-1-2 times in width, P 4-6-5, A.2, P 7-8-8, insert a marker, A.2, P 7-8-8, insert a marker, A.2, P 7-8-8, insert a marker, A.2, P 13-14-15, K 2, P 1, 5 sts in garter st. READ THE NEXT 2 SECTIONS BEFORE CONTINUING! Now dec and inc at the same time as follows: DECREASE: Dec differently as follows: Dec 1 st by P 2 tog towards the bands mid front, repeat dec every 1½-1½-1½-2-2 cm / ½"-½"-½"-¾"-¾" 5-5-4-4-5 more times. AT THE SAME TIME dec 1 st on each side of the middle cable on back piece. Repeat dec every 2-2-1½-1½-1½ cm / ¾"-¾"-½"-½"-½" 3-3-4-4-6 more times. AT THE SAME TIME dec 1 st towards cable in every P section with marker in (= 8-8-12-12-12 markers). Repeat dec every 3-2½-5-4-4 cm / 1⅛"-⅞"-2"-1½"-1½" 2-3-1-2-2 more times. INCREASE (towards the sides): When piece measures 3 cm / 1", inc along the cable towards the sleeve (i.e. cable from raglan) in P section towards the sides – READ INCREASE TIP! Inc 4 sts on row. Repeat inc every 1½-1½-2½-1½-1 cm / ½"-½"-⅞"-½"-⅜" 3-4-2-4-10 more times. When all dec and inc are done, 200-216-244-264-294 sts remain. When piece measures 11-12-12-13-14 cm / 4½"-4¾"-4¾"-5"-5½", work pattern as follows: 5 sts in garter st, P 1, K 2 (= band), P 2-2-4-4-5, A.5, A.4, A.5, A.4 0-0-1-1-1 time, P 7-8-6-11-15, A.2 0-1-1-1-2 times in width, P 7-8-6-11-15, A.4 0-0-1-1-1 time in width, * A.5, A.4 *, repeat from *-* 2-2-3-3-3 more times in width, A.5 1-1-0-0-0 times in width, P 7-8-6-11-15, A.2 0-1-1-1-2 times in width, P 7-8-6-11-15, A.4 0-0-1-1-1 time in width, A.5, A.4, A.5, P 2-2-4-4-5, K 2, P 1, 5 sts in garter st (= band). NOTE: Adjust the first cable in A.4 and A.5 to get a nice transition between diagrams. Continue with pattern and inc according to diagram. When A.4 and A.5 have been worked vertically and piece measures approx. 33-34-34-35-35 cm / 13"-13½"-13½"-13¾"-13¾", there are 316-332-376-396-426 sts on needle. Insert a marker here. NOW MEASURE THE PIECE FROM HERE. Now work rib inside 8 band sts in each side of piece as follows: S/M: * Work K over K and P over P until 7-11 sts remain before the blue marker in the side, P 2, K 2, P 3-4 *, repeat from *-* 1 more time and continue with K over K and P over P until band sts. L/XL/XXL: * Work K over K and P over P until 8-14-21 sts remain before the blue marker in the side, K 2-2-2, P 3-4-3, K 0-2-2, P 0-3-3, K 0-0-2, P 0-0-3 *, repeat from *-* 1 more time and continue with K over K and P over P until band sts. When rib has been worked for 2 cm / ¾" from marker, inc by making 1 YO before first P st in every P section. READ INCREASE TIP! When rib has been worked for 5-5-6-6-6 cm / 2"-2"-2½"-2½"-2½", bind off with K over K and P over P. SLEEVES: Slip the 80-90-102-114-116 sts from stitch holder back on circular needle. Work 1 row over all sts and cast on 12 new sts at the end of row = 92-102-114-126-128 sts. Insert a marker in the middle of the new sts (i.e. 6 sts on each side of marker). NOW MEASURE THE PIECE FROM HERE. Then work sleeve in the round on circular needle/double pointed needles. Continue the middle cable on sleeve as before but work P over cables in raglan. On 2nd round beg dec on each side of marker - READ DECREASE TIP. Repeat dec every other round 6 more times = 78-88-100-112-114 sts. Then dec 1 st on each side of marker every 2-1½-1-1-1 cm / ¾"-½"-⅜"-⅜"-⅜" 13-17-22-27-27 times = 52-54-56-58-60 sts. AT THE SAME TIME when piece measures 15 cm / 6", work A.5 over cable in the middle of sleeve - adjust the first cable in A.5 to get a nice transition between diagrams. NOTE: Do not inc in A.5 on sleeve, i.e. do not work YOs in diagram. When A.5 is finished and sleeve measures 37 cm / 14½", work rib as follows from marker at beg of round: P 0-0-1-2-3, K 1-2-2-2-2, P 3, K 2. P 3, K 2, P 2, continue rib as on last row in A.5 (= 26 sts), P 2, K 2, P 3, K 2, P 3, K 1-2-2-2-2, P 0-0-1-2-3. Continue like this for 3 cm / 1", bind off with K over K and P over P. ASSEMBLY: Sew the holes under the sleeves. Sew the buttons on to left band. |
||||||||||||||||||||||||||||
Diagram explanations |
||||||||||||||||||||||||||||
|
||||||||||||||||||||||||||||
 |
||||||||||||||||||||||||||||
 |
||||||||||||||||||||||||||||
 |
||||||||||||||||||||||||||||
Have you finished this pattern?Tag your pictures with #dropspattern #alanacardigan or submit them to the #dropsfan gallery. Do you need help with this pattern?You'll find 25 tutorial videos, a Comments/Questions area and more by visiting the pattern on garnstudio.com. © 1982-2026 DROPS Design A/S. We reserve all rights. This document, including all its sub-sections, has copyrights. Read more about what you can do with our patterns at the bottom of each pattern on our site. |
||||||||||||||||||||||||||||


With over 40 years in knitting and crochet design, DROPS Design offers one of the most extensive collections of free patterns on the internet - translated to 17 languages. As of today we count 324 catalogs and 12290 patterns - 12280 of which are translated into English (US/in).
We work hard to bring you the best knitting and crochet have to offer, inspiration and advice as well as great quality yarns at incredible prices! Would you like to use our patterns for other than personal use? You can read what you are allowed to do in the Copyright text at the bottom of all our patterns. Happy crafting!
Post a comment to pattern DROPS 156-4
We would love to hear what you have to say about this pattern!
If you want to leave a question, please make sure you select the correct category in the form below, to speed up the answering process. Required fields are marked *.